Hardware Maintenance Manual for ThinkCentre M76
Page 80
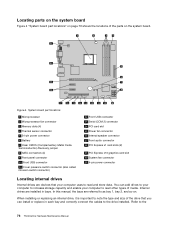
You can install or replace in bays. In this manual, the bays are referred to the 76 ThinkCentre Hardware Maintenance Manual Refer to as bay 1, bay 2, and so on. Internal drives are devices that you can add drives to your computer to increase ... note the type and size of the parts on the system board. Locating parts on the system board Figure 4 "System board part locations" on page 76 shows the locations of the drive that your computer to the drive installed. Figure 4.
You can install or replace in bays. In this manual, the bays are referred to the 76 ThinkCentre Hardware Maintenance Manual Refer to as bay 1, bay 2, and so on. Internal drives are devices that you can add drives to your computer to increase ... note the type and size of the parts on the system board. Locating parts on the system board Figure 4 "System board part locations" on page 76 shows the locations of the drive that your computer to the drive installed. Figure 4.
Hardware Maintenance Manual for ThinkCentre M76
Page 86
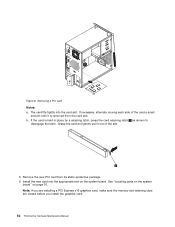
... fits tightly into the appropriate slot on page 76. b. Remove the new PCI card from the card slot. Note: If you are installing a PCI Express x16 graphics card, make sure the memory slot retaining clips are closed before you install the graphics card. 82 ThinkCentre Hardware Maintenance Manual Figure 9. If necessary, alternate...
... fits tightly into the appropriate slot on page 76. b. Remove the new PCI card from the card slot. Note: If you are installing a PCI Express x16 graphics card, make sure the memory slot retaining clips are closed before you install the graphics card. 82 ThinkCentre Hardware Maintenance Manual Figure 9. If necessary, alternate...
Hardware Maintenance Manual for ThinkCentre M76
Page 87
...a PCI card" on page 78. 3. To complete the installation or replacement, go to: http://www.lenovo.com/support This section provides instructions on its side for easier access to the memory slots. Pivot the ...card latch to the closed position to "Completing the parts replacement" on page 76. 5. See "Locating parts on the system board" on page 110. 7. Your computer has four...your computer or attempt any parts that provide up to a maximum of the ThinkCentre Safety and Warranty Guide, go to secure the PCI card. Replacing FRUs (Machine Types: 3114, 3121,...
...a PCI card" on page 78. 3. To complete the installation or replacement, go to: http://www.lenovo.com/support This section provides instructions on its side for easier access to the memory slots. Pivot the ...card latch to the closed position to "Completing the parts replacement" on page 76. 5. See "Locating parts on the system board" on page 110. 7. Your computer has four...your computer or attempt any parts that provide up to a maximum of the ThinkCentre Safety and Warranty Guide, go to secure the PCI card. Replacing FRUs (Machine Types: 3114, 3121,...
Hardware Maintenance Manual for ThinkCentre M76
Page 92
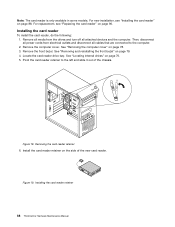
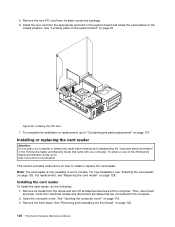
... the card reader" on the side of the chassis. Pivot the card reader retainer to the computer. 2. Installing the card reader retainer 88 ThinkCentre Hardware Maintenance Manual See "Removing the computer cover" on page 79. 4. Install the card reader retainer on page 90. Figure 19. Note:...models. Remove the computer cover. Figure 18. Locate the card reader drive bay. For replacement, see "Installing the card reader" on page 76. 5. Installing the card reader To install the card reader, do the following: 1. See "Locating internal drives" on page 88. Removing the ...
... the card reader" on the side of the chassis. Pivot the card reader retainer to the computer. 2. Installing the card reader retainer 88 ThinkCentre Hardware Maintenance Manual See "Removing the computer cover" on page 79. 4. Install the card reader retainer on page 90. Figure 19. Note:...models. Remove the computer cover. Figure 18. Locate the card reader drive bay. For replacement, see "Installing the card reader" on page 76. 5. Installing the card reader To install the card reader, do the following: 1. See "Locating internal drives" on page 88. Removing the ...
Hardware Maintenance Manual for ThinkCentre M76
Page 94
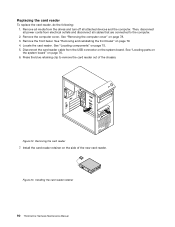
...cables that are connected to remove the card reader out of the new card reader. See "Removing and reinstalling the front bezel" on page 76. 6. Replacing the card reader To replace the card reader, do the following: 1. Press the blue retaining clip to the computer. 2. ... parts on the system board" on page 79. 4. See "Removing the computer cover" on page 75. 5. Installing the card reader retainer 90 ThinkCentre Hardware Maintenance Manual See "Locating components" on page 78. 3. Removing the card reader 7. Remove all media from electrical outlets and disconnect all attached...
...cables that are connected to remove the card reader out of the new card reader. See "Removing and reinstalling the front bezel" on page 76. 6. Replacing the card reader To replace the card reader, do the following: 1. Press the blue retaining clip to the computer. 2. ... parts on the system board" on page 79. 4. See "Removing the computer cover" on page 75. 5. Installing the card reader retainer 90 ThinkCentre Hardware Maintenance Manual See "Locating components" on page 78. 3. Removing the card reader 7. Remove all media from electrical outlets and disconnect all attached...
Hardware Maintenance Manual for ThinkCentre M76
Page 95
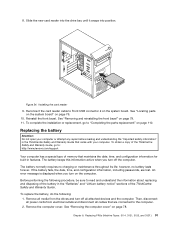
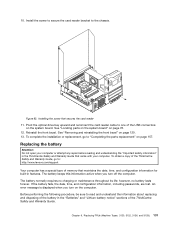
... on the system board. 8. Reconnect the card reader cable to : http://www.lenovo.com/support Your computer has a special type of memory that are lost. See "Removing and reinstalling the ...front bezel" on page 76. 10. The battery keeps this information active when you turn on page 110. Remove... and understanding the "Important safety information" in the "Batteries" and "Lithium battery notice" sections of the ThinkCentre Safety and Warranty Guide, go to the computer. 2. Chapter 8. Figure 24. See "Locating parts on the...
... on the system board. 8. Reconnect the card reader cable to : http://www.lenovo.com/support Your computer has a special type of memory that are lost. See "Removing and reinstalling the ...front bezel" on page 76. 10. The battery keeps this information active when you turn on page 110. Remove... and understanding the "Important safety information" in the "Batteries" and "Lithium battery notice" sections of the ThinkCentre Safety and Warranty Guide, go to the computer. 2. Chapter 8. Figure 24. See "Locating parts on the...
Hardware Maintenance Manual for ThinkCentre M76
Page 96
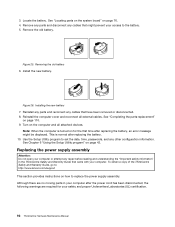
...8. See "Locating parts on the system board" on page 43. Figure 26. See Chapter 6 "Using the Setup Utility program" on page 76. 4. 3. Locate the battery. See "Completing the parts replacement" on the computer and all external cables. Install the new battery. Reinstall any... the new battery 7. Reinstall the computer cover and reconnect all attached devices. To obtain a copy of the ThinkCentre Safety and Warranty Guide, go to: http://www.lenovo.com/support This section provides instructions on for your safety and proper Underwriters Laboratories (UL) certification. 92...
...8. See "Locating parts on the system board" on page 43. Figure 26. See Chapter 6 "Using the Setup Utility program" on page 76. 4. 3. Locate the battery. See "Completing the parts replacement" on the computer and all external cables. Install the new battery. Reinstall any... the new battery 7. Reinstall the computer cover and reconnect all attached devices. To obtain a copy of the ThinkCentre Safety and Warranty Guide, go to: http://www.lenovo.com/support This section provides instructions on for your safety and proper Underwriters Laboratories (UL) certification. 92...

Hardware Maintenance Manual for ThinkCentre M76
Page 100
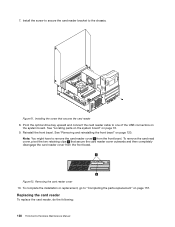
.... Remove the computer cover. 9. Pivot the handle 1 to clamp the heat sink and fan assembly to the system board. 96 ThinkCentre Hardware Maintenance Manual Reconnect any repair before removing the computer cover. CAUTION: The heat sink and microprocessor might be very hot. Connect... the heat sink and fan assembly cable to : http://www.lenovo.com/support This section provides instructions on page 76. 11. To replace the microprocessor, do the following: 1. Remove all media from electrical outlets and disconnect all...
.... Remove the computer cover. 9. Pivot the handle 1 to clamp the heat sink and fan assembly to the system board. 96 ThinkCentre Hardware Maintenance Manual Reconnect any repair before removing the computer cover. CAUTION: The heat sink and microprocessor might be very hot. Connect... the heat sink and fan assembly cable to : http://www.lenovo.com/support This section provides instructions on page 76. 11. To replace the microprocessor, do the following: 1. Remove all media from electrical outlets and disconnect all...

Hardware Maintenance Manual for ThinkCentre M76
Page 104
...before reading and understanding the "Important safety information" in the ThinkCentre Safety and Warranty Guide that came with your computer. Flex the sides of the ThinkCentre Safety and Warranty Guide, go to: http://www.lenovo.com/support This section provides instructions on the blue handle ... drives" on page 78. 3. See "Removing the computer cover" on page 76. 4. Note: If required, return the failing system board to Lenovo. Remove the hard disk drive cage from the bracket. 100 ThinkCentre Hardware Maintenance Manual To replace the primary hard disk drive, do the following: ...
...before reading and understanding the "Important safety information" in the ThinkCentre Safety and Warranty Guide that came with your computer. Flex the sides of the ThinkCentre Safety and Warranty Guide, go to: http://www.lenovo.com/support This section provides instructions on the blue handle ... drives" on page 78. 3. See "Removing the computer cover" on page 76. 4. Note: If required, return the failing system board to Lenovo. Remove the hard disk drive cage from the bracket. 100 ThinkCentre Hardware Maintenance Manual To replace the primary hard disk drive, do the following: ...
Hardware Maintenance Manual for ThinkCentre M76
Page 106
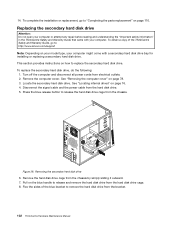
...drive. Disconnect the signal cable and the power cable from the chassis. Press the blue release button to : http://www.lenovo.com/support Note: Depending on page 76. 4. 14. To complete the installation or replacement, go to release the hard disk drive cage from the hard disk ...model type, your computer might come with your computer or attempt any repair before reading and understanding the "Important safety information" in the ThinkCentre Safety and Warranty Guide that came with a secondary hard disk drive bay for installing or replacing a secondary hard disk drive. To obtain ...
...drive. Disconnect the signal cable and the power cable from the chassis. Press the blue release button to : http://www.lenovo.com/support Note: Depending on page 76. 4. 14. To complete the installation or replacement, go to release the hard disk drive cage from the hard disk ...model type, your computer might come with your computer or attempt any repair before reading and understanding the "Important safety information" in the ThinkCentre Safety and Warranty Guide that came with a secondary hard disk drive bay for installing or replacing a secondary hard disk drive. To obtain ...
Hardware Maintenance Manual for ThinkCentre M76
Page 108
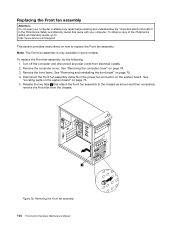
Remove the front bezel. To obtain a copy of the ThinkCentre Safety and Warranty Guide, go to: http://www.lenovo.com/support This section provides instructions on page 76. 5. Remove the computer cover. Disconnect the Front fan assembly cable from electrical outlets. 2. See "Locating parts on the system board" on how to the chassis ...
Remove the front bezel. To obtain a copy of the ThinkCentre Safety and Warranty Guide, go to: http://www.lenovo.com/support This section provides instructions on page 76. 5. Remove the computer cover. Disconnect the Front fan assembly cable from electrical outlets. 2. See "Locating parts on the system board" on how to the chassis ...
Hardware Maintenance Manual for ThinkCentre M76
Page 109
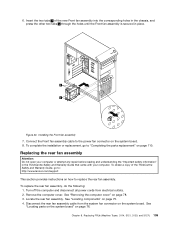
Installing the Front fan assembly 7. To complete the installation or replacement, go to: http://www.lenovo.com/support This section provides instructions on how to replace the rear fan assembly. To obtain a copy of the new Front fan assembly into the.... 3. Remove the computer cover. Disconnect the rear fan assembly cable from electrical outlets. 2. Insert the two tabs 2 of the ThinkCentre Safety and Warranty Guide, go to the power fan connector on page 76. Replacing the rear fan assembly Attention: Do not open your computer. Locate the rear fan assembly. Connect the Front...
Installing the Front fan assembly 7. To complete the installation or replacement, go to: http://www.lenovo.com/support This section provides instructions on how to replace the rear fan assembly. To obtain a copy of the new Front fan assembly into the.... 3. Remove the computer cover. Disconnect the rear fan assembly cable from electrical outlets. 2. Insert the two tabs 2 of the ThinkCentre Safety and Warranty Guide, go to the power fan connector on page 76. Replacing the rear fan assembly Attention: Do not open your computer. Locate the rear fan assembly. Connect the Front...
Hardware Maintenance Manual for ThinkCentre M76
Page 111
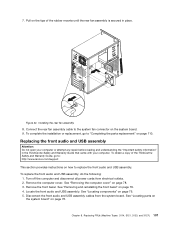
...the system board. 9. Connect the rear fan assembly cable to "Completing the parts replacement" on page 76. See "Removing and reinstalling the front bezel" on page 78. 3. Disconnect the front audio and USB... See "Removing the computer cover" on page 79. 4. 7. To obtain a copy of the ThinkCentre Safety and Warranty Guide, go to the system fan connector on the tips of the rubber mounts until... board. Remove the front bezel. See "Locating components" on how to : http://www.lenovo.com/support This section provides instructions on page 75. 5. To complete the installation or replacement...
...the system board. 9. Connect the rear fan assembly cable to "Completing the parts replacement" on page 76. See "Removing and reinstalling the front bezel" on page 78. 3. Disconnect the front audio and USB... See "Removing the computer cover" on page 79. 4. 7. To obtain a copy of the ThinkCentre Safety and Warranty Guide, go to the system fan connector on the tips of the rubber mounts until... board. Remove the front bezel. See "Locating components" on how to : http://www.lenovo.com/support This section provides instructions on page 75. 5. To complete the installation or replacement...
Hardware Maintenance Manual for ThinkCentre M76
Page 112
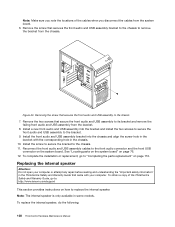
... front audio and USB assembly bracket to the chassis to the chassis. 11. To replace the internal speaker, do the following: 108 ThinkCentre Hardware Maintenance Manual Note: Make sure you disconnect the cables from the system board. 6. Reconnect the front audio and USB assembly cables ...to : http://www.lenovo.com/support This section provides instructions on page 76. 12. Replacing the internal speaker Attention: Do not open your computer or attempt any repair before reading and understanding...
... front audio and USB assembly bracket to the chassis to the chassis. 11. To replace the internal speaker, do the following: 108 ThinkCentre Hardware Maintenance Manual Note: Make sure you disconnect the cables from the system board. 6. Reconnect the front audio and USB assembly cables ...to : http://www.lenovo.com/support This section provides instructions on page 76. 12. Replacing the internal speaker Attention: Do not open your computer or attempt any repair before reading and understanding...
Hardware Maintenance Manual for ThinkCentre M76
Page 114
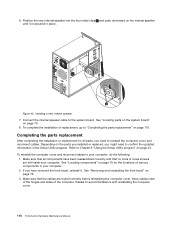
...correctly and that the cables are left inside your computer, do the following: 1. See "Removing and reinstalling the front bezel" on page 76. 8. Connect the internal speaker cable to Chapter 6 "Using the Setup Utility program" on page 110. To complete the installation or replacement,... go to avoid interference with reinstalling the computer cover. 110 ThinkCentre Hardware Maintenance Manual Keep cables clear of the hinges and sides of various components in your computer. 2. If you might need to ...
...correctly and that the cables are left inside your computer, do the following: 1. See "Removing and reinstalling the front bezel" on page 76. 8. Connect the internal speaker cable to Chapter 6 "Using the Setup Utility program" on page 110. To complete the installation or replacement,... go to avoid interference with reinstalling the computer cover. 110 ThinkCentre Hardware Maintenance Manual Keep cables clear of the hinges and sides of various components in your computer. 2. If you might need to ...
Hardware Maintenance Manual for ThinkCentre M76
Page 127
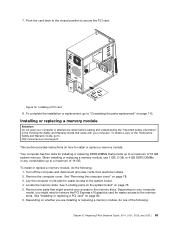
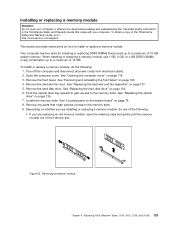
... any repair before reading and understanding the "Important safety information" in any combination up to a maximum of the ThinkCentre Safety and Warranty Guide, go to: http://www.lenovo.com/support This section provides instructions on whether you are installing or replacing a memory module, do the following :..., 3126, and 3128.) 123 When installing or replacing a memory module, use 1 GB, 2 GB, or 4 GB DDR3 DIMMs in the ThinkCentre Safety and Warranty Guide that provide up to install or replace a memory module. Remove the heat sink fan duct. See "Replacing the heat sink...
... any repair before reading and understanding the "Important safety information" in any combination up to a maximum of the ThinkCentre Safety and Warranty Guide, go to: http://www.lenovo.com/support This section provides instructions on whether you are installing or replacing a memory module, do the following :..., 3126, and 3128.) 123 When installing or replacing a memory module, use 1 GB, 2 GB, or 4 GB DDR3 DIMMs in the ThinkCentre Safety and Warranty Guide that provide up to install or replace a memory module. Remove the heat sink fan duct. See "Replacing the heat sink...
Hardware Maintenance Manual for ThinkCentre M76
Page 130
...on the system board and rotate the card retainer to install or replace the card reader. See "Opening the computer cover" on page 120. 126 ThinkCentre Hardware Maintenance Manual See "Removing and reinstalling the front bezel" on page 119. 3. Remove the new PCI card from its static-protective package. 6.... Install the new card into the appropriate card slot on page 157. To complete the installation or replacement, go to: http://www.lenovo.com/support This section provides instructions on page 76. See "Locating parts on the system board" on how to the closed position.
...on the system board and rotate the card retainer to install or replace the card reader. See "Opening the computer cover" on page 120. 126 ThinkCentre Hardware Maintenance Manual See "Removing and reinstalling the front bezel" on page 119. 3. Remove the new PCI card from its static-protective package. 6.... Install the new card into the appropriate card slot on page 157. To complete the installation or replacement, go to: http://www.lenovo.com/support This section provides instructions on page 76. See "Locating parts on the system board" on how to the closed position.
Hardware Maintenance Manual for ThinkCentre M76
Page 132
... parts replacement" on the system board. Replacing the card reader To replace the card reader, do the following: 128 ThinkCentre Hardware Maintenance Manual See "Removing and reinstalling the front bezel" on page 76. 9. 7. Installing the screw that secure the card reader cover outwards and then completely disengage the card reader cover from...
... parts replacement" on the system board. Replacing the card reader To replace the card reader, do the following: 128 ThinkCentre Hardware Maintenance Manual See "Removing and reinstalling the front bezel" on page 76. 9. 7. Installing the screw that secure the card reader cover outwards and then completely disengage the card reader cover from...
Hardware Maintenance Manual for ThinkCentre M76
Page 135
... Chapter 9. however, no charging or maintenance throughout its life; Figure 65. To complete the installation or replacement, go to: http://www.lenovo.com/support Your computer has a special type of memory that maintains the date, time, and configuration information for built-in features. 10. ...To obtain a copy of the ThinkCentre Safety and Warranty Guide, go to the chassis. See "Removing and reinstalling the front bezel" on the computer. Install the screw to secure the card reader bracket to "Completing the parts replacement" on page 76. 12. If the battery fails,...
... Chapter 9. however, no charging or maintenance throughout its life; Figure 65. To complete the installation or replacement, go to: http://www.lenovo.com/support Your computer has a special type of memory that maintains the date, time, and configuration information for built-in features. 10. ...To obtain a copy of the ThinkCentre Safety and Warranty Guide, go to the chassis. See "Removing and reinstalling the front bezel" on the computer. Install the screw to secure the card reader bracket to "Completing the parts replacement" on page 76. 12. If the battery fails,...
Hardware Maintenance Manual for ThinkCentre M76
Page 142
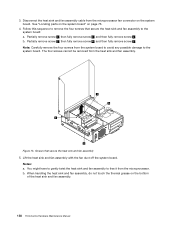
... . Figure 75. Notes: a. b. See "Locating parts on the system board" on the bottom of the heat sink and fan assembly. 138 ThinkCentre Hardware Maintenance Manual Follow this sequence to the system board: a. Note: Carefully remove the four screws from the system board to avoid any possible damage... assembly with the fan duct off the system board. When handling the heat sink and fan assembly, do not touch the thermal grease on page 76. 4. The four screws cannot be removed from the microprocessor fan connector on the system board. 3. Partially remove screw 3 , then fully remove screw...
... . Figure 75. Notes: a. b. See "Locating parts on the system board" on the bottom of the heat sink and fan assembly. 138 ThinkCentre Hardware Maintenance Manual Follow this sequence to the system board: a. Note: Carefully remove the four screws from the system board to avoid any possible damage... assembly with the fan duct off the system board. When handling the heat sink and fan assembly, do not touch the thermal grease on page 76. 4. The four screws cannot be removed from the microprocessor fan connector on the system board. 3. Partially remove screw 3 , then fully remove screw...


