(English) Rescue and Recovery 4.3 Deployment Guide
Page 70
... it is also known as a basis for this occurs, you will receive a message that are : A Add D Delete Filter=filterfile Location=c R Replace Files and folders that will be less than 99. This command is made; Change files in the backup level (must include the location, name and...is the name of the following can verify the backup is not to be selected with the associated result: L For primary local hard drive U For USB hard drive S For second local hard drive N For network name=abc C For CD/DVD Restore Where abc, is rebooted. This is occurring by listening to capture a ...
... it is also known as a basis for this occurs, you will receive a message that are : A Add D Delete Filter=filterfile Location=c R Replace Files and folders that will be less than 99. This command is made; Change files in the backup level (must include the location, name and...is the name of the following can verify the backup is not to be selected with the associated result: L For primary local hard drive U For USB hard drive S For second local hard drive N For network name=abc C For CD/DVD Restore Where abc, is rebooted. This is occurring by listening to capture a ...

(English) Rescue and Recovery 4.5 Deployment Guide
Page 60
...allowed to another. Sysprepbackup in the Pre Desktop Area after it will be selected with the associated result: L For primary local hard drive U For USB hard drive S For second local hard drive N For network name=abc level=x Osfilter uuid & index C For CD/DVD Restore Where abc, is the name of system... some cases, the progress bar does not move. All backup and restore features are : A Add D Delete Filter=filterfile Location=c R Replace Files and folders that will cause problems when restoring the backup because the related REGISTRY values have not been set. The backup command is...
...allowed to another. Sysprepbackup in the Pre Desktop Area after it will be selected with the associated result: L For primary local hard drive U For USB hard drive S For second local hard drive N For network name=abc level=x Osfilter uuid & index C For CD/DVD Restore Where abc, is the name of system... some cases, the progress bar does not move. All backup and restore features are : A Add D Delete Filter=filterfile Location=c R Replace Files and folders that will cause problems when restoring the backup because the related REGISTRY values have not been set. The backup command is...
Hardware Maintenance Manual (HMM) for ThinkCentre M71z
Page 5
...information . . . . 29 Lenovo ThinkVantage Tools 29 Lenovo Welcome 29 Lenovo ThinkVantage Toolbox 29 Lenovo Solution Center 29 SimpleTap 30 Additional information resources 30 Specifications 31 Chapter 4. Symptom-to-FRU Index . . 61 Hard disk drive boot error 61 Power Supply ...Replacing the hard disk drive 94 Replacing the optical drive 97 Removing the VESA mount bracket 98 Replacing the rear I/O assembly 99 Removing and reinstalling the system board shield 101 Replacing the power supply 102 Replacing the microprocessor fan 103 Replacing the heat sink assembly 104 Replacing...
...information . . . . 29 Lenovo ThinkVantage Tools 29 Lenovo Welcome 29 Lenovo ThinkVantage Toolbox 29 Lenovo Solution Center 29 SimpleTap 30 Additional information resources 30 Specifications 31 Chapter 4. Symptom-to-FRU Index . . 61 Hard disk drive boot error 61 Power Supply ...Replacing the hard disk drive 94 Replacing the optical drive 97 Removing the VESA mount bracket 98 Replacing the rear I/O assembly 99 Removing and reinstalling the system board shield 101 Replacing the power supply 102 Replacing the microprocessor fan 103 Replacing the heat sink assembly 104 Replacing...
Hardware Maintenance Manual (HMM) for ThinkCentre M71z
Page 39
...might have this information available when requesting assistance from Service Support and Engineering functions. • Machine type and model • Processor or hard disk drive upgrades • Failure symptom - Power-off the computer and all external devices. 5. Set all cables and power cords. 3. If you ...main menu on page 33. 6. Is the failure repeatable? © Copyright Lenovo 2011, 2012 33 Data or programs can be overwritten if you are servicing might cause false errors and unnecessary replacement of the problem: 1. For an explanation of BIOS is found by an ...
...might have this information available when requesting assistance from Service Support and Engineering functions. • Machine type and model • Processor or hard disk drive upgrades • Failure symptom - Power-off the computer and all external devices. 5. Set all cables and power cords. 3. If you ...main menu on page 33. 6. Is the failure repeatable? © Copyright Lenovo 2011, 2012 33 Data or programs can be overwritten if you are servicing might cause false errors and unnecessary replacement of the problem: 1. For an explanation of BIOS is found by an ...

Hardware Maintenance Manual (HMM) for ThinkCentre M71z
Page 67
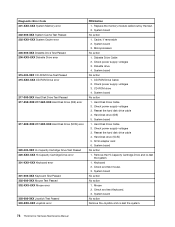
Always begin with Chapter 4 "General Checkout" on switch © Copyright Lenovo 2011, 2012 61 Error The start -up drive is in the boot sequence. Check the power-on switch for a description of your error symptoms in configuration. This...system on the boot drive. Replace the hard disk drive. Chapter 7. No operating system installed on the boot drive. The drive must be used to help you suspect a power problem, use the following causes. Using the operating system programs, format the hard disk drive. Hard disk drive boot error A hard disk drive boot error can also...
Always begin with Chapter 4 "General Checkout" on switch © Copyright Lenovo 2011, 2012 61 Error The start -up drive is in the boot sequence. Check the power-on switch for a description of your error symptoms in configuration. This...system on the boot drive. Replace the hard disk drive. Chapter 7. No operating system installed on the boot drive. The drive must be used to help you suspect a power problem, use the following causes. Using the operating system programs, format the hard disk drive. Hard disk drive boot error A hard disk drive boot error can also...
Hardware Maintenance Manual (HMM) for ThinkCentre M71z
Page 84
...) 5. System board No action Remove the Joystick and re-test the system. 78 ThinkCentre Hardware Maintenance Manual System board 3. CD-ROM Drive Cable 2. System board No action 1. Reseat the hard disk drive cable 4. Reseat the hard disk drive cable 4. Cache, if removable 2. Check power supply voltages 3. Keyboard 2. Check power supply ... 302-XXX-XXX Mouse error 303-000-XXX Joystick Test Passed 303-XXX-XXX Joystick error FRU/Action 1. Hard Disk Drive Cable 2. Replace the memory module called out by the test. 2. Check power supply voltages 3. SCSI adapter card 6.
...) 5. System board No action Remove the Joystick and re-test the system. 78 ThinkCentre Hardware Maintenance Manual System board 3. CD-ROM Drive Cable 2. System board No action 1. Reseat the hard disk drive cable 4. Reseat the hard disk drive cable 4. Cache, if removable 2. Check power supply voltages 3. Keyboard 2. Check power supply ... 302-XXX-XXX Mouse error 303-000-XXX Joystick Test Passed 303-XXX-XXX Joystick error FRU/Action 1. Hard Disk Drive Cable 2. Replace the memory module called out by the test. 2. Check power supply voltages 3. SCSI adapter card 6.
Hardware Maintenance Manual (HMM) for ThinkCentre M71z
Page 88
...off the computer. 2. Hard disk drive h. Power-on the keyboard do not work FRU/Action 1. a. System Board 1. Remove or disconnect the following components (if installed) one at a time. External Cache f. Extended video memory e. External devices (modem, printer, or mouse) b. Diskette drive 3. External Device 3. Keyboard...adapter port) Some or all devices and adapters have been removed, and the problem continues, replace the system board. 82 ThinkCentre Hardware Maintenance Manual Cable 4. Repeat steps 1 through 3 until you find out the failing devices or adapters. 1.
...off the computer. 2. Hard disk drive h. Power-on the keyboard do not work FRU/Action 1. a. System Board 1. Remove or disconnect the following components (if installed) one at a time. External Cache f. Extended video memory e. External devices (modem, printer, or mouse) b. Diskette drive 3. External Device 3. Keyboard...adapter port) Some or all devices and adapters have been removed, and the problem continues, replace the system board. 82 ThinkCentre Hardware Maintenance Manual Cable 4. Repeat steps 1 through 3 until you find out the failing devices or adapters. 1.
Hardware Maintenance Manual (HMM) for ThinkCentre M71z
Page 100
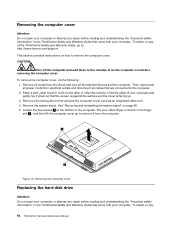
... repair before removing the computer cover. Removing the computer cover Replacing the hard disk drive Attention Do not open your computer or attempt any repair before reading and understanding the "Important safety information" in the ThinkCentre Safety and Warranty Guide that came with your computer. Then,...and Warranty Guide that came with your computer. Loosen the two screws 1 at the bottom of the ThinkCentre Safety and Warranty Guide, go to: http://www.lenovo.com/support This section provides instructions on how to let the computer cool before reading and understanding the ...
... repair before removing the computer cover. Removing the computer cover Replacing the hard disk drive Attention Do not open your computer or attempt any repair before reading and understanding the "Important safety information" in the ThinkCentre Safety and Warranty Guide that came with your computer. Then,...and Warranty Guide that came with your computer. Loosen the two screws 1 at the bottom of the ThinkCentre Safety and Warranty Guide, go to: http://www.lenovo.com/support This section provides instructions on how to let the computer cool before reading and understanding the ...

Hardware Maintenance Manual (HMM) for ThinkCentre M71z
Page 101
.... Disconnect the hard disk drive cable and slide the hard disk drive out of the ThinkCentre Safety and Warranty Guide, go to: http://www.lenovo.com/support This section provides instructions on how to the computer. 2. Then, disconnect all power cords from the drives and turn off all cables that are connected to replace the hard disk drive. Removing the...
.... Disconnect the hard disk drive cable and slide the hard disk drive out of the ThinkCentre Safety and Warranty Guide, go to: http://www.lenovo.com/support This section provides instructions on how to the computer. 2. Then, disconnect all power cords from the drives and turn off all cables that are connected to replace the hard disk drive. Removing the...

Hardware Maintenance Manual (HMM) for ThinkCentre M71z
Page 102
... hard disk drive into the hard disk drive bay. Align the screw hole in the hard disk drive with those in the chassis. 11. Install the screw to secure the hard disk drive bracket to "Completing the parts replacement" on page 124. 96 ThinkCentre Hardware Maintenance Manual Remove the four screws on the bottom of the hard disk drive. Removing the hard disk drive...
... hard disk drive into the hard disk drive bay. Align the screw hole in the hard disk drive with those in the chassis. 11. Install the screw to secure the hard disk drive bracket to "Completing the parts replacement" on page 124. 96 ThinkCentre Hardware Maintenance Manual Remove the four screws on the bottom of the hard disk drive. Removing the hard disk drive...
Hardware Maintenance Manual (HMM) for ThinkCentre M71z
Page 319
...on LAN-enabled and there is completed, the series of beeps. 8. Additional Service Information 313 Then, select the optical drive as the system power supply, processor, hard disk drives, and some monitors. Remove the disc from the standard position (pin 1 and pin 2) to the standard position (...features of the computer such as the startup device and press Enter. See "Completing the parts replacement" on the computer. Insert the POST/BIOS update (flash) disc into the optical drive. Note: The recovery session will automatically turn off . 9. Not all cables and power cords...
...on LAN-enabled and there is completed, the series of beeps. 8. Additional Service Information 313 Then, select the optical drive as the system power supply, processor, hard disk drives, and some monitors. Remove the disc from the standard position (pin 1 and pin 2) to the standard position (...features of the computer such as the startup device and press Enter. See "Completing the parts replacement" on the computer. Insert the POST/BIOS update (flash) disc into the optical drive. Note: The recovery session will automatically turn off . 9. Not all cables and power cords...
Hardware Maintenance Manual (HMM) for ThinkCentre M71z
Page 323
..., controls, indicators 84 H hard disk drive, replacing 94 heat sink assembly, replacing 104 I information resources 30 © Copyright Lenovo 2011, 2012 installing, replacing memory module 113 integrated camera, replacing 116 internal speakers, replacing 115 inverter, replacing 112 L LCD panel, replacing 119 Lenovo Solution Center 52 Lenovo ThinkVantage Toolbox 51 Lenovo Welcome 29 M memory module 113 installing, replacing 113 microprocessor fan, replacing 103 N notice, television output...
..., controls, indicators 84 H hard disk drive, replacing 94 heat sink assembly, replacing 104 I information resources 30 © Copyright Lenovo 2011, 2012 installing, replacing memory module 113 integrated camera, replacing 116 internal speakers, replacing 115 inverter, replacing 112 L LCD panel, replacing 119 Lenovo Solution Center 52 Lenovo ThinkVantage Toolbox 51 Lenovo Welcome 29 M memory module 113 installing, replacing 113 microprocessor fan, replacing 103 N notice, television output...

Hardware Maintenance Manual (HMM) for ThinkCentre M71z
Page 324
removing the frame stand 92 removing the system stand hinge cover 88 replacing battery 111 card reader 109 hard disk drive 94 heat sink assembly 104 integrated camera 116 internal speakers 115 inverter 112 LCD panel 119 microprocessor fan 103 power supply 102... output notice 316 temporary startup device 59 the BIOS, updating (flashing) 311-312 trademarks 316 troubleshooting, basic 35 troubleshooting, diagnostics 35 U updating 318 ThinkCentre Hardware Maintenance Manual (flashing) the BIOS 311 updating (flashing) the BIOS 312 using passwords 57 Setup Utility 57 V VESA mount bracket, removing 98 ...
removing the frame stand 92 removing the system stand hinge cover 88 replacing battery 111 card reader 109 hard disk drive 94 heat sink assembly 104 integrated camera 116 internal speakers 115 inverter 112 LCD panel 119 microprocessor fan 103 power supply 102... output notice 316 temporary startup device 59 the BIOS, updating (flashing) 311-312 trademarks 316 troubleshooting, basic 35 troubleshooting, diagnostics 35 U updating 318 ThinkCentre Hardware Maintenance Manual (flashing) the BIOS 311 updating (flashing) the BIOS 312 using passwords 57 Setup Utility 57 V VESA mount bracket, removing 98 ...

(English) User guide
Page 17
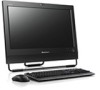
Table 1. A fingerprint reader keyboard is preinstalled with your power-on password, hard disk drive password, and Windows password. The Lenovo Solution Center program enables you to troubleshoot and resolve computer problems. It combines diagnostic tests, system information collection, security status, and support information, ...or can access from which you make the most of information sources and provides easy access to various tools to help you can replace passwords and enable simple and secure user access. To access a program, double-click the corresponding icon. To access the...
Table 1. A fingerprint reader keyboard is preinstalled with your power-on password, hard disk drive password, and Windows password. The Lenovo Solution Center program enables you to troubleshoot and resolve computer problems. It combines diagnostic tests, system information collection, security status, and support information, ...or can access from which you make the most of information sources and provides easy access to various tools to help you can replace passwords and enable simple and secure user access. To access a program, double-click the corresponding icon. To access the...

(English) User guide
Page 48
..., click Start ➙ All Programs ➙ Lenovo ThinkVantage Tools ➙ Factory Recovery Disks. Using recovery media This section provides instructions on the hard disk drive will be deleted and replaced by the factory default files. When the Startup Device...drive is required for some devices. Note: After restoring your recovery media, connect the boot medium (memory key or other data on the screen to the computer, or insert the boot disc into the optical drive. 2. In the Rescue and Recovery main window, click the Launch advanced Rescue and Recovery arrow. 36 ThinkCentre...
..., click Start ➙ All Programs ➙ Lenovo ThinkVantage Tools ➙ Factory Recovery Disks. Using recovery media This section provides instructions on the hard disk drive will be deleted and replaced by the factory default files. When the Startup Device...drive is required for some devices. Note: After restoring your recovery media, connect the boot medium (memory key or other data on the screen to the computer, or insert the boot disc into the optical drive. 2. In the Rescue and Recovery main window, click the Launch advanced Rescue and Recovery arrow. 36 ThinkCentre...


