
(English) Rescue and Recovery 4.3 Deployment Guide
Page 5
... the hard disk drive 51 Installing 51 Updating 53 Enabling the Rescue and Recovery desktop . . . 53 Scenario 2 - Installing on OEM systems . . . . . 54 Best practices for hard drive setup: Option 1 . . 55 Best practices for CD or script files 57 Scenario 5 - Working with WIM files and ImageX . . . . . 30 Using RRUTIL.EXE 30 Customizing the preboot environment . . . . 36 Configuring the Opera browser 41 Changing the video resolution 47 Startup applications 47 Passwords 48 Password access...
... the hard disk drive 51 Installing 51 Updating 53 Enabling the Rescue and Recovery desktop . . . 53 Scenario 2 - Installing on OEM systems . . . . . 54 Best practices for hard drive setup: Option 1 . . 55 Best practices for CD or script files 57 Scenario 5 - Working with WIM files and ImageX . . . . . 30 Using RRUTIL.EXE 30 Customizing the preboot environment . . . . 36 Configuring the Opera browser 41 Changing the video resolution 47 Startup applications 47 Passwords 48 Password access...
(English) Rescue and Recovery 4.3 Deployment Guide
Page 30
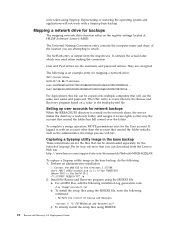
... that created the folder has full control over the folder. Mapping a network drive for the User account. Rejuvenating or restoring the operating system and applications will fail. were taken using the MSIEXE file, enter the following installation-log generation code: /L*v %temp%\rrinstall.txt b. The UNC entry is overwritten by the Rescue and Recovery program based on the registry settings located at HKLM\Software\Lenovo\MND.
... that created the folder has full control over the folder. Mapping a network drive for the User account. Rejuvenating or restoring the operating system and applications will fail. were taken using the MSIEXE file, enter the following installation-log generation code: /L*v %temp%\rrinstall.txt b. The UNC entry is overwritten by the Rescue and Recovery program based on the registry settings located at HKLM\Software\Lenovo\MND.
(English) Rescue and Recovery 4.3 Deployment Guide
Page 36
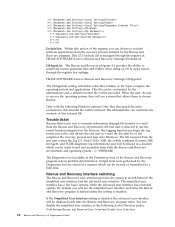
... Simplified User Interface setting is disabled, the advanced user interface will be displayed each time the Rescue and Recovery program is started unless the setting is no way to selectively restore particular files and folders when doing an OS & Apps restore through the registry key settings: HKLM\SOFTWARE\Lenovo\Rescue and Recovery\Settings\OSAppsList The OSAppsList setting will define what files, folders, or file types comprise the operating system...
... Simplified User Interface setting is disabled, the advanced user interface will be displayed each time the Rescue and Recovery program is started unless the setting is no way to selectively restore particular files and folders when doing an OS & Apps restore through the registry key settings: HKLM\SOFTWARE\Lenovo\Rescue and Recovery\Settings\OSAppsList The OSAppsList setting will define what files, folders, or file types comprise the operating system...

(English) Rescue and Recovery 4.5 Deployment Guide
Page 27
.... Configurations 21 Run your specific Sysprep implementation when you want to exclude .mpg and .jpg files from the backups, set the Backup partition type to Local Hard Drive : Type the following installation-log generation code: /L*v %temp%\rrinstall.txt b. Note: The operating system will fail when doing a Sysprep backup if the drive letters of Rescue and Recovery msiexec /i "C:\TVTRR\Rescue and Recovery.msi" c. 3. To install the setup files using...
.... Configurations 21 Run your specific Sysprep implementation when you want to exclude .mpg and .jpg files from the backups, set the Backup partition type to Local Hard Drive : Type the following installation-log generation code: /L*v %temp%\rrinstall.txt b. Note: The operating system will fail when doing a Sysprep backup if the drive letters of Rescue and Recovery msiexec /i "C:\TVTRR\Rescue and Recovery.msi" c. 3. To install the setup files using...
Hardware Maintenance Manual
Page 51
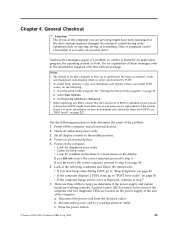
... all external devices. 2. Press the power button. © Lenovo 2005, 2006. General error messages appear if a problem or conflict is installed on the power supply at the rear of the problem: 1. Power-on page 212. a. General Checkout Attention The drives in quiet mode (no beep, no memory count and checkpoint code display) when no error is located on the front of the computer and two diagnostic LEDs are located on the system. Start the Setup Utility program...
... all external devices. 2. Press the power button. © Lenovo 2005, 2006. General error messages appear if a problem or conflict is installed on the power supply at the rear of the problem: 1. Power-on page 212. a. General Checkout Attention The drives in quiet mode (no beep, no memory count and checkpoint code display) when no error is located on the front of the computer and two diagnostic LEDs are located on the system. Start the Setup Utility program...
Hardware Maintenance Manual
Page 63
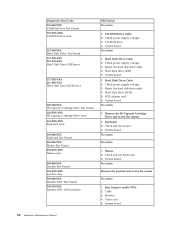
... enable or disable user access to the following : 1. Select Security Profile by Device, do not want to save the settings, select Exit the Setup Utility without saving. Using the Setup Utility 57 Attention Make sure that the IDE Drive Master password is set to Enable, all devices connected to the IDE controller (such as if they are lost or forgotten, the IDE hard disk drive must be displayed in a safe place. Z, a-z, and 0-9). 1. Start the Setup Utility...
... enable or disable user access to the following : 1. Select Security Profile by Device, do not want to save the settings, select Exit the Setup Utility without saving. Using the Setup Utility 57 Attention Make sure that the IDE Drive Master password is set to Enable, all devices connected to the IDE controller (such as if they are lost or forgotten, the IDE hard disk drive must be displayed in a safe place. Z, a-z, and 0-9). 1. Start the Setup Utility...
Hardware Maintenance Manual
Page 86
...-test the system No action 1. Run Setup to enable DDC 2. Hard Disk Drive Cable 2. Hard Disk drive (SCSI) 5. Check and test mouse 3. Cable 3. System board 80 Hardware Maintenance Manual Hard Disk Drive Cable 2. System board No action No action 1. Monitor 4. Hard Disk drive (IDE) 5. System board No action 1. Remove the Hi-Capacity Cartridge Drive and re-test the system 1. Reseat the hard disk drive cable 4. SCSI adapter card 6. Keyboard 2. Video card 5. System board No action 1. CD-ROM Drive Cable 2. Check power supply voltages 3. Reseat the hard disk drive cable...
...-test the system No action 1. Run Setup to enable DDC 2. Hard Disk Drive Cable 2. Hard Disk drive (SCSI) 5. Check and test mouse 3. Cable 3. System board 80 Hardware Maintenance Manual Hard Disk Drive Cable 2. System board No action No action 1. Monitor 4. Hard Disk drive (IDE) 5. System board No action 1. Remove the Hi-Capacity Cartridge Drive and re-test the system 1. Reseat the hard disk drive cable 4. SCSI adapter card 6. Keyboard 2. Video card 5. System board No action 1. CD-ROM Drive Cable 2. Check power supply voltages 3. Reseat the hard disk drive cable...
Hardware Maintenance Manual
Page 91
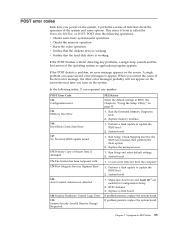
... hard disk drive is called the Power-On Self-Test, or POST. Covers were removed from the computer 1. RFID Antenna 3. POST does the following index, X can cause several error messages to -FRU Index 85 Run Setup and select default settings 2. System board 1. System board 1. This series of the operating system or application program appears. Run Setup. System board 1. Replace memory modules 1. A single problem can represent any problems, a single beep sounds and the first screen of tests is working...
... hard disk drive is called the Power-On Self-Test, or POST. Covers were removed from the computer 1. RFID Antenna 3. POST does the following index, X can cause several error messages to -FRU Index 85 Run Setup and select default settings 2. System board 1. System board 1. This series of the operating system or application program appears. Run Setup. System board 1. Replace memory modules 1. A single problem can represent any problems, a single beep sounds and the first screen of tests is working...

Hardware Maintenance Manual
Page 94
.... Computer will not RPL from server Computer will not power-off. Flashing cursor with an otherwise blank display. Power Switch 2. Network adapter (Advise network administrator of new MAC address) 1. System Board 3. Hard Disk Drive Cable 4. Memory Module 3. See "Power Supply Errors" on page 59. System Board Display/Monitor 1. Network adapter (advise network administrator of new MAC address) 1. Diskette Drive 2. Riser card 1. System Board 88 Hardware Maintenance Manual Diskette drive in-use light remains on LAN® 3. Incorrect memory size during POST FRU/Action 1. Ensure...
.... Computer will not RPL from server Computer will not power-off. Flashing cursor with an otherwise blank display. Power Switch 2. Network adapter (Advise network administrator of new MAC address) 1. System Board 3. Hard Disk Drive Cable 4. Memory Module 3. See "Power Supply Errors" on page 59. System Board Display/Monitor 1. Network adapter (advise network administrator of new MAC address) 1. Diskette Drive 2. Riser card 1. System Board 88 Hardware Maintenance Manual Diskette drive in-use light remains on LAN® 3. Incorrect memory size during POST FRU/Action 1. Ensure...
(English) Quick reference guide
Page 5
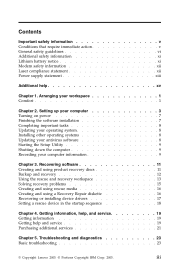
... computer information 9 Chapter 3. Troubleshooting and diagnostics 23 Basic troubleshooting 23 © Copyright Lenovo 2005. © Portions Copyright IBM Corp. 2005. Recovering software 11 Creating and using product recovery discs 11 Backup and recovery 12 Using the rescue and recovery workspace 13 Solving recovery problems 15 Creating and using rescue media 16 Creating and using a Recovery Repair diskette 16 Recovering or installing device drivers 17 Setting a rescue device in the startup sequence 18 Chapter 4. Contents...
... computer information 9 Chapter 3. Troubleshooting and diagnostics 23 Basic troubleshooting 23 © Copyright Lenovo 2005. © Portions Copyright IBM Corp. 2005. Recovering software 11 Creating and using product recovery discs 11 Backup and recovery 12 Using the rescue and recovery workspace 13 Solving recovery problems 15 Creating and using rescue media 16 Creating and using a Recovery Repair diskette 16 Recovering or installing device drivers 17 Setting a rescue device in the startup sequence 18 Chapter 4. Contents...
(English) Quick reference guide
Page 54
... a Service Provider for which Lenovo is specified in Part 3 Warranty Information. Software updates may procure and provide with the Machine, or installed subsequently; v failure resulting from other electronic media, and following the instructions that Lenovo may include basic input/output system code (called "BIOS"), utility programs, device drivers, and other support provided for downloading and installing designated software updates from a support web site or from misuse, accident, modification, unsuitable physical or operating environment...
... a Service Provider for which Lenovo is specified in Part 3 Warranty Information. Software updates may procure and provide with the Machine, or installed subsequently; v failure resulting from other electronic media, and following the instructions that Lenovo may include basic input/output system code (called "BIOS"), utility programs, device drivers, and other support provided for downloading and installing designated software updates from a support web site or from misuse, accident, modification, unsuitable physical or operating environment...
(English, Dutch, French, German, Italian) Quick reference guide for multi-lingual preload
Page 5
... ix Lithium battery notice x Modem safety information xi Laser compliance statement xi Additional help and service 19 Purchasing additional services 22 Chapter 5. Recovering software 11 Creating and using product recovery discs 11 Backup and recovery 12 Using the rescue and recovery workspace 13 Solving recovery problems 15 Creating and using rescue media 16 Creating and using a Recovery Repair diskette 16 Recovering or installing device drivers 17 Setting a rescue device in the startup sequence...
... ix Lithium battery notice x Modem safety information xi Laser compliance statement xi Additional help and service 19 Purchasing additional services 22 Chapter 5. Recovering software 11 Creating and using product recovery discs 11 Backup and recovery 12 Using the rescue and recovery workspace 13 Solving recovery problems 15 Creating and using rescue media 16 Creating and using a Recovery Repair diskette 16 Recovering or installing device drivers 17 Setting a rescue device in the startup sequence...

(English, Dutch, French, German, Italian) Quick reference guide for multi-lingual preload
Page 38
.... 5. v To restore your hard disk, you might have the option to restore the factory contents to open, see a logo screen, release the Enter or F11 key. 4. Note: After restoring your hard disk to the original factory content, you have to the factory contents, click Restore your password when prompted. Attention: If you press the power button. 3. When you set a Rescue and Recovery password, type your system; Because the Rescue and Recovery workspace operates independently from...
.... 5. v To restore your hard disk, you might have the option to restore the factory contents to open, see a logo screen, release the Enter or F11 key. 4. Note: After restoring your hard disk to the original factory content, you have to the factory contents, click Restore your password when prompted. Attention: If you press the power button. 3. When you set a Rescue and Recovery password, type your system; Because the Rescue and Recovery workspace operates independently from...

(English, Dutch, French, German, Italian) Quick reference guide for multi-lingual preload
Page 60
... technical or other electronic media, and following the instructions that apply to the Machine. If you ; writing), accident, modification, unsuitable physical or operating environment, or improper maintenance by IBM to provide warranty service, will be refunded. IBM does not warrant uninterrupted or error-free operation of your Machine is unable to do not register the Machine with a Customer Replaceable Unit (″CRU″) (e.g., keyboard, mouse, speaker, memory, hard disk drive...
... technical or other electronic media, and following the instructions that apply to the Machine. If you ; writing), accident, modification, unsuitable physical or operating environment, or improper maintenance by IBM to provide warranty service, will be refunded. IBM does not warrant uninterrupted or error-free operation of your Machine is unable to do not register the Machine with a Customer Replaceable Unit (″CRU″) (e.g., keyboard, mouse, speaker, memory, hard disk drive...
(English, Danish, Norwegian, Finnish, Swedish) Quick reference guide for multi-lingual preload
Page 5
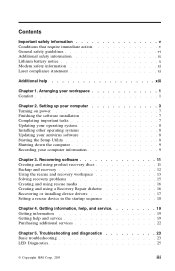
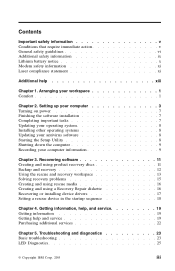
...Creating and using product recovery discs 11 Backup and recovery 12 Using the rescue and recovery workspace 13 Solving recovery problems 15 Creating and using rescue media 16 Creating and using a Recovery Repair diskette 16 Recovering or installing device drivers 17 Setting a rescue device in the startup sequence 18 Chapter 4. Setting up your computer 3 Turning on power 7 Finishing the software installation 7 Completing important tasks 7 Updating your operating system 8 Installing other operating systems 8 Updating your antivirus software 8 Starting the Setup Utility 8 Shutting...
...Creating and using product recovery discs 11 Backup and recovery 12 Using the rescue and recovery workspace 13 Solving recovery problems 15 Creating and using rescue media 16 Creating and using a Recovery Repair diskette 16 Recovering or installing device drivers 17 Setting a rescue device in the startup sequence 18 Chapter 4. Setting up your computer 3 Turning on power 7 Finishing the software installation 7 Completing important tasks 7 Updating your operating system 8 Installing other operating systems 8 Updating your antivirus software 8 Starting the Setup Utility 8 Shutting...

(English, Danish, Norwegian, Finnish, Swedish) Quick reference guide for multi-lingual preload
Page 38
... your hard disk or from a Rescue and Recovery backup, click Restore your system; When you hear beeps or see "Solving recovery problems" on the screen. then, follow the instructions on page 15. 5. Press and hold the Enter or F11 key while you set a Rescue and Recovery password, type your password when prompted. Note: If the Rescue and Recovery workspace fails to open, see a logo screen, release the Enter or F11 key...
... your hard disk or from a Rescue and Recovery backup, click Restore your system; When you hear beeps or see "Solving recovery problems" on the screen. then, follow the instructions on page 15. 5. Press and hold the Enter or F11 key while you set a Rescue and Recovery password, type your password when prompted. Note: If the Rescue and Recovery workspace fails to open, see a logo screen, release the Enter or F11 key...
(English, Danish, Norwegian, Finnish, Swedish) Quick reference guide for multi-lingual preload
Page 60
... warranty service. Any technical or other electronic media, and following the instructions that IBM provides. An initial diagnosis of Machine Code or software updates, or with or integrate into an IBM Machine at least functionally equivalent. You are genuine and unaltered. How to Obtain Warranty Service If the Machine does not function as assistance with a Customer Replaceable Unit (″CRU″) (e.g., keyboard, mouse, speaker, memory, hard disk drive), IBM...
... warranty service. Any technical or other electronic media, and following the instructions that IBM provides. An initial diagnosis of Machine Code or software updates, or with or integrate into an IBM Machine at least functionally equivalent. You are genuine and unaltered. How to Obtain Warranty Service If the Machine does not function as assistance with a Customer Replaceable Unit (″CRU″) (e.g., keyboard, mouse, speaker, memory, hard disk drive), IBM...

(English) User guide
Page 5
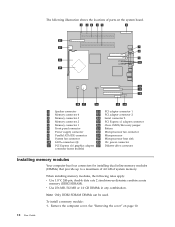
... device drivers 9 Removing the cover 10 Locating components 11 Identifying parts on the system board . . . . . 11 Installing memory modules 12 Installing adapters 13 Installing internal drives 15 Drive specifications 15 Installing a drive in bay 1 or bay 2 . . . . . 17 Installing a hard disk drive in bay 3 . . . . . 18 Connecting drives 20 Connecting the first optical drive 20 Connecting an additional optical drive or a parallel ATA hard disk drive 20 Connecting a serial ATA hard disk drive. . . . 21 Installing security features 21 Padlock 22 Password protection 22 Changing...
... device drivers 9 Removing the cover 10 Locating components 11 Identifying parts on the system board . . . . . 11 Installing memory modules 12 Installing adapters 13 Installing internal drives 15 Drive specifications 15 Installing a drive in bay 1 or bay 2 . . . . . 17 Installing a hard disk drive in bay 3 . . . . . 18 Connecting drives 20 Connecting the first optical drive 20 Connecting an additional optical drive or a parallel ATA hard disk drive 20 Connecting a serial ATA hard disk drive. . . . 21 Installing security features 21 Padlock 22 Password protection 22 Changing...
(English) User guide
Page 28
...system board. 1 Speaker connector 12 PCI adapter connector 1 2 Memory connector 4 13 PCI adapter connector 2 3 Memory connector 3 14 Serial connector 2 4 Memory connector 2 15 PCI Express x1 adapter connector 5 Memory connector 1 16 Clear CMOS/Recovery jumper 6 Front panel connector 17 Battery 7 Power supply connector 18 Microprocessor fan connector 8 Parallel ATA IDE connector 19 Microprocessor 9 System fan connector 20 Microprocessor heat sink 10 SATA connectors (4) 21 12v power connector 11 PCI Express x16 graphics adapter 22 Diskette drive connector connector...
...system board. 1 Speaker connector 12 PCI adapter connector 1 2 Memory connector 4 13 PCI adapter connector 2 3 Memory connector 3 14 Serial connector 2 4 Memory connector 2 15 PCI Express x1 adapter connector 5 Memory connector 1 16 Clear CMOS/Recovery jumper 6 Front panel connector 17 Battery 7 Power supply connector 18 Microprocessor fan connector 8 Parallel ATA IDE connector 19 Microprocessor 9 System fan connector 20 Microprocessor heat sink 10 SATA connectors (4) 21 12v power connector 11 PCI Express x16 graphics adapter 22 Diskette drive connector connector...
(English) User guide
Page 42
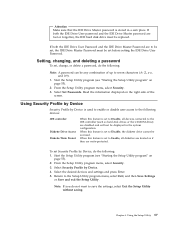
However, to change , or delete a password, do the following : Note: A password can type either password. Read the information displayed on page 25). 2. When this feature is set to Enable, all devices connected to the IDE controller (such as hard disk drives or the CD-ROM drive) are disabled and will see an error message. When this feature is displayed each time you try to access the Setup Utility program. Selecting a startup device If your administrator...
However, to change , or delete a password, do the following : Note: A password can type either password. Read the information displayed on page 25). 2. When this feature is set to Enable, all devices connected to the IDE controller (such as hard disk drives or the CD-ROM drive) are disabled and will see an error message. When this feature is displayed each time you try to access the Setup Utility program. Selecting a startup device If your administrator...


