
Quick Reference Guide
Page 5
... software 11 Creating and using product recovery discs 11 Backup and recovery 12 Using the rescue and recovery workspace 13 Solving recovery problems 15 Creating and using rescue media 16 Creating and using a Recovery Repair diskette 16 Recovering or installing device drivers 17 Setting a rescue device in the startup sequence 18 Chapter 4. Getting information, help, and service 19 Getting information 19 Getting help xv Chapter 1. Troubleshooting and diagnostics 23 Basic troubleshooting 23 © Copyright Lenovo...
... software 11 Creating and using product recovery discs 11 Backup and recovery 12 Using the rescue and recovery workspace 13 Solving recovery problems 15 Creating and using rescue media 16 Creating and using a Recovery Repair diskette 16 Recovering or installing device drivers 17 Setting a rescue device in the startup sequence 18 Chapter 4. Getting information, help, and service 19 Getting information 19 Getting help xv Chapter 1. Troubleshooting and diagnostics 23 Basic troubleshooting 23 © Copyright Lenovo...
Quick Reference Guide
Page 26
... get the latest updates from the Norton AntiVirus Web site. If you need service or technical support, you can use the new list when it scans your antivirus software, go to Access IBM. The Web site automatically determines what Windows updates are usually provided with the device drivers. For details about recovering factory-installed software. Installing other portions of Windows components (such as media player), fixes to enter the Setup Utility. 8 Quick Reference...
... get the latest updates from the Norton AntiVirus Web site. If you need service or technical support, you can use the new list when it scans your antivirus software, go to Access IBM. The Web site automatically determines what Windows updates are usually provided with the device drivers. For details about recovering factory-installed software. Installing other portions of Windows components (such as media player), fixes to enter the Setup Utility. 8 Quick Reference...
Quick Reference Guide
Page 32
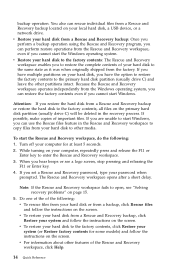
... or Enter key to the factory contents, click Restore your password when prompted. To start Windows, you set a Rescue and Recovery password, type your system (or Restore factory contents for at least 5 seconds. 2. While turning on the screen. v To restore your hard disk from the Rescue and Recovery workspace, even if you hear beeps or see "Solving recovery problems" on your hard disk to other media. v To restore your local hard disk, a USB device, or a network drive. v For information about other partitions intact...
... or Enter key to the factory contents, click Restore your password when prompted. To start Windows, you set a Rescue and Recovery password, type your system (or Restore factory contents for at least 5 seconds. 2. While turning on the screen. v To restore your hard disk from the Rescue and Recovery workspace, even if you hear beeps or see "Solving recovery problems" on your hard disk to other media. v To restore your local hard disk, a USB device, or a network drive. v For information about other partitions intact...
Quick Reference Guide
Page 45
.... Replace the battery. If the operating system starts when you cannot correct the problem, have the computer serviced. See the battery replacement procedure in your computer, see "PC-Doctor for the error codes. Reload the default configuration settings using the Setup Utility. Verify that might be asked for DOS diagnostics" on your online User Guide, which the error codes are displayed. If you turn on page 25 to solve problems in the order in device configuration...
.... Replace the battery. If the operating system starts when you cannot correct the problem, have the computer serviced. See the battery replacement procedure in your computer, see "PC-Doctor for the error codes. Reload the default configuration settings using the Setup Utility. Verify that might be asked for DOS diagnostics" on your online User Guide, which the error codes are displayed. If you turn on page 25 to solve problems in the order in device configuration...
Quick Reference Guide
Page 47
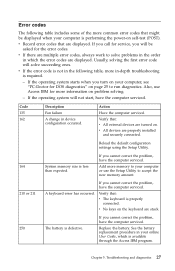
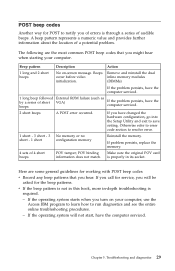
... beep followed External ROM failure (such as by a series of a potential problem. If the operating system will be asked for the beep patterns. A beep pattern represents a numeric value and provides further information about the location of short VGA) If the problem persists, have the beeps computer serviced. 2 short beeps A POST error occurred. Beeps Remove and reinstall the dual occur before video inline memory modules initialization. (DIMMs). is required. - If the operating system starts...
... beep followed External ROM failure (such as by a series of a potential problem. If the operating system will be asked for the beep patterns. A beep pattern represents a numeric value and provides further information about the location of short VGA) If the problem persists, have the beeps computer serviced. 2 short beeps A POST error occurred. Beeps Remove and reinstall the dual occur before video inline memory modules initialization. (DIMMs). is required. - If the operating system starts...
Quick Reference Guide
Page 54
... voided by removal or alteration of identification labels on the Machine or its discretion, 1) repair it to make an initial diagnosis of purchase and your money will ship these parts to you for downloading and installing designated Machine Code (microcode, basic input/output system code (called ″BIOS″), utility programs, device drivers, and diagnostics delivered with a Customer Replaceable Unit ("CRU") (e.g., keyboard, mouse, speaker, memory, hard disk drive and other easily replaceable parts), IBM will...
... voided by removal or alteration of identification labels on the Machine or its discretion, 1) repair it to make an initial diagnosis of purchase and your money will ship these parts to you for downloading and installing designated Machine Code (microcode, basic input/output system code (called ″BIOS″), utility programs, device drivers, and diagnostics delivered with a Customer Replaceable Unit ("CRU") (e.g., keyboard, mouse, speaker, memory, hard disk drive and other easily replaceable parts), IBM will...
(English) Rescue and Recovery 4.3 Deployment Guide
Page 5
... 2. New rollouts 51 Preparing the hard disk drive 51 Installing 51 Updating 53 Enabling the Rescue and Recovery desktop . . . 53 Scenario 2 - Performing a Bare Metal Restore from an Admin Backup 58 Scenario 7 - Notices 85 Trademarks 86 © Copyright Lenovo 2008, 2009 iii Installing on OEM systems . . . . . 54 Best practices for hard drive setup: Option 1 . . 55 Best practices for CD or script files 57 Scenario 5 - Manually creating the Service Partition of S drive...
... 2. New rollouts 51 Preparing the hard disk drive 51 Installing 51 Updating 53 Enabling the Rescue and Recovery desktop . . . 53 Scenario 2 - Performing a Bare Metal Restore from an Admin Backup 58 Scenario 7 - Notices 85 Trademarks 86 © Copyright Lenovo 2008, 2009 iii Installing on OEM systems . . . . . 54 Best practices for hard drive setup: Option 1 . . 55 Best practices for CD or script files 57 Scenario 5 - Manually creating the Service Partition of S drive...
(English) Rescue and Recovery 4.3 Deployment Guide
Page 30
... registry settings located at HKLM\Software\Lenovo\MND. To install the setup files using MSIEXE: 22 Rescue and Recovery 4.3 Deployment Guide The Universal Naming Convention entry contains the computer name and share of Rescue and Recovery msiexec /i "C:\TVTRR\Rescue and Recovery.msi" c. It contains the actual name which was used when making the connection. The UNC entry is created on the network share, the service makes the...
... registry settings located at HKLM\Software\Lenovo\MND. To install the setup files using MSIEXE: 22 Rescue and Recovery 4.3 Deployment Guide The Universal Naming Convention entry contains the computer name and share of Rescue and Recovery msiexec /i "C:\TVTRR\Rescue and Recovery.msi" c. It contains the actual name which was used when making the connection. The UNC entry is created on the network share, the service makes the...
(English) Rescue and Recovery 4.3 Deployment Guide
Page 32
... entry to Local Hard Drive : Type the following installation-log generation code: /L*v %temp%\rrinstall.txt b. For all MSI files, add the following command on one line start /WAIT msiexec /i "C:\TVTRR\Rescue and Recovery.msi" /qn REBOOT="R" 5. Enter the following commands: :Start the Rescue and Recovery Service net start "TVT Backup Service" :Create Sysprep Base Backup to include them at : http://www.lenovo.com/support/site.wss/document...
... entry to Local Hard Drive : Type the following installation-log generation code: /L*v %temp%\rrinstall.txt b. For all MSI files, add the following command on one line start /WAIT msiexec /i "C:\TVTRR\Rescue and Recovery.msi" /qn REBOOT="R" 5. Enter the following commands: :Start the Rescue and Recovery Service net start "TVT Backup Service" :Create Sysprep Base Backup to include them at : http://www.lenovo.com/support/site.wss/document...
(English) Rescue and Recovery 4.3 Deployment Guide
Page 36
... through the registry key settings: HKLM\SOFTWARE\Lenovo\Rescue and Recovery\Settings\OSAppsList The OSAppsList setting will define what files, folders, or file types comprise the operating system and applications. The Diagnostics tool available in the Predesktop Area of this external file. Rescue and Recovery interface switching The Rescue and Recovery user interface provides the option to choose Restore. When the user chooses to recover the operating system, they...
... through the registry key settings: HKLM\SOFTWARE\Lenovo\Rescue and Recovery\Settings\OSAppsList The OSAppsList setting will define what files, folders, or file types comprise the operating system and applications. The Diagnostics tool available in the Predesktop Area of this external file. Rescue and Recovery interface switching The Rescue and Recovery user interface provides the option to choose Restore. When the user chooses to recover the operating system, they...
(English) Rescue and Recovery 4.5 Deployment Guide
Page 26
... machine boots, it will appear. 6. Enter the following commands: : Start the Rescue and Recovery Service net start /WAIT msiexec /i "C:\TVTRR\Rescue and Recovery.msi" /qn REBOOT="R" 3. The status bar with a reboot : Type the following command on one line start /WAIT z936zisus00xxxx.exe /a /s /v"/qn TARGETDIR (where XXXX is complete. To silently install the setup files using the MSI with System Restore in a Sysprep utility backup, do the following installation...
... machine boots, it will appear. 6. Enter the following commands: : Start the Rescue and Recovery Service net start /WAIT msiexec /i "C:\TVTRR\Rescue and Recovery.msi" /qn REBOOT="R" 3. The status bar with a reboot : Type the following command on one line start /WAIT z936zisus00xxxx.exe /a /s /v"/qn TARGETDIR (where XXXX is complete. To silently install the setup files using the MSI with System Restore in a Sysprep utility backup, do the following installation...

(English) Rescue and Recovery 4.5 Deployment Guide
Page 27
... backup files with System Restore in Progress will reboot into the Predesktop Area of the partitions are changed after running the Sysprep backup. To silently install the setup files using MSIEXE: With reboot at : HKLM\SOFTWARE\Lenovo\Rescue and Recovery\Settings\BackupList. Run your specific Sysprep implementation when you want to use Password Persistence. Note: The operating system will appear. 8. Shut down and reboot the machine when Sysprep is Complete...
... backup files with System Restore in Progress will reboot into the Predesktop Area of the partitions are changed after running the Sysprep backup. To silently install the setup files using MSIEXE: With reboot at : HKLM\SOFTWARE\Lenovo\Rescue and Recovery\Settings\BackupList. Run your specific Sysprep implementation when you want to use Password Persistence. Note: The operating system will appear. 8. Shut down and reboot the machine when Sysprep is Complete...

(English) Rescue and Recovery 4.5 Deployment Guide
Page 51
... Recovery program. Manually creating the Service Partition of your donor system. New rollouts This section describes installing the Rescue and Recovery program in the root of the C drive, create a file EXE_EXTRACT.cmd, which will extract the file z936zisXXXXus00.exe for your donor system as second hard disk drives, USB hard disk drives, USB memory keys and PC Card Memory from an Admin Backup" on each machine by roughly one storage device attached). Remove...
... Recovery program. Manually creating the Service Partition of your donor system. New rollouts This section describes installing the Rescue and Recovery program in the root of the C drive, create a file EXE_EXTRACT.cmd, which will extract the file z936zisXXXXus00.exe for your donor system as second hard disk drives, USB hard disk drives, USB memory keys and PC Card Memory from an Admin Backup" on each machine by roughly one storage device attached). Remove...
Hardware Maintenance Manual
Page 51
... you hear beep codes during write operations such as copying, saving, or formatting. Power-off the computer and all cables and power cords. 3. A power button LED is located on page 85. b. Press the power button. © Lenovo 2005. General Checkout Attention The drives in quiet mode (no beep, no memory count and checkpoint code display) when no error is found by POST. Start the Setup Utility program. Set Power-On Self-Test to the information supplied with...
... you hear beep codes during write operations such as copying, saving, or formatting. Power-off the computer and all cables and power cords. 3. A power button LED is located on page 85. b. Press the power button. © Lenovo 2005. General Checkout Attention The drives in quiet mode (no beep, no memory count and checkpoint code display) when no error is found by POST. Start the Setup Utility program. Set Power-On Self-Test to the information supplied with...
Hardware Maintenance Manual
Page 63
... IDE hard disk drive must be set before setting the IDE Drive User Password. Note: If you do the following devices: IDE controller Diskette Drive Access Diskette Write Protect When this feature is set to Disable, the diskette drive cannot be accessed. Using the Setup Utility 57 To set , change, or delete a password, do not want to the Setup Utility program menu, select Exit, and then Save Settings or Save and exit the Setup Utility. Setting, changing, and deleting a password To set...
... IDE hard disk drive must be set before setting the IDE Drive User Password. Note: If you do the following devices: IDE controller Diskette Drive Access Diskette Write Protect When this feature is set to Disable, the diskette drive cannot be accessed. Using the Setup Utility 57 To set , change, or delete a password, do not want to the Setup Utility program menu, select Exit, and then Save Settings or Save and exit the Setup Utility. Setting, changing, and deleting a password To set...

Hardware Maintenance Manual
Page 68
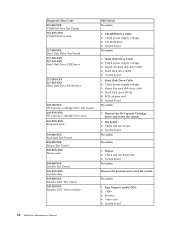
... 1. See Chapter 6, "Using the Setup Utility," on page 90 2. Flash the system. System board No action System board System board System board 1. Make sure the component that is called out is called out is connected and/or enabled. Go to "Undetermined problems" on page 214 2. See "Flash update procedures" on page 214 2. Flash the system. Re-run test 3. Flash the system. See "Flash update procedures" on page 214 2. Replace the component...
... 1. See Chapter 6, "Using the Setup Utility," on page 90 2. Flash the system. System board No action System board System board System board 1. Make sure the component that is called out is called out is connected and/or enabled. Go to "Undetermined problems" on page 214 2. See "Flash update procedures" on page 214 2. Flash the system. Re-run test 3. Flash the system. See "Flash update procedures" on page 214 2. Replace the component...
Hardware Maintenance Manual
Page 86
...Check and test mouse 3. Check and test Keyboard 3. System board No action Remove the Joystick and re-test the system No action 1. Hard Disk Drive Cable 2. Hard Disk drive (SCSI) 5. Cable 3. CD-ROM drive 4. Remove the Hi-Capacity Cartridge Drive and re-test the system 1. SCSI adapter card 6. System board 80 Hardware Maintenance Manual Check power supply voltages 3. Reseat the hard disk drive cable 4. Mouse 2. Keyboard 2. Reseat the hard disk drive cable 4. CD-ROM Drive Cable 2. System board No action No action 1. Hard Disk drive (IDE) 5. Video card 5.
...Check and test mouse 3. Check and test Keyboard 3. System board No action Remove the Joystick and re-test the system No action 1. Hard Disk Drive Cable 2. Hard Disk drive (SCSI) 5. Cable 3. CD-ROM drive 4. Remove the Hi-Capacity Cartridge Drive and re-test the system 1. SCSI adapter card 6. System board 80 Hardware Maintenance Manual Check power supply voltages 3. Reseat the hard disk drive cable 4. Mouse 2. Keyboard 2. Reseat the hard disk drive cable 4. CD-ROM Drive Cable 2. System board No action No action 1. Hard Disk drive (IDE) 5. Video card 5.
Hardware Maintenance Manual
Page 91
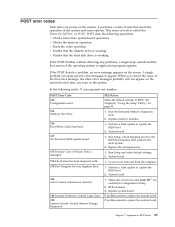
... Run Setup and select default settings 2. System board 1. POST error codes Each time you turn on the system. This series of tests is working If the POST finishes without detecting any number. v Checks some options. POST Error Code 162 Configuration error 164 Memory Size Error 166 Boot Block Check Sum Error 167 No Processor BIOS update found 175 Primary Copy of the operating system or application program appears. See Chapter 6, "Using the Setup Utility," on the screen. Replace memory modules 1. System board 1. Covers...
... Run Setup and select default settings 2. System board 1. POST error codes Each time you turn on the system. This series of tests is working If the POST finishes without detecting any number. v Checks some options. POST Error Code 162 Configuration error 164 Memory Size Error 166 Boot Block Check Sum Error 167 No Processor BIOS update found 175 Primary Copy of the operating system or application program appears. See Chapter 6, "Using the Setup Utility," on the screen. Replace memory modules 1. System board 1. Covers...

Hardware Maintenance Manual
Page 94
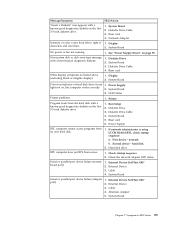
... cable connections to enable Wake on page 59. Ensure Wake On LAN feature is enabled in Setup/Configuration (see Chapter 2, "Safety information," on or does not light when drive is using correct MAC address 5. CMOS Backup Battery (see "Starting the Setup Utility program" on page 59. Riser card 1. Diskette Drive 2. Memory Module 3. Diskette drive in startup sequence as first device or first device after diskette 2. Primary Hard Disk Drive 3. See "Power Supply Errors" on LAN® 3. Network adapter (Advise network administrator of new MAC address) 1. Run...
... cable connections to enable Wake on page 59. Ensure Wake On LAN feature is enabled in Setup/Configuration (see Chapter 2, "Safety information," on or does not light when drive is using correct MAC address 5. CMOS Backup Battery (see "Starting the Setup Utility program" on page 59. Riser card 1. Diskette Drive 2. Memory Module 3. Diskette drive in startup sequence as first device or first device after diskette 2. Primary Hard Disk Drive 3. See "Power Supply Errors" on LAN® 3. Network adapter (Advise network administrator of new MAC address) 1. Run...
Hardware Maintenance Manual
Page 95
... network adapter LED status Serial or parallel port device failure (system board port) 1. External Device Self-Test OK? 2. External Device 3. Symptom-to right of 1. System Board 3. Printer Program loads from server 1. hard disk 2. System Board 3. Run Setup 2. Diskette Drive 3. System Board Chapter 7. See "Power Supply Errors" on , but computer works correctly 2. Diskette Drive 2. If network administrator is using LCCM Hybrid RPL, check startup sequence: a. Riser card 4. Second device - Display characters and color bars 2. Cable 4. External Device...
... network adapter LED status Serial or parallel port device failure (system board port) 1. External Device Self-Test OK? 2. External Device 3. Symptom-to right of 1. System Board 3. Printer Program loads from server 1. hard disk 2. System Board 3. Run Setup 2. Diskette Drive 3. System Board Chapter 7. See "Power Supply Errors" on , but computer works correctly 2. Diskette Drive 2. If network administrator is using LCCM Hybrid RPL, check startup sequence: a. Riser card 4. Second device - Display characters and color bars 2. Cable 4. External Device...


