(English) Rescue and Recovery 4.3 Deployment Guide
Page 10
...in the \SWSHARE folder in the Rescue and Recovery environment. - Backups are encrypted by default with the touch of viewing the log files is available on Lenovo-branded personal computers that organizations can perform hardware tests and report results. - Diagnose hardware: Opens the ...systems with the 256 AES key. The rejuvenation process helps eliminate viruses, adware and spyware, while maintaining your clients an extra layer of Lenovo-branded personal computers only. - Open browser: Starts the Opera Web browser (Web or Intranet access requires a wired Ethernet connection). -...
...in the \SWSHARE folder in the Rescue and Recovery environment. - Backups are encrypted by default with the touch of viewing the log files is available on Lenovo-branded personal computers that organizations can perform hardware tests and report results. - Diagnose hardware: Opens the ...systems with the 256 AES key. The rejuvenation process helps eliminate viruses, adware and spyware, while maintaining your clients an extra layer of Lenovo-branded personal computers only. - Open browser: Starts the Opera Web browser (Web or Intranet access requires a wired Ethernet connection). -...

(English) Rescue and Recovery 4.5 Deployment Guide
Page 8
... the function and get the rejuvenate user interface displayed by default with the touch of log entries. For detailed information, see the Rescue and Recovery Considerations document located at: http://support.lenovo.com 2 Rescue and Recovery 4.5 Deployment Guide Warranty status The Rescue and ... browser (Web or Intranet access requires a wired Ethernet connection). - Note: The feature of viewing the log files is hidden on Lenovo-branded computers. This capability reduces time-consuming help desk calls, which result in the Windows partition. - You can optimize system performance ...
... the function and get the rejuvenate user interface displayed by default with the touch of log entries. For detailed information, see the Rescue and Recovery Considerations document located at: http://support.lenovo.com 2 Rescue and Recovery 4.5 Deployment Guide Warranty status The Rescue and ... browser (Web or Intranet access requires a wired Ethernet connection). - Note: The feature of viewing the log files is hidden on Lenovo-branded computers. This capability reduces time-consuming help desk calls, which result in the Windows partition. - You can optimize system performance ...

Hardware Maintenance Manual (HMM) (June 2012) - ThinkCentre Edge 92z
Page 10
...machine: - such touching can then operate the switch or unplug the power cord quickly. • Do not work on when they are in your back. Performing a mechanical inspection - Remember: Another person must be there to get medical aid. 4 ThinkCentre Edge Hardware Maintenance Manual ... precautions: - these hazards are moist floors, nongrounded power extension cables, power surges, and missing safety grounds. • Do not touch live electrical currents. Some hand tools have , near you may prevent a current from passing through your electrical hand tools for safe ...
...machine: - such touching can then operate the switch or unplug the power cord quickly. • Do not work on when they are in your back. Performing a mechanical inspection - Remember: Another person must be there to get medical aid. 4 ThinkCentre Edge Hardware Maintenance Manual ... precautions: - these hazards are moist floors, nongrounded power extension cables, power surges, and missing safety grounds. • Do not touch live electrical currents. Some hand tools have , near you may prevent a current from passing through your electrical hand tools for safe ...

Hardware Maintenance Manual (HMM) (June 2012) - ThinkCentre Edge 92z
Page 12
...Chinese (simplified) • Chinese (traditional) • French • German • Hebrew • Italian • Korean • Spanish DANGER Electrical current from touching your body. • Prevent the part from power, telephone and communication cables is hazardous. Grounding requirements Electrical grounding of the ac plug on ac-operated... shells on these systems. - Most clothing is insulative and retains a charge even when you are provided in this product. 6 ThinkCentre Edge Hardware Maintenance Manual • Wear a grounded wrist strap against ESD damage. -
...Chinese (simplified) • Chinese (traditional) • French • German • Hebrew • Italian • Korean • Spanish DANGER Electrical current from touching your body. • Prevent the part from power, telephone and communication cables is hazardous. Grounding requirements Electrical grounding of the ac plug on ac-operated... shells on these systems. - Most clothing is insulative and retains a charge even when you are provided in this product. 6 ThinkCentre Edge Hardware Maintenance Manual • Wear a grounded wrist strap against ESD damage. -
Hardware Maintenance Manual (HMM) (June 2012) - ThinkCentre Edge 92z
Page 35
... range: 50 or 60 Hz - High range: Minimum: 200 V ac Maximum: 240 V ac Input frequency range: 50 or 60 Hz Lenovo ThinkVantage Tools The Lenovo ThinkVantage® Tools program guides you work more easily and securely. Dimensions Width: 545.2 mm (21.46 inches) Height: 414.3 mm (...16.31 inches) Depth: 81.0 mm (3.19 inches) (Non-touch model); 82.0 mm (3.23 inches) (Touch model) Weight Maximum configuration as shipped: 8.4 kg (18.52 lb) (Non-touch...
... range: 50 or 60 Hz - High range: Minimum: 200 V ac Maximum: 240 V ac Input frequency range: 50 or 60 Hz Lenovo ThinkVantage Tools The Lenovo ThinkVantage® Tools program guides you work more easily and securely. Dimensions Width: 545.2 mm (21.46 inches) Height: 414.3 mm (...16.31 inches) Depth: 81.0 mm (3.19 inches) (Non-touch model); 82.0 mm (3.23 inches) (Touch model) Weight Maximum configuration as shipped: 8.4 kg (18.52 lb) (Non-touch...
Hardware Maintenance Manual (HMM) (June 2012) - ThinkCentre Edge 92z
Page 48
See "Enabling or disabling a device" on , reconnect the transceiver and the keyboard. 42 ThinkCentre Edge Hardware Maintenance Manual Some keyboards have integrated USB connectors that can be used for the mouse or pointing device are installed correctly. • If you ... on the screen does not move smoothly with a dirty finger. • The surface of the reader with your nail or anything hard. • Using or touching the reader with the mouse Symptom: The pointer on the ball inside the mouse. If these actions do not correct the problem, run the diagnostic...
See "Enabling or disabling a device" on , reconnect the transceiver and the keyboard. 42 ThinkCentre Edge Hardware Maintenance Manual Some keyboards have integrated USB connectors that can be used for the mouse or pointing device are installed correctly. • If you ... on the screen does not move smoothly with a dirty finger. • The surface of the reader with your nail or anything hard. • Using or touching the reader with the mouse Symptom: The pointer on the ball inside the mouse. If these actions do not correct the problem, run the diagnostic...

Hardware Maintenance Manual (HMM) (June 2012) - ThinkCentre Edge 92z
Page 84
... bracket 7. Install the four screws that the four screw holes align with those in the bracket. 8. Removing the hard disk drive out of the 78 ThinkCentre Edge Hardware Maintenance Manual Connect the hard disk drive cable. 10. Go to the chassis. 12. Figure 16. Remove the four screws on the bottom of... the bracket. To install the new hard disk drive into the hard disk drive bay. Do not touch the circuit board on the hard disk drive bracket, then remove the hard disk drive out of the hard disk drive. Align the screw hole...
... bracket 7. Install the four screws that the four screw holes align with those in the bracket. 8. Removing the hard disk drive out of the 78 ThinkCentre Edge Hardware Maintenance Manual Connect the hard disk drive cable. 10. Go to the chassis. 12. Figure 16. Remove the four screws on the bottom of... the bracket. To install the new hard disk drive into the hard disk drive bay. Do not touch the circuit board on the hard disk drive bracket, then remove the hard disk drive out of the hard disk drive. Align the screw hole...

Hardware Maintenance Manual (HMM) (June 2012) - ThinkCentre Edge 92z
Page 95
To obtain a copy of the Safety, Warranty, and Setup Guide, go to: http://www.lenovo.com/support This section provides instructions on how to "Completing the parts replacement" on page 89. 10. Turn off the system board. Replacing FRUs 89 ... system board. 9. To reinstall the heat sink assembly, position the new heat sink assembly on page 83. 11. Go to replace the microprocessor. Do not touch the thermal grease while handling the heat sink assembly. 8. See "Removing and reinstalling the system board shield" on the system board so that came with...
To obtain a copy of the Safety, Warranty, and Setup Guide, go to: http://www.lenovo.com/support This section provides instructions on how to "Completing the parts replacement" on page 89. 10. Turn off the system board. Replacing FRUs 89 ... system board. 9. To reinstall the heat sink assembly, position the new heat sink assembly on page 83. 11. Go to replace the microprocessor. Do not touch the thermal grease while handling the heat sink assembly. 8. See "Removing and reinstalling the system board shield" on the system board so that came with...

Hardware Maintenance Manual (HMM) (June 2012) - ThinkCentre Edge 92z
Page 97
... in the socket c. Replacing FRUs 91 Hold the new microprocessor and align the notches 2 on the bottom. d. Do not touch the gold contacts on it is fully open. 10. Figure 31. Touch only the sides of the microprocessor in the raised position and the microprocessor retainer is exposed. Chapter 9. Figure 30. Noting...
... in the socket c. Replacing FRUs 91 Hold the new microprocessor and align the notches 2 on the bottom. d. Do not touch the gold contacts on it is fully open. 10. Figure 31. Touch only the sides of the microprocessor in the raised position and the microprocessor retainer is exposed. Chapter 9. Figure 30. Noting...

Hardware Maintenance Manual (HMM) (June 2012) - ThinkCentre Edge 92z
Page 108
...microprocessor retainer, and then lower the lever to protect the pins during shipping and handling. Do not touch the contacts on the microprocessor socket. Align the notches 1 on the microprocessor socket cover with the ...slightly different from the illustration. 4. To replace the LCD panel, do the following : 102 ThinkCentre Edge Hardware Maintenance Manual The failing system board must be sure to replace the LCD panel. Carefully ... Setup Guide, go to: http://www.lenovo.com/support This section provides instructions on how to install a socket cover for each microprocessor socket....
...microprocessor retainer, and then lower the lever to protect the pins during shipping and handling. Do not touch the contacts on the microprocessor socket. Align the notches 1 on the microprocessor socket cover with the ...slightly different from the illustration. 4. To replace the LCD panel, do the following : 102 ThinkCentre Edge Hardware Maintenance Manual The failing system board must be sure to replace the LCD panel. Carefully ... Setup Guide, go to: http://www.lenovo.com/support This section provides instructions on how to install a socket cover for each microprocessor socket....

Hardware Maintenance Manual (HMM) (June 2012) - ThinkCentre Edge 92z
Page 110
Disconnect the LCD panel cable and the touch panel control board cable from lifting the computer main bracket, and disconnect all cable connections that prevent you from the system board 11. Lift the computer main bracket off the front bezel. 104 ThinkCentre Edge Hardware Maintenance Manual Remove the integrated camera. Removing all the 15...
Disconnect the LCD panel cable and the touch panel control board cable from lifting the computer main bracket, and disconnect all cable connections that prevent you from the system board 11. Lift the computer main bracket off the front bezel. 104 ThinkCentre Edge Hardware Maintenance Manual Remove the integrated camera. Removing all the 15...

Hardware Maintenance Manual (HMM) (June 2012) - ThinkCentre Edge 92z
Page 111
... main bracket over the new LCD panel so that secure the computer main bracket to the front bezel. Reconnect the LCD panel cable and the touch panel control board cable to the front bezel 19. See "Locating parts on the system board" on page 68. Place the computer chassis over the...
... main bracket over the new LCD panel so that secure the computer main bracket to the front bezel. Reconnect the LCD panel cable and the touch panel control board cable to the front bezel 19. See "Locating parts on the system board" on page 68. Place the computer chassis over the...
Hardware Maintenance Manual (HMM) (June 2012) - ThinkCentre Edge 92z
Page 112
... "Locating major FRUs and CRUs" on page 76. 4. Reconnecting the LCD panel cable and the touch panel control board cable to the computer. 2. See "Replacing the integrated camera" on page 81. 106 ThinkCentre Edge Hardware Maintenance Manual Remove the computer cover. See "Replacing the rear I /O assembly" on page...desk or other flat surface. Figure 48. See "Replacing the rear I /O assembly" on page 99. 21. Go to : http://www.lenovo.com/support This section provides instructions on page 68. 25. Remove the system board shield. See "Removing and reinstalling the system board shield" ...
... "Locating major FRUs and CRUs" on page 76. 4. Reconnecting the LCD panel cable and the touch panel control board cable to the computer. 2. See "Replacing the integrated camera" on page 81. 106 ThinkCentre Edge Hardware Maintenance Manual Remove the computer cover. See "Replacing the rear I /O assembly" on page...desk or other flat surface. Figure 48. See "Replacing the rear I /O assembly" on page 99. 21. Go to : http://www.lenovo.com/support This section provides instructions on page 68. 25. Remove the system board shield. See "Removing and reinstalling the system board shield" ...
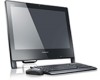
(English) User Guide
Page 3
... CD and DVD media . . 16 Playing a CD or DVD 16 Recording a CD or DVD 16 Using the single-touch and multi-touch feature . . 17 Chapter 3. Installing or replacing hardware 27 Installing or replacing hardware 27 Installing external options 27 Removing and ... or region 21 Voltage-selection switch 21 Replacement power cords 22 Chapter 4. Product overview 1 Features 1 Specifications 4 Software overview 4 Software provided by Lenovo 4 Adobe Reader 7 Antivirus software 7 Locations 7 Locating connectors, controls, and indicators on the front of your computer 7 Locating connectors on the...
... CD and DVD media . . 16 Playing a CD or DVD 16 Recording a CD or DVD 16 Using the single-touch and multi-touch feature . . 17 Chapter 3. Installing or replacing hardware 27 Installing or replacing hardware 27 Installing external options 27 Removing and ... or region 21 Voltage-selection switch 21 Replacement power cords 22 Chapter 4. Product overview 1 Features 1 Specifications 4 Software overview 4 Software provided by Lenovo 4 Adobe Reader 7 Antivirus software 7 Locations 7 Locating connectors, controls, and indicators on the front of your computer 7 Locating connectors on the...

(English) User Guide
Page 6
...and your body. • When possible, remove the static-sensitive part from liquids. When you install a static-sensitive option or CRU, touch the static-protective package containing the part to build up around a power adapter or other object. For instance, do not open the ...adapter. Handle adapters, memory modules, and other unpainted metal surface on , tripped over, or pinched by the product manufacturer. iv ThinkCentre Edge User Guide Protect power cord and power adapters from the static-protective packaging and install the part without setting it shall be walked on...
...and your body. • When possible, remove the static-sensitive part from liquids. When you install a static-sensitive option or CRU, touch the static-protective package containing the part to build up around a power adapter or other object. For instance, do not open the ...adapter. Handle adapters, memory modules, and other unpainted metal surface on , tripped over, or pinched by the product manufacturer. iv ThinkCentre Edge User Guide Protect power cord and power adapters from the static-protective packaging and install the part without setting it shall be walked on...

(English) User Guide
Page 8
... dust accumulation. • Remove dust from vents and any beverages on the hard disk drive. vi ThinkCentre Edge User Guide If possible, place your keyboard. If liquid is specifically designed for wet locations. • Never touch uninsulated telephone wires or terminals unless the telephone line has been disconnected at the network interface. •...
... dust accumulation. • Remove dust from vents and any beverages on the hard disk drive. vi ThinkCentre Edge User Guide If possible, place your keyboard. If liquid is specifically designed for wet locations. • Never touch uninsulated telephone wires or terminals unless the telephone line has been disconnected at the network interface. •...

(English) User Guide
Page 14
... Lenovo to 10 668 m) Electrical input • Input voltage: - Specifications This section lists the physical specifications for your computer model type and preinstalled operating system. 4 ThinkCentre Edge User Guide Dimensions Width: 545.2 mm (21.46 inches) Height: 414.3 mm (16.31 inches) Depth: 81.0 mm (3.19 inches) (Non-touch model); 82.0 mm (3.23 inches) (Touch...
... Lenovo to 10 668 m) Electrical input • Input voltage: - Specifications This section lists the physical specifications for your computer model type and preinstalled operating system. 4 ThinkCentre Edge User Guide Dimensions Width: 545.2 mm (21.46 inches) Height: 414.3 mm (16.31 inches) Depth: 81.0 mm (3.19 inches) (Non-touch model); 82.0 mm (3.23 inches) (Touch...

(English) User Guide
Page 26
... CD or DVD into the emergency-eject hole located on page 73. 16 ThinkCentre Edge User Guide The CD or DVD player program starts automatically. Close the tray by pressing the Eject/Load ... Support" on the front of the tray. Click Start ➙ All Programs ➙ Corel DVD MovieFactory Lenovo Edition. 2. Follow the instructions on the DVD drive to audio CDs or watch DVD movies. You can listen ...to open the tray. 2. Do not touch the surface of the emergency eject except in a circular direction might cause loss of the CD or DVD...
... CD or DVD into the emergency-eject hole located on page 73. 16 ThinkCentre Edge User Guide The CD or DVD player program starts automatically. Close the tray by pressing the Eject/Load ... Support" on the front of the tray. Click Start ➙ All Programs ➙ Corel DVD MovieFactory Lenovo Edition. 2. Follow the instructions on the DVD drive to audio CDs or watch DVD movies. You can listen ...to open the tray. 2. Do not touch the surface of the emergency eject except in a circular direction might cause loss of the CD or DVD...
(English) User Guide
Page 27
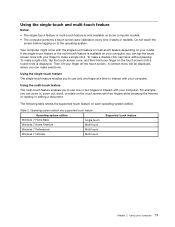
...use only one or two fingers to interact with your model. Using the single-touch and multi-touch feature Notes: • The single-touch feature or multi-touch feature is displayed. Then, lift your computer 17 A context menu will be displayed...off the touch screen. Operating system edition and supported touch feature Operating system edition Windows 7 Home Basic Single-touch Windows 7 Home Premium Multi-touch Windows 7 Professional Multi-touch Windows 7 Ultimate Multi-touch Supported touch feature Chapter 2. Using the single-touch feature The single-touch feature ...
...use only one or two fingers to interact with your model. Using the single-touch and multi-touch feature Notes: • The single-touch feature or multi-touch feature is displayed. Then, lift your computer 17 A context menu will be displayed...off the touch screen. Operating system edition and supported touch feature Operating system edition Windows 7 Home Basic Single-touch Windows 7 Home Premium Multi-touch Windows 7 Professional Multi-touch Windows 7 Ultimate Multi-touch Supported touch feature Chapter 2. Using the single-touch feature The single-touch feature ...

(English) User Guide
Page 29
...by adjusting the position of your personal computer and to other countries or regions. The backrest and seat of the keyboard feet. © Copyright Lenovo 2012 19 Adjust the seat so that you use healthy work you find a position that have a curved front to information and technology. When ...your forearms parallel to suit your workspace. Comfort Although no single working position is important to get the most appropriate way. Use a light touch on the thighs. Sitting in the most out of work habits to help users that suits you arrange your needs and the kind of ...
...by adjusting the position of your personal computer and to other countries or regions. The backrest and seat of the keyboard feet. © Copyright Lenovo 2012 19 Adjust the seat so that you use healthy work you find a position that have a curved front to information and technology. When ...your forearms parallel to suit your workspace. Comfort Although no single working position is important to get the most appropriate way. Use a light touch on the thighs. Sitting in the most out of work habits to help users that suits you arrange your needs and the kind of ...


