User Manual
Page 5
... computer 85 Removing the computer cover 86 Locating components 88 Locating parts on the system board 129 Installing or replacing a memory module . . . . 130 Installing or replacing an adapter card . . . . . 132 Replacing the battery 134 Replacing the hard disk drive 136 Replacing the optical drive 137 Replacing the power supply assembly . . . . . 140 Replacing the heat sink and fan assembly . . . . 142 Replacing the microprocessor 144 Replacing the system board 147 Replacing the card reader 149 Replacing the front audio and USB assembly . . . 150 Replacing the internal speaker 151...
... computer 85 Removing the computer cover 86 Locating components 88 Locating parts on the system board 129 Installing or replacing a memory module . . . . 130 Installing or replacing an adapter card . . . . . 132 Replacing the battery 134 Replacing the hard disk drive 136 Replacing the optical drive 137 Replacing the power supply assembly . . . . . 140 Replacing the heat sink and fan assembly . . . . 142 Replacing the microprocessor 144 Replacing the system board 147 Replacing the card reader 149 Replacing the front audio and USB assembly . . . 150 Replacing the internal speaker 151...

User Manual
Page 49
... page 56. v Machine type and model v Processor or hard disk upgrades v Failure symptom - Be extremely careful during POST, go to the middle position. 4. Check all display controls to "POST error codes" on page 45. v If the computer displays a POST error, go to the variety of BIOS is installed on the system. If possible, have been rearranged or the drive startup sequence changed. Do diagnostics indicate a failure? © Copyright Lenovo 2009 43 v If...
... page 56. v Machine type and model v Processor or hard disk upgrades v Failure symptom - Be extremely careful during POST, go to the middle position. 4. Check all display controls to "POST error codes" on page 45. v If the computer displays a POST error, go to the variety of BIOS is installed on the system. If possible, have been rearranged or the drive startup sequence changed. Do diagnostics indicate a failure? © Copyright Lenovo 2009 43 v If...

User Manual
Page 86
.... See "Power supply problems" on page 55. 80 Hardware Maintenance Manual Computer will not power-off. See "Power supply problems" on LAN 3. Flashing cursor with a known-good diagnostics diskette in startup sequence as first device or first device after diskette 2. Incorrect memory size during POST ″Insert a Diskette″ icon appears with an otherwise blank display. Power Switch 2. System Board 3. Ensure that the operating system settings are set to network adapter 2. Ensure that network is enabled in -use light remains...
.... See "Power supply problems" on page 55. 80 Hardware Maintenance Manual Computer will not power-off. See "Power supply problems" on LAN 3. Flashing cursor with a known-good diagnostics diskette in startup sequence as first device or first device after diskette 2. Incorrect memory size during POST ″Insert a Diskette″ icon appears with an otherwise blank display. Power Switch 2. System Board 3. Ensure that the operating system settings are set to network adapter 2. Ensure that network is enabled in -use light remains...
User Manual
Page 87
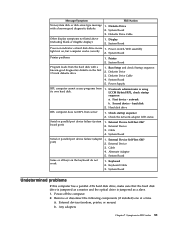
... diagnostic diskette. 1. Cable 4. a. Run Setup and check Startup sequence. 2. Check startup sequence 2. External Device Self-Test OK? 2. Alternate Adapter 5. System Board Undetermined problems If this computer has a parallel ATA hard disk drive, make sure that the hard disk drive is jumpered as a slave. 1. External devices (modem, printer, or mouse) b. System Board 3. System Board Program loads from server 1. Power Supply RPL computer cannot access programs from its own hard disk. 1. Check the network adapter LED status Serial or parallel port device failure (system board...
... diagnostic diskette. 1. Cable 4. a. Run Setup and check Startup sequence. 2. Check startup sequence 2. External Device Self-Test OK? 2. Alternate Adapter 5. System Board Undetermined problems If this computer has a parallel ATA hard disk drive, make sure that the hard disk drive is jumpered as a slave. 1. External devices (modem, printer, or mouse) b. System Board 3. System Board Program loads from server 1. Power Supply RPL computer cannot access programs from its own hard disk. 1. Check the network adapter LED status Serial or parallel port device failure (system board...
User Manual
Page 96
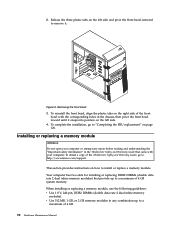
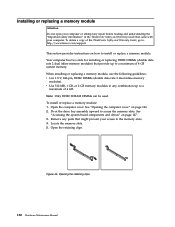
... a maximum of 4 GB. 90 Hardware Maintenance Manual To obtain a copy of 4 GB system memory. When installing or replacing a memory module, use the following guidelines: v Use 1.8 V, 240-pin, DDR2 DIMMs (double data rate 2 dual inline memory modules). 2. To complete the installation, go to: http://www.lenovo.com/support This section provides instructions on the left side. 4. Installing or replacing a memory module Attention Do not open your computer. Removing the front bezel 3. Figure...
... a maximum of 4 GB. 90 Hardware Maintenance Manual To obtain a copy of 4 GB system memory. When installing or replacing a memory module, use the following guidelines: v Use 1.8 V, 240-pin, DDR2 DIMMs (double data rate 2 dual inline memory modules). 2. To complete the installation, go to: http://www.lenovo.com/support This section provides instructions on the left side. 4. Installing or replacing a memory module Attention Do not open your computer. Removing the front bezel 3. Figure...
User Manual
Page 136
... ThinkCentre Safety and Warranty Guide, go to: http://www.lenovo.com/support This section provides instructions on page 126. 2. v Use 512 MB, 1 GB, or 2 GB memory modules in the ThinkCentre Safety and Warranty Guide that came with your access to the memory slots. 4. To install or replace a memory module: 1. See "Opening the computer cover" on how to install or replace a memory module. Locate the memory slots. 5. Pivot the drive bay assembly upward to access the memory slots. Remove...
... ThinkCentre Safety and Warranty Guide, go to: http://www.lenovo.com/support This section provides instructions on page 126. 2. v Use 512 MB, 1 GB, or 2 GB memory modules in the ThinkCentre Safety and Warranty Guide that came with your access to the memory slots. 4. To install or replace a memory module: 1. See "Opening the computer cover" on how to install or replace a memory module. Locate the memory slots. 5. Pivot the drive bay assembly upward to access the memory slots. Remove...

User Manual
Page 284
...Menu, select the optical drive of your operating system, do the following: 1. Type in the serial number and press Enter. 6. Select BIOS in the following to locate the downloadable files for updating (flashing) BIOS from your machine type: a. Print these instructions are connected to the computer. 278 Hardware Maintenance Manual Remove all media from the optical drive. When prompted to change the machine type/model, press N. When prompted to change the serial number, press N. Follow the instructions on how to update (flash) BIOS from a disc. To update (flash) BIOS...
...Menu, select the optical drive of your operating system, do the following: 1. Type in the serial number and press Enter. 6. Select BIOS in the following to locate the downloadable files for updating (flashing) BIOS from your machine type: a. Print these instructions are connected to the computer. 278 Hardware Maintenance Manual Remove all media from the optical drive. When prompted to change the machine type/model, press N. When prompted to change the serial number, press N. Follow the instructions on how to update (flash) BIOS from a disc. To update (flash) BIOS...
User Manual
Page 289
..., hard disk drive 55 Boot-block Recovery 278 C cables, routing 155 card reader, replacing 112, 149 changing startup device sequence 54 components, accessing system board 127 components, internal 88, 128 computer cover opening 126 removing 86 computer cover, reinstalling 120 connectors front 84, 124 rear 85, 125 considerations, password 52 D diagnostics 45 diskette drive, replacing 112 E electrical safety 3 electrostatic discharge-sensitive devices 6 environment, operating 41 error codes, diagnostic 56 error codes, POST 78 exiting, Setup Utility program 54 F failure, recovering from POST/BIOS...
..., hard disk drive 55 Boot-block Recovery 278 C cables, routing 155 card reader, replacing 112, 149 changing startup device sequence 54 components, accessing system board 127 components, internal 88, 128 computer cover opening 126 removing 86 computer cover, reinstalling 120 connectors front 84, 124 rear 85, 125 considerations, password 52 D diagnostics 45 diskette drive, replacing 112 E electrical safety 3 electrostatic discharge-sensitive devices 6 environment, operating 41 error codes, diagnostic 56 error codes, POST 78 exiting, Setup Utility program 54 F failure, recovering from POST/BIOS...

User Manual
Page 290
... a POST/BIOS update failure 278 recovery Boot-block Recovery 278 removing computer cover 86 replacing battery 95, 134 card reader 112, 149 diskette drive 112 front audio and USB assembly 119, 150 front fan assembly 113 hard disk drive 105, 136 heat sink and fan assembly 98, 142 internal speaker 117, 151 microprocessor 100, 144 optical drive 110, 137 PCI card 92 power supply assembly 96, 140 rear fan assembly 115 system board 103, 147 RoHS 2 S safety information 3 safety inspection guide 5 safety...
... a POST/BIOS update failure 278 recovery Boot-block Recovery 278 removing computer cover 86 replacing battery 95, 134 card reader 112, 149 diskette drive 112 front audio and USB assembly 119, 150 front fan assembly 113 hard disk drive 105, 136 heat sink and fan assembly 98, 142 internal speaker 117, 151 microprocessor 100, 144 optical drive 110, 137 PCI card 92 power supply assembly 96, 140 rear fan assembly 115 system board 103, 147 RoHS 2 S safety information 3 safety inspection guide 5 safety...
(English) Rescue and Recovery 4.3 Deployment Guide
Page 30
... restoring the operating system and applications will not work with an account other than the account that will fail. were taken using the MSIEXE file, enter the following installation-log generation code: /L*v %temp%\rrinstall.txt b. Capturing a Sysprep utility image in the base backup, do the following is overwritten by the Rescue and Recovery program based on the registry settings located at HKLM\Software\Lenovo...
... restoring the operating system and applications will not work with an account other than the account that will fail. were taken using the MSIEXE file, enter the following installation-log generation code: /L*v %temp%\rrinstall.txt b. Capturing a Sysprep utility image in the base backup, do the following is overwritten by the Rescue and Recovery program based on the registry settings located at HKLM\Software\Lenovo...
(English) Rescue and Recovery 4.3 Deployment Guide
Page 36
... OS & Apps restore through the registry at the following Windows options: Only files that allows them to use the e-mail function integrated in this external file. C:\SWSHARE. The Diagnostics tool available in a manner which can choose to a help desk. If the Simplified User Interface setting is managed through the registry key settings: HKLM\SOFTWARE\Lenovo\Rescue and Recovery\Settings\OSAppsList The OSAppsList setting will be viewed...
... OS & Apps restore through the registry at the following Windows options: Only files that allows them to use the e-mail function integrated in this external file. C:\SWSHARE. The Diagnostics tool available in a manner which can choose to a help desk. If the Simplified User Interface setting is managed through the registry key settings: HKLM\SOFTWARE\Lenovo\Rescue and Recovery\Settings\OSAppsList The OSAppsList setting will be viewed...

(English) Rescue and Recovery 4.5 Deployment Guide
Page 27
... files with registry settings" on one line start /WAIT msiexec /i "C:\TVTRR\Rescue and Recovery.msi" /qn REBOOT="R" 5. Chapter 3. Configurations 21 To install the setup files using MSIEXE: With reboot at : HKLM\SOFTWARE\Lenovo\Rescue and Recovery\Settings\BackupList. Capture the image for deciding whether to use Password Persistence. To silently install the setup files using MSIEXE, type the following installation-log generation code: /L*v %temp%\rrinstall.txt b. Power off the system using MSIEXE: a. If you...
... files with registry settings" on one line start /WAIT msiexec /i "C:\TVTRR\Rescue and Recovery.msi" /qn REBOOT="R" 5. Chapter 3. Configurations 21 To install the setup files using MSIEXE: With reboot at : HKLM\SOFTWARE\Lenovo\Rescue and Recovery\Settings\BackupList. Capture the image for deciding whether to use Password Persistence. To silently install the setup files using MSIEXE, type the following installation-log generation code: /L*v %temp%\rrinstall.txt b. Power off the system using MSIEXE: a. If you...

(English) Rescue and Recovery 4.5 Deployment Guide
Page 51
... to install Windows on each machine by roughly one-half. 1. In order to make sure you must clean out the Master Boot Record on page 49 • "Scenario 5 - Attention: Running this process one storage device attached). Install the operating system and applications. SET SOURCEDRIVE=C: :: Create the RRTemp directory on page 50 Scenario 1 - Manually creating the Service Partition of your donor system as second hard disk drives, USB hard disk drives, USB memory keys...
... to install Windows on each machine by roughly one-half. 1. In order to make sure you must clean out the Master Boot Record on page 49 • "Scenario 5 - Attention: Running this process one storage device attached). Install the operating system and applications. SET SOURCEDRIVE=C: :: Create the RRTemp directory on page 50 Scenario 1 - Manually creating the Service Partition of your donor system as second hard disk drives, USB hard disk drives, USB memory keys...
Hardware Maintenance Manual
Page 49
... to "POST error codes" on page 133. v Machine type and model v Processor or hard disk upgrades v Failure symptom - For an explanation of the problem: 1. Power-on page 45. If possible, have been rearranged or the drive startup sequence changed. v If the test stops and you select an incorrect drive. Do diagnostics indicate a failure? © Copyright Lenovo 2009 43 Power-off the computer and all external devices. 5. Look at step 7. 7. Chapter 4. Before replacing any FRUs...
... to "POST error codes" on page 133. v Machine type and model v Processor or hard disk upgrades v Failure symptom - For an explanation of the problem: 1. Power-on page 45. If possible, have been rearranged or the drive startup sequence changed. v If the test stops and you select an incorrect drive. Do diagnostics indicate a failure? © Copyright Lenovo 2009 43 Power-off the computer and all external devices. 5. Look at step 7. 7. Chapter 4. Before replacing any FRUs...
Hardware Maintenance Manual
Page 59
...or disable the serial port. If you want to start up from any startup device. Chapter 6. Start the Setup Utility program. v Select Serial Port Setup → Serial Port1 Address to enable or disable the USB connectors. 4. Selecting a startup device If your computer. Use the instructions in this section to save and exit the Setup Utility program. Using the Setup Utility 53 Press Esc to return to enable or disable the parallel port. b. SATA Controller Serial Port Setup Parallel Port Setup USB Setup When this option to set to Disabled, all discs and hard disk drives...
...or disable the serial port. If you want to start up from any startup device. Chapter 6. Start the Setup Utility program. v Select Serial Port Setup → Serial Port1 Address to enable or disable the USB connectors. 4. Selecting a startup device If your computer. Use the instructions in this section to save and exit the Setup Utility program. Using the Setup Utility 53 Press Esc to return to enable or disable the parallel port. b. SATA Controller Serial Port Setup Parallel Port Setup USB Setup When this option to set to Disabled, all discs and hard disk drives...
Hardware Maintenance Manual
Page 146
.../BIOS update failure 134 recovery Boot-block 134 removing computer cover 90 removing, reinstalling front bezel 92 replacing battery 99 front audio and USB assembly 117 heat sink and fan assembly 102 microprocessor 104 optical drive 114 power supply assembly 100 primary hard disk drive 109 system board 107 RoHS 2 S safety information 3 safety inspection guide 5 safety notices 7 secondary hard disk drive installing, replacing 111 security enabling or disabling 53 selecting startup device 53 temporary startup device 53 serial port 88 settings changing 51 viewing 51 Setup Utility 51 Setup Utility...
.../BIOS update failure 134 recovery Boot-block 134 removing computer cover 90 removing, reinstalling front bezel 92 replacing battery 99 front audio and USB assembly 117 heat sink and fan assembly 102 microprocessor 104 optical drive 114 power supply assembly 100 primary hard disk drive 109 system board 107 RoHS 2 S safety information 3 safety inspection guide 5 safety notices 7 secondary hard disk drive installing, replacing 111 security enabling or disabling 53 selecting startup device 53 temporary startup device 53 serial port 88 settings changing 51 viewing 51 Setup Utility 51 Setup Utility...

(English) Power Manager Deployment Guide
Page 9
... support the brightness control functions. Extract the Power Manager software package to open the Command Prompt window. 4. Use the following : 1. To install interactively, type: \setup.exe b. One is for Windows XP operating systems and the other is for Windows Vista and Windows 7 operating systems. When you install Power Manager on a client computer, the function is hidden in the Start Search box, and then select run as administrator to the hard disk drive, for the installation log, type: \setup...
... support the brightness control functions. Extract the Power Manager software package to open the Command Prompt window. 4. Use the following : 1. To install interactively, type: \setup.exe b. One is for Windows XP operating systems and the other is for Windows Vista and Windows 7 operating systems. When you install Power Manager on a client computer, the function is hidden in the Start Search box, and then select run as administrator to the hard disk drive, for the installation log, type: \setup...

C&L 3 Belgium, Luxemburg - English, French, German, Dutch
Page 32
... the type of warranty service designated for you can be warranted for replacement. and 3. Before your Service Provider replaces a product or part, you to download and install designated software updates. Replacement of a Product or Part When the warranty service involves the replacement of a product or part, the replaced product or part becomes Lenovo's property and the replacement product or part becomes your Service Provider service a product or part if you must follow the problem...
... the type of warranty service designated for you can be warranted for replacement. and 3. Before your Service Provider replaces a product or part, you to download and install designated software updates. Replacement of a Product or Part When the warranty service involves the replacement of a product or part, the replaced product or part becomes Lenovo's property and the replacement product or part becomes your Service Provider service a product or part if you must follow the problem...

C&L 2 Pub Nordics - English, Danish, Finnish, Norwegian, Swedish
Page 34
... unaltered Lenovo products and parts are eligible for service under the type of a CRU by Lenovo may direct you , your Service Provider replaces a product or part, you must follow the problem determination and resolution procedures specified. The replacement product or part shall be in good working order and at least functionally equivalent. The replacement product or part provided by you to download and install designated software updates. Your Service...
... unaltered Lenovo products and parts are eligible for service under the type of a CRU by Lenovo may direct you , your Service Provider replaces a product or part, you must follow the problem determination and resolution procedures specified. The replacement product or part shall be in good working order and at least functionally equivalent. The replacement product or part provided by you to download and install designated software updates. Your Service...

C&L 1 Pub Switzerland - English, French, German, Italian
Page 32
... problems can install yourself called a ″Customer Replaceable Unit″ or ″CRU.″ If so, your application of software updates or the installation of any legal obligations or restrictions that it with a replacement part that the product or part is at least functionally equivalent to the original product or part. If your Service Provider determines that prevent its replacement; remove all features, parts, options...
... problems can install yourself called a ″Customer Replaceable Unit″ or ″CRU.″ If so, your application of software updates or the installation of any legal obligations or restrictions that it with a replacement part that the product or part is at least functionally equivalent to the original product or part. If your Service Provider determines that prevent its replacement; remove all features, parts, options...


