

Troubleshooting Guide
Page 30
... and then press NmLk (ScrLk). If these items are correct, have the computer serviced. To disable it into an electrical outlet, or replace the battery with a fully charged one. 20 ThinkPad® T61 Service and Troubleshooting Guide Sleep (standby) or hibernation problems Problem: Solution: Problem: Solution: The computer enters sleep (standby) mode (the sleep...
... and then press NmLk (ScrLk). If these items are correct, have the computer serviced. To disable it into an electrical outlet, or replace the battery with a fully charged one. 20 ThinkPad® T61 Service and Troubleshooting Guide Sleep (standby) or hibernation problems Problem: Solution: Problem: Solution: The computer enters sleep (standby) mode (the sleep...

Troubleshooting Guide
Page 42
Slide the battery into the computer 2 . 2 32 ThinkPad® T61 Service and Troubleshooting Guide Align the battery as follows: a. Replacing the battery Note: If your computer is a ThinkPad T61 14.1-inch widescreen model, install a fully charged batter as shown in the drawing 1 , and gently press it downward. 1 b.
Slide the battery into the computer 2 . 2 32 ThinkPad® T61 Service and Troubleshooting Guide Align the battery as follows: a. Replacing the battery Note: If your computer is a ThinkPad T61 14.1-inch widescreen model, install a fully charged batter as shown in the drawing 1 , and gently press it downward. 1 b.

Troubleshooting Guide
Page 44
...physical shocks. Before removing the hard disk drive, make a backup copy of all cables from the computer. 2. Turn off . Remove the battery. 4. Upgrading the hard disk drive Attention Handling a hard disk drive v Do not drop the drive or subject it to the cover of data on...that absorbs the physical shock. For 14.1-inch widescreen models: For 14.1-inch screen and 15.4-inch widescreen models: 34 ThinkPad® T61 Service and Troubleshooting Guide To replace the hard disk drive, do the following: 1. Incorrect handling can cause damage and permanent loss of the drive. Close...
...physical shocks. Before removing the hard disk drive, make a backup copy of all cables from the computer. 2. Turn off . Remove the battery. 4. Upgrading the hard disk drive Attention Handling a hard disk drive v Do not drop the drive or subject it to the cover of data on...that absorbs the physical shock. For 14.1-inch widescreen models: For 14.1-inch screen and 15.4-inch widescreen models: 34 ThinkPad® T61 Service and Troubleshooting Guide To replace the hard disk drive, do the following: 1. Incorrect handling can cause damage and permanent loss of the drive. Close...
Troubleshooting Guide
Page 48
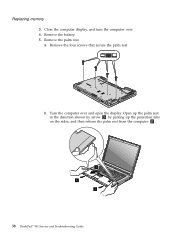
b. Turn the computer over . 4. Remove the four screws that secure the palm rest. Remove the palm rest. a. Open up the palm rest in the direction shown by arrow 1 by picking up the projection tabs on the sides, and then release the palm rest from the computer 2 . 1 2 2 38 ThinkPad® T61 Service and Troubleshooting Guide Remove the battery. 5. Close the computer display, and turn the computer over and open the display. Replacing memory 3.
b. Turn the computer over . 4. Remove the four screws that secure the palm rest. Remove the palm rest. a. Open up the palm rest in the direction shown by arrow 1 by picking up the projection tabs on the sides, and then release the palm rest from the computer 2 . 1 2 2 38 ThinkPad® T61 Service and Troubleshooting Guide Remove the battery. 5. Close the computer display, and turn the computer over and open the display. Replacing memory 3.

Troubleshooting Guide
Page 52
d. The Rescue and Recovery screen opens. 3. To make sure that the SO-DIMM is displayed. 42 ThinkPad® T61 Service and Troubleshooting Guide Turn the computer on. 2. Reinstall the four screws for the palm rest. 9. While the "To interrupt normal startup, ... palm rest until it clicks into place. The System Restart Required window is installed correctly, do as follows: 1. Turn the computer over . Replacing memory c. Reinstall the battery. 10. Push the front side of the screen, press the ThinkVantage button. Close the computer display, and turn the computer over , and ...
d. The Rescue and Recovery screen opens. 3. To make sure that the SO-DIMM is displayed. 42 ThinkPad® T61 Service and Troubleshooting Guide Turn the computer on. 2. Reinstall the four screws for the palm rest. 9. While the "To interrupt normal startup, ... palm rest until it clicks into place. The System Restart Required window is installed correctly, do as follows: 1. Turn the computer over . Replacing memory c. Reinstall the battery. 10. Push the front side of the screen, press the ThinkVantage button. Close the computer display, and turn the computer over , and ...

Troubleshooting Guide
Page 64
... Parts and Labor - 4 years Battery pack - 1 year Other Parts and Labor - 4 years Battery pack - 1 year 6462, 6468 All Parts and Labor - 4 years Battery pack - 1 year 6471 Korea Parts and Labor - 1 years Battery pack - 1 year Types of Warranty Service 3 1 3 1 3 1 4 1 3 1 2 1 4 1 3 1 3 1 2 1 3 1 3 1 4 1 3 1 2 1 3 1 Types of warranty service 1. Customer Replaceable Unit (″CRU″) Service 54 ThinkPad® T61 Service and Troubleshooting Guide
... Parts and Labor - 4 years Battery pack - 1 year Other Parts and Labor - 4 years Battery pack - 1 year 6462, 6468 All Parts and Labor - 4 years Battery pack - 1 year 6471 Korea Parts and Labor - 1 years Battery pack - 1 year Types of Warranty Service 3 1 3 1 3 1 4 1 3 1 2 1 4 1 3 1 3 1 2 1 3 1 3 1 4 1 3 1 2 1 3 1 Types of warranty service 1. Customer Replaceable Unit (″CRU″) Service 54 ThinkPad® T61 Service and Troubleshooting Guide
Troubleshooting Guide
Page 68
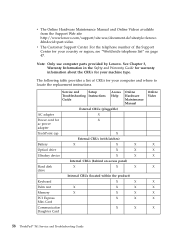
...where to locate the replacement instructions. For the ... Center for X ac power adapter TrackPoint cap X External CRUs (with latches) Battery X X X Optical drive X X Ultrabay device X X Internal CRUs (behind...Card X X Online Video X X X X X X X X X 58 ThinkPad® T61 Service and Troubleshooting Guide Service and Setup Troubleshooting Instructions Guide Access Help Online Hardware Maintenance ...Lenovo. v The Online Hardware Maintenance Manual and Online Videos available from the Support Web site http://www.lenovo.com/support/site.wss/document.do?sitestyle=lenovo...
...where to locate the replacement instructions. For the ... Center for X ac power adapter TrackPoint cap X External CRUs (with latches) Battery X X X Optical drive X X Ultrabay device X X Internal CRUs (behind...Card X X Online Video X X X X X X X X X 58 ThinkPad® T61 Service and Troubleshooting Guide Service and Setup Troubleshooting Instructions Guide Access Help Online Hardware Maintenance ...Lenovo. v The Online Hardware Maintenance Manual and Online Videos available from the Support Web site http://www.lenovo.com/support/site.wss/document.do?sitestyle=lenovo...


