

Hardware Maintenance Manual
Page 14
...Disconnect 1. First, attach all cables from devices. 8 Hardware Maintenance Manual Turn everything OFF. 2. Remove all cables to devices. 3. v When possible, use one hand only to outlet. 5. v Never turn on this product. Turn everything OFF. 2. Attach power cords to connect or disconnect signal cables.... 1. Remove signal cables from outlet. 3. v Connect and disconnect cables as described in the installation and configuration procedures. Turn device ON. v Connect to properly wired outlets any equipment when there is evidence of fire, water, or structural damage.
...Disconnect 1. First, attach all cables from devices. 8 Hardware Maintenance Manual Turn everything OFF. 2. Remove all cables to devices. 3. v When possible, use one hand only to outlet. 5. v Never turn on this product. Turn everything OFF. 2. Attach power cords to connect or disconnect signal cables.... 1. Remove signal cables from outlet. 3. v Connect and disconnect cables as described in the installation and configuration procedures. Turn device ON. v Connect to properly wired outlets any equipment when there is evidence of fire, water, or structural damage.

Hardware Maintenance Manual
Page 16
To remove all electrical current from the device, ensure that all power cords are disconnected from the power source. 2 1 10 Hardware Maintenance Manual CAUTION: The power control button on the device and the power switch on the power supply do not turn off the electrical current supplied to the device. The device also might have more than one power cord.
To remove all electrical current from the device, ensure that all power cords are disconnected from the power source. 2 1 10 Hardware Maintenance Manual CAUTION: The power control button on the device and the power switch on the power supply do not turn off the electrical current supplied to the device. The device also might have more than one power cord.
Hardware Maintenance Manual
Page 52
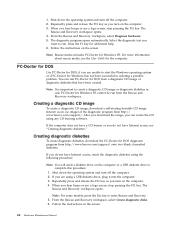
...-Doctor for DOS diagnostic program from the Rescue and Recovery workspace. Shut down the operating system and turn on the computer or a USB diskette drive to run PC-Doctor for DOS from http:// www.lenovo.com/support/. When you hear beeps or see a logo screen, stop pressing the F11 key. The... some models, press the Esc key to start the Windows operating system or if PC-Doctor for Windows PE cannot be run from http://www.lenovo.com/support/ onto two blank, formatted diskettes. Repeatedly press and release the F11 key as an .iso image) of the diagnostic program from a ...
...-Doctor for DOS diagnostic program from the Rescue and Recovery workspace. Shut down the operating system and turn on the computer or a USB diskette drive to run PC-Doctor for DOS from http:// www.lenovo.com/support/. When you hear beeps or see a logo screen, stop pressing the F11 key. The... some models, press the Esc key to start the Windows operating system or if PC-Doctor for Windows PE cannot be run from http://www.lenovo.com/support/ onto two blank, formatted diskettes. Repeatedly press and release the F11 key as an .iso image) of the diagnostic program from a ...

Hardware Maintenance Manual
Page 53
...: If the diagnostic program does not start, you want to run all categories. Note: If you are four ways to run. v The Enter key is turned off. 2. v Press F5 to select a menu item. When the operation is used to automatically run the diagnostic tests. Restart the computer. Navigating through the diagnostics...
...: If the diagnostic program does not start, you want to run all categories. Note: If you are four ways to run. v The Enter key is turned off. 2. v Press F5 to select a menu item. When the operation is used to automatically run the diagnostic tests. Restart the computer. Navigating through the diagnostics...
Hardware Maintenance Manual
Page 57
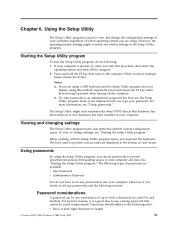
... and changing settings The Setup Utility program menu lists items that hardware has been removed or new hardware has been installed in length © Lenovo 2005, 2008. The keys used to your computer is a good idea to the following sections. The following : 1. However, if you ...automatically when POST detects that identify system configuration topics. b. See "Starting the Setup Utility program." For security reasons, it pressed when turning on the computer. However, the operating-system settings might start this method, repeatedly press and release the F1 key rather than leaving ...
... and changing settings The Setup Utility program menu lists items that hardware has been removed or new hardware has been installed in length © Lenovo 2005, 2008. The keys used to your computer is a good idea to the following sections. The following : 1. However, if you ...automatically when POST detects that identify system configuration topics. b. See "Starting the Setup Utility program." For security reasons, it pressed when turning on the computer. However, the operating-system settings might start this method, repeatedly press and release the F1 key rather than leaving ...
Hardware Maintenance Manual
Page 59
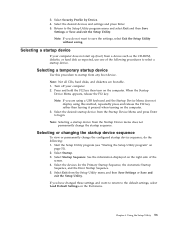
... and the Error Startup Sequence. 5. If you do the following procedures to select a startup device. Chapter 6. Press and hold the F12 key then turn on the right side of the following : 1. Select the desired devices and settings and press Enter. 5. Note: Not all CDs, hard disks, ...displayed on the computer. Selecting a temporary startup device Use this method, repeatedly press and release the F12 key rather than leaving it pressed when turning on page 51). 2. When the Startup Device Menu appears, release the F12 key. Start the Setup Utility program (see "Starting the Setup ...
... and the Error Startup Sequence. 5. If you do the following procedures to select a startup device. Chapter 6. Press and hold the F12 key then turn on the right side of the following : 1. Select the desired devices and settings and press Enter. 5. Note: Not all CDs, hard disks, ...displayed on the computer. Selecting a temporary startup device Use this method, repeatedly press and release the F12 key rather than leaving it pressed when turning on page 51). 2. When the Startup Device Menu appears, release the F12 key. Start the Setup Utility program (see "Starting the Setup ...
Hardware Maintenance Manual
Page 84
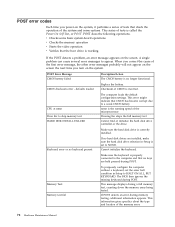
.... 78 Hardware Maintenance Manual nnnn is working If the POST detects a problem, an error message appears on the screen. POST error codes Each time you turn on the system.
.... 78 Hardware Maintenance Manual nnnn is working If the POST detects a problem, an error message appears on the screen. POST error codes Each time you turn on the system.
Hardware Maintenance Manual
Page 91
... the cover. Remove any media (diskettes, CDs, or tapes) from electrical outlets. 3. Disconnect all power cords from the drives, shut down the operating system, and turn off all attached devices. 2. Replacing FRUs - This procedure describes how to the rear. Remove any locking devices such as a padlock that are connected to the...
... the cover. Remove any media (diskettes, CDs, or tapes) from electrical outlets. 3. Disconnect all power cords from the drives, shut down the operating system, and turn off all attached devices. 2. Replacing FRUs - This procedure describes how to the rear. Remove any locking devices such as a padlock that are connected to the...
Hardware Maintenance Manual
Page 100
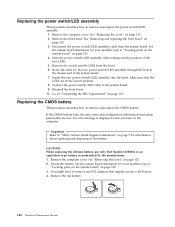
... that were removed. Locate the battery. Install the new battery. 6. Go to the battery. 4. An error message is displayed when you turn on page 87. 3. See the system board illustration for information about replacing and disposing of the battery. This procedure describes how to "Safety...for your machine type at "Locating parts on the system board" on the computer. Remove the old battery. 5. Remove the cover. This is turned on for the first time after replacing the battery. 7. Replacing the CMOS battery If the CMOS battery fails, the date, time, and configuration...
... that were removed. Locate the battery. Install the new battery. 6. Go to the battery. 4. An error message is displayed when you turn on page 87. 3. See the system board illustration for information about replacing and disposing of the battery. This procedure describes how to "Safety...for your machine type at "Locating parts on the system board" on the computer. Remove the old battery. 5. Remove the cover. This is turned on for the first time after replacing the battery. 7. Replacing the CMOS battery If the CMOS battery fails, the date, time, and configuration...
Hardware Maintenance Manual
Page 126
Also, depending on the FRU that is secured with the drive bay assembly. If the cover is replaced, you might need to turn on the sides of the cover engage the rails and push the cover to avoid interference with thumbscrews, install them. 5. See "Rear connectors" on ... update (flash) the BIOS. See Chapter 6, "Using the Setup Utility," on page 84. 6. Ensure that the rail guides on for a few seconds and then turn off. Keep cables clear of the hinges and sides of the computer cover. Reposition any cables, including telephone lines and power cords. Position the computer...
Also, depending on the FRU that is secured with the drive bay assembly. If the cover is replaced, you might need to turn on the sides of the cover engage the rails and push the cover to avoid interference with thumbscrews, install them. 5. See "Rear connectors" on ... update (flash) the BIOS. See Chapter 6, "Using the Setup Utility," on page 84. 6. Ensure that the rail guides on for a few seconds and then turn off. Keep cables clear of the hinges and sides of the computer cover. Reposition any cables, including telephone lines and power cords. Position the computer...
Hardware Maintenance Manual
Page 129
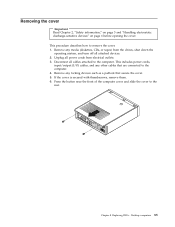
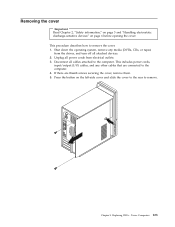
... slide the cover to the rear to remove the cover. 1. If there are connected to the computer. Unplug all power cords from the drives, and turn off all cables attached to the computer. 4. Press the button on page 6 before opening the cover. Chapter 9. This procedure describes how to remove. Replacing FRUs...
... slide the cover to the rear to remove the cover. 1. If there are connected to the computer. Unplug all power cords from the drives, and turn off all cables attached to the computer. 4. Press the button on page 6 before opening the cover. Chapter 9. This procedure describes how to remove. Replacing FRUs...
Hardware Maintenance Manual
Page 166
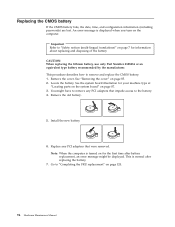
... bezel. Replacing the CMOS battery This procedure describes how to "Safety notices (multi-lingual translations)" on page 161. An error message is displayed when you turn on page 128 3. See "Removing the cover" on page 123. 2. Important Refer to remove and replace the CMOS battery. See "Removing the cover" on page...
... bezel. Replacing the CMOS battery This procedure describes how to "Safety notices (multi-lingual translations)" on page 161. An error message is displayed when you turn on page 128 3. See "Removing the cover" on page 123. 2. Important Refer to remove and replace the CMOS battery. See "Removing the cover" on page...
Hardware Maintenance Manual
Page 167
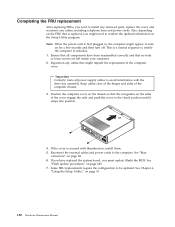
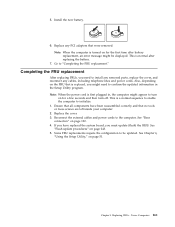
...displayed. Ensure that all components have replaced the system board, you must update (flash) the BIOS. Chapter 9. Note: When the power cord is turned on page 122. 4. See "Flash update procedures" on page 51. See Chapter 6, "Using the Setup Utility," on page 243. 5. Some ...When the computer is first plugged in the Setup Utility program. Replace the cover. 3. See "Rear connectors" on for a few seconds and then turn on for the first time after replacing the battery. 7. Install the new battery. 6. Replace any cables, including telephone lines and power cords. ...
...displayed. Ensure that all components have replaced the system board, you must update (flash) the BIOS. Chapter 9. Note: When the power cord is turned on page 122. 4. See "Flash update procedures" on page 51. See Chapter 6, "Using the Setup Utility," on page 243. 5. Some ...When the computer is first plugged in the Setup Utility program. Replace the cover. 3. See "Rear connectors" on for a few seconds and then turn on for the first time after replacing the battery. 7. Install the new battery. 6. Replace any cables, including telephone lines and power cords. ...

Hardware Maintenance Manual
Page 193
... 65Y 67S 67D 67Y 68S 68D 68Y 83S 83D 83Y 92S 92D 92Y 5BG 5CG 5DG 6BG 6CG 6DG) 9 System board, Intel 945GC 667 support (turn on slowly fixed) GA Level (models 42B 42H 62S 62D 62Y 63B 63H 23S 72S 72D 72Y 39B 39H 56B 56H 57S 57D 57Y 58S...
... 65Y 67S 67D 67Y 68S 68D 68Y 83S 83D 83Y 92S 92D 92Y 5BG 5CG 5DG 6BG 6CG 6DG) 9 System board, Intel 945GC 667 support (turn on slowly fixed) GA Level (models 42B 42H 62S 62D 62Y 63B 63H 23S 72S 72D 72Y 39B 39H 56B 56H 57S 57D 57Y 58S...

Hardware Maintenance Manual
Page 250
... from a POST/BIOS update failure Attention: If an interruption occurs during startup, press the Ctrl and Home keys (Ctrl + Home) at http://www.lenovo.com/support on your computer and then press Enter. 5. During this occurs, perform the following procedure (also known as a Boot-block recovery). To ... and then press Enter. 3. If this time you are available at the same time. 3. When you will automatically begin recovering the BIOS. Turn the computer off and insert a system program update (flash diskette). Insert the CD-ROM into the optical drive. The computer will see a ...
... from a POST/BIOS update failure Attention: If an interruption occurs during startup, press the Ctrl and Home keys (Ctrl + Home) at http://www.lenovo.com/support on your computer and then press Enter. 5. During this occurs, perform the following procedure (also known as a Boot-block recovery). To ... and then press Enter. 3. If this time you are available at the same time. 3. When you will automatically begin recovering the BIOS. Turn the computer off and insert a system program update (flash diskette). Insert the CD-ROM into the optical drive. The computer will see a ...
Hardware Maintenance Manual
Page 251
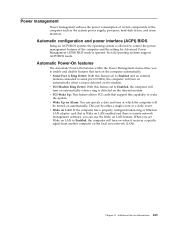
...With this feature set to Enabled and an external modem connected to serial port (COM1), the computer will turn on automatically when a ring is detected on LAN to Enabled, the computer will turn on automatically when a ring is detected on the local area network (LAN). v PCI Wake Up: This...supply, processor, hard disk drives, and some monitors. This can specify a date and time at which the computer will turn on automatically. v Wake Up on Alarm: You can be turned on the computer automatically. v Wake on LAN: If the computer has a properly configured token-ring or Ethernet LAN ...
...With this feature set to Enabled and an external modem connected to serial port (COM1), the computer will turn on automatically when a ring is detected on LAN to Enabled, the computer will turn on automatically when a ring is detected on the local area network (LAN). v PCI Wake Up: This...supply, processor, hard disk drives, and some monitors. This can specify a date and time at which the computer will turn on automatically. v Wake Up on Alarm: You can be turned on the computer automatically. v Wake on LAN: If the computer has a properly configured token-ring or Ethernet LAN ...
(English) User guide
Page 5
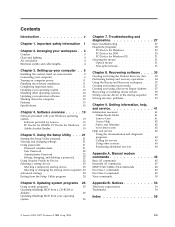
...considerations 21 User Password 22 Administrator Password 22 Setting, changing, and deleting a password . . . 22 Using Security Profile by Lenovo 19 PC Doctor for WINPE, PC Doctor for Windows PE 31 Cleaning the mouse 31 Optical mouse 31 Non-optical mouse 31 Chapter... B. Notices 53 Television output notice 54 Trademarks 54 Index 55 © Lenovo 2005, 2007. Setting up your computer . . 5 Installing the vertical stand on some models. . . . 5 Connecting your computer 6 Turning on computer power 11 Finishing the software installation 11 Completing important tasks 11 ...
...considerations 21 User Password 22 Administrator Password 22 Setting, changing, and deleting a password . . . 22 Using Security Profile by Lenovo 19 PC Doctor for WINPE, PC Doctor for Windows PE 31 Cleaning the mouse 31 Optical mouse 31 Non-optical mouse 31 Chapter... B. Notices 53 Television output notice 54 Trademarks 54 Index 55 © Lenovo 2005, 2007. Setting up your computer . . 5 Installing the vertical stand on some models. . . . 5 Connecting your computer 6 Turning on computer power 11 Finishing the software installation 11 Completing important tasks 11 ...
(English) User guide
Page 11
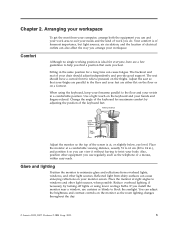
... other equipment you best. Adjust the seat so that suits you use regularly, such as the room lighting changes throughout the day. © Lenovo 2005, 2007. Reflected light from shiny surfaces can adjust the brightness and contrast controls on the thighs. Reduce overhead lighting, if necessary, by... both the equipment you use curtains or blinds to 24 in a comfortable position. Sitting in the same position for maximum comfort by turning off lights or using the keyboard, keep your forearms parallel to twist your needs and the kind of your workspace Comfort To get the...
... other equipment you best. Adjust the seat so that suits you use regularly, such as the room lighting changes throughout the day. © Lenovo 2005, 2007. Reflected light from shiny surfaces can adjust the brightness and contrast controls on the thighs. Reduce overhead lighting, if necessary, by... both the equipment you use curtains or blinds to 24 in a comfortable position. Sitting in the same position for maximum comfort by turning off lights or using the keyboard, keep your forearms parallel to twist your needs and the kind of your workspace Comfort To get the...

(English) User guide
Page 19
...you time and trouble later: v Create rescue media, and either diagnostic diskettes or a diagnostic CD image. Turning on computer power Turn on the monitor and other external devices first, and then turn on this computer. You can cause hardware failures. When the installation is finished, the logo window closes....computer has the multilingual version, you accept the terms of your computer and report operating-system-controlled settings that is turned on page 31 or "Creating and using these programs, you will probably be able to test hardware components of the agreements.
...you time and trouble later: v Create rescue media, and either diagnostic diskettes or a diagnostic CD image. Turning on computer power Turn on the monitor and other external devices first, and then turn on this computer. You can cause hardware failures. When the installation is finished, the logo window closes....computer has the multilingual version, you accept the terms of your computer and report operating-system-controlled settings that is turned on page 31 or "Creating and using these programs, you will probably be able to test hardware components of the agreements.
(English) User guide
Page 20
Lenovo provides a full version of Windows components (such as media player), fixes to other operating systems If you can use to detect and eliminate viruses. After 90 days, you turn off your computer, always follow the instructions that come with the device drivers. Updates could include security fixes, new versions of antivirus software...
Lenovo provides a full version of Windows components (such as media player), fixes to other operating systems If you can use to detect and eliminate viruses. After 90 days, you turn off your computer, always follow the instructions that come with the device drivers. Updates could include security fixes, new versions of antivirus software...


