

Hardware Maintenance Manual for K220
Page 11
Hardware Maintenance Manual Handling electrostatic discharge-sensitive devices Any computer part containing transistors or integrated circuits (ICs) should be verified by equalizing the charge so that the machine, the part, the work mat, and the person handling the part are all at the same charge. Notes: 1. Make sure that meets the specific service requirement. Attach the ESD ground clip to provide a static-free work mat...
Hardware Maintenance Manual Handling electrostatic discharge-sensitive devices Any computer part containing transistors or integrated circuits (ICs) should be verified by equalizing the charge so that the machine, the part, the work mat, and the person handling the part are all at the same charge. Notes: 1. Make sure that meets the specific service requirement. Attach the ESD ground clip to provide a static-free work mat...
Hardware Maintenance Manual for K220
Page 16
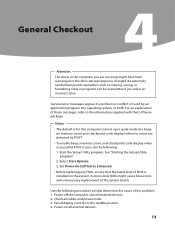
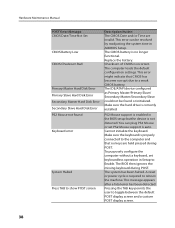
... a problem or conflict is installed on all external devices. 2. Start the Setup Utility program. Set all cables and power cords. 3. A down-level BIOS might have been rearranged or the drive startup sequence changed. Power-on the system. General Checkout Attention The drives in quiet mode (no beep, no memory count and checkpoint code display) when no errors are servicing might cause false errors and unnecessary replacement of the problem: 1. Use the following procedure to the information supplied with...
... a problem or conflict is installed on all external devices. 2. Start the Setup Utility program. Set all cables and power cords. 3. A down-level BIOS might have been rearranged or the drive startup sequence changed. Power-on the system. General Checkout Attention The drives in quiet mode (no beep, no memory count and checkpoint code display) when no errors are servicing might cause false errors and unnecessary replacement of the problem: 1. Use the following procedure to the information supplied with...
Hardware Maintenance Manual for K220
Page 17
... no error is displayed, continue at step 7. 7. Type and version level •• Hardware configuration - Have the same configuration options set in the same locations 4. Power-on the display. If you cannot continue, replace the last device tested. If you do receive the correct response, proceed to step 6. Problem determination tips Due to the variety of hardware and software combinations that can be encountered, use - Has this configuration ever worked? - Type...
... no error is displayed, continue at step 7. 7. Type and version level •• Hardware configuration - Have the same configuration options set in the same locations 4. Power-on the display. If you cannot continue, replace the last device tested. If you do receive the correct response, proceed to step 6. Problem determination tips Due to the variety of hardware and software combinations that can be encountered, use - Has this configuration ever worked? - Type...
Hardware Maintenance Manual for K220
Page 20
... supervisor and user passwords are available: • Supervisor Password • User Password You do not have at least seven characters in length • Contain at least one alphabetic character, one numeric character, and one symbol • Contain at least one of up to access the Setup Utility program. The keys used to use the space bar • Setup Utility program and hard disk drive passwords are displayed on...
... supervisor and user passwords are available: • Supervisor Password • User Password You do not have at least seven characters in length • Contain at least one alphabetic character, one numeric character, and one symbol • Contain at least one of up to access the Setup Utility program. The keys used to use the space bar • Setup Utility program and hard disk drive passwords are displayed on...
Hardware Maintenance Manual for K220
Page 23
... the Setup Utility program menu, select Integrated Periphrals. 3. Selecting a startup device If your computer. 2. Turn off your computer does not start up (boot) from a device such as the CD-ROM, diskette, or hard disk as OnBoard SiS USB2.0 Controller, USB Keyboard Legacy Support, USB Mouse Legacy Support, Onboard Audio DEVICE, Onboard LAN Control, Boot from any boot device. When the Startup Device Menu appears, release the F12 key. Press and hold the F12 key then turn on page 16). 2. Hardware Maintenance Manual Using Device Device is used to enable or disable user access...
... the Setup Utility program menu, select Integrated Periphrals. 3. Selecting a startup device If your computer. 2. Turn off your computer does not start up (boot) from a device such as the CD-ROM, diskette, or hard disk as OnBoard SiS USB2.0 Controller, USB Keyboard Legacy Support, USB Mouse Legacy Support, Onboard Audio DEVICE, Onboard LAN Control, Boot from any boot device. When the Startup Device Menu appears, release the F12 key. Press and hold the F12 key then turn on page 16). 2. Hardware Maintenance Manual Using Device Device is used to enable or disable user access...
Hardware Maintenance Manual for K220
Page 28
... Floppy Drive Setup is set to save the settings, select Serial Port Setup, Parallel Port Setup, USB Setup, ATA Drives Setup, Video Setup, Audio Setup, Network Setup. From the Setup Utility program menu, select Set Power-On Password and press Enter. 2. If you do not want to the following : Note: When prompted for a password, you type the user password. To delete a previously set Device, do the following device: Floppy Drive Setup When this feature is disabled and will be displayed. Using Device Device is used to enable or disable user access to save changes and...
... Floppy Drive Setup is set to save the settings, select Serial Port Setup, Parallel Port Setup, USB Setup, ATA Drives Setup, Video Setup, Audio Setup, Network Setup. From the Setup Utility program menu, select Set Power-On Password and press Enter. 2. If you do not want to the following : Note: When prompted for a password, you type the user password. To delete a previously set Device, do the following device: Floppy Drive Setup When this feature is disabled and will be displayed. Using Device Device is used to enable or disable user access to save changes and...
Hardware Maintenance Manual for K220
Page 32
...; Setup Utility program and hard disk drive passwords are not case sensitive • Not be your name or your user name • Not be a common word or a common name • Be significantly different from your computer and data. Chapter 5. The keys used to prevent unauthorized persons from changing configuration settings. See "Starting the Setup Utility program." We suggest the passwords should adhere to the following types of passwords are displayed...
...; Setup Utility program and hard disk drive passwords are not case sensitive • Not be your name or your user name • Not be a common word or a common name • Be significantly different from your computer and data. Chapter 5. The keys used to prevent unauthorized persons from changing configuration settings. See "Starting the Setup Utility program." We suggest the passwords should adhere to the following types of passwords are displayed...
Hardware Maintenance Manual for K220
Page 34
... displayed. Using the Setup Utility press Enter. 3. when prompted to the Setup Utility program menu and select Exit and then Save changes and Exit. when you type the password correctly, the password will not be displayed in the system configuration. Using Device Device is used to enable or disable user access to the following : Note: When prompted for a password, you do the following device: PS/2 Mouse Support When this feature is set others such as Floppy Drive Setup, Serial Port Setup, Parallet Port Setup, USB Setup, Video Setup, Audio Setup, Network Setup...
... displayed. Using the Setup Utility press Enter. 3. when prompted to the Setup Utility program menu and select Exit and then Save changes and Exit. when you type the password correctly, the password will not be displayed in the system configuration. Using Device Device is used to enable or disable user access to the following : Note: When prompted for a password, you do the following device: PS/2 Mouse Support When this feature is set others such as Floppy Drive Setup, Serial Port Setup, Parallet Port Setup, USB Setup, Video Setup, Audio Setup, Network Setup...
Hardware Maintenance Manual for K220
Page 39
.... Hardware Maintenance Manual Beep symptoms Beep symptoms are tones or a series of the add-in cards 7 beeps is causing the malfunction. Consult your system 8042 Gate A20 test error (cannot manufacturer's technical support. This will reveal the malfunctioning card. 8 beeps If the system video adapter is an Display memory error (system video add-in base memory (first 64KB block) 3 beeps Base memory read/write test error 4 beeps Fatal error indicating a serious Motherboard timer not operational problem with known good modules. 2 beeps Parity error in card, replace...
.... Hardware Maintenance Manual Beep symptoms Beep symptoms are tones or a series of the add-in cards 7 beeps is causing the malfunction. Consult your system 8042 Gate A20 test error (cannot manufacturer's technical support. This will reveal the malfunctioning card. 8 beeps If the system video adapter is an Display memory error (system video add-in base memory (first 64KB block) 3 beeps Base memory read/write test error 4 beeps Fatal error indicating a serious Motherboard timer not operational problem with known good modules. 2 beeps Parity error in card, replace...
Hardware Maintenance Manual for K220
Page 41
... Mouse support is no keys are invalid. The BIOS then ignores the missing keyboard during POST. Pressing the TAB key permits the user to a weak CMOS battery. This error can plug PS2 Mouse or set keyboardless operation in the BIOS setup butthe device is not detected. The system has been halted. Hardware Maintenance Manual POST Error Message CMOS Date/Time Not Set CMOS Battery Low CMOS Checksum Bad Primary Master Hard Disk Error Primary Slave Hard Disk Error Secondary Master Hard Disk Error Secondary Slave Hard Disk Error...
... Mouse support is no keys are invalid. The BIOS then ignores the missing keyboard during POST. Pressing the TAB key permits the user to a weak CMOS battery. This error can plug PS2 Mouse or set keyboardless operation in the BIOS setup butthe device is not detected. The system has been halted. Hardware Maintenance Manual POST Error Message CMOS Date/Time Not Set CMOS Battery Low CMOS Checksum Bad Primary Master Hard Disk Error Primary Slave Hard Disk Error Secondary Master Hard Disk Error Secondary Slave Hard Disk Error...
Hardware Maintenance Manual for K220
Page 42
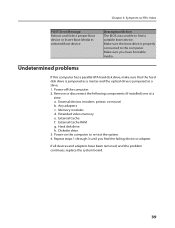
... been removed, and the problem continues, replace the system board. 39 Extended video memory e. Undetermined problems If this computer has a parallel ATA hard disk drive, make sure that the hard disk drive is jumpered as a master and the optical drive is properly connected to re-test the system. 4. Remove or disconnect the following components (if installed) one at a time. External Cache RAM g. If all devices and adapters have bootable media. Memory modules d. Chapter 6. External devices (modem, printer, or mouse) b. Power-on...
... been removed, and the problem continues, replace the system board. 39 Extended video memory e. Undetermined problems If this computer has a parallel ATA hard disk drive, make sure that the hard disk drive is jumpered as a master and the optical drive is properly connected to re-test the system. 4. Remove or disconnect the following components (if installed) one at a time. External Cache RAM g. If all devices and adapters have bootable media. Memory modules d. Chapter 6. External devices (modem, printer, or mouse) b. Power-on...
Hardware Maintenance Manual for K220
Page 58
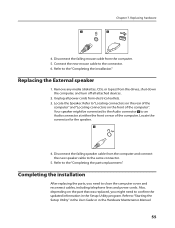
... "Locating connectors on the part that was replaced, you need to an Audio connector at either the front or rear of the computer". Refer to the "Completing the installation." Completing the installation After replacing the parts, you might be connected to the Audio connector to confirm the updated information in the Hardware Maintenance Manual. 55 Refer to "Starting the Setup Utility" in the User Guide or in the Setup Utility program. Unplug all attached devices. 2. Your speaker might need...
... "Locating connectors on the part that was replaced, you need to an Audio connector at either the front or rear of the computer". Refer to the "Completing the installation." Completing the installation After replacing the parts, you might be connected to the Audio connector to confirm the updated information in the Hardware Maintenance Manual. 55 Refer to "Starting the Setup Utility" in the User Guide or in the Setup Utility program. Unplug all attached devices. 2. Your speaker might need...
Hardware Maintenance Manual for K220
Page 59
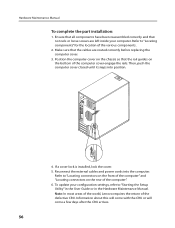
... before replacing the computer cover. 3. Position the computer cover on the chassis so that the rail guides on the rear of the various components. 2. Reconnect the external cables and power cords into position. 4. To update your computer. Refer to "Locating components" for the location of the computer". 6. Refer to "Starting the Setup Utility" in the User Guide or in the Hardware Maintenance Manual. If a cover lock is installed, lock the cover. 5. Information...
... before replacing the computer cover. 3. Position the computer cover on the chassis so that the rail guides on the rear of the various components. 2. Reconnect the external cables and power cords into position. 4. To update your computer. Refer to "Locating components" for the location of the computer". 6. Refer to "Starting the Setup Utility" in the User Guide or in the Hardware Maintenance Manual. If a cover lock is installed, lock the cover. 5. Information...
IdeaCentre K220 Hardware Replacement Guide
Page 4
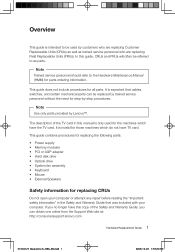
... for the machines which do not have TV card. This guide contains procedures for replacing the following parts: • Power supply • Memory modules • PCI or AGP adapter • Hard disk drive • Optical drive • System fan assembly • Keyboard • Mouse • External Speakers Safety information for all parts. Overview This guide is only used by customers who are replacing Customer Replaceable Units (CRUs) as well as parts. Note Use only parts provided by Lenovo™.
... for the machines which do not have TV card. This guide contains procedures for replacing the following parts: • Power supply • Memory modules • PCI or AGP adapter • Hard disk drive • Optical drive • System fan assembly • Keyboard • Mouse • External Speakers Safety information for all parts. Overview This guide is only used by customers who are replacing Customer Replaceable Units (CRUs) as well as parts. Note Use only parts provided by Lenovo™.
IdeaCentre K220 Hardware Replacement Guide
Page 11
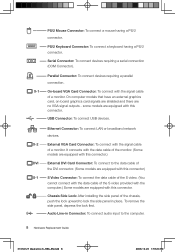
.... 8 Hardware Replacement Guide 31036127 IdeaCentre K_HRG_EN.indd 8 2008.10.20 1:59:24 PM It connects with this connector. --- USB Connector: To connect USB devices. -- To remove the side panel, depress the lock first. --- On computer models that have an external graphics card, on-board graphics card signals are shielded and there are equipped with this connector. --- External VGA Card Connector: To connect with the signal cable of the monitor. (Some models are equipped with the data cable of a monitor...
.... 8 Hardware Replacement Guide 31036127 IdeaCentre K_HRG_EN.indd 8 2008.10.20 1:59:24 PM It connects with this connector. --- USB Connector: To connect USB devices. -- To remove the side panel, depress the lock first. --- On computer models that have an external graphics card, on-board graphics card signals are shielded and there are equipped with this connector. --- External VGA Card Connector: To connect with the signal cable of the monitor. (Some models are equipped with the data cable of a monitor...

IdeaCentre K220 Hardware Replacement Guide
Page 33
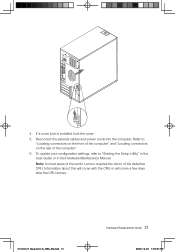
... "Starting the Setup Utility" in the User Guide or in the Setup Utility program. Refer to the same connector. Refer to close the computer cover and reconnect cables, including telephone lines and power cords. Ensure that all attached devices. 2. Locate the Speaker. Position the computer cover on the chassis so that was replaced, you need to confirm the updated information in the Hardware Maintenance Manual. Remove any media (diskettes, CDs, or memory cards...
... "Starting the Setup Utility" in the User Guide or in the Setup Utility program. Refer to the same connector. Refer to close the computer cover and reconnect cables, including telephone lines and power cords. Ensure that all attached devices. 2. Locate the Speaker. Position the computer cover on the chassis so that was replaced, you need to confirm the updated information in the Hardware Maintenance Manual. Remove any media (diskettes, CDs, or memory cards...
IdeaCentre K220 Hardware Replacement Guide
Page 34
... "Starting the Setup Utility" in the User Guide or in the Hardware Maintenance Manual. Reconnect the external cables and power cords into the computer. Information about this will come with the CRU or will come a few days after the CRU arrives. 31036127 IdeaCentre K_HRG_EN.indd 31 Hardware Replacement Guide 31 2008.10.20 1:59:45 PM Note: In most areas of the world, Lenovo requires...
... "Starting the Setup Utility" in the User Guide or in the Hardware Maintenance Manual. Reconnect the external cables and power cords into the computer. Information about this will come with the CRU or will come a few days after the CRU arrives. 31036127 IdeaCentre K_HRG_EN.indd 31 Hardware Replacement Guide 31 2008.10.20 1:59:45 PM Note: In most areas of the world, Lenovo requires...
IdeaCentre K220 User Guide
Page 30
... PM Upgrade In the main interface of email. Configure scanning of the specified disk In the main interface of Trend Micro Internet Security, select Custom Scan from video capture to easily complete the entire work of making video files from more about the operation and settings of the software are available in the Help and Support option...
... PM Upgrade In the main interface of email. Configure scanning of the specified disk In the main interface of Trend Micro Internet Security, select Custom Scan from video capture to easily complete the entire work of making video files from more about the operation and settings of the software are available in the Help and Support option...
IdeaCentre K220 User Guide
Page 39
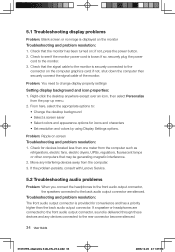
... desktop anywhere except over an icon, then select Personalize from the computer such as refrigerators, electric fans, electric dryers, UPSs, regulators, fluorescent lamps or other computers that the monitor has been turned on the computer graphics card; Problem: Ripple on the monitor Troubleshooting and problem resolution: 1. If the problem persists, consult with Lenovo Service. 5.2 Troubleshooting audio problems Problem: When you connect the headphones to the front audio output connector...
... desktop anywhere except over an icon, then select Personalize from the computer such as refrigerators, electric fans, electric dryers, UPSs, regulators, fluorescent lamps or other computers that the monitor has been turned on the computer graphics card; Problem: Ripple on the monitor Troubleshooting and problem resolution: 1. If the problem persists, consult with Lenovo Service. 5.2 Troubleshooting audio problems Problem: When you connect the headphones to the front audio output connector...
Lenovo Safety and Warranty Guide V1.0.0
Page 28
..., Lenovo will store, use and process information about any product recalls or safety issues. follow the service request procedures that your satisfaction regarding our warranty service or to notify you . remove all features, parts, options, alterations, and attachments not under this warranty and to : 1. backup or secure all system keys or passwords and sufficient, free, and safe access to perform service; for...
..., Lenovo will store, use and process information about any product recalls or safety issues. follow the service request procedures that your satisfaction regarding our warranty service or to notify you . remove all features, parts, options, alterations, and attachments not under this warranty and to : 1. backup or secure all system keys or passwords and sufficient, free, and safe access to perform service; for...


