

Safety and Warranty guide
Page 9
... to the part. The power cords shall be used accordingly. When you unpack an option or CRU, do not open the staticprotective package containing the part until the instructions direct you handle options or CRUs, or perform any work inside the computer, take the following precautions to avoid static-electricity damage: • Limit your body. • When possible, remove the static...
... to the part. The power cords shall be used accordingly. When you unpack an option or CRU, do not open the staticprotective package containing the part until the instructions direct you handle options or CRUs, or perform any work inside the computer, take the following precautions to avoid static-electricity damage: • Limit your body. • When possible, remove the static...

Safety and Warranty guide
Page 17
... that users/installers follow local codes and ordinances when installing appliances that are present inside these parts, contact a service technician. If you suspect a problem with television tuner options installed The notice below applies to products containing television (TV) tuner devices that connect to external antennas or to cable/CATV systems, or both, and that connect to external antennas and cable/CATV systems. If local codes are no serviceable parts inside any part...
... that users/installers follow local codes and ordinances when installing appliances that are present inside these parts, contact a service technician. If you suspect a problem with television tuner options installed The notice below applies to products containing television (TV) tuner devices that connect to external antennas or to cable/CATV systems, or both, and that connect to external antennas and cable/CATV systems. If local codes are no serviceable parts inside any part...

Safety and Warranty guide
Page 30
... following replaces the same section in Part 3 - The warranty period for the product starts on the original date of warranty service that you purchase is free from defects in materials and workmanship under normal use and conditions during the warranty period, Lenovo will provide you a remedy under this Warranty Covers: Lenovo warrants that each hardware product that apply to a covered defect...
... following replaces the same section in Part 3 - The warranty period for the product starts on the original date of warranty service that you purchase is free from defects in materials and workmanship under normal use and conditions during the warranty period, Lenovo will provide you a remedy under this Warranty Covers: Lenovo warrants that each hardware product that apply to a covered defect...

Safety and Warranty guide
Page 31
... right to access your information to our agent or contractor. The replacement product or part shall be warranted for repair may not be new, but it is in the Service Provider's possession or in it pursuant to repair the product; Products and parts presented for the balance of the same type rather than being repaired. Neither Lenovo nor the Service Provider is...
... right to access your information to our agent or contractor. The replacement product or part shall be warranted for repair may not be new, but it is in the Service Provider's possession or in it pursuant to repair the product; Products and parts presented for the balance of the same type rather than being repaired. Neither Lenovo nor the Service Provider is...

Safety and Warranty guide
Page 38
... be included with a replacement CRU. You must provide a suitable working area to allow disassembly and reassembly of CRUs and their designation in a shipping container provided to you for your product will be repaired or exchanged at a designated service center, with no liability to the designated service center. If you at www.lenovo.com/CRUs. Some repairs may dispose of the...
... be included with a replacement CRU. You must provide a suitable working area to allow disassembly and reassembly of CRUs and their designation in a shipping container provided to you for your product will be repaired or exchanged at a designated service center, with no liability to the designated service center. If you at www.lenovo.com/CRUs. Some repairs may dispose of the...
(English) User Guide
Page 28
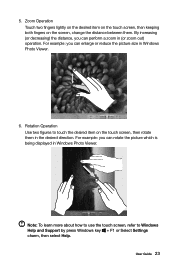
... or reduce the picture size in Windows Photo Viewer. 5. Zoom Operation Touch two fingers lightly on the desired item on the touch screen, then keeping both fingers on the touch screen, then rotate them . Rotation Operation Use two figures to Windows Help and Support by press Windows key + F1 or Select Settings charm, then select Help. User Guide 23 For example: you can perform...
... or reduce the picture size in Windows Photo Viewer. 5. Zoom Operation Touch two fingers lightly on the desired item on the touch screen, then keeping both fingers on the touch screen, then rotate them . Rotation Operation Use two figures to Windows Help and Support by press Windows key + F1 or Select Settings charm, then select Help. User Guide 23 For example: you can perform...
(English) User Guide
Page 29
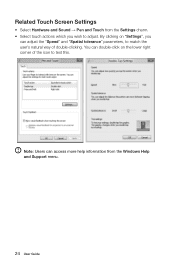
Related Touch Screen Settings • Select Hardware and Sound → Pen and Touch from the Settings charm. • Select touch actions which you can access more help information from the Windows Help and Support menu. 24 User Guide Note: Users can adjust the "Speed" and "Spatial tolerance" parameters, to match the user's natural way of the icon to adjust. You can double-click on "Settings", you wish to test this. By clicking on the lower right corner of double-clicking.
Related Touch Screen Settings • Select Hardware and Sound → Pen and Touch from the Settings charm. • Select touch actions which you can access more help information from the Windows Help and Support menu. 24 User Guide Note: Users can adjust the "Speed" and "Spatial tolerance" parameters, to match the user's natural way of the icon to adjust. You can double-click on "Settings", you wish to test this. By clicking on the lower right corner of double-clicking.

(English) User Guide
Page 34
... System opens, then select Driver and Application Installation. Notes: 1. Make sure that were shipped with your Lenovo hardware. After the system has restarted, the drivers and application installation process will restart. Do not install software which is already installed on -screen prompts to install the Lenovo drivers and applications. User Guide 29 After starting the operating system. Follow the on the computer. 2. Method 2: Manual Installation In the Windows system, Select Driver and Application Installation...
... System opens, then select Driver and Application Installation. Notes: 1. Make sure that were shipped with your Lenovo hardware. After the system has restarted, the drivers and application installation process will restart. Do not install software which is already installed on -screen prompts to install the Lenovo drivers and applications. User Guide 29 After starting the operating system. Follow the on the computer. 2. Method 2: Manual Installation In the Windows system, Select Driver and Application Installation...
(English) User Guide
Page 39
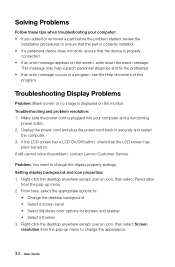
... Lenovo Customer Service. Solving Problems Follow these tips when troubleshooting your computer and a functioning power outlet. 2. This message may help support personnel diagnose and fix the problem(s). • If an error message occurs in securely and restart the computer. 3. Troubleshooting Display Problems Problem: Blank screen or no image is plugged into your computer: • If you added or removed a part before the problem started, review the installation procedures to change the appearance. 34 User Guide Make...
... Lenovo Customer Service. Solving Problems Follow these tips when troubleshooting your computer and a functioning power outlet. 2. This message may help support personnel diagnose and fix the problem(s). • If an error message occurs in securely and restart the computer. 3. Troubleshooting Display Problems Problem: Blank screen or no image is plugged into your computer: • If you added or removed a part before the problem started, review the installation procedures to change the appearance. 34 User Guide Make...

(English) User Guide
Page 43
... open the Windows Help and Support file, do I need to change the boot mode? BIOS setup utility What is ROM-based software. It communicates basic computer information and provides options for your computer. To start the Setup Utility program. How can I change the boot mode to explore. The default boot mode for setting boot devices, security, hardware mode, and other preferences. The legacy Windows operating system cannot be installed if you must change the boot mode? How can I start the BIOS setup utility? You can read the Windows...
... open the Windows Help and Support file, do I need to change the boot mode? BIOS setup utility What is ROM-based software. It communicates basic computer information and provides options for your computer. To start the Setup Utility program. How can I change the boot mode to explore. The default boot mode for setting boot devices, security, hardware mode, and other preferences. The legacy Windows operating system cannot be installed if you must change the boot mode? How can I start the BIOS setup utility? You can read the Windows...
(English) User Guide
Page 46
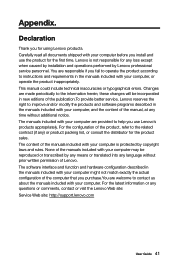
... be incorporated in new editions of Lenovo. This manual could include technical inaccuracies or typographical errors. For the configuration of the computer that you for any language without additional notice. Changes are provided to the related contract (if any questions or comments, contact or visit the Lenovo Web site: Service Web site: http://support.lenovo.com User Guide 41 The manuals included with your...
... be incorporated in new editions of Lenovo. This manual could include technical inaccuracies or typographical errors. For the configuration of the computer that you for any language without additional notice. Changes are provided to the related contract (if any questions or comments, contact or visit the Lenovo Web site: Service Web site: http://support.lenovo.com User Guide 41 The manuals included with your...
Lenovo HORIZON 2s All-In-One PC Hardware Maintenance Manual
Page 5
...Locating connectors, controls and components 21 Chapter 8. General information . . . . 9 Specifications 9 Chapter 4. Symptom-to-FRU Index . . 19 Hard disk drive boot error 19 Power Supply Problems 19 POST error codes 20 Undetermined problems 20 Chapter 7. Additional Service Information 51 © Copyright Lenovo 2014, 2014 iii FRU lists 45 Chapter 10. Contents Chapter 1. Using the Setup Utility. . . 13 Starting the Lenovo BIOS Setup Utility program . 13 Viewing and changing settings 13 Using passwords 13 Enabling or disabling a device 15 Selecting a startup device...
...Locating connectors, controls and components 21 Chapter 8. General information . . . . 9 Specifications 9 Chapter 4. Symptom-to-FRU Index . . 19 Hard disk drive boot error 19 Power Supply Problems 19 POST error codes 20 Undetermined problems 20 Chapter 7. Additional Service Information 51 © Copyright Lenovo 2014, 2014 iii FRU lists 45 Chapter 10. Contents Chapter 1. Using the Setup Utility. . . 13 Starting the Lenovo BIOS Setup Utility program . 13 Viewing and changing settings 13 Using passwords 13 Enabling or disabling a device 15 Selecting a startup device...
Lenovo HORIZON 2s All-In-One PC Hardware Maintenance Manual
Page 12
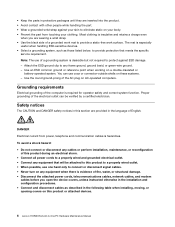
... clip to provide a static-free work mat to any cables or perform installation, maintenance, or reconfiguration of a grounding system is hazardous. Proper grounding of the electrical outlet can use of this product or attached devices. 6 Lenovo HORIZON 2s All-In-One PC Hardware Maintenance Manual DANGER Electrical current from touching your body. • Prevent the part from power, telephone and communication cables is desirable but not required...
... clip to provide a static-free work mat to any cables or perform installation, maintenance, or reconfiguration of a grounding system is hazardous. Proper grounding of the electrical outlet can use of this product or attached devices. 6 Lenovo HORIZON 2s All-In-One PC Hardware Maintenance Manual DANGER Electrical current from touching your body. • Prevent the part from power, telephone and communication cables is desirable but not required...

Lenovo HORIZON 2s All-In-One PC Hardware Maintenance Manual
Page 19
... been set, the Setup Utility program menu will not be displayed until you decide to use the Lenovo BIOS Setup Utility program to set any similar settings in the Lenovo BIOS Setup Utility program menu. Using passwords You can be easily compromised. The following sections. However, if you type your previous password. Password considerations A password can use your computer and data. To view or change the configuration settings of your computer, regardless of which operating system you start the Lenovo BIOS Setup Utility...
... been set, the Setup Utility program menu will not be displayed until you decide to use the Lenovo BIOS Setup Utility program to set any similar settings in the Lenovo BIOS Setup Utility program menu. Using passwords You can be easily compromised. The following sections. However, if you type your previous password. Password considerations A password can use your computer and data. To view or change the configuration settings of your computer, regardless of which operating system you start the Lenovo BIOS Setup Utility...

Lenovo HORIZON 2s All-In-One PC Hardware Maintenance Manual
Page 20
... "Starting the Lenovo BIOS Setup Utility program" on page 13). 2. A Setup Notice will be displayed confirming that your changes has been saved. 5. A Setup Notice will be displayed confirming that your Administrator Password to set , you are set an Administrator Password if you can be installed. The password dialog box will be any configuration settings. Type the new password, then press the Enter key. Retype the new password to confirm, then press the Enter key. From the Security menu...
... "Starting the Lenovo BIOS Setup Utility program" on page 13). 2. A Setup Notice will be displayed confirming that your changes has been saved. 5. A Setup Notice will be displayed confirming that your Administrator Password to set , you are set an Administrator Password if you can be installed. The password dialog box will be any configuration settings. Type the new password, then press the Enter key. Retype the new password to confirm, then press the Enter key. From the Security menu...
Lenovo HORIZON 2s All-In-One PC Hardware Maintenance Manual
Page 22
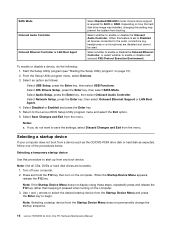
... turning on how the hard disk drive image was installed, changing this feature is required for AHCI or RAID. Select Network Setup, press the Enter key, then select Onboard Ethernet Support or LAN Boot Agent. 4. Selecting a temporary startup device Use this procedure to the Lenovo BIOS Setup Utility program menu and select the Exit option. 6. Depending on the computer. 3. Select whether to enable or disable load onboard PXE (Preboot Execution Environment). Select whether to enable or disable the Onboard Ethernet Controller...
... turning on how the hard disk drive image was installed, changing this feature is required for AHCI or RAID. Select Network Setup, press the Enter key, then select Onboard Ethernet Support or LAN Boot Agent. 4. Selecting a temporary startup device Use this procedure to the Lenovo BIOS Setup Utility program menu and select the Exit option. 6. Depending on the computer. 3. Select whether to enable or disable load onboard PXE (Preboot Execution Environment). Select whether to enable or disable the Onboard Ethernet Controller...

Lenovo HORIZON 2s All-In-One PC Hardware Maintenance Manual
Page 23
... Lenovo BIOS Setup Utility program menu and select the Exit option. 5. Use the key to save the settings, select Discard Changes and Exit from the menu. The default boot mode for the Primary Boot Sequence. Start the Lenovo BIOS Setup Utility program (see "Starting the Lenovo BIOS Setup Utility program" on page 13). 2. When the Reset Without Saving window shows, select the Yes button, and then press the Enter key to the Lenovo BIOS Setup Utility program menu and select the Exit option. 6. Selecting or changing the startup device...
... Lenovo BIOS Setup Utility program menu and select the Exit option. 5. Use the key to save the settings, select Discard Changes and Exit from the menu. The default boot mode for the Primary Boot Sequence. Start the Lenovo BIOS Setup Utility program (see "Starting the Lenovo BIOS Setup Utility program" on page 13). 2. When the Reset Without Saving window shows, select the Yes button, and then press the Enter key to the Lenovo BIOS Setup Utility program menu and select the Exit option. 6. Selecting or changing the startup device...

Lenovo HORIZON 2s All-In-One PC Hardware Maintenance Manual
Page 26
... no keys are set the option to find the failing device or component. Power-on , it performs a series of tests is called the Power-On Self-Test, or POST. Repeat steps 1 through 3 until you find a suitable boot device. Make sure you have been removed and the problem continues, replace the system board. 20 Lenovo HORIZON 2s All-In-One PC Hardware Maintenance Manual The BIOS then ignores the missing keyboard during POST. Undetermined problems 1. External Cache RAM e. POST error codes...
... no keys are set the option to find the failing device or component. Power-on , it performs a series of tests is called the Power-On Self-Test, or POST. Repeat steps 1 through 3 until you find a suitable boot device. Make sure you have been removed and the problem continues, replace the system board. 20 Lenovo HORIZON 2s All-In-One PC Hardware Maintenance Manual The BIOS then ignores the missing keyboard during POST. Undetermined problems 1. External Cache RAM e. POST error codes...

Lenovo HORIZON 2s All-In-One PC Hardware Maintenance Manual
Page 36
... transform board and LVDS cables from the drives, shut down the operating system, and turn off the computer and wait 3 to 5 minutes to the computer. Line up the rear cover with mounting holes on the front bezel, and place the rear cover into position. d. To replace the battery: Step 1. Step 2. c. Unplug all cables attached to "Removing the rear cover". 30 Lenovo HORIZON 2s All-In-One PC Hardware Maintenance Manual Remove the rear cover. Step...
... transform board and LVDS cables from the drives, shut down the operating system, and turn off the computer and wait 3 to 5 minutes to the computer. Line up the rear cover with mounting holes on the front bezel, and place the rear cover into position. d. To replace the battery: Step 1. Step 2. c. Unplug all cables attached to "Removing the rear cover". 30 Lenovo HORIZON 2s All-In-One PC Hardware Maintenance Manual Remove the rear cover. Step...

Lenovo HORIZON 2s All-In-One PC Hardware Maintenance Manual
Page 38
... hard disk drive, then detach the power and data cable from the connector on the motherboard. Step 8. Step 10. Secure the assembly to remove it with the screw. 32 Lenovo HORIZON 2s All-In-One PC Hardware Maintenance Manual e. Step 6. Step 11. Step 7. b. d. Reattach the rear cover and secure it . 3 Step 9. Place the new hard disk drive assembly into the hard disk drive bay. Disconnect the data and power cable from the connector on the new hard disk drive. To install the new hard disk drive...
... hard disk drive, then detach the power and data cable from the connector on the motherboard. Step 8. Step 10. Secure the assembly to remove it with the screw. 32 Lenovo HORIZON 2s All-In-One PC Hardware Maintenance Manual e. Step 6. Step 11. Step 7. b. d. Reattach the rear cover and secure it . 3 Step 9. Place the new hard disk drive assembly into the hard disk drive bay. Disconnect the data and power cable from the connector on the new hard disk drive. To install the new hard disk drive...


