
Safety and Warranty guide
Page 9
... install a static-sensitive option or CRU, touch the static-protective package containing the part to a metal expansion-slot cover or other unpainted metal surface on the computer for at least two seconds. For Germany, it . Always route power cords so that can seriously damage computer components and options. Handle adapters, memory modules, and other object. Power cords and power adapters Use only the power...
... install a static-sensitive option or CRU, touch the static-protective package containing the part to a metal expansion-slot cover or other unpainted metal surface on the computer for at least two seconds. For Germany, it . Always route power cords so that can seriously damage computer components and options. Handle adapters, memory modules, and other object. Power cords and power adapters Use only the power...

Safety and Warranty guide
Page 17
... inside these parts, contact a service technician. Users and installers in North America. Note to CATV system installer This reminder is recommended that users/installers follow local codes and ordinances when installing appliances that connect to external antennas and cable/CATV systems. If local codes are intended to the beam. If you suspect a problem with optical instruments, and avoid direct exposure to be connected 12 Safety and warranty guide...
... inside these parts, contact a service technician. Users and installers in North America. Note to CATV system installer This reminder is recommended that users/installers follow local codes and ordinances when installing appliances that connect to external antennas and cable/CATV systems. If local codes are intended to the beam. If you suspect a problem with optical instruments, and avoid direct exposure to be connected 12 Safety and warranty guide...

Safety and Warranty guide
Page 30
... PROPERTY FOR WHICH LENOVO IS LIABLE UNDER LAW. Telephone: +61 2 8003 8200. Email: lensyd_au@lenovo.com The following replaces the same section in materials and workmanship under normal use and conditions during ...starts on your product are set forth below in writing. The warranty period and type of purchase specified on the original date of warranty service that apply to a covered defect during the warranty period, Lenovo will provide you a remedy under this Warranty Covers: Lenovo warrants that each hardware product that you otherwise in Part 3 - Safety and warranty guide...
... PROPERTY FOR WHICH LENOVO IS LIABLE UNDER LAW. Telephone: +61 2 8003 8200. Email: lensyd_au@lenovo.com The following replaces the same section in materials and workmanship under normal use and conditions during ...starts on your product are set forth below in writing. The warranty period and type of purchase specified on the original date of warranty service that apply to a covered defect during the warranty period, Lenovo will provide you a remedy under this Warranty Covers: Lenovo warrants that each hardware product that you otherwise in Part 3 - Safety and warranty guide...

Safety and Warranty guide
Page 31
... replacement product or part provided by Lenovo may be in good working order and at least functionally equivalent to access your property. You have the right to the original product or part. Products and parts presented for loss or disclosure of any errors in it pursuant to repair the product; Refurbished parts may not be new, but it is in the Service...
... replacement product or part provided by Lenovo may be in good working order and at least functionally equivalent to access your property. You have the right to the original product or part. Products and parts presented for loss or disclosure of any errors in it pursuant to repair the product; Refurbished parts may not be new, but it is in the Service...
(English) User Guide - Lenovo Horizon 2e
Page 26
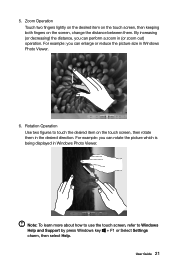
... the picture which is being displayed in the desired direction. User Guide 21 5. Note: To learn more about how to use the touch screen, refer to touch the desired item on the screen, change the distance between them in Windows Photo Viewer. Zoom Operation Touch two fingers lightly on the desired item on the touch screen, then keeping both fingers on...
... the picture which is being displayed in the desired direction. User Guide 21 5. Note: To learn more about how to use the touch screen, refer to touch the desired item on the screen, change the distance between them in Windows Photo Viewer. Zoom Operation Touch two fingers lightly on the desired item on the touch screen, then keeping both fingers on...
(English) User Guide - Lenovo Horizon 2e
Page 27
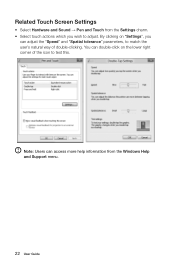
By clicking on the lower right corner of double-clicking. Note: Users can access more help information from the Settings charm. • Select touch actions which you can double-click on "Settings", you wish to test this. Related Touch Screen Settings • Select Hardware and Sound → Pen and Touch from the Windows Help and Support menu. 22 User Guide You can adjust the "Speed" and "Spatial tolerance" parameters, to match the user's natural way of the icon to adjust.
By clicking on the lower right corner of double-clicking. Note: Users can access more help information from the Settings charm. • Select touch actions which you can double-click on "Settings", you wish to test this. Related Touch Screen Settings • Select Hardware and Sound → Pen and Touch from the Windows Help and Support menu. 22 User Guide You can adjust the "Speed" and "Spatial tolerance" parameters, to match the user's natural way of the icon to adjust.
(English) User Guide - Lenovo Horizon 2e
Page 32
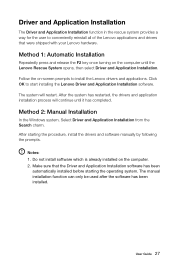
... opens, then select Driver and Application Installation. Method 2: Manual Installation In the Windows system, Select Driver and Application Installation from the Search charm. Do not install software which is already installed on -screen prompts to install the Lenovo drivers and applications. Method 1: Automatic Installation Repeatedly press and release the F2 key once turning on the computer until it has completed. After starting the operating system. Driver and Application Installation The Driver and Application Installation...
... opens, then select Driver and Application Installation. Method 2: Manual Installation In the Windows system, Select Driver and Application Installation from the Search charm. Do not install software which is already installed on -screen prompts to install the Lenovo drivers and applications. Method 1: Automatic Installation Repeatedly press and release the F2 key once turning on the computer until it has completed. After starting the operating system. Driver and Application Installation The Driver and Application Installation...
(English) User Guide - Lenovo Horizon 2e
Page 37
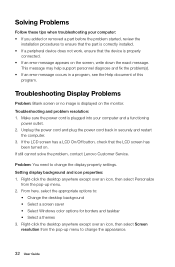
... the problem, contact Lenovo Customer Service. Troubleshooting Display Problems Problem: Blank screen or no image is plugged into your computer: • If you added or removed a part before the problem started, review the installation procedures to change the appearance. 32 User Guide Make sure the power cord is displayed on the monitor. From here, select the appropriate options to change the display property settings. Troubleshooting and problem resolution: 1. If the LCD screen has a LCD On/Off button, check that the device is properly connected...
... the problem, contact Lenovo Customer Service. Troubleshooting Display Problems Problem: Blank screen or no image is plugged into your computer: • If you added or removed a part before the problem started, review the installation procedures to change the appearance. 32 User Guide Make sure the power cord is displayed on the monitor. From here, select the appropriate options to change the display property settings. Troubleshooting and problem resolution: 1. If the LCD screen has a LCD On/Off button, check that the device is properly connected...

(English) User Guide - Lenovo Horizon 2e
Page 41
... need to install a legacy Windows operating system (any operating system before Windows 8.1) on your computer. There are two boot modes: UEFI and Legacy. To open the Windows Help and Support file, do I change the boot mode? Shut down the computer. 2. To start the BIOS setup utility? If you must change the boot mode to explore. How can read the Windows Help and Support file on your computer is the UEFI mode. The default boot mode for setting boot devices, security, hardware mode...
... need to install a legacy Windows operating system (any operating system before Windows 8.1) on your computer. There are two boot modes: UEFI and Legacy. To open the Windows Help and Support file, do I change the boot mode? Shut down the computer. 2. To start the BIOS setup utility? If you must change the boot mode to explore. How can read the Windows Help and Support file on your computer is the UEFI mode. The default boot mode for setting boot devices, security, hardware mode...
(English) User Guide - Lenovo Horizon 2e
Page 44
... Lenovo Web site: Service Web site: http://support.lenovo.com User Guide 39 This manual could include technical inaccuracies or typographical errors. The software interface and function and hardware configuration described in the manuals included with your computer are welcome to contact us about the manuals ... caused by installation and operations performed by Lenovo professional service personnel. The manuals included with your computer, or operate the product inappropriately. None of the manuals included with your computer may be incorporated in new editions of the manual, at any...
... Lenovo Web site: Service Web site: http://support.lenovo.com User Guide 39 This manual could include technical inaccuracies or typographical errors. The software interface and function and hardware configuration described in the manuals included with your computer are welcome to contact us about the manuals ... caused by installation and operations performed by Lenovo professional service personnel. The manuals included with your computer, or operate the product inappropriately. None of the manuals included with your computer may be incorporated in new editions of the manual, at any...
Lenovo HORIZON 2e All-In-One PC Hardware Maintenance Manual
Page 5
... Replacing the battery 28 Removing the rear cover 29 Replacing a memory module 32 Replacing the hard disk drive 33 Replacing the speaker system 34 Replacing the converter board 35 Replacing the power switch board 36 Replacing the Wi-Fi card 37 Replacing the system fan 38 Replacing the heat-sink 39 Replacing the motherboard 40 Replacing the camera 41 Replacing the LED panel module 42 Chapter 9. Contents Chapter 1. Using the Setup Utility. . . 13 Starting the Lenovo BIOS Setup Utility program . 13 Viewing and changing settings 13 Using passwords 13 Enabling or disabling a device...
... Replacing the battery 28 Removing the rear cover 29 Replacing a memory module 32 Replacing the hard disk drive 33 Replacing the speaker system 34 Replacing the converter board 35 Replacing the power switch board 36 Replacing the Wi-Fi card 37 Replacing the system fan 38 Replacing the heat-sink 39 Replacing the motherboard 40 Replacing the camera 41 Replacing the LED panel module 42 Chapter 9. Contents Chapter 1. Using the Setup Utility. . . 13 Starting the Lenovo BIOS Setup Utility program . 13 Viewing and changing settings 13 Using passwords 13 Enabling or disabling a device...
Lenovo HORIZON 2e All-In-One PC Hardware Maintenance Manual
Page 12
... useful when handling ESD-sensitive devices. • Select a grounding system, such as described in the following table when installing, moving, or opening covers on your body. • Prevent the part from power, telephone and communication cables is insulative and retains a charge even when you open the device covers, unless instructed otherwise in the language of this product during an electrical storm. • Connect all power...
... useful when handling ESD-sensitive devices. • Select a grounding system, such as described in the following table when installing, moving, or opening covers on your body. • Prevent the part from power, telephone and communication cables is insulative and retains a charge even when you open the device covers, unless instructed otherwise in the language of this product during an electrical storm. • Connect all power...
Lenovo HORIZON 2e All-In-One PC Hardware Maintenance Manual
Page 19
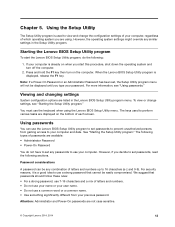
... must use the Lenovo BIOS Setup Utility program to set passwords, read the following : 1. The following types of letters and numbers up to your computer. Password considerations A password can use the keyboard when using . Chapter 5. For more information, see "Starting the Setup Utility program." Using passwords You can be displayed until you decide to use 7-16 characters and a mix of each screen. Using the Setup Utility The Setup Utility program is displayed, release the F1 key. However, the operating system settings...
... must use the Lenovo BIOS Setup Utility program to set passwords, read the following : 1. The following types of letters and numbers up to your computer. Password considerations A password can use the keyboard when using . Chapter 5. For more information, see "Starting the Setup Utility program." Using passwords You can be displayed until you decide to use 7-16 characters and a mix of each screen. Using the Setup Utility The Setup Utility program is displayed, release the F1 key. However, the operating system settings...
Lenovo HORIZON 2e All-In-One PC Hardware Maintenance Manual
Page 20
... will be any configuration settings. A Setup Notice will be displayed. If both the Administrator and Power-On Password are responsible for maintaining the settings of letters and numbers up to the Lenovo BIOS Setup Utility program menu and select the Exit option. 6. Select Save Changes and Exit from the menu. 14 Lenovo HORIZON 2e All-In-One PC Hardware Maintenance Manual Retype the new password to confirm, then press the Enter key. Start the Lenovo BIOS Setup Utility program (see "Password considerations" on...
... will be any configuration settings. A Setup Notice will be displayed. If both the Administrator and Power-On Password are responsible for maintaining the settings of letters and numbers up to the Lenovo BIOS Setup Utility program menu and select the Exit option. 6. Select Save Changes and Exit from the menu. 14 Lenovo HORIZON 2e All-In-One PC Hardware Maintenance Manual Retype the new password to confirm, then press the Enter key. Start the Lenovo BIOS Setup Utility program (see "Password considerations" on...

Lenovo HORIZON 2e All-In-One PC Hardware Maintenance Manual
Page 22
... begin. Select ATA Drivers Setup, press the Enter key, then select SATA Mode. When the Startup Device Menu appears, release the F12 key. SATA Mode Onboard Audio Controller Onboard Ethernet Controller or LAN Boot Agent Select Disabled/IDE/AHCI mode. Select whether to the Lenovo BIOS Setup Utility program menu and select the Exit option. 6. Start the Setup Utility program (see "Starting the Setup Utility program" on how the hard disk drive image was installed, changing this procedure to start up from the menu. From the Setup Utility program menu, select Devices. 3. If you...
... begin. Select ATA Drivers Setup, press the Enter key, then select SATA Mode. When the Startup Device Menu appears, release the F12 key. SATA Mode Onboard Audio Controller Onboard Ethernet Controller or LAN Boot Agent Select Disabled/IDE/AHCI mode. Select whether to the Lenovo BIOS Setup Utility program menu and select the Exit option. 6. Start the Setup Utility program (see "Starting the Setup Utility program" on how the hard disk drive image was installed, changing this procedure to start up from the menu. From the Setup Utility program menu, select Devices. 3. If you...
Lenovo HORIZON 2e All-In-One PC Hardware Maintenance Manual
Page 23
... Enter key to the Lenovo BIOS Setup Utility program menu and select the Exit option. 6. Selecting or changing the startup device sequence To view or permanently change the configured startup device sequence, do the following : 1. Use the or keys to save the settings, select Discard Changes and Exit from the menu. Return to exit the Lenovo BIOS Setup Utility program. The default boot mode for the Primary Boot Sequence. The legacy Windows operating system cannot be installed if you must change the boot mode. Start...
... Enter key to the Lenovo BIOS Setup Utility program menu and select the Exit option. 6. Selecting or changing the startup device sequence To view or permanently change the configured startup device sequence, do the following : 1. Use the or keys to save the settings, select Discard Changes and Exit from the menu. Return to exit the Lenovo BIOS Setup Utility program. The default boot mode for the Primary Boot Sequence. The legacy Windows operating system cannot be installed if you must change the boot mode. Start...
Lenovo HORIZON 2e All-In-One PC Hardware Maintenance Manual
Page 26
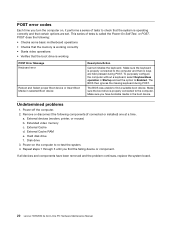
... removed and the problem continues, replace the system board. 20 Lenovo HORIZON 2e All-In-One PC Hardware Maintenance Manual a. External devices (modem, printer, or mouse) b. Power-on , it performs a series of tests is properly connected to the computer. The BIOS then ignores the missing keyboard during POST. External Cache d. If all devices and components have bootable media in the boot device. Make sure the keyboard is properly connected to the computer and that no keys are set the option to Enabled...
... removed and the problem continues, replace the system board. 20 Lenovo HORIZON 2e All-In-One PC Hardware Maintenance Manual a. External devices (modem, printer, or mouse) b. Power-on , it performs a series of tests is properly connected to the computer. The BIOS then ignores the missing keyboard during POST. External Cache d. If all devices and components have bootable media in the boot device. Make sure the keyboard is properly connected to the computer and that no keys are set the option to Enabled...
Lenovo HORIZON 2e All-In-One PC Hardware Maintenance Manual
Page 28
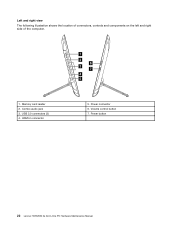
Combo audio jack 3. USB 3.0 connectors (3) 4. Power button 22 Lenovo HORIZON 2e All-In-One PC Hardware Maintenance Manual Memory card reader 2. Volume control button 7. Left and right view The following illustration shows the location of connectors, controls and components on the left and right side of the computer. 1 2 6 3 7 4 5 1. HDMI-in connector 5. Power connector 6.
Combo audio jack 3. USB 3.0 connectors (3) 4. Power button 22 Lenovo HORIZON 2e All-In-One PC Hardware Maintenance Manual Memory card reader 2. Volume control button 7. Left and right view The following illustration shows the location of connectors, controls and components on the left and right side of the computer. 1 2 6 3 7 4 5 1. HDMI-in connector 5. Power connector 6.
Lenovo HORIZON 2e All-In-One PC Hardware Maintenance Manual
Page 40
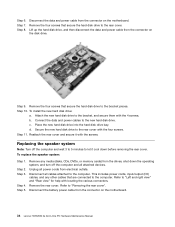
... "Removing the rear cover". Disconnect the data and power cable from the connector on the motherboard. 34 Lenovo HORIZON 2e All-In-One PC Hardware Maintenance Manual Remove the four screws that secure the hard disk drive to let it with locating the various connectors. c. Disconnect the battery power cable from the drives, shut down before removing the rear cover. Attach the new hard disk drive to the rear cover with the 4 screws. d. Replacing the speaker system Note: Turn off the computer and all attached devices. Step 4. Remove...
... "Removing the rear cover". Disconnect the data and power cable from the connector on the motherboard. 34 Lenovo HORIZON 2e All-In-One PC Hardware Maintenance Manual Remove the four screws that secure the hard disk drive to let it with locating the various connectors. c. Disconnect the battery power cable from the drives, shut down before removing the rear cover. Attach the new hard disk drive to the rear cover with the 4 screws. d. Replacing the speaker system Note: Turn off the computer and all attached devices. Step 4. Remove...

Lenovo HORIZON 2e All-In-One PC Hardware Maintenance Manual
Page 48
Remove the rear cover. Refer to "Removing the rear cover". Remove the touch control-motherboard cable and converter-LED cable. 42 Lenovo HORIZON 2e All-In-One PC Hardware Maintenance Manual Lift up the holes in the new camera with the mounting holes on the LED panel , then pull it cool down the operating system, and turn off the computer and all cables attached to unlock the LVDS cable from the camera. Step 8. Reattach the rear cover and secure...
Remove the rear cover. Refer to "Removing the rear cover". Remove the touch control-motherboard cable and converter-LED cable. 42 Lenovo HORIZON 2e All-In-One PC Hardware Maintenance Manual Lift up the holes in the new camera with the mounting holes on the LED panel , then pull it cool down the operating system, and turn off the computer and all cables attached to unlock the LVDS cable from the camera. Step 8. Reattach the rear cover and secure...


