Lenovo G455/G555 UserGuide V1.0
Page 5
... Calling the customer support center ........ 36 Getting help around the world 37 Lenovo warranty service telephone numbers 38 Appendix B. Learning the basics 9 First use 9 Using AC adapter and battery 11 Using the touchpad 12 Using the keyboard 13 Special keys and buttons... 1 Left-side view 4 Right-side view 5 Front view 6 Bottom view 7 Chapter 2. Lenovo regulatory notice .... 64 Lenovo regulatory notice 64 Appendix G. Upgrading and replacing devices 29 Replacing the battery 29 Replacing the hard disk drive 30 Replacing memory 32 Removing the optical drive 34 Appendix A....
... Calling the customer support center ........ 36 Getting help around the world 37 Lenovo warranty service telephone numbers 38 Appendix B. Learning the basics 9 First use 9 Using AC adapter and battery 11 Using the touchpad 12 Using the keyboard 13 Special keys and buttons... 1 Left-side view 4 Right-side view 5 Front view 6 Bottom view 7 Chapter 2. Lenovo regulatory notice .... 64 Lenovo regulatory notice 64 Appendix G. Upgrading and replacing devices 29 Replacing the battery 29 Replacing the hard disk drive 30 Replacing memory 32 Removing the optical drive 34 Appendix A....
Lenovo G455/G555 UserGuide V1.0
Page 7
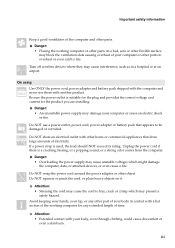
... damage your computer or other object. Attention: • Extended contact with another product. On using Use ONLY the power cord, power adapter and battery pack shipped with a hot section of the working computer or other parts on it. Do NOT use them with your body in a hospital or... An unsuitable power supply may cause interference, such as in contact with the computer and never use a power outlet, power cord, power adapter or battery pack that draw large amounts of electricity. Do NOT squeeze or pinch the cord, or place heavy objects on a bed, sofa or other flexible surface...
... damage your computer or other object. Attention: • Extended contact with another product. On using Use ONLY the power cord, power adapter and battery pack shipped with a hot section of the working computer or other parts on it. Do NOT use them with your body in a hospital or... An unsuitable power supply may cause interference, such as in contact with the computer and never use a power outlet, power cord, power adapter or battery pack that draw large amounts of electricity. Do NOT squeeze or pinch the cord, or place heavy objects on a bed, sofa or other flexible surface...
Lenovo G455/G555 UserGuide V1.0
Page 8
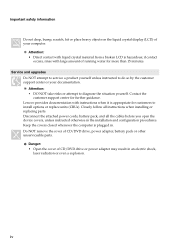
...result in an electric shock, laser radiation or even a explosion. Lenovo provides documentation with instructions when it is hazardous; Danger: • Open the cover of your documentation. Disconnect the attached power cords, battery pack, and all instructions when installing or replacing parts. if contact ... install options or replace units (CRUs). Attention: • Direct contact with large amount of CD/DVD drive, power adapter, battery pack or other unserviceable parts. Do NOT remove the cover of running water for further guidance. iv Keep the covers closed whenever...
...result in an electric shock, laser radiation or even a explosion. Lenovo provides documentation with instructions when it is hazardous; Danger: • Open the cover of your documentation. Disconnect the attached power cords, battery pack, and all instructions when installing or replacing parts. if contact ... install options or replace units (CRUs). Attention: • Direct contact with large amount of CD/DVD drive, power adapter, battery pack or other unserviceable parts. Do NOT remove the cover of running water for further guidance. iv Keep the covers closed whenever...
Lenovo G455/G555 UserGuide V1.0
Page 13
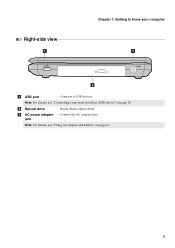
b Optical drive c AC power adapter jack Reads/Burns optical disks. Note: For details, see "Using AC adapter and battery" on page 18. Connect the AC adapter here. Chapter 1. Note: For details, see "Connecting a universal serial bus (USB) device" on page 11. 5 Getting to know your computer Right-side view 1 3 2 a USB port Connects to USB devices.
b Optical drive c AC power adapter jack Reads/Burns optical disks. Note: For details, see "Using AC adapter and battery" on page 18. Connect the AC adapter here. Chapter 1. Note: For details, see "Connecting a universal serial bus (USB) device" on page 11. 5 Getting to know your computer Right-side view 1 3 2 a USB port Connects to USB devices.
Lenovo G455/G555 UserGuide V1.0
Page 16
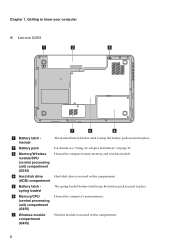
... memory and wireless module. Getting to know your computer „ Lenovo G455 2 1 a Battery latch manual b Battery pack c Memory/Wireless module/CPU (central processing unit) compartment (G555) d Hard disk drive (HDD) compartment e Battery latch spring loaded f Memory/CPU (central processing unit) compartment (G455) g Wireless module compartment (G455) The manual battery latch is secured in this compartment. 8 Chapter 1. For details...
... memory and wireless module. Getting to know your computer „ Lenovo G455 2 1 a Battery latch manual b Battery pack c Memory/Wireless module/CPU (central processing unit) compartment (G555) d Hard disk drive (HDD) compartment e Battery latch spring loaded f Memory/CPU (central processing unit) compartment (G455) g Wireless module compartment (G455) The manual battery latch is secured in this compartment. 8 Chapter 1. For details...
Lenovo G455/G555 UserGuide V1.0
Page 17
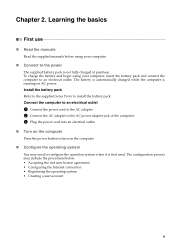
...Read the manuals Read the supplied manuals before using your computer. „ Connect to the power The supplied battery pack is not fully charged at purchase. Install the battery pack Refer to the supplied Setup Poster to turn on AC power. The configuration process may need to an... electrical outlet. Chapter 2. The battery is automatically charged while the computer is first used. To charge the battery and begin using your computer, insert the battery pack and connect the computer to configure the operation system when it is ...
...Read the manuals Read the supplied manuals before using your computer. „ Connect to the power The supplied battery pack is not fully charged at purchase. Install the battery pack Refer to the supplied Setup Poster to turn on AC power. The configuration process may need to an... electrical outlet. Chapter 2. The battery is automatically charged while the computer is first used. To charge the battery and begin using your computer, insert the battery pack and connect the computer to configure the operation system when it is ...
Lenovo G455/G555 UserGuide V1.0
Page 19
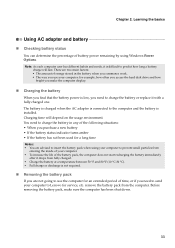
... will depend on the usage environment. Charging time will last. Before removing the battery pack, make the computer display. „ Charging the battery When you find that the battery power is low, you need to send your computer to Lenovo for a long time Notes: • You are two main factors: • ...The amount of time, or if you need to charge the battery or replace it with a fully ...
... will depend on the usage environment. Charging time will last. Before removing the battery pack, make the computer display. „ Charging the battery When you find that the battery power is low, you need to send your computer to Lenovo for a long time Notes: • You are two main factors: • ...The amount of time, or if you need to charge the battery or replace it with a fully ...

Lenovo G455/G555 UserGuide V1.0
Page 20
... regulations and your fingertip over the pad in the direction in landfills. The function corresponds to that of the battery, comply with a battery of the type recommended by Lenovo. • Keep the battery pack away from fire. • Do not expose the battery pack to water or rain. • Do not attempt to disassemble the...
... regulations and your fingertip over the pad in the direction in landfills. The function corresponds to that of the battery, comply with a battery of the type recommended by Lenovo. • Keep the battery pack away from fire. • Do not expose the battery pack to water or rain. • Do not attempt to disassemble the...
Lenovo G455/G555 UserGuide V1.0
Page 24
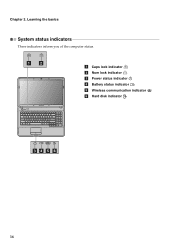
Learning the basics System status indicators These indicators inform you of the computer status. 1 2 G555 a Caps lock indicator b Num lock indicator c Power status indicator d Battery status indicator e Wireless communication indicator f Hard disk indicator 3 16 Chapter 2.
Learning the basics System status indicators These indicators inform you of the computer status. 1 2 G555 a Caps lock indicator b Num lock indicator c Power status indicator d Battery status indicator e Wireless communication indicator f Hard disk indicator 3 16 Chapter 2.
Lenovo G455/G555 UserGuide V1.0
Page 27
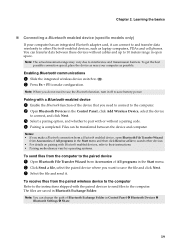
... enabled device, open space. Notes: • If you make configuration. Enabling Bluetooth communications 1 Slide the integrated wireless device switch to . 2 Press Fn + F5 to save battery power. Pairing with or without cables and up to 10 meters range in open Bluetooth File Transfer Wizard from Accessories of the device that you...
... enabled device, open space. Notes: • If you make configuration. Enabling Bluetooth communications 1 Slide the integrated wireless device switch to . 2 Press Fn + F5 to save battery power. Pairing with or without cables and up to 10 meters range in open Bluetooth File Transfer Wizard from Accessories of the device that you...

Lenovo G455/G555 UserGuide V1.0
Page 30
... or to a previously generated backup. Notes: • The backup process and creation of operating system and preinstalled software). „ Using Lenovo OneKey Recovery (Within Windows operating system) In Windows operating system, double click the OneKey Recovery System Icon on the size of recovery discs ...may take some time, connect the AC adapter and battery pack to launch Lenovo OneKey Recovery. You can be loaded, follow the steps below to access OneKey Rescue System. • Shut down your system ...
... or to a previously generated backup. Notes: • The backup process and creation of operating system and preinstalled software). „ Using Lenovo OneKey Recovery (Within Windows operating system) In Windows operating system, double click the OneKey Recovery System Icon on the size of recovery discs ...may take some time, connect the AC adapter and battery pack to launch Lenovo OneKey Recovery. You can be loaded, follow the steps below to access OneKey Rescue System. • Shut down your system ...
Lenovo G455/G555 UserGuide V1.0
Page 33
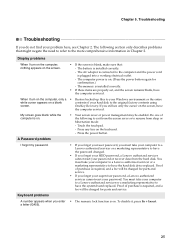
...set, and the screen remains blank, have the computer serviced. Proof of the following section only describes problems that : - a letter (G455). 25 Display problems When I forgot my password. Proof of your problem here, see only the cursor on the screen, have the ...computer serviced. A number appears when you forget your HDD password, a Lenovo authorized servicer cannot reset your computer to a Lenovo authorized servicer or a marketing representative to resume from the hard disk. The battery is plugged into a working electrical outlet. - Press the power button. You...
...set, and the screen remains blank, have the computer serviced. Proof of the following section only describes problems that : - a letter (G455). 25 Display problems When I forgot my password. Proof of your problem here, see only the cursor on the screen, have the ...computer serviced. A number appears when you forget your HDD password, a Lenovo authorized servicer cannot reset your computer to a Lenovo authorized servicer or a marketing representative to resume from the hard disk. The battery is plugged into a working electrical outlet. - Press the power button. You...

Lenovo G455/G555 UserGuide V1.0
Page 34
... power button for sleep mode. The screen is within range, have sleep mode and the computer does entered hibernation mode automatically because the battery is blank. The monitor type is on self-test (POST). - Check the settings for 4 seconds or more. If you install...on , press Fn + to start DVD playback. If the problem persist, follow the solution in hibernation mode or power-off . • The battery power is getting low. The display device driver is within the acceptable range. Incorrect characters appear on page 39. A message, "Unable to resume...
... power button for sleep mode. The screen is within range, have sleep mode and the computer does entered hibernation mode automatically because the battery is blank. The monitor type is on self-test (POST). - Check the settings for 4 seconds or more. If you install...on , press Fn + to start DVD playback. If the problem persist, follow the solution in hibernation mode or power-off . • The battery power is getting low. The display device driver is within the acceptable range. Incorrect characters appear on page 39. A message, "Unable to resume...
Lenovo G455/G555 UserGuide V1.0
Page 35
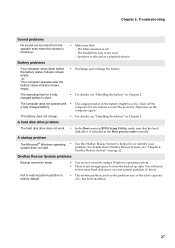
...Use the OneKey Rescue System to free more hard disk space on your problem. then turn on page 22. The battery does not charge. • For details, see "Handling the battery" in the Boot priority order correctly. You will need to help solve or identify your system partition (C drive). ...• The system partition, such as a playback device. Battery problems • Make sure that the hard disk drive is selected as the partition size or the drive capacity of C, has been modified. 27 ...
...Use the OneKey Rescue System to free more hard disk space on your problem. then turn on page 22. The battery does not charge. • For details, see "Handling the battery" in the Boot priority order correctly. You will need to help solve or identify your system partition (C drive). ...• The system partition, such as a playback device. Battery problems • Make sure that the hard disk drive is selected as the partition size or the drive capacity of C, has been modified. 27 ...

Lenovo G455/G555 UserGuide V1.0
Page 36
If the computer still does not respond, remove the AC adapter and the battery. • Your computer might damage your computer, press and hold the power button for 4 seconds or more. Boot priority order in the BIOS Setup Utility ...
If the computer still does not respond, remove the AC adapter and the battery. • Your computer might damage your computer, press and hold the power button for 4 seconds or more. Boot priority order in the BIOS Setup Utility ...
Lenovo G455/G555 UserGuide V1.0
Page 37
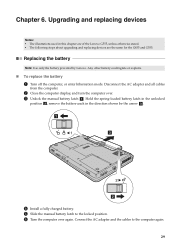
... steps about upgrading and replacing devices are the same for the G455 and G555. Upgrading and replacing devices Notes: • The illustrations used in the direction shown by Lenovo. Replacing the battery Note: Use only the battery provided by the arrow c. 4 Install a fully charged battery. 5 Slide the manual battery latch to the computer again. 29 Chapter 6.
... steps about upgrading and replacing devices are the same for the G455 and G555. Upgrading and replacing devices Notes: • The illustrations used in the direction shown by Lenovo. Replacing the battery Note: Use only the battery provided by the arrow c. 4 Install a fully charged battery. 5 Slide the manual battery latch to the computer again. 29 Chapter 6.
Lenovo G455/G555 UserGuide V1.0
Page 38
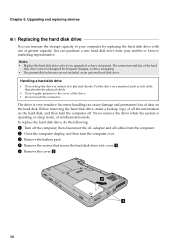
...system is very sensitive. Upgrading and replacing devices Replacing the hard disk drive You can cause damage and permanent loss of your reseller or Lenovo marketing representative. The connectors and bay of all cables from your computer by replacing the hard disk drive with one of the drive.... softwares are not included on the hard disk. Put the drive on the hard disk, and then turn the computer over. 3 Remove the battery pack. 4 Remove the screws that absorbs the physical shock. • Do not apply pressure to physical shocks. then disconnect the AC adapter and...
...system is very sensitive. Upgrading and replacing devices Replacing the hard disk drive You can cause damage and permanent loss of your reseller or Lenovo marketing representative. The connectors and bay of all cables from your computer by replacing the hard disk drive with one of the drive.... softwares are not included on the hard disk. Put the drive on the hard disk, and then turn the computer over. 3 Remove the battery pack. 4 Remove the screws that absorbs the physical shock. • Do not apply pressure to physical shocks. then disconnect the AC adapter and...
Lenovo G455/G555 UserGuide V1.0
Page 39
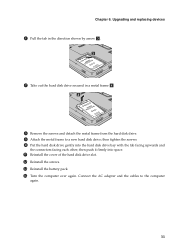
... over again. then push it firmly into the hard disk drive bay with the tab facing upwards and the connectors facing each other; C Reinstall the battery pack.
... over again. then push it firmly into the hard disk drive bay with the tab facing upwards and the connectors facing each other; C Reinstall the battery pack.
Lenovo G455/G555 UserGuide V1.0
Page 40
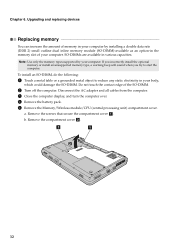
.... 2 Turn off the computer. Disconnect the AC adapter and all cables from the computer. 3 Close the computer display, and turn the computer over. 4 Remove the battery pack. 5 Remove the Memory/Wireless module/CPU (central processing unit) compartment cover. Remove the compartment cover b. 11 1 2 32 To install an SO-DIMM, do the...
.... 2 Turn off the computer. Disconnect the AC adapter and all cables from the computer. 3 Close the computer display, and turn the computer over. 4 Remove the battery pack. 5 Remove the Memory/Wireless module/CPU (central processing unit) compartment cover. Remove the compartment cover b. 11 1 2 32 To install an SO-DIMM, do the...
Lenovo G455/G555 UserGuide V1.0
Page 41
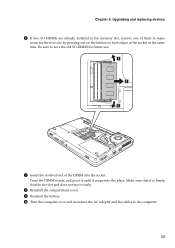
.... Upgrading and replacing devices 6 If two SO-DIMMs are already installed in the slot and does not move easily. 8 Reinstall the compartment cover. 9 Reinstall the battery. 0 Turn the computer over, and reconnect the AC adapter and the cables to make room for future use. 1 2 1 7 Insert the notched end of them to...
.... Upgrading and replacing devices 6 If two SO-DIMMs are already installed in the slot and does not move easily. 8 Reinstall the compartment cover. 9 Reinstall the battery. 0 Turn the computer over, and reconnect the AC adapter and the cables to make room for future use. 1 2 1 7 Insert the notched end of them to...


