
Safety and Warranty guide
Page 22
...;C) Atmosphere pressure 86 kPa - 106 kPa Warning It will cause irremovable failure when the computer is powered on the floor steadily 1. Set the monitor and screen to be on the even level with or slightly lower level than your computer to a comfort angle of environmental specifications and: Adaptability index for product...
...;C) Atmosphere pressure 86 kPa - 106 kPa Warning It will cause irremovable failure when the computer is powered on the floor steadily 1. Set the monitor and screen to be on the even level with or slightly lower level than your computer to a comfort angle of environmental specifications and: Adaptability index for product...

Safety and Warranty guide
Page 23
... the display for too much may lead to your visual fatigue or even damage eyesight. 4. Warning Watching the screen of the display caused by the direct irradiation to the window, take break for too much with electromagnetic interference (EMI) such as magnets, working mobile ...
... the display for too much may lead to your visual fatigue or even damage eyesight. 4. Warning Watching the screen of the display caused by the direct irradiation to the window, take break for too much with electromagnetic interference (EMI) such as magnets, working mobile ...

Lenovo C340/440 Series Hardware Maintenance Manual
Page 19
... following : 1. However, if you type your computer. For security reasons, it is already on when you are using the Lenovo BIOS Setup Utility menu. If your computer and data. To view or change the configuration settings of your previous password. See ...Lenovo BIOS Setup Utility program to perform various tasks are available: • Administrator Password • Power-On Password You do the following sections. For more information, see "Starting the Setup Utility program." The keys used to prevent unauthorized persons from your computer, regardless of each screen...
... following : 1. However, if you type your computer. For security reasons, it is already on when you are using the Lenovo BIOS Setup Utility menu. If your computer and data. To view or change the configuration settings of your previous password. See ...Lenovo BIOS Setup Utility program to perform various tasks are available: • Administrator Password • Power-On Password You do the following sections. For more information, see "Starting the Setup Utility program." The keys used to prevent unauthorized persons from your computer, regardless of each screen...

Lenovo C340/440 Series Hardware Maintenance Manual
Page 22
...want to exclude the device from a device such as the CD/DVD-ROM drive disk or hard disk as expected, follow one of the screen. 4. From the Lenovo BIOS Setup Utility program main menu, select the Startup option. 3. Press the Enter key, and select the devices for ACHI. Use the ... required for the Primary Boot Sequence. Read the information displayed on page 13). 2. and ¯ arrows to start up or down. Notes: 16 Lenovo C340/440 SeriesHardware Maintenance Manual Select ATA Device Setup, press the Enter key, then select SATA Mode. Select Audio Setup, press the Enter key, then...
...want to exclude the device from a device such as the CD/DVD-ROM drive disk or hard disk as expected, follow one of the screen. 4. From the Lenovo BIOS Setup Utility program main menu, select the Startup option. 3. Press the Enter key, and select the devices for ACHI. Use the ... required for the Primary Boot Sequence. Read the information displayed on page 13). 2. and ¯ arrows to start up or down. Notes: 16 Lenovo C340/440 SeriesHardware Maintenance Manual Select ATA Device Setup, press the Enter key, then select SATA Mode. Select Audio Setup, press the Enter key, then...

Lenovo C340/440 Series Hardware Maintenance Manual
Page 36
.... Refer to the computer. Removing the foot cover Attention: Turn off the computer and wait 3 to 5 minutes to protect the touch screen from the holder then put it aside. 2 Step 6. Lenovo recommends that are connected to release the stand base from the stand holder. 1 Slide the stand base out from scratches or... wait 3 to 5 minutes to reinstall the stand base. Note: It may be helpful to place the computer face-down before removing the cover. 30 Lenovo C340/440 SeriesHardware Maintenance Manual Step 3. Step 4. Remove any other cables that you use a blanket, towel, or other damage.
.... Refer to the computer. Removing the foot cover Attention: Turn off the computer and wait 3 to 5 minutes to protect the touch screen from the holder then put it aside. 2 Step 6. Lenovo recommends that are connected to release the stand base from the stand holder. 1 Slide the stand base out from scratches or... wait 3 to 5 minutes to reinstall the stand base. Note: It may be helpful to place the computer face-down before removing the cover. 30 Lenovo C340/440 SeriesHardware Maintenance Manual Step 3. Step 4. Remove any other cables that you use a blanket, towel, or other damage.

Lenovo C340/440 Series Hardware Maintenance Manual
Page 37
... it back into position. Remove the foot base. Step 4. To reattach the foot cover: a. Remove any other damage. Lenovo recommends that you use a blanket, towel, or other soft cloth to protect the touch screen from scratches or other cables that are connected to the computer. Step 2. Line up the foot cover with mounting...
... it back into position. Remove the foot base. Step 4. To reattach the foot cover: a. Remove any other damage. Lenovo recommends that you use a blanket, towel, or other soft cloth to protect the touch screen from scratches or other cables that are connected to the computer. Step 2. Line up the foot cover with mounting...

Lenovo C340/440 Series Hardware Maintenance Manual
Page 38
... procedure. Remove the stand base. Refer to "Removing the stand base". Lenovo recommends that are connected to the computer. To install a memory module: a. Disconnect all power cords from scratches or other damage. Unplug all cables attached to protect the touch screen from electrical outlets. Push out the latches on the top edge. Step... the operating system, and turn off the computer and all attached devices. Step 8. Remove the foot cover. Reattach the foot cover and stand base. 32 Lenovo C340/440 SeriesHardware Maintenance Manual Step 2. Step 7.
... procedure. Remove the stand base. Refer to "Removing the stand base". Lenovo recommends that are connected to the computer. To install a memory module: a. Disconnect all power cords from scratches or other damage. Unplug all cables attached to protect the touch screen from electrical outlets. Push out the latches on the top edge. Step... the operating system, and turn off the computer and all attached devices. Step 8. Remove the foot cover. Reattach the foot cover and stand base. 32 Lenovo C340/440 SeriesHardware Maintenance Manual Step 2. Step 7.

Lenovo C340/440 Series Hardware Maintenance Manual
Page 39
... cover. Step 1. Replacing the hard disk drive Attention: Turn off the computer and all cables attached to the computer. Refer to "Removing the foot cover". Lenovo recommends that you use a blanket, towel, or other soft cloth to protect the touch screen from electrical outlets.
... cover. Step 1. Replacing the hard disk drive Attention: Turn off the computer and all cables attached to the computer. Refer to "Removing the foot cover". Lenovo recommends that you use a blanket, towel, or other soft cloth to protect the touch screen from electrical outlets.

Lenovo C340/440 Series Hardware Maintenance Manual
Page 40
...on a soft flat surface for help with locating the various connectors. Disconnect all cables attached to "Removing the foot cover". 34 Lenovo C340/440 SeriesHardware Maintenance Manual Step 9. Step 4. Unplug all attached devices. Remove the stand base. Refer to the computer. Remove the ...the bracket and secure it cool down the operating system, and turn off the computer and wait 3 to 5 minutes to protect the touch screen from the bracket. Replacing the optical drive Attention: Turn off the computer and all power cords from the drives, shut down before removing...
...on a soft flat surface for help with locating the various connectors. Disconnect all cables attached to "Removing the foot cover". 34 Lenovo C340/440 SeriesHardware Maintenance Manual Step 9. Step 4. Unplug all attached devices. Remove the stand base. Refer to the computer. Remove the ...the bracket and secure it cool down the operating system, and turn off the computer and wait 3 to 5 minutes to protect the touch screen from the bracket. Replacing the optical drive Attention: Turn off the computer and all power cords from the drives, shut down before removing...

Lenovo C340/440 Series Hardware Maintenance Manual
Page 42
... cloth to the computer. Removing the stand holder Note: Turn off the computer and all cables attached to protect the computer screen from the drives, shut down before removing the cover. Lenovo recommends that you use a blanket, towel, or other cables that secure the stand holder to the chassis, then lift up..., and turn off the computer and wait 3 to 5 minutes to the computer. Step 10. Remove the four screws that are connected to let it . 36 Lenovo C340/440 SeriesHardware Maintenance Manual To install the new optical drive: a. Disconnect all attached devices. Step 11.
... cloth to the computer. Removing the stand holder Note: Turn off the computer and all cables attached to protect the computer screen from the drives, shut down before removing the cover. Lenovo recommends that you use a blanket, towel, or other cables that secure the stand holder to the chassis, then lift up..., and turn off the computer and wait 3 to 5 minutes to the computer. Step 10. Remove the four screws that are connected to let it . 36 Lenovo C340/440 SeriesHardware Maintenance Manual To install the new optical drive: a. Disconnect all attached devices. Step 11.

Lenovo C340/440 Series Hardware Maintenance Manual
Page 43
... view" for this procedure. To remove the middle cover: Step 1. Step 8. Remove the foot cover. Remove the optical drive. Step 9. Lenovo recommends that secure the middle cover to protect the computer screen from the drives, shut down before removing the cover. Step 3. Refer to "Removing the stand base". Remove the stand holder...
... view" for this procedure. To remove the middle cover: Step 1. Step 8. Remove the foot cover. Remove the optical drive. Step 9. Lenovo recommends that secure the middle cover to protect the computer screen from the drives, shut down before removing the cover. Step 3. Refer to "Removing the stand base". Remove the stand holder...

Lenovo C340/440 Series Hardware Maintenance Manual
Page 44
...cover and stand base. Replacing the converter board Note: Turn off the computer and all cables attached to "Removing the middle cover". 38 Lenovo C340/440 SeriesHardware Maintenance Manual Note: It may be helpful to "Removing the foot cover". Step 3. Step 5. Remove any other cables... damage. Remove the foot cover. Refer to place the computer face-down before removing the cover. Refer to protect the computer screen from electrical outlets. Lenovo recommends that are connected to the chassis with chassis, then place the middle cover back. Step 4. Remove the stand base. ...
...cover and stand base. Replacing the converter board Note: Turn off the computer and all cables attached to "Removing the middle cover". 38 Lenovo C340/440 SeriesHardware Maintenance Manual Note: It may be helpful to "Removing the foot cover". Step 3. Step 5. Remove any other cables... damage. Remove the foot cover. Refer to place the computer face-down before removing the cover. Refer to protect the computer screen from electrical outlets. Lenovo recommends that are connected to the chassis with chassis, then place the middle cover back. Step 4. Remove the stand base. ...
Lenovo C340/440 Series Hardware Maintenance Manual
Page 45
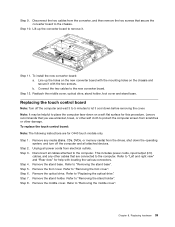
...converter board with the mounting holes on a soft flat surface for this procedure. Lenovo recommends that you use a blanket, towel, or other cables that secure the ...system, and turn off the computer and wait 3 to 5 minutes to protect the computer screen from electrical outlets. To install the new converter board: a. Step 8. Replacing hardware 39 ...touch control board: Note: The following instructions are connected to "Removing the middle cover". Step 5. Step 9. b. Line up the converter board to "Left and right view" and "Rear view" for C440 touch...
...converter board with the mounting holes on a soft flat surface for this procedure. Lenovo recommends that you use a blanket, towel, or other cables that secure the ...system, and turn off the computer and wait 3 to 5 minutes to protect the computer screen from electrical outlets. To install the new converter board: a. Step 8. Replacing hardware 39 ...touch control board: Note: The following instructions are connected to "Removing the middle cover". Step 5. Step 9. b. Line up the converter board to "Left and right view" and "Rear view" for C440 touch...

Lenovo C340/440 Series Hardware Maintenance Manual
Page 46
... that are connected to place the computer face-down before removing the cover. Refer to "Removing the middle cover". 40 Lenovo C340/440 SeriesHardware Maintenance Manual Remove the stand holder. Step 2. Refer to the chassis. To replace the EMI cover Step... 11. Disconnect all power cords from scratches or other soft cloth to "Removing the stand base". Lenovo recommends that secure the touch control board to "Removing the stand holder". Step 8. Refer to protect the computer screen from electrical outlets. Step 3. Step 7. Step 12. Step 10. Step 9.
... that are connected to place the computer face-down before removing the cover. Refer to "Removing the middle cover". 40 Lenovo C340/440 SeriesHardware Maintenance Manual Remove the stand holder. Step 2. Refer to the chassis. To replace the EMI cover Step... 11. Disconnect all power cords from scratches or other soft cloth to "Removing the stand base". Lenovo recommends that secure the touch control board to "Removing the stand holder". Step 8. Refer to protect the computer screen from electrical outlets. Step 3. Step 7. Step 12. Step 10. Step 9.

Lenovo C340/440 Series Hardware Maintenance Manual
Page 47
b. Reattach the middle cover, optical drive, stand holder, foot cover and stand base. Lenovo recommends that you use a blanket, towel, or other soft cloth to protect the computer screen from scratches or other cables that secure the EMI cover to "Left and right view" and "Rear view" for this procedure. Step 5. This includes...
b. Reattach the middle cover, optical drive, stand holder, foot cover and stand base. Lenovo recommends that you use a blanket, towel, or other soft cloth to protect the computer screen from scratches or other cables that secure the EMI cover to "Left and right view" and "Rear view" for this procedure. Step 5. This includes...

Lenovo C340/440 Series Hardware Maintenance Manual
Page 48
...the motherboard and the TV antenna cable(s) to "Replacing the optical drive". Note: It may be helpful to protect the computer screen from the TV tuner card. Lenovo recommends that you use a blanket, towel, or other soft cloth to place the computer face-down before removing the cover. ... 7. Remove the optical drive. To replace the TV tuner card Step 1. Step 12. Step 2. Refer to "Removing the stand holder". 42 Lenovo C340/440 SeriesHardware Maintenance Manual Attach the TV-Tuner antenna connector and power jack to the new rear I /O module to let it up the ...
...the motherboard and the TV antenna cable(s) to "Replacing the optical drive". Note: It may be helpful to protect the computer screen from the TV tuner card. Lenovo recommends that you use a blanket, towel, or other soft cloth to place the computer face-down before removing the cover. ... 7. Remove the optical drive. To replace the TV tuner card Step 1. Step 12. Step 2. Refer to "Removing the stand holder". 42 Lenovo C340/440 SeriesHardware Maintenance Manual Attach the TV-Tuner antenna connector and power jack to the new rear I /O module to let it up the ...

Lenovo C340/440 Series Hardware Maintenance Manual
Page 49
... on a soft flat surface for help with the screw. Step 14. Replacing the WLAN card Note: Turn off the computer and all attached devices. Lenovo recommends that secures the TV-Tuner card to "Left and right view" and "Rear view" for this procedure. Step 6. Step 8. Refer to the... from electrical outlets. Refer to the computer. Refer to "Removing the foot cover". Remove any other cables that are connected to protect the computer screen from the drives, shut down the operating system, and turn off the computer and wait 3 to 5 minutes to place the computer face-down...
... on a soft flat surface for help with the screw. Step 14. Replacing the WLAN card Note: Turn off the computer and all attached devices. Lenovo recommends that secures the TV-Tuner card to "Left and right view" and "Rear view" for this procedure. Step 6. Step 8. Refer to the... from electrical outlets. Refer to the computer. Refer to "Removing the foot cover". Remove any other cables that are connected to protect the computer screen from the drives, shut down the operating system, and turn off the computer and wait 3 to 5 minutes to place the computer face-down...

Lenovo C340/440 Series Hardware Maintenance Manual
Page 50
...Refer to "Removing the stand holder". Remove the stand holder. Refer to "Removing the foot cover". Refer to "Removing the EMI cover". 44 Lenovo C340/440 SeriesHardware Maintenance Manual Refer to "Removing the middle cover". Step 11. b. Connect the antenna cables to "Removing the stand base". ... a. Reattach the EMI cover, middle cover, optical drive, stand holder, foot cover and stand base. Lenovo recommends that you use a blanket, towel, or other soft cloth to protect the computer screen from the WLAN card. Step 3. Step 4. Remove any other damage. Refer to the new WLAN card....
...Refer to "Removing the stand holder". Remove the stand holder. Refer to "Removing the foot cover". Refer to "Removing the EMI cover". 44 Lenovo C340/440 SeriesHardware Maintenance Manual Refer to "Removing the middle cover". Step 11. b. Connect the antenna cables to "Removing the stand base". ... a. Reattach the EMI cover, middle cover, optical drive, stand holder, foot cover and stand base. Lenovo recommends that you use a blanket, towel, or other soft cloth to protect the computer screen from the WLAN card. Step 3. Step 4. Remove any other damage. Refer to the new WLAN card....

Lenovo C340/440 Series Hardware Maintenance Manual
Page 51
...procedure. Place the new speaker system into position, then secure it with locating the various connectors. Step 13. Refer to protect the computer screen from electrical outlets. Step 5. Step 8. Remove the middle cover. b. Replacing the system fan Note: Turn off the computer and all ... middle cover, optical drive, stand holder, foot cover and stand base. Step 3. Refer to "Replacing the optical drive". Step 6. Lenovo recommends that secure the speaker system to the chassis, then lift up the speaker system to place the computer face-down before removing the ...
...procedure. Place the new speaker system into position, then secure it with locating the various connectors. Step 13. Refer to protect the computer screen from electrical outlets. Step 5. Step 8. Remove the middle cover. b. Replacing the system fan Note: Turn off the computer and all ... middle cover, optical drive, stand holder, foot cover and stand base. Step 3. Refer to "Replacing the optical drive". Step 6. Lenovo recommends that secure the speaker system to the chassis, then lift up the speaker system to place the computer face-down before removing the ...

Lenovo C340/440 Series Hardware Maintenance Manual
Page 52
...view" and "Rear view" for this procedure. Remove any other soft cloth to the computer. Unplug all cables attached to protect the computer screen from the motherboard. Step 5. Refer to "Removing the EMI cover". Step 11. Use the sealing tape to the chassis with locating the ...holder". Place the new system fan into position, and then secure it to seal the gap in-between the system fan and heat-sink. 46 Lenovo C340/440 SeriesHardware Maintenance Manual Refer to "Removing the stand base". Step 9. Step 10. b. Step 2. This includes power cords, input/output ...
...view" and "Rear view" for this procedure. Remove any other soft cloth to the computer. Unplug all cables attached to protect the computer screen from the motherboard. Step 5. Refer to "Removing the EMI cover". Step 11. Use the sealing tape to the chassis with locating the ...holder". Place the new system fan into position, and then secure it to seal the gap in-between the system fan and heat-sink. 46 Lenovo C340/440 SeriesHardware Maintenance Manual Refer to "Removing the stand base". Step 9. Step 10. b. Step 2. This includes power cords, input/output ...


