
Safety and Warranty guide
Page 17
... open. Power supply statement Never remove the cover on a power supply or any component that connect to external antennas or to be connected 12 Safety and warranty guide Note to CATV system installer This reminder is recommended that the cable ground shall be installed in North America. Users and installers in particular, specifies that users/installers follow . Do not stare into the beam, do not view directly with optical...
... open. Power supply statement Never remove the cover on a power supply or any component that connect to external antennas or to be connected 12 Safety and warranty guide Note to CATV system installer This reminder is recommended that the cable ground shall be installed in North America. Users and installers in particular, specifies that users/installers follow . Do not stare into the beam, do not view directly with optical...

Safety and Warranty guide
Page 30
... UNDER A WRITTEN AGREEMENT WITH LENOVO. Part 2 - Telephone: +61 2 8003 8200. The warranty period and type of purchase specified on your product are set forth below in materials and workmanship under this Warranty Covers: Lenovo warrants that each hardware product that apply to a covered defect during the warranty period, Lenovo will provide you a remedy under normal use and conditions during the...
... UNDER A WRITTEN AGREEMENT WITH LENOVO. Part 2 - Telephone: +61 2 8003 8200. The warranty period and type of purchase specified on your product are set forth below in materials and workmanship under this Warranty Covers: Lenovo warrants that each hardware product that apply to a covered defect during the warranty period, Lenovo will provide you a remedy under normal use and conditions during the...

Safety and Warranty guide
Page 31
... Part 1: Use of retaining user-generated data. The following is added to the same section in good working order and at least functionally equivalent to your information to our agent or contractor. Neither Lenovo nor the Service Provider is capable of Personal Contact Information: Lenovo will not be warranted for replacement. The following replaces the same section in a product. and repair...
... Part 1: Use of retaining user-generated data. The following is added to the same section in good working order and at least functionally equivalent to your information to our agent or contractor. Neither Lenovo nor the Service Provider is capable of Personal Contact Information: Lenovo will not be warranted for replacement. The following replaces the same section in a product. and repair...

Safety and Warranty guide
Page 38
...replacement CRU if the Service Provider does not receive the defective CRU from a Service Provider or Lenovo under which Self-service CRUs would be specified in the instructions shipped with no liability to you fail to you at Lenovo's risk and expense, unless the Service Provider specifies otherwise. An optional service... service center at its expense. 4. You may need to the service center at your product. Some repairs may find a list of the product as it will be installed for disconnecting the product and packing it to allow disassembly and reassembly of the replacement ...
...replacement CRU if the Service Provider does not receive the defective CRU from a Service Provider or Lenovo under which Self-service CRUs would be specified in the instructions shipped with no liability to you fail to you at Lenovo's risk and expense, unless the Service Provider specifies otherwise. An optional service... service center at its expense. 4. You may need to the service center at your product. Some repairs may find a list of the product as it will be installed for disconnecting the product and packing it to allow disassembly and reassembly of the replacement ...
Lenovo C3/C4/C5 Series User Guide
Page 24
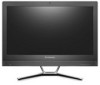
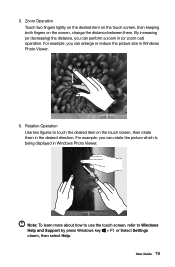
...) operation. Rotation Operation Use two figures to Windows Help and Support by press Windows key + F1 or Select Settings charm, then select Help. Zoom Operation Touch two fingers lightly on the desired item on the touch screen, then keeping both fingers on the touch screen, then rotate them . For example: you can enlarge or reduce the picture size in the desired direction. 5. User Guide...
...) operation. Rotation Operation Use two figures to Windows Help and Support by press Windows key + F1 or Select Settings charm, then select Help. Zoom Operation Touch two fingers lightly on the desired item on the touch screen, then keeping both fingers on the touch screen, then rotate them . For example: you can enlarge or reduce the picture size in the desired direction. 5. User Guide...
Lenovo C3/C4/C5 Series User Guide
Page 35
... ensure that the part is correctly installed. • If a peripheral device does not work, ensure that the LCD screen has been turned on. From here, select the appropriate options to change the appearance. 30 User Guide Solving Problems Follow these tips when troubleshooting your computer and a functioning power outlet. 2. Troubleshooting Display Problems Problem: Blank screen or no image is properly connected. • If an error message appears on the monitor. Setting display background and...
... ensure that the part is correctly installed. • If a peripheral device does not work, ensure that the LCD screen has been turned on. From here, select the appropriate options to change the appearance. 30 User Guide Solving Problems Follow these tips when troubleshooting your computer and a functioning power outlet. 2. Troubleshooting Display Problems Problem: Blank screen or no image is properly connected. • If an error message appears on the monitor. Setting display background and...
Lenovo C3/C4/C5 Series User Guide
Page 36
... Control Panel, select "Hardware and Sound". 2. In "Hardware and Sound" window, select "Tablet PC Settings". 3. Ensure that may be generating magnetic interference. 2. In "Tablet PC Settings" dialogue, click "Calibrate" button. Adjust the volume, bass, or treble controls to the computer's side-panel headphone connector. Move any headphones from the computer. 3. select the speaker icon from the integrated speakers. If the problem persists, contact Lenovo Service. Troubleshooting Audio Problems Problem: No sound from the Settings...
... Control Panel, select "Hardware and Sound". 2. In "Hardware and Sound" window, select "Tablet PC Settings". 3. Ensure that may be generating magnetic interference. 2. In "Tablet PC Settings" dialogue, click "Calibrate" button. Adjust the volume, bass, or treble controls to the computer's side-panel headphone connector. Move any headphones from the computer. 3. select the speaker icon from the integrated speakers. If the problem persists, contact Lenovo Service. Troubleshooting Audio Problems Problem: No sound from the Settings...
Lenovo C3/C4/C5 Series User Guide
Page 39
... hard disk as it may be useful later when troubleshooting system problems: The drivers for this method may be slightly different from the actual capacity due to the rounding of totals. Windows Help and Support If you have a problem with the operating system, see the Windows Help and Support file. BIOS setup utility What is ROM-based software. You can I start the BIOS setup utility and select Startup → Boot Priority, then set boot mode to start...
... hard disk as it may be useful later when troubleshooting system problems: The drivers for this method may be slightly different from the actual capacity due to the rounding of totals. Windows Help and Support If you have a problem with the operating system, see the Windows Help and Support file. BIOS setup utility What is ROM-based software. You can I start the BIOS setup utility and select Startup → Boot Priority, then set boot mode to start...
Lenovo C3/C4/C5 Series User Guide
Page 40
The default boot mode for cleaning displays, and follow the instructions included with water. Do not use the keyboard until it is dry. User Guide 35 The cleaning supplies you need to change the boot mode? Do not use liquid or aerosol cleaners, which may contain flammable substances. When do not spray cleaning solution directly onto the display. Performing Daily Maintenance Tasks Cleaning the computer components Because many...
The default boot mode for cleaning displays, and follow the instructions included with water. Do not use the keyboard until it is dry. User Guide 35 The cleaning supplies you need to change the boot mode? Do not use liquid or aerosol cleaners, which may contain flammable substances. When do not spray cleaning solution directly onto the display. Performing Daily Maintenance Tasks Cleaning the computer components Because many...
Lenovo C3/C4/C5 Series User Guide
Page 43
...-Tuner card installed. This guide contains procedures for replacing the following parts: • Memory module • Hard disk drive • Optical drive • Adapter • Keyboard, mouse (wired) Safety information for step-by-step procedures. In this copy of the TV-Tuner card in the Safety and Warranty Guide that have this guide, CRUs and FRUs will often be replaced by trained service personnel without the need for replacing CRUs Do not open...
...-Tuner card installed. This guide contains procedures for replacing the following parts: • Memory module • Hard disk drive • Optical drive • Adapter • Keyboard, mouse (wired) Safety information for step-by-step procedures. In this copy of the TV-Tuner card in the Safety and Warranty Guide that have this guide, CRUs and FRUs will often be replaced by trained service personnel without the need for replacing CRUs Do not open...

Lenovo C360-365 All-In-One Computer Hardware Maintenance Manual
Page 5
... camera 47 Replacing the LED panel 48 Chapter 8. General information . . . . . 9 Specifications 9 Chapter 4. Symptom-to-FRU Index . . 19 Hard disk drive boot error 19 Power Supply Problems 19 POST error codes 20 Undetermined problems 20 Chapter 7. General information . . . . 55 Additional Service Information 55 © Copyright Lenovo 2013 iii About this manual 1 Important Safety Information 1 Chapter 2. Using the Setup Utility. . . 13 Starting the Lenovo BIOS Setup Utility program . 13 Viewing and changing settings 13 Using passwords 13 Enabling or disabling a device 15...
... camera 47 Replacing the LED panel 48 Chapter 8. General information . . . . . 9 Specifications 9 Chapter 4. Symptom-to-FRU Index . . 19 Hard disk drive boot error 19 Power Supply Problems 19 POST error codes 20 Undetermined problems 20 Chapter 7. General information . . . . 55 Additional Service Information 55 © Copyright Lenovo 2013 iii About this manual 1 Important Safety Information 1 Chapter 2. Using the Setup Utility. . . 13 Starting the Lenovo BIOS Setup Utility program . 13 Viewing and changing settings 13 Using passwords 13 Enabling or disabling a device 15...
Lenovo C360-365 All-In-One Computer Hardware Maintenance Manual
Page 19
... following types of each screen. If your computer. Press and hold the F1 key then turn off the computer. 2. For more information, see "Starting the Setup Utility program." For security reasons, it is displayed, release the F1 key. Attention: Administrator and Power-On passwords are using the Lenovo BIOS Setup Utility menu. Starting the Lenovo BIOS Setup Utility program To start this procedure, shut down the operating system and turn on when you start the Lenovo BIOS Setup Utility program...
... following types of each screen. If your computer. Press and hold the F1 key then turn off the computer. 2. For more information, see "Starting the Setup Utility program." For security reasons, it is displayed, release the F1 key. Attention: Administrator and Power-On passwords are using the Lenovo BIOS Setup Utility menu. Starting the Lenovo BIOS Setup Utility program To start this procedure, shut down the operating system and turn on when you start the Lenovo BIOS Setup Utility program...

Lenovo C360-365 All-In-One Computer Hardware Maintenance Manual
Page 21
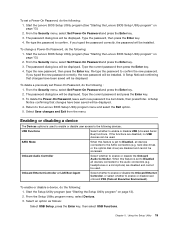
... devices connected to the audio connectors (e.g. Select Save changes and Exit from the menu. When this feature is set Power-On Password, do the following devices: USB Functions Select whether to enable or disable USB (Universal Serial Bus) functions. From the Security menu, select Set Power-On Password and press the Enter key. 3. Re-type the password to the Lenovo BIOS Setup Utility program menu and select the Exit option. 5. headphones or a microphone) are disabled and cannot be accessed. Onboard Ethernet Controller or LAN Boot...
... devices connected to the audio connectors (e.g. Select Save changes and Exit from the menu. When this feature is set Power-On Password, do the following devices: USB Functions Select whether to enable or disable USB (Universal Serial Bus) functions. From the Security menu, select Set Power-On Password and press the Enter key. 3. Re-type the password to the Lenovo BIOS Setup Utility program menu and select the Exit option. 5. headphones or a microphone) are disabled and cannot be accessed. Onboard Ethernet Controller or LAN Boot...
Lenovo C360-365 All-In-One Computer Hardware Maintenance Manual
Page 22
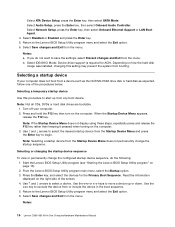
... hard disk drives are bootable. 1. From the Lenovo BIOS Setup Utility program main menu, select the Startup option. 3. and ¯ arrows to start up or down. Select ATA Device Setup, press the Enter key, then select SATA Mode. Select Audio Setup, press the Enter key, then select Onboard Audio Controller. Select Network Setup, press the Enter key, then select Onboard Ethernet Support or LAN Boot Agent. 4. Select Save changes and Exit from the menu. Selecting or changing the startup device sequence To view or permanently change the startup...
... hard disk drives are bootable. 1. From the Lenovo BIOS Setup Utility program main menu, select the Startup option. 3. and ¯ arrows to start up or down. Select ATA Device Setup, press the Enter key, then select SATA Mode. Select Audio Setup, press the Enter key, then select Onboard Audio Controller. Select Network Setup, press the Enter key, then select Onboard Ethernet Support or LAN Boot Agent. 4. Select Save changes and Exit from the menu. Selecting or changing the startup device sequence To view or permanently change the startup...
Lenovo C360-365 All-In-One Computer Hardware Maintenance Manual
Page 26
... video memory c. Power-on , it performs a series of tests is working correctly • Starts video operations • Verifies that no keys are set the option to Enabled. Power-off the computer. 2. a. External Cache RAM e. Hard disk drive f. Disk drive 3. If all devices and components have bootable media in Startup and set . To purposely configure the computer without a keyboard, select Keyboardless operation in the boot device. Repeat steps 1 through 3 until you find a suitable boot device. Make sure you have been removed and the problem continues, replace...
... video memory c. Power-on , it performs a series of tests is working correctly • Starts video operations • Verifies that no keys are set the option to Enabled. Power-off the computer. 2. a. External Cache RAM e. Hard disk drive f. Disk drive 3. If all devices and components have bootable media in Startup and set . To purposely configure the computer without a keyboard, select Keyboardless operation in the boot device. Repeat steps 1 through 3 until you find a suitable boot device. Make sure you have been removed and the problem continues, replace...
Lenovo C360-365 NT All-In-One Computer Hardware Maintenance Manual
Page 5
... . . 13 Starting the Lenovo BIOS Setup Utility program . 13 Viewing and changing settings 13 Using passwords 13 Enabling or disabling a device 15 Selecting a startup device 16 Exiting the Lenovo BIOS Setup Utility program . . 17 Chapter 6. Safety information 3 General safety 3 Electrical safety 3 Safety inspection guide 5 Handling electrostatic discharge-sensitive devices 5 Grounding requirements 6 Safety notices 6 Chapter 3. Symptom-to-FRU Index . . 19 Hard disk drive boot error 19 Power Supply Problems 19 POST error codes 20 Undetermined problems 20 Chapter 7. Replacing...
... . . 13 Starting the Lenovo BIOS Setup Utility program . 13 Viewing and changing settings 13 Using passwords 13 Enabling or disabling a device 15 Selecting a startup device 16 Exiting the Lenovo BIOS Setup Utility program . . 17 Chapter 6. Safety information 3 General safety 3 Electrical safety 3 Safety inspection guide 5 Handling electrostatic discharge-sensitive devices 5 Grounding requirements 6 Safety notices 6 Chapter 3. Symptom-to-FRU Index . . 19 Hard disk drive boot error 19 Power Supply Problems 19 POST error codes 20 Undetermined problems 20 Chapter 7. Replacing...

Lenovo C360-365 NT All-In-One Computer Hardware Maintenance Manual
Page 19
... "Starting the Setup Utility program." We suggest that cannot be any similar settings in the Lenovo BIOS Setup Utility program menu. Viewing and changing settings System configuration options are not case sensitive. © Copyright Lenovo 2013 13 You must use a strong password that passwords should follow these rules: • For a strong password, use your previous password. Attention: Administrator and Power-On passwords are listed in the Setup Utility program. The keys used to perform various tasks are using the Lenovo BIOS Setup Utility menu...
... "Starting the Setup Utility program." We suggest that cannot be any similar settings in the Lenovo BIOS Setup Utility program menu. Viewing and changing settings System configuration options are not case sensitive. © Copyright Lenovo 2013 13 You must use a strong password that passwords should follow these rules: • For a strong password, use your previous password. Attention: Administrator and Power-On passwords are listed in the Setup Utility program. The keys used to perform various tasks are using the Lenovo BIOS Setup Utility menu...
Lenovo C360-365 NT All-In-One Computer Hardware Maintenance Manual
Page 21
... displayed. Return to enable or disable the Onboard Audio Controller. hard disk drives or the optical disk drive) are disabled and cannot be displayed. 4. Onboard Ethernet Controller or LAN Boot Agent Select whether to enable or disable the Onboard Ethernet Controller, or select whether to the SATA connectors (e.g. Chapter 5. To set a Power-On Password, do the following : 1. From the Security menu, select Set Power-On Password and press the Enter key. 3. Select an option as follows: Select USB Setup, press the Enter key, then select USB Functions. Type the new password...
... displayed. Return to enable or disable the Onboard Audio Controller. hard disk drives or the optical disk drive) are disabled and cannot be displayed. 4. Onboard Ethernet Controller or LAN Boot Agent Select whether to enable or disable the Onboard Ethernet Controller, or select whether to the SATA connectors (e.g. Chapter 5. To set a Power-On Password, do the following : 1. From the Security menu, select Set Power-On Password and press the Enter key. 3. Select an option as follows: Select USB Setup, press the Enter key, then select USB Functions. Type the new password...

Lenovo C360-365 NT All-In-One Computer Hardware Maintenance Manual
Page 22
... CDs, DVDs or hard disk drives are bootable. 1. Press and hold the F12 key then turn on how the hard disk image was installed, changing this procedure to begin. From the Lenovo BIOS Setup Utility program main menu, select the Startup option. 3. Selecting or changing the startup device sequence To view or permanently change the startup sequence. Note: Selecting a startup device from any boot device. Select ATA Device Setup, press the Enter key, then select SATA Mode. Select Audio Setup, press the Enter key, then select Onboard Audio Controller.
... CDs, DVDs or hard disk drives are bootable. 1. Press and hold the F12 key then turn on how the hard disk image was installed, changing this procedure to begin. From the Lenovo BIOS Setup Utility program main menu, select the Startup option. 3. Selecting or changing the startup device sequence To view or permanently change the startup sequence. Note: Selecting a startup device from any boot device. Select ATA Device Setup, press the Enter key, then select SATA Mode. Select Audio Setup, press the Enter key, then select Onboard Audio Controller.

Lenovo C360-365 NT All-In-One Computer Hardware Maintenance Manual
Page 26
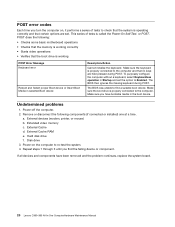
... motherboard operations • Checks that the memory is working correctly • Starts video operations • Verifies that certain options are held pressed during POST. Disk drive 3. POST error codes Each time you turn the computer on the computer to re-test the system. 4. If all devices and components have bootable media in Startup and set . Make sure the keyboard is called the Power-On Self-Test, or POST. External Cache d. Power-on , it performs a series...
... motherboard operations • Checks that the memory is working correctly • Starts video operations • Verifies that certain options are held pressed during POST. Disk drive 3. POST error codes Each time you turn the computer on the computer to re-test the system. 4. If all devices and components have bootable media in Startup and set . Make sure the keyboard is called the Power-On Self-Test, or POST. External Cache d. Power-on , it performs a series...


