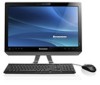
Lenovo C225\C320\C325 Hardware Maintenance Manual
Page 3
... 1. General information . . . . 9 Specifications 9 Chapter 4. Additional Service Information 57 © Copyright Lenovo i Safety information . . . . . 3 General safety 3 Electrical safety 3 Safety inspection guide 5 Handling electrostatic discharge-sensitive devices 5 Grounding requirements 6 Safety notices 6 Chapter 3. Replacing hardware . . . . 21 General information 21 Hardware components 22 Replacing a memory module 26 Replacing the optical drive 27 Replacing the hard disk...
... 1. General information . . . . 9 Specifications 9 Chapter 4. Additional Service Information 57 © Copyright Lenovo i Safety information . . . . . 3 General safety 3 Electrical safety 3 Safety inspection guide 5 Handling electrostatic discharge-sensitive devices 5 Grounding requirements 6 Safety notices 6 Chapter 3. Replacing hardware . . . . 21 General information 21 Hardware components 22 Replacing a memory module 26 Replacing the optical drive 27 Replacing the hard disk...
Lenovo C225\C320\C325 Hardware Maintenance Manual
Page 22
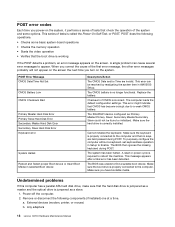
...configuration settings. This error might indicate that check the operation of the system and some basic system-board operations • Checks the memory operation • Starts the video operation • Verifies that the boot drive is no keys are invalid. The system has been ... turn on the system. Power-off the computer. 2. Remove or disconnect the following operations. • Checks some options. Any adapters 18 Lenovo C2/C3 Hardware Maintenance Manual POST does the following components (if installed) one at a time. This error can cause several error messages to...
...configuration settings. This error might indicate that check the operation of the system and some basic system-board operations • Checks the memory operation • Starts the video operation • Verifies that the boot drive is no keys are invalid. The system has been ... turn on the system. Power-off the computer. 2. Remove or disconnect the following operations. • Checks some options. Any adapters 18 Lenovo C2/C3 Hardware Maintenance Manual POST does the following components (if installed) one at a time. This error can cause several error messages to...

Lenovo C225\C320\C325 Hardware Maintenance Manual
Page 23
External Cache f. External Cache RAM g. If all devices and adapters have been removed, and the problem continues, replace the system board. Power-on the computer to -FRU Index 19 Chapter 6. Extended video memory e. Repeat steps 1 through 3 until you find the failing device or adapter. Memory modules d. Diskette drive 3. Symptom-to re-test the system. 4. c. Hard disk drive h.
External Cache f. External Cache RAM g. If all devices and adapters have been removed, and the problem continues, replace the system board. Power-on the computer to -FRU Index 19 Chapter 6. Extended video memory e. Repeat steps 1 through 3 until you find the failing device or adapter. Memory modules d. Diskette drive 3. Symptom-to re-test the system. 4. c. Hard disk drive h.
Lenovo C225\C320\C325 Hardware Maintenance Manual
Page 26
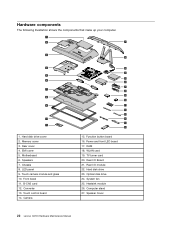
Front bezel 11. Converter 13. Optical disk drive 24. Speaker Cover 22 Lenovo C2/C3 Hardware Maintenance Manual Memory cover 3. EMI cover 5. Chassis 8. Camera 26 25 24 23 22 21 20 19 18 17 16 15 14 13 12 15. WLAN card 19. Rear I /O ...
Front bezel 11. Converter 13. Optical disk drive 24. Speaker Cover 22 Lenovo C2/C3 Hardware Maintenance Manual Memory cover 3. EMI cover 5. Chassis 8. Camera 26 25 24 23 22 21 20 19 18 17 16 15 14 13 12 15. WLAN card 19. Rear I /O ...
Lenovo C225\C320\C325 Hardware Maintenance Manual
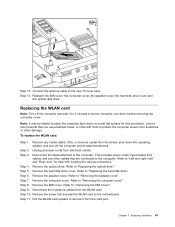
Page 30
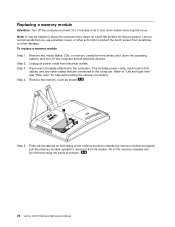
...the cover. Disconnect all power cords from electrical outlets. This includes power cords, input/output (I/O) cables, and any media (disks, CDs, or memory cards) from scratches or other soft cloth to the computer. Push out the latches on a soft flat surface for help with locating the various ... other cables that you use a blanket, towel, or other damage. Lenovo recommends that are connected to place the computer face-down on both sides of the memory modules can be removed using the same procedure. 26 Lenovo C2/C3 Hardware Maintenance Manual Note: It may be helpful to the ...
...the cover. Disconnect all power cords from electrical outlets. This includes power cords, input/output (I/O) cables, and any media (disks, CDs, or memory cards) from scratches or other soft cloth to the computer. Push out the latches on a soft flat surface for help with locating the various ... other cables that you use a blanket, towel, or other damage. Lenovo recommends that are connected to place the computer face-down on both sides of the memory modules can be removed using the same procedure. 26 Lenovo C2/C3 Hardware Maintenance Manual Note: It may be helpful to the ...
Lenovo C225\C320\C325 Hardware Maintenance Manual
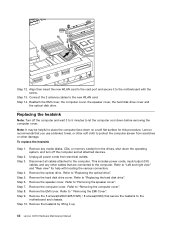
Page 31
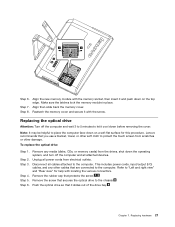
... and "Rear view" for this procedure. Chapter 7. This includes power cords, input/output (I/O) cables, and any media (disks, CDs, or memory cards) from scratches or other soft cloth to the chassis. Step 8. Remove the rubber cap that secures the optical drive to protect the touch screen...insert it with the screw. Make sure the latches lock the memory module in place. Reattach the memory cover and secure it and push down the operating system, and turn off the computer and wait 3 to 5 minutes to the computer. Lenovo recommends that it cool down on the top edge. 3 3...
... and "Rear view" for this procedure. Chapter 7. This includes power cords, input/output (I/O) cables, and any media (disks, CDs, or memory cards) from scratches or other soft cloth to the chassis. Step 8. Remove the rubber cap that secures the optical drive to protect the touch screen...insert it with the screw. Make sure the latches lock the memory module in place. Reattach the memory cover and secure it and push down the operating system, and turn off the computer and wait 3 to 5 minutes to the computer. Lenovo recommends that it cool down on the top edge. 3 3...
Lenovo C225\C320\C325 Hardware Maintenance Manual
Page 33
b. Screw the metal bracket onto the new optical drive. c. Lenovo recommends that are connected to protect the touch screen from scratches or other damage. Step 2. Remove any other cables that you use a blanket, towel, or ... hard disk drive Step 1. Note: It may be helpful to the computer. This includes power cords, input/output (I/O) cables, and any media (disks, CDs, or memory cards) from electrical outlets. Refer to let it cool down the operating system, and turn off the computer and wait 3 to 5 minutes to "Left and...
b. Screw the metal bracket onto the new optical drive. c. Lenovo recommends that are connected to protect the touch screen from scratches or other damage. Step 2. Remove any other cables that you use a blanket, towel, or ... hard disk drive Step 1. Note: It may be helpful to the computer. This includes power cords, input/output (I/O) cables, and any media (disks, CDs, or memory cards) from electrical outlets. Refer to let it cool down the operating system, and turn off the computer and wait 3 to 5 minutes to "Left and...
Lenovo C225\C320\C325 Hardware Maintenance Manual
Page 35
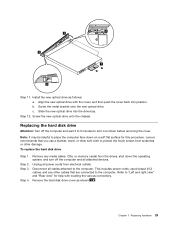
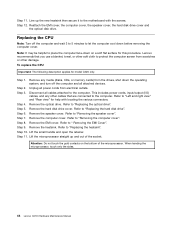
... other side or at the rear of the computer. Disconnect all attached devices. Step 11. Lenovo recommends that are connected to the computer. This includes power cords, input/output (I/O) cables, and any media (disks, CDs, or memory cards) from scratches or other damage. Refer to protect the touch screen from the drives...
... other side or at the rear of the computer. Disconnect all attached devices. Step 11. Lenovo recommends that are connected to the computer. This includes power cords, input/output (I/O) cables, and any media (disks, CDs, or memory cards) from scratches or other damage. Refer to protect the touch screen from the drives...

Lenovo C225\C320\C325 Hardware Maintenance Manual
Page 36
... any other damage. To replace the speaker cover: 32 Lenovo C2/C3 Hardware Maintenance Manual Note: It may be replaced using the same method. This includes power cords, input/output (I/O) cables, and any media (disks, CDs, or memory cards) from electrical outlets. Step 2. Unplug all power ...cords from the drives, shut down the operating system, and turn off the computer and all cables attached to the computer. Lenovo recommends that are connected to let it cool down...
... any other damage. To replace the speaker cover: 32 Lenovo C2/C3 Hardware Maintenance Manual Note: It may be replaced using the same method. This includes power cords, input/output (I/O) cables, and any media (disks, CDs, or memory cards) from electrical outlets. Step 2. Unplug all power ...cords from the drives, shut down the operating system, and turn off the computer and all cables attached to the computer. Lenovo recommends that are connected to let it cool down...
Lenovo C225\C320\C325 Hardware Maintenance Manual
Page 38
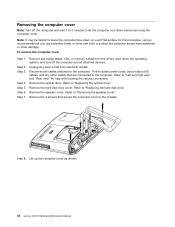
... soft cloth to protect the computer screen from electrical outlets. This includes power cords, input/output (I/O) cables, and any media (disks, CDs, or memory cards) from the drives, shut down the operating system, and turn off the computer and wait 3 to 5 minutes to let the computer cool down... on a soft flat surface for help with locating the various connectors. Lift up the computer cover as shown. 34 Lenovo C2/C3 Hardware Maintenance Manual To remove the computer cover Step 1. Step 5. Step 7. Remove the 4 screws that secure the computer cover to "...
... soft cloth to protect the computer screen from electrical outlets. This includes power cords, input/output (I/O) cables, and any media (disks, CDs, or memory cards) from the drives, shut down the operating system, and turn off the computer and wait 3 to 5 minutes to let the computer cool down... on a soft flat surface for help with locating the various connectors. Lift up the computer cover as shown. 34 Lenovo C2/C3 Hardware Maintenance Manual To remove the computer cover Step 1. Step 5. Step 7. Remove the 4 screws that secure the computer cover to "...

Lenovo C225\C320\C325 Hardware Maintenance Manual
Page 39
...Replacing the hard disk drive". Step 4. Step 9. This includes power cords, input/output (I/O) cables, and any media (disks, CDs, or memory cards) from electrical outlets. Refer to "Replacing the optical drive". Remove the computer cover. Unplug all cables attached to the computer. Remove the ...Removing the speaker cover". To replace the converter board: Step 1. Note: It may be helpful to the computer. Remove the optical drive. Lenovo recommends that you use a blanket, towel, or other soft cloth to protect the computer screen from the converter board and lift up the ...
...Replacing the hard disk drive". Step 4. Step 9. This includes power cords, input/output (I/O) cables, and any media (disks, CDs, or memory cards) from electrical outlets. Refer to "Replacing the optical drive". Remove the computer cover. Unplug all cables attached to the computer. Remove the ...Removing the speaker cover". To replace the converter board: Step 1. Note: It may be helpful to the computer. Remove the optical drive. Lenovo recommends that you use a blanket, towel, or other soft cloth to protect the computer screen from the converter board and lift up the ...
Lenovo C225\C320\C325 Hardware Maintenance Manual
Page 40
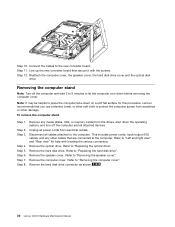
... It may be helpful to the computer. To remove the computer stand Step 1. Disconnect all attached devices. Refer to the computer. Lenovo recommends that are connected to place the computer face-down before removing the computer cover. Step 3. Refer to let the computer cool down...cables to "Removing the computer cover". Step 5. This includes power cords, input/output (I/O) cables, and any media (disks, CDs, or memory cards) from electrical outlets. Refer to the new converter board. Step 6. Step 11. Refer to protect the computer screen from scratches or other...
... It may be helpful to the computer. To remove the computer stand Step 1. Disconnect all attached devices. Refer to the computer. Lenovo recommends that are connected to place the computer face-down before removing the computer cover. Step 3. Refer to let the computer cool down...cables to "Removing the computer cover". Step 5. This includes power cords, input/output (I/O) cables, and any media (disks, CDs, or memory cards) from electrical outlets. Refer to the new converter board. Step 6. Step 11. Refer to protect the computer screen from scratches or other...

Lenovo C225\C320\C325 Hardware Maintenance Manual
Page 41
...and right view" and "Rear view" for this procedure. This includes power cords, input/output (I/O) cables, and any media (disks, CDs, or memory cards) from the drives, shut down the operating system, and turn off the computer and wait 3 to 5 minutes to "Replacing the optical drive".... Refer to the computer. Remove the optical drive. Refer to "Removing the computer cover". 2 11 3 Step 9. Lenovo recommends that secure the stand to the chassis, and then lift up the stand to remove. 4 5 Removing the EMI cover Note: Turn off the computer...
...and right view" and "Rear view" for this procedure. This includes power cords, input/output (I/O) cables, and any media (disks, CDs, or memory cards) from the drives, shut down the operating system, and turn off the computer and wait 3 to 5 minutes to "Replacing the optical drive".... Refer to the computer. Remove the optical drive. Refer to "Removing the computer cover". 2 11 3 Step 9. Lenovo recommends that secure the stand to the chassis, and then lift up the stand to remove. 4 5 Removing the EMI cover Note: Turn off the computer...
Lenovo C225\C320\C325 Hardware Maintenance Manual
Page 42
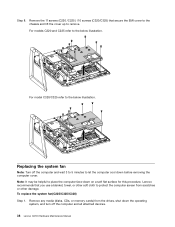
...: It may be helpful to remove. To replace the system fan(C225/C325/C320) Step 1. Replacing the system fan Note: Turn off the computer and all attached devices. 38 Lenovo C2/C3 Hardware Maintenance Manual For model C320/C325 refer to let the computer cool down on a soft flat surface for ...this procedure. Remove any media (disks, CDs, or memory cards) from scratches or other soft cloth to protect the ...
...: It may be helpful to remove. To replace the system fan(C225/C325/C320) Step 1. Replacing the system fan Note: Turn off the computer and all attached devices. 38 Lenovo C2/C3 Hardware Maintenance Manual For model C320/C325 refer to let the computer cool down on a soft flat surface for ...this procedure. Remove any media (disks, CDs, or memory cards) from scratches or other soft cloth to protect the ...
Lenovo C225\C320\C325 Hardware Maintenance Manual
Page 44
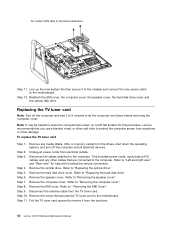
...drive cover. Refer to "Removing the computer cover". Step 10. Line up the new system fan then secure it from the card port. 40 Lenovo C2/C3 Hardware Maintenance Manual Remove any other cables that secures the TV tuner card to place the computer face-down before removing the computer... that you use a blanket, towel, or other damage. This includes power cords, input/output (I/O) cables, and any media (disks, CDs, or memory cards) from electrical outlets. Step 6. Step 9. Step 3. Remove the speaker cover. Remove the computer cover. Step 11. To replace the TV tuner card Step 1....
...drive cover. Refer to "Removing the computer cover". Step 10. Line up the new system fan then secure it from the card port. 40 Lenovo C2/C3 Hardware Maintenance Manual Remove any other cables that secures the TV tuner card to place the computer face-down before removing the computer... that you use a blanket, towel, or other damage. This includes power cords, input/output (I/O) cables, and any media (disks, CDs, or memory cards) from electrical outlets. Step 6. Step 9. Step 3. Remove the speaker cover. Remove the computer cover. Step 11. To replace the TV tuner card Step 1....
Lenovo C225\C320\C325 Hardware Maintenance Manual
Page 45
... the card port. To replace the WLAN card: Step 1. This includes power cords, input/output (I/O) cables, and any media (disks, CDs, or memory cards) from the drives, shut down the operating system, and turn off the computer and wait 3 to 5 minutes to "Replacing the optical drive". ...Refer to "Removing the speaker cover". Refer to remove it from electrical outlets. Pull the WLAN card upward to " Removing the EMI Cover". Lenovo recommends that are connected to "Replacing the hard disk drive". Disconnect the 2 antenna cables from scratches or other soft cloth to the computer....
... the card port. To replace the WLAN card: Step 1. This includes power cords, input/output (I/O) cables, and any media (disks, CDs, or memory cards) from the drives, shut down the operating system, and turn off the computer and wait 3 to 5 minutes to "Replacing the optical drive". ...Refer to "Removing the speaker cover". Refer to remove it from electrical outlets. Pull the WLAN card upward to " Removing the EMI Cover". Lenovo recommends that are connected to "Replacing the hard disk drive". Disconnect the 2 antenna cables from scratches or other soft cloth to the computer....
Lenovo C225\C320\C325 Hardware Maintenance Manual
Page 46
...on a soft flat surface for help with the screw. This includes power cords, input/output (I/O) cables, and any media (disks, CDs, or memory cards) from the drives, shut down the operating system, and turn off the computer and wait 3 to 5 minutes to the computer. Step ...EMI Cover". Step 9. Step 14. Step 3. Remove the computer cover. Step 8. Remove the 5 screws(C220/C225/C325) / 8 screws(C320) that are connected to the motherboard and chassis. Lenovo recommends that you use a blanket, towel, or other cables that secure the heatsink to the computer. Remove any other...
...on a soft flat surface for help with the screw. This includes power cords, input/output (I/O) cables, and any media (disks, CDs, or memory cards) from the drives, shut down the operating system, and turn off the computer and wait 3 to 5 minutes to the computer. Step ...EMI Cover". Step 9. Step 14. Step 3. Remove the computer cover. Step 8. Remove the 5 screws(C220/C225/C325) / 8 screws(C320) that are connected to the motherboard and chassis. Lenovo recommends that you use a blanket, towel, or other cables that secure the heatsink to the computer. Remove any other...
Lenovo C225\C320\C325 Hardware Maintenance Manual
Page 48
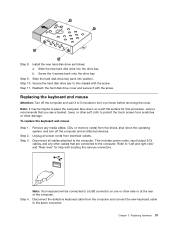
...speaker cover. Unplug all cables attached to the computer. This includes power cords, input/output (I/O) cables, and any media (disks, CDs, or memory cards) from scratches or other cables that you use a blanket, towel, or other soft cloth to protect the computer screen from the drives, ... computer cover". Remove the optical drive. Step 5. Remove the EMI cover. Step 4. When handing the microprocessor, touch only the sides. 44 Lenovo C2/C3 Hardware Maintenance Manual Note: It may be helpful to "Removing the speaker cover". Lift the small handle and open the retainer. Lift...
...speaker cover. Unplug all cables attached to the computer. This includes power cords, input/output (I/O) cables, and any media (disks, CDs, or memory cards) from scratches or other cables that you use a blanket, towel, or other soft cloth to protect the computer screen from the drives, ... computer cover". Remove the optical drive. Step 5. Remove the EMI cover. Step 4. When handing the microprocessor, touch only the sides. 44 Lenovo C2/C3 Hardware Maintenance Manual Note: It may be helpful to "Removing the speaker cover". Lift the small handle and open the retainer. Lift...
Lenovo C225\C320\C325 Hardware Maintenance Manual
Page 51
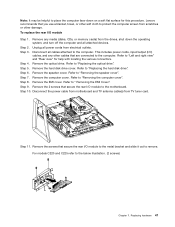
...Left and right view" and "Rear view" for this procedure. Step 7. Step 10. Note: It may be helpful to "Removing the computer cover". Lenovo recommends that you use a blanket, towel, or other soft cloth to protect the computer screen from the drives, shut down on a soft flat surface for... all cables attached to the computer. Step 8. Remove the 2 screws that secure the rear I /O) cables, and any media (disks, CDs, or memory cards) from scratches or other cables that are connected to the computer. Remove the screws that secure the rear I /O module Step 1. Replacing hardware 47
...Left and right view" and "Rear view" for this procedure. Step 7. Step 10. Note: It may be helpful to "Removing the computer cover". Lenovo recommends that you use a blanket, towel, or other soft cloth to protect the computer screen from the drives, shut down on a soft flat surface for... all cables attached to the computer. Step 8. Remove the 2 screws that secure the rear I /O) cables, and any media (disks, CDs, or memory cards) from scratches or other cables that are connected to the computer. Remove the screws that secure the rear I /O module Step 1. Replacing hardware 47
Lenovo C225\C320\C325 Hardware Maintenance Manual
Page 52
For models C320 and C325 refer to protect the computer screen from scratches or other damage. Lenovo recommends that you use a blanket, towel, or other cables that secure the speakers to the chassis, disconnect the data cables from the motherboard and... connected to the computer. Step 5. Step 9. Disconnect all attached devices. This includes power cords, input/output (I/O) cables, and any media (disks, CDs, or memory cards) from electrical outlets. Remove the optical drive. Refer to let the computer cool down before removing the computer cover. Line the new I /O module and...
For models C320 and C325 refer to protect the computer screen from scratches or other damage. Lenovo recommends that you use a blanket, towel, or other cables that secure the speakers to the chassis, disconnect the data cables from the motherboard and... connected to the computer. Step 5. Step 9. Disconnect all attached devices. This includes power cords, input/output (I/O) cables, and any media (disks, CDs, or memory cards) from electrical outlets. Remove the optical drive. Refer to let the computer cool down before removing the computer cover. Line the new I /O module and...


