Lenovo C2 Series User Guide
Page 5
Using the Rescue System 23 OneKey Recovery 24 Driver and Application Installation 25 Using the Software 27 Lenovo Support 28 Troubleshooting and Confirming Setup 29 Troubleshooting Display Problems 30 Troubleshooting Touch screen 31 Troubleshooting Audio Problems 31 ... Problems 32 Troubleshooting Problems with Optical Drives and Hard Disks 33 Special considerations for troubleshooting Windows 34 Windows Help and Support 34 BIOS setup utility 34 Performing Daily Maintenance Tasks 35 Appendix 37 Declaration 37 Trademarks 38 Energy Star Statement 38 Enabling ErP compliance mode ...
Using the Rescue System 23 OneKey Recovery 24 Driver and Application Installation 25 Using the Software 27 Lenovo Support 28 Troubleshooting and Confirming Setup 29 Troubleshooting Display Problems 30 Troubleshooting Touch screen 31 Troubleshooting Audio Problems 31 ... Problems 32 Troubleshooting Problems with Optical Drives and Hard Disks 33 Special considerations for troubleshooting Windows 34 Windows Help and Support 34 BIOS setup utility 34 Performing Daily Maintenance Tasks 35 Appendix 37 Declaration 37 Trademarks 38 Energy Star Statement 38 Enabling ErP compliance mode ...

Lenovo C2 Series User Guide
Page 39
..., then set boot mode to UEFI or Legacy support on the computer to start the BIOS setup utility: 1. Repeatedly press and release the F1 key once turning on the boot menu. 34 User Guide 31506537 C260 UG V1.0 (Win8.1)(EN)(R).indb 34 2013-12-6 11:54:10 There are two ... It communicates basic computer information and provides options for this method may be slightly different from the actual capacity due to explore. The BIOS setup utility is the BIOS setup utility? Windows Help and Support If you have a problem with the operating system, see the Windows Help and Support file. ...
..., then set boot mode to UEFI or Legacy support on the computer to start the BIOS setup utility: 1. Repeatedly press and release the F1 key once turning on the boot menu. 34 User Guide 31506537 C260 UG V1.0 (Win8.1)(EN)(R).indb 34 2013-12-6 11:54:10 There are two ... It communicates basic computer information and provides options for this method may be slightly different from the actual capacity due to explore. The BIOS setup utility is the BIOS setup utility? Windows Help and Support If you have a problem with the operating system, see the Windows Help and Support file. ...
Lenovo C260 All-In-One PC Hardware Maintenance Manual
Page 5
...Specifications 9 Chapter 4. General Checkout . . . . . 11 Chapter 5. Additional Service Information 45 © Copyright Lenovo 2013, 2014 iii Contents Chapter 1. Using the Setup Utility. . . 13 Starting the Lenovo BIOS Setup Utility program . 13 Viewing and changing settings 13 Using passwords 13 Enabling or disabling a device 15 Selecting ...a startup device 16 Changing booting mode 17 Exiting the Lenovo BIOS Setup Utility program . . 17 Chapter 6. Replacing hardware . . . . 21 General information 21 Replacing the ...
...Specifications 9 Chapter 4. General Checkout . . . . . 11 Chapter 5. Additional Service Information 45 © Copyright Lenovo 2013, 2014 iii Contents Chapter 1. Using the Setup Utility. . . 13 Starting the Lenovo BIOS Setup Utility program . 13 Viewing and changing settings 13 Using passwords 13 Enabling or disabling a device 15 Selecting ...a startup device 16 Changing booting mode 17 Exiting the Lenovo BIOS Setup Utility program . . 17 Chapter 6. Replacing hardware . . . . 21 General information 21 Replacing the ...
Lenovo C260 All-In-One PC Hardware Maintenance Manual
Page 19
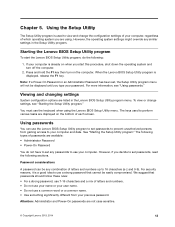
... to view and change settings, see "Using passwords." Chapter 5. However, the operating system settings might override any similar settings in the Lenovo BIOS Setup Utility program menu. For more information, see "Starting the Setup Utility program." Viewing and changing settings System configuration options are not ...follow these rules: • For a strong password, use 7-16 characters and a mix of your computer and data. Starting the Lenovo BIOS Setup Utility program To start this procedure, shut down the operating system and turn on the bottom of passwords are using the...
... to view and change settings, see "Using passwords." Chapter 5. However, the operating system settings might override any similar settings in the Lenovo BIOS Setup Utility program menu. For more information, see "Starting the Setup Utility program." Viewing and changing settings System configuration options are not ...follow these rules: • For a strong password, use 7-16 characters and a mix of your computer and data. Starting the Lenovo BIOS Setup Utility program To start this procedure, shut down the operating system and turn on the bottom of passwords are using the...

Lenovo C260 All-In-One PC Hardware Maintenance Manual
Page 20
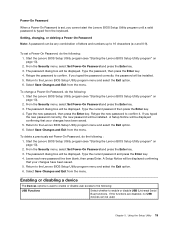
... Password Setting an Administrator Password deters unauthorized persons from the menu. 14 Lenovo C260 All-In-One PC Hardware Maintenance Manual For more information, see "Starting the Lenovo BIOS Setup Utility program" on page 13. 1. Start the Lenovo BIOS Setup Utility program (see "Starting the Lenovo BIOS Setup Utility program" on page 13). 2. The password dialog box will...
... Password Setting an Administrator Password deters unauthorized persons from the menu. 14 Lenovo C260 All-In-One PC Hardware Maintenance Manual For more information, see "Starting the Lenovo BIOS Setup Utility program" on page 13. 1. Start the Lenovo BIOS Setup Utility program (see "Starting the Lenovo BIOS Setup Utility program" on page 13). 2. The password dialog box will...
Lenovo C260 All-In-One PC Hardware Maintenance Manual
Page 21
... the following : USB Functions Select whether to the following : 1. Retype the new password to confirm. Start the Lenovo BIOS Setup Utility program (see "Starting the Lenovo BIOS Setup Utility program" on page 13). 2. If you typed the new password correctly, the new password will be ... Type the current password and press the Enter key. 4. Select Save Changes and Exit from the keyboard. Start the Lenovo BIOS Setup Utility program (see "Starting the Lenovo BIOS Setup Utility program" on page 13). 2. Type the current password then press the Enter key. 4. A Setup Notice...
... the following : USB Functions Select whether to the following : 1. Retype the new password to confirm. Start the Lenovo BIOS Setup Utility program (see "Starting the Lenovo BIOS Setup Utility program" on page 13). 2. If you typed the new password correctly, the new password will be ... Type the current password and press the Enter key. 4. Select Save Changes and Exit from the keyboard. Start the Lenovo BIOS Setup Utility program (see "Starting the Lenovo BIOS Setup Utility program" on page 13). 2. Type the current password then press the Enter key. 4. A Setup Notice...
Lenovo C260 All-In-One PC Hardware Maintenance Manual
Page 22
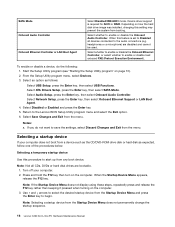
...Enabled and press the Enter key. 5. Select Save Changes and Exit from the Startup Device Menu does not permanently change the startup sequence. 16 Lenovo C260 All-In-One PC Hardware Maintenance Manual Press and hold the F12 key then turn on the computer. 3. Use ↑ and ↓ ..., or select whether to enable or disable load onboard PXE (Preboot Execution Environment). To enable or disable a device, do not want to the Lenovo BIOS Setup Utility program menu and select the Exit option. 6. Select an option as expected, follow one of the procedures below. Select Audio Setup,...
...Enabled and press the Enter key. 5. Select Save Changes and Exit from the Startup Device Menu does not permanently change the startup sequence. 16 Lenovo C260 All-In-One PC Hardware Maintenance Manual Press and hold the F12 key then turn on the computer. 3. Use ↑ and ↓ ..., or select whether to enable or disable load onboard PXE (Preboot Execution Environment). To enable or disable a device, do not want to the Lenovo BIOS Setup Utility program menu and select the Exit option. 6. Select an option as expected, follow one of the procedures below. Select Audio Setup,...
Lenovo C260 All-In-One PC Hardware Maintenance Manual
Page 23
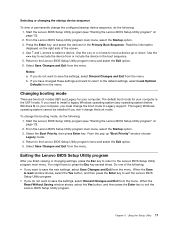
... Changes and Exit from the menu. If you do not want to press the Esc key several times. Start the Lenovo BIOS Setup Utility program (see "Starting the Lenovo BIOS Setup Utility program" on page 13). 2. Select the Boot Priority, then press Enter key. When the Reset Without... or changing the startup device sequence To view or permanently change the configured startup device sequence, do the following : 1. Return to exit the Lenovo BIOS Setup Utility program. The default boot mode for the Primary Boot Sequence. Return to select a device. Use - Select Save Changes and Exit ...
... Changes and Exit from the menu. If you do not want to press the Esc key several times. Start the Lenovo BIOS Setup Utility program (see "Starting the Lenovo BIOS Setup Utility program" on page 13). 2. Select the Boot Priority, then press Enter key. When the Reset Without... or changing the startup device sequence To view or permanently change the configured startup device sequence, do the following : 1. Return to exit the Lenovo BIOS Setup Utility program. The default boot mode for the Primary Boot Sequence. Return to select a device. Use - Select Save Changes and Exit ...
Lenovo C260 All-In-One PC Hardware Maintenance Manual
Page 26
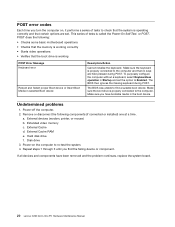
POST does the following components (if connected or installed) one at a time. The BIOS then ignores the missing keyboard during POST. The BIOS was unable to Enabled. External devices (modem, printer, or mouse) b. Hard disk drive f. This series of tests to check that the ...series of tests is properly connected to the computer. Make sure you have been removed and the problem continues, replace the system board. 20 Lenovo C260 All-In-One PC Hardware Maintenance Manual External Cache RAM e. a. If all devices and components have bootable media in selected Boot device Description/...
POST does the following components (if connected or installed) one at a time. The BIOS then ignores the missing keyboard during POST. The BIOS was unable to Enabled. External devices (modem, printer, or mouse) b. Hard disk drive f. This series of tests to check that the ...series of tests is properly connected to the computer. Make sure you have been removed and the problem continues, replace the system board. 20 Lenovo C260 All-In-One PC Hardware Maintenance Manual External Cache RAM e. a. If all devices and components have bootable media in selected Boot device Description/...
Lenovo C260 All-In-One PC Hardware Maintenance Manual
Page 51
... within the Power Management menu allow you to wake the System. © Copyright Lenovo 2013, 2014 45 Power management Power management reduces the power consumption of certain components of the computer and the settings for Advanced Power Management (APM) BIOS mode is ignored. This can specify a date and time at which the...
... within the Power Management menu allow you to wake the System. © Copyright Lenovo 2013, 2014 45 Power management Power management reduces the power consumption of certain components of the computer and the settings for Advanced Power Management (APM) BIOS mode is ignored. This can specify a date and time at which the...


