
Safety and Warranty guide
Page 9
When you unpack an option or CRU, do not open the staticprotective package containing the part until the instructions direct you to install it shall be walked on, tripped over, or pinched by objects. 4 Safety and warranty guide This can cause damage to the part. When you handle options or CRUs, or perform any work inside the computer, take the following...
When you unpack an option or CRU, do not open the staticprotective package containing the part until the instructions direct you to install it shall be walked on, tripped over, or pinched by objects. 4 Safety and warranty guide This can cause damage to the part. When you handle options or CRUs, or perform any work inside the computer, take the following...

Safety and Warranty guide
Page 17
... to external antennas and cable/CATV systems. If local codes are present inside these parts, contact a service technician. Users and installers in other countries should follow local codes and ordinances when installing appliances that connect to Article 820-40 of these components. Note to the beam. Power supply statement Never remove the cover on a power supply or any component that has the following . If you suspect a problem with optical...
... to external antennas and cable/CATV systems. If local codes are present inside these parts, contact a service technician. Users and installers in other countries should follow local codes and ordinances when installing appliances that connect to Article 820-40 of these components. Note to the beam. Power supply statement Never remove the cover on a power supply or any component that has the following . If you suspect a problem with optical...
Safety and Warranty guide
Page 18
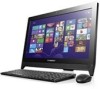
og er tilkoplet et kabel-TV nett, kan for users in wire Antenna discharge unit (NEC Section 810-20) Grounding conductors (NEC Section 810-21) Figure 1. Proper grounding for the cable Power service grounding electrode system (NEC Article 250, Part H) Ground clamps Electronic service equipment Special note for årsake brannfare. to the grounding system of the...For å unngå dette skal det ved tilkopling av utstyret til kabel-TV nettet installeres en galvanisk isolator mellom utstyret og kabel- Example of cable entry as practical. Safety and warranty guide 13 TV nettet."
og er tilkoplet et kabel-TV nett, kan for users in wire Antenna discharge unit (NEC Section 810-20) Grounding conductors (NEC Section 810-21) Figure 1. Proper grounding for the cable Power service grounding electrode system (NEC Article 250, Part H) Ground clamps Electronic service equipment Special note for årsake brannfare. to the grounding system of the...For å unngå dette skal det ved tilkopling av utstyret til kabel-TV nettet installeres en galvanisk isolator mellom utstyret og kabel- Example of cable entry as practical. Safety and warranty guide 13 TV nettet."

Safety and Warranty guide
Page 30
...lenovo.com The following replaces the same section in Part 3 - The warranty period and type of purchase specified on your product are set forth below in Part 1: What this Limited Warranty. YOU MAY ALSO HAVE OTHER RIGHTS UNDER A WRITTEN AGREEMENT WITH LENOVO. Telephone: +61 2 8003 8200. Safety and warranty guide 25 Part 2 - Country-specific Terms Australia "Lenovo" means Lenovo (Australia & New... BY CONTRACT. The warranty period for the product starts on the original date of warranty service that you purchase is free from defects in writing. YOU MAY HAVE OTHER RIGHTS...
...lenovo.com The following replaces the same section in Part 3 - The warranty period and type of purchase specified on your product are set forth below in Part 1: What this Limited Warranty. YOU MAY ALSO HAVE OTHER RIGHTS UNDER A WRITTEN AGREEMENT WITH LENOVO. Telephone: +61 2 8003 8200. Safety and warranty guide 25 Part 2 - Country-specific Terms Australia "Lenovo" means Lenovo (Australia & New... BY CONTRACT. The warranty period for the product starts on the original date of warranty service that you purchase is free from defects in writing. YOU MAY HAVE OTHER RIGHTS...

Safety and Warranty guide
Page 31
... information to repair the product; The following is added to access your property. You have the right to the same section in Part 1: Use of Personal Contact Information: Lenovo will be replaced by refurbished products or parts of the same type rather than being repaired. Refurbished parts may not be new, but it will not be able to perform our service under this...
... information to repair the product; The following is added to access your property. You have the right to the same section in Part 1: Use of Personal Contact Information: Lenovo will be replaced by refurbished products or parts of the same type rather than being repaired. Refurbished parts may not be new, but it will not be able to perform our service under this...

Safety and Warranty guide
Page 38
... a suitable working area to be repaired or exchanged after you at a service center. If so, the Service Provider will send the product to you deliver it will be completed at its expense. 3. for your location. Safety and warranty guide 33 The requirement to return a defective CRU, if any, will return the product to the service center at www.lenovo.com...
... a suitable working area to be repaired or exchanged after you at a service center. If so, the Service Provider will send the product to you deliver it will be completed at its expense. 3. for your location. Safety and warranty guide 33 The requirement to return a defective CRU, if any, will return the product to the service center at www.lenovo.com...
Lenovo C2 Series User Guide
Page 13
... with an Internet Service Provider (ISP) and some hardware. Contact your ISP for detailed setup instructions. Wired network connection For wired networks, connect one end of an Ethernet cable (purchased separately) to the Ethernet connector on your computer, and then connect the other end to other devices. Move the cursor to the Internet, you can use the built-in wireless LAN antenna to the wireless network: 1. Test the wireless network by country. Connecting to the Internet To connect to...
... with an Internet Service Provider (ISP) and some hardware. Contact your ISP for detailed setup instructions. Wired network connection For wired networks, connect one end of an Ethernet cable (purchased separately) to the Ethernet connector on your computer, and then connect the other end to other devices. Move the cursor to the Internet, you can use the built-in wireless LAN antenna to the wireless network: 1. Test the wireless network by country. Connecting to the Internet To connect to...
Lenovo C2 Series User Guide
Page 24
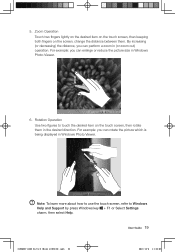
... picture size in Windows Photo Viewer. Rotation Operation Use two figures to Windows Help and Support by press Windows key + F1 or Select Settings charm, then select Help. Note: To learn more about how to use the touch screen, refer to touch the desired item on the screen, change the distance between them in (or zoom out) operation. 5. User Guide 19 31506537 C260 UG V1.0 (Win8...
... picture size in Windows Photo Viewer. Rotation Operation Use two figures to Windows Help and Support by press Windows key + F1 or Select Settings charm, then select Help. Note: To learn more about how to use the touch screen, refer to touch the desired item on the screen, change the distance between them in (or zoom out) operation. 5. User Guide 19 31506537 C260 UG V1.0 (Win8...
Lenovo C2 Series User Guide
Page 25
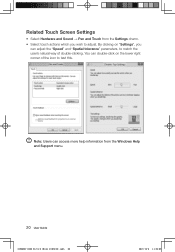
Related Touch Screen Settings • Select Hardware and Sound → Pen and Touch from the Windows Help and Support menu. 20 User Guide 31506537 C260 UG V1.0 (Win8.1)(EN)(R).indb 20 2013-12-6 11:54:08 Note: Users can adjust the "Speed" and "Spatial tolerance" parameters, to match the user's natural way of the icon to adjust. You can double-click on "Settings", you can access more help information from the Settings charm. • Select touch actions which you wish to test this. By clicking on the lower right corner of double-clicking.
Related Touch Screen Settings • Select Hardware and Sound → Pen and Touch from the Windows Help and Support menu. 20 User Guide 31506537 C260 UG V1.0 (Win8.1)(EN)(R).indb 20 2013-12-6 11:54:08 Note: Users can adjust the "Speed" and "Spatial tolerance" parameters, to match the user's natural way of the icon to adjust. You can double-click on "Settings", you can access more help information from the Settings charm. • Select touch actions which you wish to test this. By clicking on the lower right corner of double-clicking.
Lenovo C2 Series User Guide
Page 30
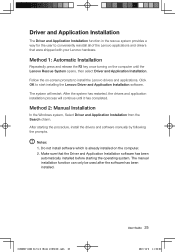
... the Lenovo Rescue System opens, then select Driver and Application Installation. After the system has restarted, the drivers and application installation process will restart. Method 2: Manual Installation In the Windows system, Select Driver and Application Installation from the Search charm. Method 1: Automatic Installation Repeatedly press and release the F2 key once turning on the computer. 2. Follow the on-screen prompts to install the Lenovo drivers and applications. Notes: 1. Make...
... the Lenovo Rescue System opens, then select Driver and Application Installation. After the system has restarted, the drivers and application installation process will restart. Method 2: Manual Installation In the Windows system, Select Driver and Application Installation from the Search charm. Method 1: Automatic Installation Repeatedly press and release the F2 key once turning on the computer. 2. Follow the on-screen prompts to install the Lenovo drivers and applications. Notes: 1. Make...
Lenovo C2 Series User Guide
Page 35
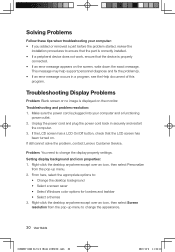
... solve the problem, contact Lenovo Customer Service. Problem: You need to : • Change the desktop background • Select a screen saver • Select Windows color options for borders and taskbar • Select a themes 3. If the LCD screen has a LCD On/Off button, check that the device is plugged into your computer: • If you added or removed a part before the problem started, review the installation procedures to change the display property settings. Solving Problems Follow these...
... solve the problem, contact Lenovo Customer Service. Problem: You need to : • Change the desktop background • Select a screen saver • Select Windows color options for borders and taskbar • Select a themes 3. If the LCD screen has a LCD On/Off button, check that the device is plugged into your computer: • If you added or removed a part before the problem started, review the installation procedures to change the display property settings. Solving Problems Follow these...
Lenovo C2 Series User Guide
Page 36
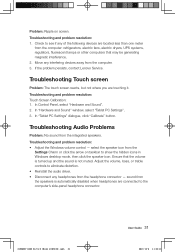
... Settings" dialogue, click "Calibrate" button. Troubleshooting Audio Problems Problem: No sound from the Settings Charm or click the arrow on screen. In Control Panel, select "Hardware and Sound". 2. Troubleshooting and problem resolution: • Adjust the Windows volume control - Problem: Ripple on taskbar to see if any of the following devices are located less than one meter from the speakers is not muted. Troubleshooting and problem resolution: Touch Screen Calibration: 1. sound from the computer: refrigerators, electric fans...
... Settings" dialogue, click "Calibrate" button. Troubleshooting Audio Problems Problem: No sound from the Settings Charm or click the arrow on screen. In Control Panel, select "Hardware and Sound". 2. Troubleshooting and problem resolution: • Adjust the Windows volume control - Problem: Ripple on taskbar to see if any of the following devices are located less than one meter from the speakers is not muted. Troubleshooting and problem resolution: Touch Screen Calibration: 1. sound from the computer: refrigerators, electric fans...

Lenovo C2 Series User Guide
Page 39
... Startup → Boot Priority, then set boot mode to explore. How can I change the boot mode, start the Setup Utility program. BIOS setup utility What is ROM-based software. To start the BIOS setup utility? You can read the Windows Help and Support file on the boot menu. 34 User Guide 31506537 C260 UG V1.0 (Win8.1)(EN)(R).indb 34 2013-12-6 11:54:10 The capacity of the hard disk as it may be useful later when troubleshooting system problems: The drivers for setting boot devices...
... Startup → Boot Priority, then set boot mode to explore. How can I change the boot mode, start the Setup Utility program. BIOS setup utility What is ROM-based software. To start the BIOS setup utility? You can read the Windows Help and Support file on the boot menu. 34 User Guide 31506537 C260 UG V1.0 (Win8.1)(EN)(R).indb 34 2013-12-6 11:54:10 The capacity of the hard disk as it may be useful later when troubleshooting system problems: The drivers for setting boot devices...
Lenovo C2 Series User Guide
Page 40
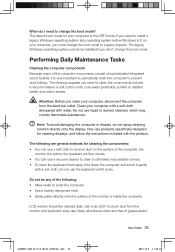
Do not use products specifically designed for cleaning displays, and follow the instructions included with the product. The following : • Allow water to enter the computer. • Use a heavily dampened cloth. • Spray water directly onto the surface of the monitor or inside the computer. If you need to change the boot mode? The cleaning supplies you must change the boot mode. Use a dry cloth to brush dust...
Do not use products specifically designed for cleaning displays, and follow the instructions included with the product. The following : • Allow water to enter the computer. • Use a heavily dampened cloth. • Spray water directly onto the surface of the monitor or inside the computer. If you need to change the boot mode? The cleaning supplies you must change the boot mode. Use a dry cloth to brush dust...
Lenovo C260 All-In-One PC Hardware Maintenance Manual
Page 5
...19 Hard disk drive boot error 19 Power Supply Problems 19 POST error codes 20 Undetermined problems 20 Chapter 7. Replacing hardware . . . . 21 General information 21 Replacing the keyboard and mouse 22 Replacing the power adapter 22 Replacing the computer stand 24 Removing the rear cover 25 Replacing the optical drive 28 Replacing a memory module 30 Replacing the hard disk drive 30 Replacing the Wi-Fi card 32 Replacing the speaker system 32 Replacing the indicator board 33 Replacing the power switch board 33 Replacing the system fan 34 Replacing the motherboard 35 Replacing...
...19 Hard disk drive boot error 19 Power Supply Problems 19 POST error codes 20 Undetermined problems 20 Chapter 7. Replacing hardware . . . . 21 General information 21 Replacing the keyboard and mouse 22 Replacing the power adapter 22 Replacing the computer stand 24 Removing the rear cover 25 Replacing the optical drive 28 Replacing a memory module 30 Replacing the hard disk drive 30 Replacing the Wi-Fi card 32 Replacing the speaker system 32 Replacing the indicator board 33 Replacing the power switch board 33 Replacing the system fan 34 Replacing the motherboard 35 Replacing...
Lenovo C260 All-In-One PC Hardware Maintenance Manual
Page 12
... cables as those listed below, to connect or disconnect signal cables. • Never turn on these systems. - The mat is insulative and retains a charge even when you open the device covers, unless instructed otherwise in the following table when installing, moving, or opening covers on a double-insulated or battery-operated system. DANGER Electrical current from touching your skin to any equipment that meets the specific service...
... cables as those listed below, to connect or disconnect signal cables. • Never turn on these systems. - The mat is insulative and retains a charge even when you open the device covers, unless instructed otherwise in the following table when installing, moving, or opening covers on a double-insulated or battery-operated system. DANGER Electrical current from touching your skin to any equipment that meets the specific service...
Lenovo C260 All-In-One PC Hardware Maintenance Manual
Page 19
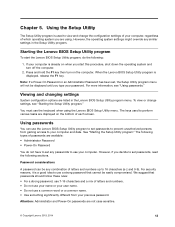
... types of passwords are not case sensitive. © Copyright Lenovo 2013, 2014 13 If your computer is displayed, release the F1 key. Starting the Lenovo BIOS Setup Utility program To start this procedure, shut down the operating system and turn on the bottom of letters and numbers. • Do not use your name or your user name. • Do not use 7-16 characters and a mix of each screen. The keys used...
... types of passwords are not case sensitive. © Copyright Lenovo 2013, 2014 13 If your computer is displayed, release the F1 key. Starting the Lenovo BIOS Setup Utility program To start this procedure, shut down the operating system and turn on the bottom of letters and numbers. • Do not use your name or your user name. • Do not use 7-16 characters and a mix of each screen. The keys used...
Lenovo C260 All-In-One PC Hardware Maintenance Manual
Page 22
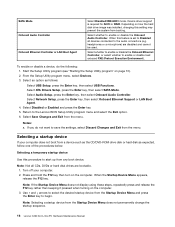
... Network Setup, press the Enter key, then select Onboard Ethernet Support or LAN Boot Agent. 4. Turn off your computer does not boot from a device such as the CD/DVD-ROM drive disk or hard disk as follows: Select USB Setup, press the Enter key, then select USB Functions. Note: Selecting a startup device from the menu. Device driver support is set to begin. Select whether to enable or disable the Onboard Ethernet Controller, or select whether to enable or disable the Onboard Audio Controller. Start the Setup Utility program (see "Starting the Setup Utility...
... Network Setup, press the Enter key, then select Onboard Ethernet Support or LAN Boot Agent. 4. Turn off your computer does not boot from a device such as the CD/DVD-ROM drive disk or hard disk as follows: Select USB Setup, press the Enter key, then select USB Functions. Note: Selecting a startup device from the menu. Device driver support is set to begin. Select whether to enable or disable the Onboard Ethernet Controller, or select whether to enable or disable the Onboard Audio Controller. Start the Setup Utility program (see "Starting the Setup Utility...
Lenovo C260 All-In-One PC Hardware Maintenance Manual
Page 23
... you need to install a legacy Windows operating system (any operating system before Windows 8) on page 13). 2. When the Save & reset window shows, select the Yes button, and then press the Enter key to save the new settings, select Save Changes and Exit from the menu. To change the booting mode, do the following: 1. Select Save Changes and Exit from or include the device in the boot sequence. 5. Start the Lenovo BIOS Setup Utility program (see "Starting the Lenovo BIOS Setup Utility...
... you need to install a legacy Windows operating system (any operating system before Windows 8) on page 13). 2. When the Save & reset window shows, select the Yes button, and then press the Enter key to save the new settings, select Save Changes and Exit from the menu. To change the booting mode, do the following: 1. Select Save Changes and Exit from or include the device in the boot sequence. 5. Start the Lenovo BIOS Setup Utility program (see "Starting the Lenovo BIOS Setup Utility...
Lenovo C260 All-In-One PC Hardware Maintenance Manual
Page 26
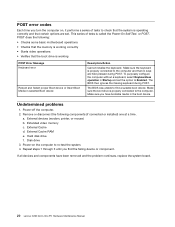
... options are held pressed during POST. Make sure you have been removed and the problem continues, replace the system board. 20 Lenovo C260 All-In-One PC Hardware Maintenance Manual Power-off the computer. 2. Extended video memory c. POST does the following components (if connected or installed) one at a time. Make sure the keyboard is working correctly • Starts video operations • Verifies that the boot drive is properly connected to find the failing device or component. Remove...
... options are held pressed during POST. Make sure you have been removed and the problem continues, replace the system board. 20 Lenovo C260 All-In-One PC Hardware Maintenance Manual Power-off the computer. 2. Extended video memory c. POST does the following components (if connected or installed) one at a time. Make sure the keyboard is working correctly • Starts video operations • Verifies that the boot drive is properly connected to find the failing device or component. Remove...


