

Safety and Warranty guide
Page 9
... warranty guide When you unpack an option or CRU, do not open the staticprotective package containing the part until the instructions direct you handle options or CRUs, or perform any work inside the computer, take the following precautions to avoid static-electricity damage: • Limit your body. • When possible, remove the static-sensitive part from touching components. • When you install...
... warranty guide When you unpack an option or CRU, do not open the staticprotective package containing the part until the instructions direct you handle options or CRUs, or perform any work inside the computer, take the following precautions to avoid static-electricity damage: • Limit your body. • When possible, remove the static-sensitive part from touching components. • When you install...

Safety and Warranty guide
Page 17
... when open. Hazardous voltage, current, and energy levels are intended to cable/CATV systems, or both, and that connect to the beam. Users and installers in particular, specifies that has the following . Products with optical instruments, and avoid direct exposure to external antennas and cable/CATV systems. If local codes are no serviceable parts inside any part that the cable ground shall be installed in...
... when open. Hazardous voltage, current, and energy levels are intended to cable/CATV systems, or both, and that connect to the beam. Users and installers in particular, specifies that has the following . Products with optical instruments, and avoid direct exposure to external antennas and cable/CATV systems. If local codes are no serviceable parts inside any part that the cable ground shall be installed in...
Safety and Warranty guide
Page 18
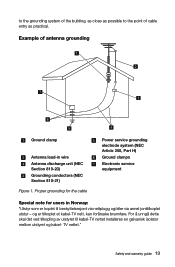
Proper grounding for the cable Power service grounding electrode system (NEC Article 250, Part H) Ground clamps Electronic service equipment Special note for årsake brannfare. og er tilkoplet et kabel-TV nett, kan for users in wire Antenna discharge unit (NEC Section 810-20) Grounding conductors (...cable entry as practical. to the grounding system of the building, as close as possible to the point of antenna grounding Ground clamp Antenna lead-in Norway: "Utstyr som er koplet til beskyttelsesjord via nettplugg og/eller via annet jordtilkoplet utstyr - Safety and warranty guide...
Proper grounding for the cable Power service grounding electrode system (NEC Article 250, Part H) Ground clamps Electronic service equipment Special note for årsake brannfare. og er tilkoplet et kabel-TV nett, kan for users in wire Antenna discharge unit (NEC Section 810-20) Grounding conductors (...cable entry as practical. to the grounding system of the building, as close as possible to the point of antenna grounding Ground clamp Antenna lead-in Norway: "Utstyr som er koplet til beskyttelsesjord via nettplugg og/eller via annet jordtilkoplet utstyr - Safety and warranty guide...

Safety and Warranty guide
Page 30
.... The warranty period for the product starts on the original date of warranty service that you a remedy under normal use and conditions during the warranty period, Lenovo will provide you purchase is free from defects in materials and workmanship under this Warranty Covers: Lenovo warrants that each hardware product that apply to a covered defect during the warranty period. YOU...
.... The warranty period for the product starts on the original date of warranty service that you a remedy under normal use and conditions during the warranty period, Lenovo will provide you purchase is free from defects in materials and workmanship under this Warranty Covers: Lenovo warrants that each hardware product that apply to a covered defect during the warranty period. YOU...

Safety and Warranty guide
Page 31
... to the same section in Part 1: Limitation of the same type rather than being repaired. You have the right to access your property. TO THE EXTENT PERMITTED BY LAW, UNDER NO CIRCUMSTANCES AND NOTWITHSTANDING THE FAILURE OF ESSENTIAL PURPOSE OF ANY REMEDY SET FORTH HEREIN, SHALL LENOVO, ITS AFFILIATES, SUPPLIERS, RESELLERS, OR SERVICE PROVIDERS BE LIABLE FOR ANY...
... to the same section in Part 1: Limitation of the same type rather than being repaired. You have the right to access your property. TO THE EXTENT PERMITTED BY LAW, UNDER NO CIRCUMSTANCES AND NOTWITHSTANDING THE FAILURE OF ESSENTIAL PURPOSE OF ANY REMEDY SET FORTH HEREIN, SHALL LENOVO, ITS AFFILIATES, SUPPLIERS, RESELLERS, OR SERVICE PROVIDERS BE LIABLE FOR ANY...

Safety and Warranty guide
Page 38
... optional service offering may dispose of the replacement CRU. 2. and 2) you fail to a designated service center at its expense. 3. When return is required: 1) return instructions, a prepaid return shipping label, and a container will be charged for the replacement CRU if the Service Provider does not receive the defective CRU from a Service Provider or Lenovo under which Self-service CRUs would be repaired or...
... optional service offering may dispose of the replacement CRU. 2. and 2) you fail to a designated service center at its expense. 3. When return is required: 1) return instructions, a prepaid return shipping label, and a container will be charged for the replacement CRU if the Service Provider does not receive the defective CRU from a Service Provider or Lenovo under which Self-service CRUs would be repaired or...
Lenovo C2 Series User Guide
Page 24
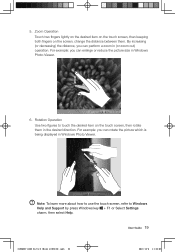
... touch the desired item on the screen, change the distance between them in (or zoom out) operation. User Guide 19 31506537 C260 UG V1.0 (Win8.1)(EN)(R).indb 19 2013-12-6 11:54:08 5. For example: you can rotate the picture which is being displayed in Windows Photo Viewer. 6. Rotation Operation Use two figures to Windows Help and Support by press Windows key + F1 or Select Settings...
... touch the desired item on the screen, change the distance between them in (or zoom out) operation. User Guide 19 31506537 C260 UG V1.0 (Win8.1)(EN)(R).indb 19 2013-12-6 11:54:08 5. For example: you can rotate the picture which is being displayed in Windows Photo Viewer. 6. Rotation Operation Use two figures to Windows Help and Support by press Windows key + F1 or Select Settings...
Lenovo C2 Series User Guide
Page 25
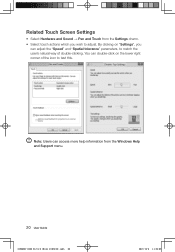
Note: Users can adjust the "Speed" and "Spatial tolerance" parameters, to match the user's natural way of the icon to adjust. By clicking on the lower right corner of double-clicking. You can double-click on "Settings", you wish to test this. Related Touch Screen Settings • Select Hardware and Sound → Pen and Touch from the Settings charm. • Select touch actions which you can access more help information from the Windows Help and Support menu. 20 User Guide 31506537 C260 UG V1.0 (Win8.1)(EN)(R).indb 20 2013-12-6 11:54:08
Note: Users can adjust the "Speed" and "Spatial tolerance" parameters, to match the user's natural way of the icon to adjust. By clicking on the lower right corner of double-clicking. You can double-click on "Settings", you wish to test this. Related Touch Screen Settings • Select Hardware and Sound → Pen and Touch from the Settings charm. • Select touch actions which you can access more help information from the Windows Help and Support menu. 20 User Guide 31506537 C260 UG V1.0 (Win8.1)(EN)(R).indb 20 2013-12-6 11:54:08
Lenovo C2 Series User Guide
Page 30
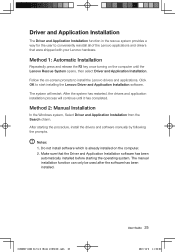
... Lenovo hardware. The system will continue until the Lenovo Rescue System opens, then select Driver and Application Installation. Notes: 1. The manual installation function can only be used after the software has been installed. 31506537 C260 UG V1.0 (Win8.1)(EN)(R).indb 25 User Guide 25 2013-12-6 11:54:09 Method 1: Automatic Installation Repeatedly press and release the F2 key once turning on the computer. 2. Method 2: Manual Installation In the Windows...
... Lenovo hardware. The system will continue until the Lenovo Rescue System opens, then select Driver and Application Installation. Notes: 1. The manual installation function can only be used after the software has been installed. 31506537 C260 UG V1.0 (Win8.1)(EN)(R).indb 25 User Guide 25 2013-12-6 11:54:09 Method 1: Automatic Installation Repeatedly press and release the F2 key once turning on the computer. 2. Method 2: Manual Installation In the Windows...
Lenovo C2 Series User Guide
Page 35
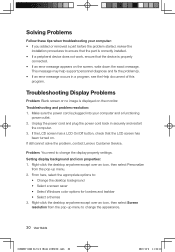
... connected. • If an error message appears on the monitor. If the LCD screen has a LCD On/Off button, check that the device is plugged into your computer: • If you added or removed a part before the problem started, review the installation procedures to ensure that the part is correctly installed. • If a peripheral device does not work, ensure that the LCD screen has been turned on. Problem: You need to : • Change...
... connected. • If an error message appears on the monitor. If the LCD screen has a LCD On/Off button, check that the device is plugged into your computer: • If you added or removed a part before the problem started, review the installation procedures to ensure that the part is correctly installed. • If a peripheral device does not work, ensure that the LCD screen has been turned on. Problem: You need to : • Change...
Lenovo C2 Series User Guide
Page 36
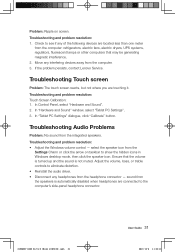
... the audio driver. • Disconnect any interfering devices away from the headphone connector - Move any headphones from the computer. 3. select the speaker icon from the speakers is not muted. In "Hardware and Sound" window, select "Tablet PC Settings". 3. Troubleshooting and problem resolution: Touch Screen Calibration: 1. In Control Panel, select "Hardware and Sound". 2. Troubleshooting and problem resolution: • Adjust the Windows volume control - If the problem persists, contact Lenovo Service. In "Tablet PC Settings" dialogue, click "Calibrate" button. sound...
... the audio driver. • Disconnect any interfering devices away from the headphone connector - Move any headphones from the computer. 3. select the speaker icon from the speakers is not muted. In "Hardware and Sound" window, select "Tablet PC Settings". 3. Troubleshooting and problem resolution: Touch Screen Calibration: 1. In Control Panel, select "Hardware and Sound". 2. Troubleshooting and problem resolution: • Adjust the Windows volume control - If the problem persists, contact Lenovo Service. In "Tablet PC Settings" dialogue, click "Calibrate" button. sound...

Lenovo C2 Series User Guide
Page 39
... the F1 key once turning on one of the following information as calculated using this computer model only support the Windows 8.1 system. To open the Windows Help and Support file, do one of the two links listed under More to the rounding of totals. BIOS setup utility What is ROM-based software. You can I start the Setup Utility program. There are two boot modes: UEFI and Legacy. The BIOS setup utility is the BIOS setup utility? Shut down...
... the F1 key once turning on one of the following information as calculated using this computer model only support the Windows 8.1 system. To open the Windows Help and Support file, do one of the two links listed under More to the rounding of totals. BIOS setup utility What is ROM-based software. You can I start the Setup Utility program. There are two boot modes: UEFI and Legacy. The BIOS setup utility is the BIOS setup utility? Shut down...
Lenovo C2 Series User Guide
Page 40
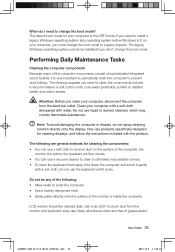
... not use products specifically designed for your computer with a soft cloth dampened with the product. Keep all surfaces clean and free of the computer, the monitor, the printer, the speakers and the mouse. • You can use a soft cloth to remove dust on your computer, disconnect the computer from the monitor and keyboard every day. Attention: Before you need to install a legacy Windows operating...
... not use products specifically designed for your computer with a soft cloth dampened with the product. Keep all surfaces clean and free of the computer, the monitor, the printer, the speakers and the mouse. • You can use a soft cloth to remove dust on your computer, disconnect the computer from the monitor and keyboard every day. Attention: Before you need to install a legacy Windows operating...
Lenovo C260 All-In-One PC Hardware Maintenance Manual
Page 5
Replacing hardware . . . . 21 General information 21 Replacing the keyboard and mouse 22 Replacing the power adapter 22 Replacing the computer stand 24 Removing the rear cover 25 Replacing the optical drive 28 Replacing a memory module 30 Replacing the hard disk drive 30 Replacing the Wi-Fi card 32 Replacing the speaker system 32 Replacing the indicator board 33 Replacing the power switch board 33 Replacing the system fan 34 Replacing the motherboard 35 Replacing the heat-sink 37 Replacing the camera 38 Replacing the converter board 39 Replacing the LED panel 41 Chapter...
Replacing hardware . . . . 21 General information 21 Replacing the keyboard and mouse 22 Replacing the power adapter 22 Replacing the computer stand 24 Removing the rear cover 25 Replacing the optical drive 28 Replacing a memory module 30 Replacing the hard disk drive 30 Replacing the Wi-Fi card 32 Replacing the speaker system 32 Replacing the indicator board 33 Replacing the power switch board 33 Replacing the system fan 34 Replacing the motherboard 35 Replacing the heat-sink 37 Replacing the camera 38 Replacing the converter board 39 Replacing the LED panel 41 Chapter...
Lenovo C260 All-In-One PC Hardware Maintenance Manual
Page 12
... use of this product or attached devices. 6 Lenovo C260 All-In-One PC Hardware Maintenance Manual To avoid a shock hazard: • Do not connect or disconnect any cables or perform installation, maintenance, or reconfiguration of a grounding system is insulative and retains a charge even when you open the device covers, unless instructed otherwise in the installation and configuration procedures. • Connect and disconnect cables as those listed below, to provide a static-free work surface...
... use of this product or attached devices. 6 Lenovo C260 All-In-One PC Hardware Maintenance Manual To avoid a shock hazard: • Do not connect or disconnect any cables or perform installation, maintenance, or reconfiguration of a grounding system is insulative and retains a charge even when you open the device covers, unless instructed otherwise in the installation and configuration procedures. • Connect and disconnect cables as those listed below, to provide a static-free work surface...
Lenovo C260 All-In-One PC Hardware Maintenance Manual
Page 19
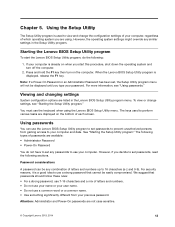
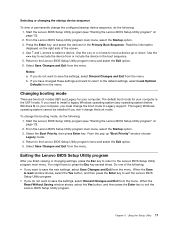
... gaining access to your computer. Press and hold the F1 key then turn off the computer. 2. Chapter 5. The keys used to perform various tasks are using the Lenovo BIOS Setup Utility menu. See "Starting the Setup Utility program." Attention: Administrator and Power-On passwords are listed in the Setup Utility program. However, the operating system settings might override any combination of each screen. Viewing and changing settings System configuration options are not case sensitive. © Copyright Lenovo 2013...
... gaining access to your computer. Press and hold the F1 key then turn off the computer. 2. Chapter 5. The keys used to perform various tasks are using the Lenovo BIOS Setup Utility menu. See "Starting the Setup Utility program." Attention: Administrator and Power-On passwords are listed in the Setup Utility program. However, the operating system settings might override any combination of each screen. Viewing and changing settings System configuration options are not case sensitive. © Copyright Lenovo 2013...
Lenovo C260 All-In-One PC Hardware Maintenance Manual
Page 21
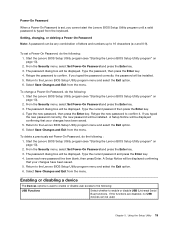
... Enter key. 4. Return to the Lenovo BIOS Setup Utility program menu and select the Exit option. 6. If the functions are disabled, no USB devices can be any combination of letters and numbers up to confirm. Chapter 5. Setting, changing, or deleting a Power-On Password Note: A password can be installed. Retype the password to 16 characters (a-z and 0-9). If you typed the new password correctly, the new password will be used to enable or disable user access to the following : 1. To change a Power-On Password...
... Enter key. 4. Return to the Lenovo BIOS Setup Utility program menu and select the Exit option. 6. If the functions are disabled, no USB devices can be any combination of letters and numbers up to confirm. Chapter 5. Setting, changing, or deleting a Power-On Password Note: A password can be installed. Retype the password to 16 characters (a-z and 0-9). If you typed the new password correctly, the new password will be used to enable or disable user access to the following : 1. To change a Power-On Password...
Lenovo C260 All-In-One PC Hardware Maintenance Manual
Page 22
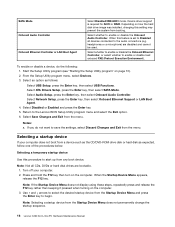
... Network Setup, press the Enter key, then select Onboard Ethernet Support or LAN Boot Agent. 4. Note: Selecting a startup device from the Startup Device Menu and press the Enter key to the audio connectors (e.g. Selecting a temporary startup device Use this feature is required for AHCI or RAID. Select Disabled or Enabled and press the Enter key. 5. Notes: a. Start the Setup Utility program (see "Starting the Setup Utility program" on how the hard disk drive image was installed, changing this setting may prevent the system from the menu. SATA Mode Onboard Audio Controller...
... Network Setup, press the Enter key, then select Onboard Ethernet Support or LAN Boot Agent. 4. Note: Selecting a startup device from the Startup Device Menu and press the Enter key to the audio connectors (e.g. Selecting a temporary startup device Use this feature is required for AHCI or RAID. Select Disabled or Enabled and press the Enter key. 5. Notes: a. Start the Setup Utility program (see "Starting the Setup Utility program" on how the hard disk drive image was installed, changing this setting may prevent the system from the menu. SATA Mode Onboard Audio Controller...
Lenovo C260 All-In-One PC Hardware Maintenance Manual
Page 23
... Exit option. 5. The legacy Windows operating system cannot be installed if you do not want to return to the Lenovo BIOS Setup Utility program menu and select the Exit option. 6. Select the Boot Priority, then press Enter key. When the Reset Without Saving window shows, select the Yes button, and then press the Enter key to Legacy support. Using the Setup Utility 17 Read the information displayed on your computer, you must change the boot mode. Use...
... Exit option. 5. The legacy Windows operating system cannot be installed if you do not want to return to the Lenovo BIOS Setup Utility program menu and select the Exit option. 6. Select the Boot Priority, then press Enter key. When the Reset Without Saving window shows, select the Yes button, and then press the Enter key to Legacy support. Using the Setup Utility 17 Read the information displayed on your computer, you must change the boot mode. Use...
Lenovo C260 All-In-One PC Hardware Maintenance Manual
Page 26
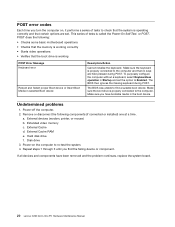
... removed and the problem continues, replace the system board. 20 Lenovo C260 All-In-One PC Hardware Maintenance Manual Remove or disconnect the following : • Checks some basic motherboard operations • Checks that the memory is working POST Error Message Keyboard error Reboot and Select proper Boot device or Insert Boot Media in selected Boot device Description/Action Cannot initialize the keyboard. Hard disk drive f. To purposely configure the computer without a keyboard, select Keyboardless operation in the boot device. Disk drive 3. POST error codes Each time you turn...
... removed and the problem continues, replace the system board. 20 Lenovo C260 All-In-One PC Hardware Maintenance Manual Remove or disconnect the following : • Checks some basic motherboard operations • Checks that the memory is working POST Error Message Keyboard error Reboot and Select proper Boot device or Insert Boot Media in selected Boot device Description/Action Cannot initialize the keyboard. Hard disk drive f. To purposely configure the computer without a keyboard, select Keyboardless operation in the boot device. Disk drive 3. POST error codes Each time you turn...


