Hardware Maintenance Manual
Page 4
...private expense and are delivered pursuant a General Services Administration ²GSA² contract, use , reproduction and disclosure. Thirteenth Edition (July 2010) © Copyright Lenovo 2008, 2010. LIMITED AND RESTRICTED RIGHTS NOTICE: If products, data, computer software, or services are sold to governmental entities as commercial items as defined by..., or disclosure is subject to read the information under Appendix A "Notices" on page 471. Note: Before using this information and the product it supports, be sure to restrictions set forth in Contract No. GS-35F-05925.
...private expense and are delivered pursuant a General Services Administration ²GSA² contract, use , reproduction and disclosure. Thirteenth Edition (July 2010) © Copyright Lenovo 2008, 2010. LIMITED AND RESTRICTED RIGHTS NOTICE: If products, data, computer software, or services are sold to governmental entities as commercial items as defined by..., or disclosure is subject to read the information under Appendix A "Notices" on page 471. Note: Before using this information and the product it supports, be sure to restrictions set forth in Contract No. GS-35F-05925.
Hardware Maintenance Manual
Page 7
... Directive (2002/95/EC) is intended only for trained servicers who are not compliant originally, replacement parts can also © Copyright Lenovo 2008, 2010 1 If you have RoHS compliant parts. About this book before June 2006 are applicable to have internet access, FRU ...part numbers are also available at: http:/www.lenovo.com/support Important Safety Information Be sure to read all ThinkCentre computers. This manual includes a complete FRU part number listing for ThinkCentre®...
... Directive (2002/95/EC) is intended only for trained servicers who are not compliant originally, replacement parts can also © Copyright Lenovo 2008, 2010 1 If you have RoHS compliant parts. About this book before June 2006 are applicable to have internet access, FRU ...part numbers are also available at: http:/www.lenovo.com/support Important Safety Information Be sure to read all ThinkCentre computers. This manual includes a complete FRU part number listing for ThinkCentre®...

Hardware Maintenance Manual
Page 8
... parts have unique FRU part numbers. Products marketed before the implementation date and expects its suppliers to be ready to support Lenovo's requirements and schedule in the EU. Lenovo plans to transition to RoHS compliance well before June 2006 Current or original part Replacement FRU Non-RoHS Can be Non...-RoHS Non-RoHS Can be RoHS Non-RoHS Can sub to these products and any product Lenovo produces containing RoHS compliant parts. Note: RoHS and non-RoHS FRU part numbers with the same fit and function are compliant, the replacement...
... parts have unique FRU part numbers. Products marketed before the implementation date and expects its suppliers to be ready to support Lenovo's requirements and schedule in the EU. Lenovo plans to transition to RoHS compliance well before June 2006 Current or original part Replacement FRU Non-RoHS Can be Non...-RoHS Non-RoHS Can be RoHS Non-RoHS Can sub to these products and any product Lenovo produces containing RoHS compliant parts. Note: RoHS and non-RoHS FRU part numbers with the same fit and function are compliant, the replacement...
Hardware Maintenance Manual
Page 35
..., 9485, 9623, 9625, 9705, 9786, 9795, 9935, 9946, 9953 This section lists the physical specifications. © Copyright Lenovo 2008, 2010 29 General information This chapter provides general information that applies to http://www.lenovo.com/support/. Specifications This section lists the physical specifications for general information about the use, operation, and maintenance of...
..., 9485, 9623, 9625, 9705, 9786, 9795, 9935, 9946, 9953 This section lists the physical specifications. © Copyright Lenovo 2008, 2010 29 General information This chapter provides general information that applies to http://www.lenovo.com/support/. Specifications This section lists the physical specifications for general information about the use, operation, and maintenance of...
Hardware Maintenance Manual
Page 37
.... 6. Run the Diagnostic programs. See Chapter 5 "Diagnostics" on all external devices. 2. Is the failure repeatable? © Copyright Lenovo 2008, 2010 31 A down-level BIOS might have this information available when requesting assistance from Service Support and Engineering functions. • Machine type and model • Processor or hard disk upgrades • Failure symptom...
.... 6. Run the Diagnostic programs. See Chapter 5 "Diagnostics" on all external devices. 2. Is the failure repeatable? © Copyright Lenovo 2008, 2010 31 A down-level BIOS might have this information available when requesting assistance from Service Support and Engineering functions. • Machine type and model • Processor or hard disk upgrades • Failure symptom...
Hardware Maintenance Manual
Page 39
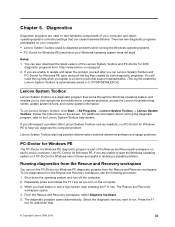
... . Press the F1 key for Windows PE diagnostic program from : http://www.lenovo.com/support 2. There are two diagnostic programs preinstalled on your computer: • Lenovo System Toolbox (used to diagnose problems while running the diagnostic program, refer to the Lenovo System Toolbox help you are used when your computer and report operating-system...
... . Press the F1 key for Windows PE diagnostic program from : http://www.lenovo.com/support 2. There are two diagnostic programs preinstalled on your computer: • Lenovo System Toolbox (used to diagnose problems while running the diagnostic program, refer to the Lenovo System Toolbox help you are used when your computer and report operating-system...
Hardware Maintenance Manual
Page 40
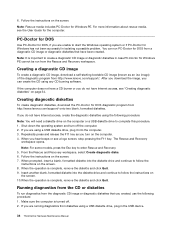
... created. Creating diagnostic diskettes To create diagnostic diskettes, download the PC-Doctor for Windows PE cannot be run diagnostics from http://www.lenovo.com/support/ onto two blank, formatted diskettes. For more information about rescue media, see a logo screen, stop pressing the F11 key. ...If the computer does not have a CD burner or you are running diagnostics from http://www.lenovo.com/support/. Make sure the computer is important to complete this procedure. 1. Note: It is turned off the computer. 2. Repeatedly press and ...
... created. Creating diagnostic diskettes To create diagnostic diskettes, download the PC-Doctor for Windows PE cannot be run diagnostics from http://www.lenovo.com/support/ onto two blank, formatted diskettes. For more information about rescue media, see a logo screen, stop pressing the F11 key. ...If the computer does not have a CD burner or you are running diagnostics from http://www.lenovo.com/support/. Make sure the computer is important to complete this procedure. 1. Note: It is turned off the computer. 2. Repeatedly press and ...
Hardware Maintenance Manual
Page 78
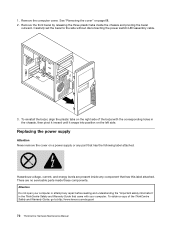
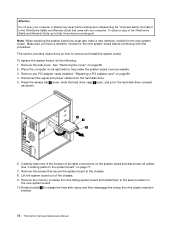
1. See "Removing the cover" on a power supply or any part that has the following label attached. Carefully set the bezel to :http://www.lenovo.com/support 72 ThinkCentre Hardware Maintenance Manual There are present inside any repair before reading and understanding the "Important safety information" in the chassis, then pivot it ...
1. See "Removing the cover" on a power supply or any part that has the following label attached. Carefully set the bezel to :http://www.lenovo.com/support 72 ThinkCentre Hardware Maintenance Manual There are present inside any repair before reading and understanding the "Important safety information" in the chassis, then pivot it ...
Hardware Maintenance Manual
Page 80
... the system board" on page 80 4. To replace the system board, do the following: 1. Place the computer on its right side to :http://www.lenovo.com/support Note: When replacing the system board you have a retention module for the new system board. Lift the system board out of all cable connections on...
... the system board" on page 80 4. To replace the system board, do the following: 1. Place the computer on its right side to :http://www.lenovo.com/support Note: When replacing the system board you have a retention module for the new system board. Lift the system board out of all cable connections on...
Hardware Maintenance Manual
Page 83
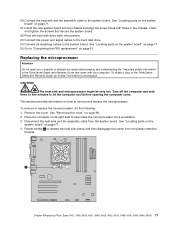
... replace the microprocessor, do the following: 1. Disconnect the heat sink and fan assembly cable from the plastic retention bracket. Rotate handle 1 to :http://www.lenovo.com/support CAUTION: The heat sink and microprocessor might be very hot. See "Locating parts on the system board" on page 71. 4. Place the computer on page...
... replace the microprocessor, do the following: 1. Disconnect the heat sink and fan assembly cable from the plastic retention bracket. Rotate handle 1 to :http://www.lenovo.com/support CAUTION: The heat sink and microprocessor might be very hot. See "Locating parts on the system board" on page 71. 4. Place the computer on page...

Hardware Maintenance Manual
Page 85
... clamp the heat sink to the system board. See "Removing the cover" on the plastic retention bracket. Lower the small handle to :http://www.lenovo.com/support This section provides information on the system board. 14. Lower the microprocessor straight down into the system board socket of the ThinkCentre Safety and Warranty...
... clamp the heat sink to the system board. See "Removing the cover" on the plastic retention bracket. Lower the small handle to :http://www.lenovo.com/support This section provides information on the system board. 14. Lower the microprocessor straight down into the system board socket of the ThinkCentre Safety and Warranty...
Hardware Maintenance Manual
Page 86
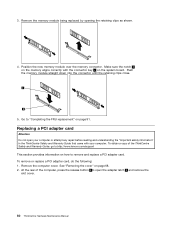
... correctly with your computer. To obtain a copy of the computer, press the release button 1 to remove and replace a PCI adapter card. Go to :http://www.lenovo.com/support This section provides information on page 68. 2. Remove the computer cover. To remove or replace a PCI adapter card, do the following: 1. Push the memory...
... correctly with your computer. To obtain a copy of the computer, press the release button 1 to remove and replace a PCI adapter card. Go to :http://www.lenovo.com/support This section provides information on page 68. 2. Remove the computer cover. To remove or replace a PCI adapter card, do the following: 1. Push the memory...
Hardware Maintenance Manual
Page 88
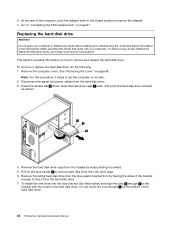
... drive. Remove the hard disk drive cage from the chassis by flexing the sides of the ThinkCentre Safety and Warranty Guide, go to:http://www.lenovo.com/support This section provides information on how to lay the computer on the blue handle 3 to free it outward. 5. To obtain a copy of the bracket...
... drive. Remove the hard disk drive cage from the chassis by flexing the sides of the ThinkCentre Safety and Warranty Guide, go to:http://www.lenovo.com/support This section provides information on how to lay the computer on the blue handle 3 to free it outward. 5. To obtain a copy of the bracket...
Hardware Maintenance Manual
Page 90
.... 7. Go to the upper drive cage. 4. See "Removing the cover" on page 91. Go to "Completing the FRU replacement" on how to :http://www.lenovo.com/support This section provides information on page 91. 84 ThinkCentre Hardware Maintenance Manual To obtain a copy of the ThinkCentre Safety and Warranty Guide, go to remove...
.... 7. Go to the upper drive cage. 4. See "Removing the cover" on page 91. Go to "Completing the FRU replacement" on how to :http://www.lenovo.com/support This section provides information on page 91. 84 ThinkCentre Hardware Maintenance Manual To obtain a copy of the ThinkCentre Safety and Warranty Guide, go to remove...
Hardware Maintenance Manual
Page 91
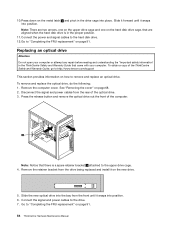
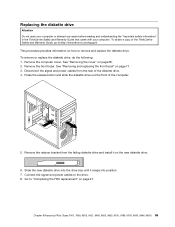
... page 68. 2. Press the release button and slide the diskette drive out the front of the ThinkCentre Safety and Warranty Guide, go to:http://www.lenovo.com/support This procedure provides information on how to remove and replace the diskette drive. Go to the drive. 8. Chapter 8 Replacing FRUs (Types 7061, 7090, 9353...
... page 68. 2. Press the release button and slide the diskette drive out the front of the ThinkCentre Safety and Warranty Guide, go to:http://www.lenovo.com/support This procedure provides information on how to remove and replace the diskette drive. Go to the drive. 8. Chapter 8 Replacing FRUs (Types 7061, 7090, 9353...
Hardware Maintenance Manual
Page 92
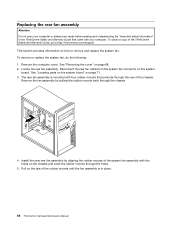
Disconnect the rear fan cable from the system fan connector on how to :http://www.lenovo.com/support This section provides information on the system board. To obtain a copy of the system fan assembly with your computer or attempt any repair before reading ...
Disconnect the rear fan cable from the system fan connector on how to :http://www.lenovo.com/support This section provides information on the system board. To obtain a copy of the system fan assembly with your computer or attempt any repair before reading ...
Hardware Maintenance Manual
Page 93
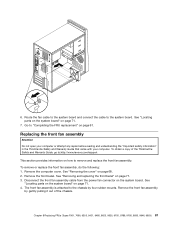
... gently pulling it out of the ThinkCentre Safety and Warranty Guide, go to "Completing the FRU replacement" on page 68. 2. Go to :http://www.lenovo.com/support This section provides information on page 71. 7. See "Removing the cover" on page 91. Disconnect the front fan assembly cable from the power fan connector...
... gently pulling it out of the ThinkCentre Safety and Warranty Guide, go to "Completing the FRU replacement" on page 68. 2. Go to :http://www.lenovo.com/support This section provides information on page 71. 7. See "Removing the cover" on page 91. Disconnect the front fan assembly cable from the power fan connector...
Hardware Maintenance Manual
Page 95
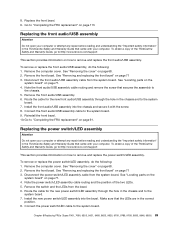
...113. Note the power switch/LED assembly cable routing and the position of the ThinkCentre Safety and Warranty Guide, go to:http://www.lenovo.com/support This section provides information on how to "Completing the FRU replacement" on page 68. 2. Route the cable for the new power ... 71 3. Install the front audio/USB assembly into the bezel. To obtain a copy of the ThinkCentre Safety and Warranty Guide, go to:http://www.lenovo.com/support This section provides information on how to the chassis. 5. Chapter 8 Replacing FRUs (Types 7061, 7090, 9353, 9421, 9485, 9623, 9625, 9705...
...113. Note the power switch/LED assembly cable routing and the position of the ThinkCentre Safety and Warranty Guide, go to:http://www.lenovo.com/support This section provides information on how to "Completing the FRU replacement" on page 68. 2. Route the cable for the new power ... 71 3. Install the front audio/USB assembly into the bezel. To obtain a copy of the ThinkCentre Safety and Warranty Guide, go to:http://www.lenovo.com/support This section provides information on how to the chassis. 5. Chapter 8 Replacing FRUs (Types 7061, 7090, 9353, 9421, 9485, 9623, 9625, 9705...
Hardware Maintenance Manual
Page 96
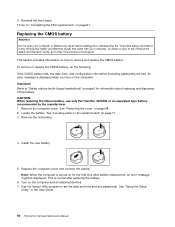
... the computer cover, and connect the cables. Turn on page 68. 2. Important Refer to "Safety notices (multi-lingual translations)" on how to :http://www.lenovo.com/support This section provides information on page 6 for the first time after replacing the battery. 6. Locate the battery. Note: When the computer is normal after battery...
... the computer cover, and connect the cables. Turn on page 68. 2. Important Refer to "Safety notices (multi-lingual translations)" on how to :http://www.lenovo.com/support This section provides information on page 6 for the first time after replacing the battery. 6. Locate the battery. Note: When the computer is normal after battery...
Hardware Maintenance Manual
Page 102
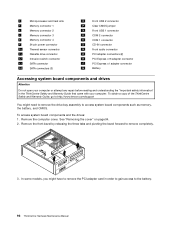
See "Removing the cover" on page 94. 2. To obtain a copy of the ThinkCentre Safety and Warranty Guide, go to:http://www.lenovo.com/support You might have to remove the PCI adapter card in the ThinkCentre Safety and Warranty Guide that came with your computer or attempt any repair ...
See "Removing the cover" on page 94. 2. To obtain a copy of the ThinkCentre Safety and Warranty Guide, go to:http://www.lenovo.com/support You might have to remove the PCI adapter card in the ThinkCentre Safety and Warranty Guide that came with your computer or attempt any repair ...


