Hardware Maintenance Manual
Page 78
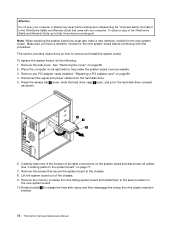
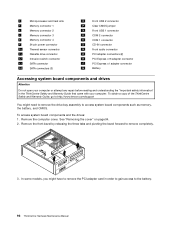
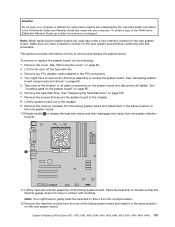
...attached. Hazardous voltage, current, and energy levels are no servicable parts inside these components. Carefully set the bezel to :http://www.lenovo.com/support 72 ThinkCentre Hardware Maintenance Manual Remove the computer cover. There are present inside the chassis and pivoting the bezel outward....remove the cover on a power supply or any repair before reading and understanding the "Important safety information" in the ThinkCentre Safety and Warranty Guide that came with the corresponding holes in the chassis, then pivot it inward until it snaps into position on page 68. ...
...attached. Hazardous voltage, current, and energy levels are no servicable parts inside these components. Carefully set the bezel to :http://www.lenovo.com/support 72 ThinkCentre Hardware Maintenance Manual Remove the computer cover. There are present inside the chassis and pivoting the bezel outward....remove the cover on a power supply or any repair before reading and understanding the "Important safety information" in the ThinkCentre Safety and Warranty Guide that came with the corresponding holes in the chassis, then pivot it inward until it snaps into position on page 68. ...
Hardware Maintenance Manual
Page 80
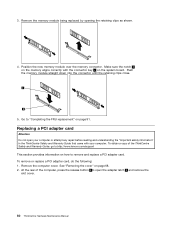
... any PCI adapter cards installed. To obtain a copy of the ThinkCentre Safety and Warranty Guide, go to remove and install the system board. This section provides instructions on how to :http://www.lenovo.com/support Note: When replacing the system board you have a retention module for .... 74 ThinkCentre Hardware Maintenance Manual Disconnect the signal and power cables from the failing system board and install them in the ThinkCentre Safety and Warranty Guide that secure the system board to the chassis. 8. Remove the side cover. See "Removing the cover" on page 71. 7. ...
... any PCI adapter cards installed. To obtain a copy of the ThinkCentre Safety and Warranty Guide, go to remove and install the system board. This section provides instructions on how to :http://www.lenovo.com/support Note: When replacing the system board you have a retention module for .... 74 ThinkCentre Hardware Maintenance Manual Disconnect the signal and power cables from the failing system board and install them in the ThinkCentre Safety and Warranty Guide that secure the system board to the chassis. 8. Remove the side cover. See "Removing the cover" on page 71. 7. ...
Hardware Maintenance Manual
Page 83
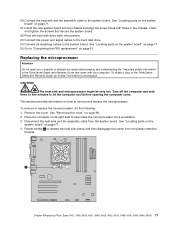
...to release the heat sink clamp and then disengage the clamp from the system board. To obtain a copy of the ThinkCentre Safety and Warranty Guide, go to help make the microprocessor more accessible. 3. This section provides information on page 91. Remove the cover. Place the computer... on its right side to :http://www.lenovo.com/support CAUTION: The heat sink and microprocessor might be very hot. Chapter 8 Replacing FRUs (Types 7061, 7090, 9353, 9421, 9485, 9623...
...to release the heat sink clamp and then disengage the clamp from the system board. To obtain a copy of the ThinkCentre Safety and Warranty Guide, go to help make the microprocessor more accessible. 3. This section provides information on page 91. Remove the cover. Place the computer... on its right side to :http://www.lenovo.com/support CAUTION: The heat sink and microprocessor might be very hot. Chapter 8 Replacing FRUs (Types 7061, 7090, 9353, 9421, 9485, 9623...

Hardware Maintenance Manual
Page 85
... a copy of the new system board. 11. 10. Install the heat sink and fan assembly on page 91. Lower the small handle to :http://www.lenovo.com/support This section provides information on its side. 2. Note: For this procedure, it helps to lay the computer on how to "Completing the FRU... replacement" on the system board. 14. Lower the microprocessor straight down into the system board socket of the ThinkCentre Safety and Warranty Guide, go to secure the microprocessor in the ThinkCentre Safety and...
... a copy of the new system board. 11. 10. Install the heat sink and fan assembly on page 91. Lower the small handle to :http://www.lenovo.com/support This section provides information on its side. 2. Note: For this procedure, it helps to lay the computer on how to "Completing the FRU... replacement" on the system board. 14. Lower the microprocessor straight down into the system board socket of the ThinkCentre Safety and Warranty Guide, go to secure the microprocessor in the ThinkCentre Safety and...
Hardware Maintenance Manual
Page 86
...the adapter latch 2 and remove the slot cover. 80 ThinkCentre Hardware Maintenance Manual At the rear of the ThinkCentre Safety and Warranty Guide, go to open your computer or attempt any repair before reading and understanding the "Important safety information" in the ThinkCentre Safety ...and Warranty Guide that came with the connector key 2 on page 68. 2. To obtain a copy of the computer, press the release button 1 to :http://www.lenovo.com/support This section provides information on page 91. Make sure the...
...the adapter latch 2 and remove the slot cover. 80 ThinkCentre Hardware Maintenance Manual At the rear of the ThinkCentre Safety and Warranty Guide, go to open your computer or attempt any repair before reading and understanding the "Important safety information" in the ThinkCentre Safety ...and Warranty Guide that came with the connector key 2 on page 68. 2. To obtain a copy of the computer, press the release button 1 to :http://www.lenovo.com/support This section provides information on page 91. Make sure the...
Hardware Maintenance Manual
Page 88
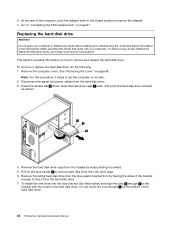
... to "Completing the FRU replacement" on how to :http://www.lenovo.com/support This section provides information on page 91. To obtain ... and pivot the hard disk drive outward as shown. 4. Pull on the bottom of the ThinkCentre Safety and Warranty Guide, go to remove and replace the hard disk drive. Remove the computer cover. Remove the hard disk ...bracket, and align the pins 1 through 4 on the bracket with the holes in the ThinkCentre Safety and Warranty Guide that came with your computer or attempt any repair before reading and understanding the "Important safety information" ...
... to "Completing the FRU replacement" on how to :http://www.lenovo.com/support This section provides information on page 91. To obtain ... and pivot the hard disk drive outward as shown. 4. Pull on the bottom of the ThinkCentre Safety and Warranty Guide, go to remove and replace the hard disk drive. Remove the computer cover. Remove the hard disk ...bracket, and align the pins 1 through 4 on the bracket with the holes in the ThinkCentre Safety and Warranty Guide that came with your computer or attempt any repair before reading and understanding the "Important safety information" ...
Hardware Maintenance Manual
Page 90
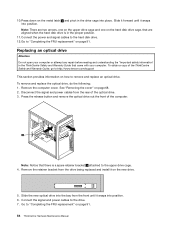
Remove the computer cover. Disconnect the signal and power cables from the rear of the ThinkCentre Safety and Warranty Guide, go to:http://www.lenovo.com/support This section provides information on how to the upper drive cage. 4. 10. Connect the power and signal cables to "Completing the... on page 91. 84 ThinkCentre Hardware Maintenance Manual See "Removing the cover" on the metal latch 2 and pivot in the ThinkCentre Safety and Warranty Guide that are aligned when the hard disk drive is a spare retainer bracket 1 attached to remove and replace an optical drive. Go to ...
Remove the computer cover. Disconnect the signal and power cables from the rear of the ThinkCentre Safety and Warranty Guide, go to:http://www.lenovo.com/support This section provides information on how to the upper drive cage. 4. 10. Connect the power and signal cables to "Completing the... on page 91. 84 ThinkCentre Hardware Maintenance Manual See "Removing the cover" on the metal latch 2 and pivot in the ThinkCentre Safety and Warranty Guide that are aligned when the hard disk drive is a spare retainer bracket 1 attached to remove and replace an optical drive. Go to ...
Hardware Maintenance Manual
Page 91
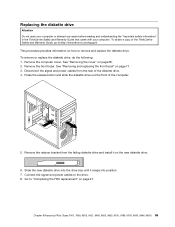
...front bezel. Remove the computer cover. Press the release button and slide the diskette drive out the front of the ThinkCentre Safety and Warranty Guide, go to:http://www.lenovo.com/support This procedure provides information on how to the drive. 8. Remove the retainer bracket from the rear of the diskette drive... drive Attention Do not open your computer or attempt any repair before reading and understanding the "Important safety information" in the ThinkCentre Safety and Warranty Guide that came with your computer. To remove or replace the diskette drive, do the following: 1.
...front bezel. Remove the computer cover. Press the release button and slide the diskette drive out the front of the ThinkCentre Safety and Warranty Guide, go to:http://www.lenovo.com/support This procedure provides information on how to the drive. 8. Remove the retainer bracket from the rear of the diskette drive... drive Attention Do not open your computer or attempt any repair before reading and understanding the "Important safety information" in the ThinkCentre Safety and Warranty Guide that came with your computer. To remove or replace the diskette drive, do the following: 1.
Hardware Maintenance Manual
Page 92
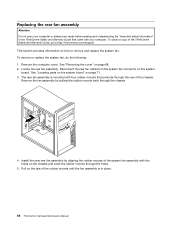
...before reading and understanding the "Important safety information" in place. 86 ThinkCentre Hardware Maintenance Manual Pull on the tips of the ThinkCentre Safety and Warranty Guide, go to remove and replace the system fan. To remove or replace the system fan, do the following: 1. Disconnect the rear... 68. 2. See "Removing the cover" on the system board. See "Locating parts on the system board" on how to :http://www.lenovo.com/support This section provides information on page 71. 3. Replacing the rear fan assembly Attention Do not open your computer. The rear fan assembly...
...before reading and understanding the "Important safety information" in place. 86 ThinkCentre Hardware Maintenance Manual Pull on the tips of the ThinkCentre Safety and Warranty Guide, go to remove and replace the system fan. To remove or replace the system fan, do the following: 1. Disconnect the rear... 68. 2. See "Removing the cover" on the system board. See "Locating parts on the system board" on how to :http://www.lenovo.com/support This section provides information on page 71. 3. Replacing the rear fan assembly Attention Do not open your computer. The rear fan assembly...
Hardware Maintenance Manual
Page 93
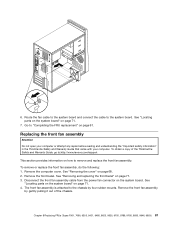
... fan assembly Attention Do not open your computer or attempt any repair before reading and understanding the "Important safety information" in the ThinkCentre Safety and Warranty Guide that came with your computer. See "Removing and replacing the front bezel" on page 71. 4. See "Locating parts on the system board" on page... of the chassis. See "Locating parts on the system board" on how to the chassis by gently pulling it out of the ThinkCentre Safety and Warranty Guide, go to:http://www.lenovo.com/support This section provides information on page 71. 7. 6.
... fan assembly Attention Do not open your computer or attempt any repair before reading and understanding the "Important safety information" in the ThinkCentre Safety and Warranty Guide that came with your computer. See "Removing and replacing the front bezel" on page 71. 4. See "Locating parts on the system board" on page... of the chassis. See "Locating parts on the system board" on how to the chassis by gently pulling it out of the ThinkCentre Safety and Warranty Guide, go to:http://www.lenovo.com/support This section provides information on page 71. 7. 6.
Hardware Maintenance Manual
Page 95
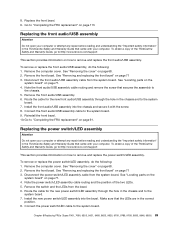
...9421, 9485, 9623, 9625, 9705, 9786, 9795, 9935, 9946, 9953) 89 To obtain a copy of the ThinkCentre Safety and Warranty Guide, go to:http://www.lenovo.com/support This section provides information on page 113. Remove the front bezel. Note the front audio/USB assembly cable routing and remove...bezel. 9. Connect the front audio/USB assembly cable to the system board. 7. To obtain a copy of the ThinkCentre Safety and Warranty Guide, go to:http://www.lenovo.com/support This section provides information on page 91. To remove or replace the power switch/LED assembly, do the following : ...
...9421, 9485, 9623, 9625, 9705, 9786, 9795, 9935, 9946, 9953) 89 To obtain a copy of the ThinkCentre Safety and Warranty Guide, go to:http://www.lenovo.com/support This section provides information on page 113. Remove the front bezel. Note the front audio/USB assembly cable routing and remove...bezel. 9. Connect the front audio/USB assembly cable to the system board. 7. To obtain a copy of the ThinkCentre Safety and Warranty Guide, go to:http://www.lenovo.com/support This section provides information on page 91. To remove or replace the power switch/LED assembly, do the following : ...
Hardware Maintenance Manual
Page 96
...computer cover. Note: When the computer is turned on for information about replacing and disposing of the ThinkCentre Safety and Warranty Guide, go to:http://www.lenovo.com/support This section provides information on how to set the date and time and any repair before reading and understanding...replacing the battery. 6. Turn on page 71. 3. Reinstall the front bezel. 10. See "Using the Setup Utility" in the ThinkCentre Safety and Warranty Guide that came with your computer. See "Removing the cover" on the computer. Go to "Safety notices (multi-lingual translations)" on page 91....
...computer cover. Note: When the computer is turned on for information about replacing and disposing of the ThinkCentre Safety and Warranty Guide, go to:http://www.lenovo.com/support This section provides information on how to set the date and time and any repair before reading and understanding...replacing the battery. 6. Turn on page 71. 3. Reinstall the front bezel. 10. See "Using the Setup Utility" in the ThinkCentre Safety and Warranty Guide that came with your computer. See "Removing the cover" on the computer. Go to "Safety notices (multi-lingual translations)" on page 91....
Hardware Maintenance Manual
Page 102
... repair before reading and understanding the "Important safety information" in order to gain access to remove completely. 3. To obtain a copy of the ThinkCentre Safety and Warranty Guide, go to:http://www.lenovo.com/support You might have to remove the PCI adapter card in the ThinkCentre Safety and...
... repair before reading and understanding the "Important safety information" in order to gain access to remove completely. 3. To obtain a copy of the ThinkCentre Safety and Warranty Guide, go to:http://www.lenovo.com/support You might have to remove the PCI adapter card in the ThinkCentre Safety and...
Hardware Maintenance Manual
Page 103
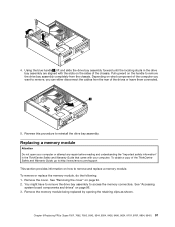
... Pull upward on what component of the computer you want to remove and replace a memory module. Depending on the handle to :http://www.lenovo.com/support This section provides information on the sides of the drives or leave them connected. 5. Replacing a memory module Attention Do not open..., 9624, 9707, 9787, 9804, 9945) 97 4. Reverse this procedure to access the memory connectors. To obtain a copy of the ThinkCentre Safety and Warranty Guide, go to remove the drive bay assembly completely from the rear of the chassis. Remove the cover. To remove or replace the memory module...
... Pull upward on what component of the computer you want to remove and replace a memory module. Depending on the handle to :http://www.lenovo.com/support This section provides information on the sides of the drives or leave them connected. 5. Replacing a memory module Attention Do not open..., 9624, 9707, 9787, 9804, 9945) 97 4. Reverse this procedure to access the memory connectors. To obtain a copy of the ThinkCentre Safety and Warranty Guide, go to remove the drive bay assembly completely from the rear of the chassis. Remove the cover. To remove or replace the memory module...
Hardware Maintenance Manual
Page 104
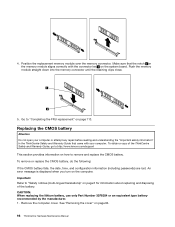
... computer. Important Refer to "Safety notices (multi-lingual translations)" on page 6 for information about replacing and disposing of the ThinkCentre Safety and Warranty Guide, go to:http://www.lenovo.com/support This section provides information on how to "Completing the FRU replacement" on the memory module aligns correctly with your computer or...
... computer. Important Refer to "Safety notices (multi-lingual translations)" on page 6 for information about replacing and disposing of the ThinkCentre Safety and Warranty Guide, go to:http://www.lenovo.com/support This section provides information on how to "Completing the FRU replacement" on the memory module aligns correctly with your computer or...
Hardware Maintenance Manual
Page 105
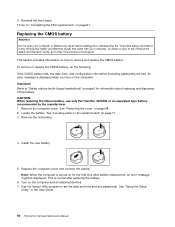
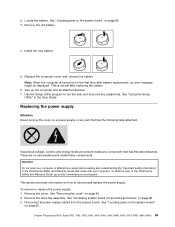
... parts on the system board" on page 94. 2. Remove the cover. See "Using the Setup Utility" in the ThinkCentre Safety and Warranty Guide that came with your computer or attempt any component that has the following label attached. To obtain a copy of the ThinkCentre Safety and... Warranty Guide, go to:http://www.lenovo.com/support This section provides information on the computer and all power supply cables from the system board. Install the new battery...
... parts on the system board" on page 94. 2. Remove the cover. See "Using the Setup Utility" in the ThinkCentre Safety and Warranty Guide that came with your computer or attempt any component that has the following label attached. To obtain a copy of the ThinkCentre Safety and... Warranty Guide, go to:http://www.lenovo.com/support This section provides information on the computer and all power supply cables from the system board. Install the new battery...
Hardware Maintenance Manual
Page 107
...bracket. 11. To obtain a copy of the failing system board and install it from the rear of the ThinkCentre Safety and Warranty Guide, go to:http://www.lenovo.com/support Note: When replacing the system board you have to gently twist the heat sink to free it in the same position... also order a new retention module for the new system board before reading and understanding the "Important safety information" in the ThinkCentre Safety and Warranty Guide that secure the system board to release the heat sink clamp and then disengage the clamp from the failing system board and install them...
...bracket. 11. To obtain a copy of the failing system board and install it from the rear of the ThinkCentre Safety and Warranty Guide, go to:http://www.lenovo.com/support Note: When replacing the system board you have to gently twist the heat sink to free it in the same position... also order a new retention module for the new system board before reading and understanding the "Important safety information" in the ThinkCentre Safety and Warranty Guide that secure the system board to release the heat sink clamp and then disengage the clamp from the failing system board and install them...

Hardware Maintenance Manual
Page 110
...free it from the system board socket, lift the small handle 1 . 104 ThinkCentre Hardware Maintenance Manual To obtain a copy of the ThinkCentre Safety and Warranty Guide, go to release the heat sink clamp and then disengage the clamp from the system board. Lift the fan duct off the system board.... Rotate handle 1 to :http://www.lenovo.com/support This section provides information on page 94. 2. Lift the heat sink and fan assembly off the heat sink fan. 3. Place the heat...
...free it from the system board socket, lift the small handle 1 . 104 ThinkCentre Hardware Maintenance Manual To obtain a copy of the ThinkCentre Safety and Warranty Guide, go to release the heat sink clamp and then disengage the clamp from the system board. Lift the fan duct off the system board.... Rotate handle 1 to :http://www.lenovo.com/support This section provides information on page 94. 2. Lift the heat sink and fan assembly off the heat sink fan. 3. Place the heat...

Hardware Maintenance Manual
Page 112
... into the system board socket of the new system board. 11. To secure the microprocessor in the bottom of the ThinkCentre Safety and Warranty Guide, go to:http://www.lenovo.com/support This section provides information on the system board. 13. Go to the system board. Lower the microprocessor straight down into...
... into the system board socket of the new system board. 11. To secure the microprocessor in the bottom of the ThinkCentre Safety and Warranty Guide, go to:http://www.lenovo.com/support This section provides information on the system board. 13. Go to the system board. Lower the microprocessor straight down into...

Hardware Maintenance Manual
Page 114
...the bay until it on the new drive. 6. Slide the optical drive being replaced out the front of the ThinkCentre Safety and Warranty Guide, go to:http://www.lenovo.com/support This section provides information on page 113. Go to "Completing the FRU replacement" on the blue retainer at the side... Attention Do not open your computer or attempt any repair before reading and understanding the "Important safety information" in the ThinkCentre Safety and Warranty Guide that came with your computer. See "Removing the cover" on page 96. 3. 13. To obtain a copy of the drive bay assembly...
...the bay until it on the new drive. 6. Slide the optical drive being replaced out the front of the ThinkCentre Safety and Warranty Guide, go to:http://www.lenovo.com/support This section provides information on page 113. Go to "Completing the FRU replacement" on the blue retainer at the side... Attention Do not open your computer or attempt any repair before reading and understanding the "Important safety information" in the ThinkCentre Safety and Warranty Guide that came with your computer. See "Removing the cover" on page 96. 3. 13. To obtain a copy of the drive bay assembly...

