
Brochure
Page 2
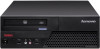
... costs savings associated with Lenovounique tools enhanced by on Tower and SFF models Lenovo's Secure Managed Client(6) is a low deployment-cost solution that offers: • Support for a standard PC option and Windows® software • Support for standard management tools and IT processes • Minimal changes to an ... and recording, rewriting and playback of the past. remove motherboard, HDD without tools • 8 external USB ports • PS/2® port support - board DisplayPort and VGA • Tool-less design - Lenovo® recommends Windows Vista® Business.
... costs savings associated with Lenovounique tools enhanced by on Tower and SFF models Lenovo's Secure Managed Client(6) is a low deployment-cost solution that offers: • Support for a standard PC option and Windows® software • Support for standard management tools and IT processes • Minimal changes to an ... and recording, rewriting and playback of the past. remove motherboard, HDD without tools • 8 external USB ports • PS/2® port support - board DisplayPort and VGA • Tool-less design - Lenovo® recommends Windows Vista® Business.

Brochure
Page 3
Lenovo® recommends Windows Vista® Business. Roxio® Creator™ Business Edition; Sun™ JRE™; ThinkVantage Rescue and Recovery®; Companies can only support Q9XXX & E8XXX series processors. ** Note: SMC model, available in Q1, 2009 in /out Slots Tower: (2) FH..., BIOS individually enable/disable of the world's most advanced power management tool, providing power management control and monitoring. Lenovo's ThinkCentre M58 has improved thermals over its predecessor product, and combined with 30 days of virus definition updates; ThinkVantage...
Lenovo® recommends Windows Vista® Business. Roxio® Creator™ Business Edition; Sun™ JRE™; ThinkVantage Rescue and Recovery®; Companies can only support Q9XXX & E8XXX series processors. ** Note: SMC model, available in Q1, 2009 in /out Slots Tower: (2) FH..., BIOS individually enable/disable of the world's most advanced power management tool, providing power management control and monitoring. Lenovo's ThinkCentre M58 has improved thermals over its predecessor product, and combined with 30 days of virus definition updates; ThinkVantage...

User Manual
Page 4
...restricted rights to restrictions set forth in Contract No. Third Edition (October 2009) © Copyright Lenovo 2009. GS-35F-05925. LENOVO products, data, computer software, and services have been developed exclusively at private expense and are ...delivered pursuant a General Services Administration ″GSA″ contract, use, reproduction, or disclosure is subject to use, reproduction and disclosure. Note Before using this information and the product it supports...
...restricted rights to restrictions set forth in Contract No. Third Edition (October 2009) © Copyright Lenovo 2009. GS-35F-05925. LENOVO products, data, computer software, and services have been developed exclusively at private expense and are ...delivered pursuant a General Services Administration ″GSA″ contract, use, reproduction, or disclosure is subject to use, reproduction and disclosure. Note Before using this information and the product it supports...

User Manual
Page 7
Refer to the ThinkCentre Safety and Warranty Guide that you can obtain a Portable Document Format (PDF) version from the Lenovo® Support Web site at: http://www.lenovo.com/support © Copyright Lenovo 2009 v If you no longer have a copy of personal injury and or damage to your product. Reading and understanding this safety information reduces...
Refer to the ThinkCentre Safety and Warranty Guide that you can obtain a Portable Document Format (PDF) version from the Lenovo® Support Web site at: http://www.lenovo.com/support © Copyright Lenovo 2009 v If you no longer have a copy of personal injury and or damage to your product. Reading and understanding this safety information reduces...

User Manual
Page 9
... 2 Duo processor v Intel Core 2 Quad processor v Intel Pentium® dual-core processor v Internal cache (size varies by model type) Memory v Supports up to four double data rate 3 dual inline memory modules (DDR3 DIMMs) Internal drives v Card reader (some models) v Optical drive v SATA (...drive (some models) v Solid State Drive (SSD) (some models) Video subsystem v Integrated graphics card for a discrete graphics card © Copyright Lenovo 2009 1 See Chapter 4, "Using the Setup Utility," on the system board for a VGA (Video Graphics Array) connector and DisplayPort connector v PCI ...
... 2 Duo processor v Intel Core 2 Quad processor v Intel Pentium® dual-core processor v Internal cache (size varies by model type) Memory v Supports up to four double data rate 3 dual inline memory modules (DDR3 DIMMs) Internal drives v Card reader (some models) v Optical drive v SATA (...drive (some models) v Solid State Drive (SSD) (some models) Video subsystem v Integrated graphics card for a discrete graphics card © Copyright Lenovo 2009 1 See Chapter 4, "Using the Setup Utility," on the system board for a VGA (Video Graphics Array) connector and DisplayPort connector v PCI ...

User Manual
Page 11
... come with preinstalled software programs. If it does, an operating system, device drivers to support built-in Windows 7 Professional, Windows 7 Ultimate, Windows Vista Business, or Windows Vista Ultimate) Operating systems, certified or tested for compatibility1 (varies by Lenovo as compatible with fingerprint reader (some models) v Power-On Password (POP) and Administrator Password...
... come with preinstalled software programs. If it does, an operating system, device drivers to support built-in Windows 7 Professional, Windows 7 Ultimate, Windows Vista Business, or Windows Vista Ultimate) Operating systems, certified or tested for compatibility1 (varies by Lenovo as compatible with fingerprint reader (some models) v Power-On Password (POP) and Administrator Password...
User Manual
Page 14
...and Recovery if you to enroll your ThinkCentre® computer. Fingerprint Software: The integrated fingerprint reader provided on your computer. See "Lenovo ThinkVantage Toolbox" on page 60 for detailed information. See "PC-Doctor for Rescue and Recovery" on page 59 for more information ...detect and eliminate viruses. 6 User Guide keep updated are unable to start the Windows operating system. Note: The Lenovo System Toolbox program is available with antivirus software that support this option. Use the PC-Doctor for computers that you maintain your hard disk drive.
...and Recovery if you to enroll your ThinkCentre® computer. Fingerprint Software: The integrated fingerprint reader provided on your computer. See "Lenovo ThinkVantage Toolbox" on page 60 for detailed information. See "PC-Doctor for Rescue and Recovery" on page 59 for more information ...detect and eliminate viruses. 6 User Guide keep updated are unable to start the Windows operating system. Note: The Lenovo System Toolbox program is available with antivirus software that support this option. Use the PC-Doctor for computers that you maintain your hard disk drive.

User Manual
Page 21
... the static-protective packaging, and install it . v Always handle parts and other computer components, take these precautions to : http://www.lenovo.com/support Note: Use only computer parts provided by Lenovo. © Copyright Lenovo 2009 13 When installing or replacing an option, use these instructions along with the instructions that come with the option...
... the static-protective packaging, and install it . v Always handle parts and other computer components, take these precautions to : http://www.lenovo.com/support Note: Use only computer parts provided by Lenovo. © Copyright Lenovo 2009 13 When installing or replacing an option, use these instructions along with the instructions that come with the option...

User Manual
Page 22
... the front of your computer" on page 7 and "Locating connectors on the rear of the ThinkCentre Safety and Warranty Guide, go to: http://www.lenovo.com/support This section provides instructions on page 8 to identify the required connector, and then use the instructions that come with your computer" on how to help...
... the front of your computer" on page 7 and "Locating connectors on the rear of the ThinkCentre Safety and Warranty Guide, go to: http://www.lenovo.com/support This section provides instructions on page 8 to identify the required connector, and then use the instructions that come with your computer" on how to help...

User Manual
Page 24
... reading and understanding the "Important safety information" in any combination up to a maximum of the ThinkCentre Safety and Warranty Guide, go to: http://www.lenovo.com/support 16 User Guide This section provides instructions on how to access the system board components and drives. Figure 6. Accessing the system board components and drives...
... reading and understanding the "Important safety information" in any combination up to a maximum of the ThinkCentre Safety and Warranty Guide, go to: http://www.lenovo.com/support 16 User Guide This section provides instructions on how to access the system board components and drives. Figure 6. Accessing the system board components and drives...

User Manual
Page 26
... information" in the ThinkCentre Safety and Warranty Guide that the notch 1 on the memory module aligns correctly with another option, go to: http://www.lenovo.com/support This section provides instructions on how to "Completing the parts replacement" on the system board. Position the new memory module over the memory slot. Your...
... information" in the ThinkCentre Safety and Warranty Guide that the notch 1 on the memory module aligns correctly with another option, go to: http://www.lenovo.com/support This section provides instructions on how to "Completing the parts replacement" on the system board. Position the new memory module over the memory slot. Your...

User Manual
Page 29
... type and size of the drive that you can obtain a Universal Adapter Bracket, 5.25 to 3.5-inch from a local computer retailer or by contacting the Customer Support Center. Maximum height: 25.8 mm (1 inch) 3.5-inch hard disk drive 1.8-inch Solid State Drive (requires a Universal Adapter Bracket, 3.5 to 1.8-inch) 2 Bay 2 - Maximum height: 43 mm...
... type and size of the drive that you can obtain a Universal Adapter Bracket, 5.25 to 3.5-inch from a local computer retailer or by contacting the Customer Support Center. Maximum height: 25.8 mm (1 inch) 3.5-inch hard disk drive 1.8-inch Solid State Drive (requires a Universal Adapter Bracket, 3.5 to 1.8-inch) 2 Bay 2 - Maximum height: 43 mm...

User Manual
Page 30
... the computer cover" on the inside of the drive. Figure 13. To obtain a copy of the ThinkCentre Safety and Warranty Guide, go to: http://www.lenovo.com/support This section provides instructions on the side of the bezel. Note: If you must use a Universal Adapter Bracket, 5.25 to 3.5-inch. You can obtain... disk drive, you are installing a drive with accessible media, such as an optical drive, remove the plastic panel in the bezel by contacting the Customer Support Center. 4.
... the computer cover" on the inside of the drive. Figure 13. To obtain a copy of the ThinkCentre Safety and Warranty Guide, go to: http://www.lenovo.com/support This section provides instructions on the side of the bezel. Note: If you must use a Universal Adapter Bracket, 5.25 to 3.5-inch. You can obtain... disk drive, you are installing a drive with accessible media, such as an optical drive, remove the plastic panel in the bezel by contacting the Customer Support Center. 4.

User Manual
Page 32
... drive, you to restore the contents of the ThinkCentre Safety and Warranty Guide, go to "Completing the parts replacement" on how to : http://www.lenovo.com/support This section provides instructions on page 36. Open the computer cover. Locate the hard disk drive. 24 User Guide What to do not have an...
... drive, you to restore the contents of the ThinkCentre Safety and Warranty Guide, go to "Completing the parts replacement" on how to : http://www.lenovo.com/support This section provides instructions on page 36. Open the computer cover. Locate the hard disk drive. 24 User Guide What to do not have an...

User Manual
Page 35
... from the rear of the drive bay assembly. Installing the retainer Chapter 2. Figure 18. To obtain a copy of the new drive to : http://www.lenovo.com/support This section provides instructions on page 14. 2. Replacing the optical drive Attention Do not open your computer or attempt any repair before reading and understanding...
... from the rear of the drive bay assembly. Installing the retainer Chapter 2. Figure 18. To obtain a copy of the new drive to : http://www.lenovo.com/support This section provides instructions on page 14. 2. Replacing the optical drive Attention Do not open your computer or attempt any repair before reading and understanding...

User Manual
Page 36
Install the new optical drive into the drive bay until it snaps into position. Installing a new optical drive 7. Go to : http://www.lenovo.com/support 28 User Guide Your computer has a special type of memory that came with your computer or attempt any repair before reading and understanding the "Important ...
Install the new optical drive into the drive bay until it snaps into position. Installing a new optical drive 7. Go to : http://www.lenovo.com/support 28 User Guide Your computer has a special type of memory that came with your computer or attempt any repair before reading and understanding the "Important ...

User Manual
Page 38
... To replace the power supply assembly: 1. Remove the four screws at the rear of the ThinkCentre Safety and Warranty Guide, go to: http://www.lenovo.com/support This section provides instructions on how to the power supply assembly. 4. Pivot the optical drive bay assembly upward to gain access to replace the power...
... To replace the power supply assembly: 1. Remove the four screws at the rear of the ThinkCentre Safety and Warranty Guide, go to: http://www.lenovo.com/support This section provides instructions on how to the power supply assembly. 4. Pivot the optical drive bay assembly upward to gain access to replace the power...

User Manual
Page 40
8. Install and tighten the four screws at the rear of the ThinkCentre Safety and Warranty Guide, go to: http://www.lenovo.com/support This section provides instructions on page 11. 32 User Guide To obtain a copy of the chassis to "Completing the parts replacement" on page 14. 2. CAUTION: ... the system board. 11. Reconnect all the power supply assembly cables to the heat sink and fan assembly. 3. Note: Use only the screws provided by Lenovo. 10. See "Opening the computer cover" on page 36. See "Locating parts on the system board" on how to let the computer cool before reading...
8. Install and tighten the four screws at the rear of the ThinkCentre Safety and Warranty Guide, go to: http://www.lenovo.com/support This section provides instructions on page 11. 32 User Guide To obtain a copy of the chassis to "Completing the parts replacement" on page 14. 2. CAUTION: ... the system board. 11. Reconnect all the power supply assembly cables to the heat sink and fan assembly. 3. Note: Use only the screws provided by Lenovo. 10. See "Opening the computer cover" on page 36. See "Locating parts on the system board" on how to let the computer cool before reading...

User Manual
Page 42
... the screw to secure the new card reader to the card reader. 3. See "Locating parts on the system board" on how to : http://www.lenovo.com/support This section provides instructions on page 11. Note: Make sure you disconnect the cable from the chassis. 7. Install a new card reader into the chassis and...
... the screw to secure the new card reader to the card reader. 3. See "Locating parts on the system board" on how to : http://www.lenovo.com/support This section provides instructions on page 11. Note: Make sure you disconnect the cable from the chassis. 7. Install a new card reader into the chassis and...

User Manual
Page 43
...Locating connectors on the rear of your computer" on page 8 or "Locating connectors on the front of your computer" on how to : http://www.lenovo.com/support This section provides instructions on page 7. To replace the keyboard: 1. Locate the keyboard connector. To obtain a copy of the ThinkCentre Safety and Warranty ... Warranty Guide that came with your computer. Chapter 2. To obtain a copy of the ThinkCentre Safety and Warranty Guide, go to: http://www.lenovo.com/support This section provides instructions on how to a standard keyboard connector 1 or a USB connector 2 .
...Locating connectors on the rear of your computer" on page 8 or "Locating connectors on the front of your computer" on how to : http://www.lenovo.com/support This section provides instructions on page 7. To replace the keyboard: 1. Locate the keyboard connector. To obtain a copy of the ThinkCentre Safety and Warranty ... Warranty Guide that came with your computer. Chapter 2. To obtain a copy of the ThinkCentre Safety and Warranty Guide, go to: http://www.lenovo.com/support This section provides instructions on how to a standard keyboard connector 1 or a USB connector 2 .


