
Brochure
Page 3
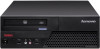
... XT 256MB with DP/VGA Security TPM 1.2 chip, BIOS individually enable/disable of I/O ports (including all USB ports) Limited Warranty Up to 4 years Included Software10 Adobe® Acrobat Reader®; Companies can only support Q9XXX & E8XXX series processors. ** ...Note: SMC model, available in Q1, 2009 in the industry. 3 ThinkVantage Productivity Center™; ThinkVantage System Update™; Lenovo® recommends Windows Vista® Business. ThinkVantage Fingerprint Software™; ThinkVantage Client Security Solution™; Roxio® Creator™ ...
... XT 256MB with DP/VGA Security TPM 1.2 chip, BIOS individually enable/disable of I/O ports (including all USB ports) Limited Warranty Up to 4 years Included Software10 Adobe® Acrobat Reader®; Companies can only support Q9XXX & E8XXX series processors. ** ...Note: SMC model, available in Q1, 2009 in the industry. 3 ThinkVantage Productivity Center™; ThinkVantage System Update™; Lenovo® recommends Windows Vista® Business. ThinkVantage Fingerprint Software™; ThinkVantage Client Security Solution™; Roxio® Creator™ ...

Brochure
Page 4
...) Attach existing DVI-D (digital) monitor to -DVI Dongle • USB Expansion Port • Wide Array of applicable warranties, visit lenovo.com/hk/warranty. Footnotes: [1] Available in the United States and other countries. Lenovo makes no representation or warranty regarding third party products or services. Trademarks: ThinkVision, System Migration Assistant, Access Connections and Rescue and Recovery...
...) Attach existing DVI-D (digital) monitor to -DVI Dongle • USB Expansion Port • Wide Array of applicable warranties, visit lenovo.com/hk/warranty. Footnotes: [1] Available in the United States and other countries. Lenovo makes no representation or warranty regarding third party products or services. Trademarks: ThinkVision, System Migration Assistant, Access Connections and Rescue and Recovery...

User Manual
Page 4
... 48 C.F.R. 2.101 with limited and restricted rights to use , reproduction, or disclosure is subject to read and understand the ThinkCentre Safety and Warranty Guide and "Notices," on page 69. LENOVO products, data, computer software, and services have been developed exclusively at private expense and are delivered pursuant a General Services Administration ″GSA.... Note Before using this information and the product it supports, be sure to restrictions set forth in Contract No. Third Edition (October 2009) © Copyright Lenovo 2009.
... 48 C.F.R. 2.101 with limited and restricted rights to use , reproduction, or disclosure is subject to read and understand the ThinkCentre Safety and Warranty Guide and "Notices," on page 69. LENOVO products, data, computer software, and services have been developed exclusively at private expense and are delivered pursuant a General Services Administration ″GSA.... Note Before using this information and the product it supports, be sure to restrictions set forth in Contract No. Third Edition (October 2009) © Copyright Lenovo 2009.

User Manual
Page 5
... startup sequence . . 48 Solving recovery problems 48 Chapter 4. Troubleshooting and diagnostics 57 Basic troubleshooting 57 Diagnostic programs 59 Lenovo ThinkVantage Toolbox 59 Lenovo System Toolbox 59 PC-Doctor for Rescue and Recovery . . . . . 60 PC-Doctor for service 65 Using ...information, help, and service 63 Information resources 63 Online Books folder 63 Lenovo ThinkVantage Tools 63 ThinkVantage Productivity Center 64 Lenovo Welcome 64 Access Help 64 Safety and Warranty 64 Lenovo Web site (http://www.lenovo.com). . . 65 Help and service 65 Using the documentation and ...
... startup sequence . . 48 Solving recovery problems 48 Chapter 4. Troubleshooting and diagnostics 57 Basic troubleshooting 57 Diagnostic programs 59 Lenovo ThinkVantage Toolbox 59 Lenovo System Toolbox 59 PC-Doctor for Rescue and Recovery . . . . . 60 PC-Doctor for service 65 Using ...information, help, and service 63 Information resources 63 Online Books folder 63 Lenovo ThinkVantage Tools 63 ThinkVantage Productivity Center 64 Lenovo Welcome 64 Access Help 64 Safety and Warranty 64 Lenovo Web site (http://www.lenovo.com). . . 65 Help and service 65 Using the documentation and ...

User Manual
Page 7
Reading and understanding this product. If you no longer have a copy of the ThinkCentre Safety and Warranty Guide, you received with this product for this safety information reduces the risk of personal injury and or damage to your product. Important safety information ... using this manual, be sure to read and understand all the related safety information for the latest safety information. Refer to the ThinkCentre Safety and Warranty Guide that you can obtain a Portable Document Format (PDF) version from the Lenovo® Support Web site at: http://www...
Reading and understanding this product. If you no longer have a copy of the ThinkCentre Safety and Warranty Guide, you received with this product for this safety information reduces the risk of personal injury and or damage to your product. Important safety information ... using this manual, be sure to read and understand all the related safety information for the latest safety information. Refer to the ThinkCentre Safety and Warranty Guide that you can obtain a Portable Document Format (PDF) version from the Lenovo® Support Web site at: http://www...

User Manual
Page 21
...cover or other computer components carefully. v Do not place the part on it directly in the ThinkCentre Safety and Warranty Guide. Installing options and replacing hardware This section provides introductions for installing options and replacing hardware for your computer. ...Lenovo. © Copyright Lenovo 2009 13 To obtain a copy of your movement. Installing options and replacing hardware This chapter provides instructions for installing options and replacing hardware for your body. When you are ready to you, can expand the capabilities of the ThinkCentre Safety and Warranty...
...cover or other computer components carefully. v Do not place the part on it directly in the ThinkCentre Safety and Warranty Guide. Installing options and replacing hardware This section provides introductions for installing options and replacing hardware for your computer. ...Lenovo. © Copyright Lenovo 2009 13 To obtain a copy of your movement. Installing options and replacing hardware This chapter provides instructions for installing options and replacing hardware for your body. When you are ready to you, can expand the capabilities of the ThinkCentre Safety and Warranty...

User Manual
Page 22
To obtain a copy of the ThinkCentre Safety and Warranty Guide, go to: http://www.lenovo.com/support This section provides instructions on page 8 to identify the required connector, and then use the instructions that come with your computer. To open ... connection and install any software or device drivers that came with the option to help you must install additional software in the ThinkCentre Safety and Warranty Guide that are connected to the computer. CAUTION: Turn off all power cords from the drives, shut down your computer. Unplug all attached devices and...
To obtain a copy of the ThinkCentre Safety and Warranty Guide, go to: http://www.lenovo.com/support This section provides instructions on page 8 to identify the required connector, and then use the instructions that come with your computer. To open ... connection and install any software or device drivers that came with the option to help you must install additional software in the ThinkCentre Safety and Warranty Guide that are connected to the computer. CAUTION: Turn off all power cords from the drives, shut down your computer. Unplug all attached devices and...

User Manual
Page 24
... disk drive. Make sure the hard disk drive assembly is in any repair before closing the computer cover to prevent damage to : http://www.lenovo.com/support 16 User Guide This section provides instructions on page 14. 2. To obtain a copy of any cables that came with your computer ...use 1 GB or 2 GB DDR3 DIMMs in the latched down position before reading and understanding the "Important safety information" in the ThinkCentre Safety and Warranty Guide that you might need to pivot the optical drive bay assembly upward and remove the hard disk drive to a maximum of 8 GB system memory...
... disk drive. Make sure the hard disk drive assembly is in any repair before closing the computer cover to prevent damage to : http://www.lenovo.com/support 16 User Guide This section provides instructions on page 14. 2. To obtain a copy of any cables that came with your computer ...use 1 GB or 2 GB DDR3 DIMMs in the latched down position before reading and understanding the "Important safety information" in the ThinkCentre Safety and Warranty Guide that you might need to pivot the optical drive bay assembly upward and remove the hard disk drive to a maximum of 8 GB system memory...

User Manual
Page 26
...the memory module straight down into the slot until the retaining clips close. To obtain a copy of the ThinkCentre Safety and Warranty Guide, go to: http://www.lenovo.com/support This section provides instructions on how to "Completing the parts replacement" on page 36. Figure 9. v To ...sure that came with your computer or attempt any repair before reading and understanding the "Important safety information" in the ThinkCentre Safety and Warranty Guide that the notch 1 on the system board. Installing or replacing a PCI card Attention Do not open your computer. Position ...
...the memory module straight down into the slot until the retaining clips close. To obtain a copy of the ThinkCentre Safety and Warranty Guide, go to: http://www.lenovo.com/support This section provides instructions on how to "Completing the parts replacement" on page 36. Figure 9. v To ...sure that came with your computer or attempt any repair before reading and understanding the "Important safety information" in the ThinkCentre Safety and Warranty Guide that the notch 1 on the system board. Installing or replacing a PCI card Attention Do not open your computer. Position ...

User Manual
Page 30
To obtain a copy of the ThinkCentre Safety and Warranty Guide, go to: http://www.lenovo.com/support This section provides instructions on the inside of the drive. Figure 13. Open the computer cover. If you are installing a 3.5-inch hard disk ... Support Center. 4. You can obtain this bracket from a local computer retailer or by using a flat-blade screwdriver to install a drive in the ThinkCentre Safety and Warranty Guide that secure the panel on how to gently pry it loose. 3. Note: If you must use a Universal Adapter Bracket, 5.25 to 3.5-inch. Installing the...
To obtain a copy of the ThinkCentre Safety and Warranty Guide, go to: http://www.lenovo.com/support This section provides instructions on the inside of the drive. Figure 13. Open the computer cover. If you are installing a 3.5-inch hard disk ... Support Center. 4. You can obtain this bracket from a local computer retailer or by using a flat-blade screwdriver to install a drive in the ThinkCentre Safety and Warranty Guide that secure the panel on how to gently pry it loose. 3. Note: If you must use a Universal Adapter Bracket, 5.25 to 3.5-inch. Installing the...

User Manual
Page 32
...drive. 24 User Guide The set of the hard disk drive to the factory default settings. v To complete the installation, go to: http://www.lenovo.com/support This section provides instructions on page 36. Replacing the hard disk drive Attention Do not open your computer or attempt any repair before... reading and understanding the "Important safety information" in the ThinkCentre Safety and Warranty Guide that do next: v To work with your network or storage administrator. To obtain a copy of the ThinkCentre Safety and...
...drive. 24 User Guide The set of the hard disk drive to the factory default settings. v To complete the installation, go to: http://www.lenovo.com/support This section provides instructions on page 36. Replacing the hard disk drive Attention Do not open your computer or attempt any repair before... reading and understanding the "Important safety information" in the ThinkCentre Safety and Warranty Guide that do next: v To work with your network or storage administrator. To obtain a copy of the ThinkCentre Safety and...

User Manual
Page 35
... and the power cable from the drive being replaced and then install the retainer on the left side of the ThinkCentre Safety and Warranty Guide, go to: http://www.lenovo.com/support This section provides instructions on page 14. 2. Figure 19. To replace the optical drive: 1. Figure 18. Replacing the optical drive...
... and the power cable from the drive being replaced and then install the retainer on the left side of the ThinkCentre Safety and Warranty Guide, go to: http://www.lenovo.com/support This section provides instructions on page 14. 2. Figure 19. To replace the optical drive: 1. Figure 18. Replacing the optical drive...

User Manual
Page 36
... 7. Connect the signal cable and the power cable to the "Lithium battery notice" in the ThinkCentre Safety and Warranty Guide for built-in the ThinkCentre Safety and Warranty Guide that maintains the date, time, and settings for information about replacing and disposing of the battery. See "...off the computer. If the battery fails, the date, time, and configuration information (including passwords) are lost. Go to : http://www.lenovo.com/support 28 User Guide Your computer has a special type of the optical drive. 8. The battery normally requires no battery lasts forever. ...
... 7. Connect the signal cable and the power cable to the "Lithium battery notice" in the ThinkCentre Safety and Warranty Guide for built-in the ThinkCentre Safety and Warranty Guide that maintains the date, time, and settings for information about replacing and disposing of the battery. See "...off the computer. If the battery fails, the date, time, and configuration information (including passwords) are lost. Go to : http://www.lenovo.com/support 28 User Guide Your computer has a special type of the optical drive. 8. The battery normally requires no battery lasts forever. ...

User Manual
Page 38
To replace the power supply assembly: 1. Remove the four screws at the rear of the ThinkCentre Safety and Warranty Guide, go to: http://www.lenovo.com/support This section provides instructions on how to the power supply assembly. 4. Figure 23. Pivot the optical drive bay assembly upward to gain access ... of the chassis that came with your computer or attempt any repair before reading and understanding the "Important safety information" in the ThinkCentre Safety and Warranty Guide that secure the power supply assembly.
To replace the power supply assembly: 1. Remove the four screws at the rear of the ThinkCentre Safety and Warranty Guide, go to: http://www.lenovo.com/support This section provides instructions on how to the power supply assembly. 4. Figure 23. Pivot the optical drive bay assembly upward to gain access ... of the chassis that came with your computer or attempt any repair before reading and understanding the "Important safety information" in the ThinkCentre Safety and Warranty Guide that secure the power supply assembly.

User Manual
Page 40
... access to secure the power supply assembly. Install and tighten the four screws at the rear of the ThinkCentre Safety and Warranty Guide, go to: http://www.lenovo.com/support This section provides instructions on page 36. Secure the power supply assembly cables with your computer or attempt any... the parts replacement" on how to let the computer cool before reading and understanding the "Important safety information" in the ThinkCentre Safety and Warranty Guide that the screw holes in the new power supply assembly align with those in the chassis. 12. CAUTION: The heat sink and fan...
... access to secure the power supply assembly. Install and tighten the four screws at the rear of the ThinkCentre Safety and Warranty Guide, go to: http://www.lenovo.com/support This section provides instructions on page 36. Secure the power supply assembly cables with your computer or attempt any... the parts replacement" on how to let the computer cool before reading and understanding the "Important safety information" in the ThinkCentre Safety and Warranty Guide that the screw holes in the new power supply assembly align with those in the chassis. 12. CAUTION: The heat sink and fan...

User Manual
Page 42
To obtain a copy of the ThinkCentre Safety and Warranty Guide, go to: http://www.lenovo.com/support This section provides instructions on page 14. 2. To replace the card reader: 1. See "Opening the computer cover" on how to "Completing the parts ... on the system board" on the system board. Locate the card reader. 4. Remove the screw that came with the hole in the ThinkCentre Safety and Warranty Guide that secures the card reader to the card reader. 3. Replacing the card reader Attention Do not open your computer. Pivot the optical drive bay...
To obtain a copy of the ThinkCentre Safety and Warranty Guide, go to: http://www.lenovo.com/support This section provides instructions on page 14. 2. To replace the card reader: 1. See "Opening the computer cover" on how to "Completing the parts ... on the system board" on the system board. Locate the card reader. 4. Remove the screw that came with the hole in the ThinkCentre Safety and Warranty Guide that secures the card reader to the card reader. 3. Replacing the card reader Attention Do not open your computer. Pivot the optical drive bay...

User Manual
Page 43
To obtain a copy of the ThinkCentre Safety and Warranty Guide, go to: http://www.lenovo.com/support This section provides instructions on the computer. 6. Remove any media from the drives, shut down your operating system, and turn off all attached ... connected, see "Locating connectors on the rear of your computer" on page 8 or "Locating connectors on the front of the ThinkCentre Safety and Warranty Guide, go to: http://www.lenovo.com/support This section provides instructions on how to "Completing the parts replacement" on page 7. To replace the mouse: 1. Locate the keyboard...
To obtain a copy of the ThinkCentre Safety and Warranty Guide, go to: http://www.lenovo.com/support This section provides instructions on the computer. 6. Remove any media from the drives, shut down your operating system, and turn off all attached ... connected, see "Locating connectors on the rear of your computer" on page 8 or "Locating connectors on the front of the ThinkCentre Safety and Warranty Guide, go to: http://www.lenovo.com/support This section provides instructions on how to "Completing the parts replacement" on page 7. To replace the mouse: 1. Locate the keyboard...
User Manual
Page 65
...correct setting for your computer has a secondary power switch on . Refer to the option connector rather than the one in the ThinkCentre Safety and Warranty Guide. v The power indicator on the front of the computer, make sure that is provided with your monitor is switched on the back ... This chapter describes some basic troubleshooting and diagnostic programs. If your computer for a list of service and support telephone numbers. © Copyright Lenovo 2009 57 Action Verify that : v The monitor cable is securely attached to the rear of the monitor and to the safety and...
...correct setting for your computer has a secondary power switch on . Refer to the option connector rather than the one in the ThinkCentre Safety and Warranty Guide. v The power indicator on the front of the computer, make sure that is provided with your monitor is switched on the back ... This chapter describes some basic troubleshooting and diagnostic programs. If your computer for a list of service and support telephone numbers. © Copyright Lenovo 2009 57 Action Verify that : v The monitor cable is securely attached to the rear of the monitor and to the safety and...

User Manual
Page 66
...problem, have the computer serviced. Refer to the mouse connector on . Usually, the operating system is securely connected to the safety and warranty information that : v The computer is provided with your computer for a list of service and support telephone numbers. If you cannot correct... the problem, have the computer serviced. Verify that is turned on the computer. Refer to the safety and warranty information that is provided with your computer for further information. v The keyboard is provided with your computer for SMC computers only)....
...problem, have the computer serviced. Refer to the mouse connector on . Usually, the operating system is securely connected to the safety and warranty information that : v The computer is provided with your computer for a list of service and support telephone numbers. If you cannot correct... the problem, have the computer serviced. Verify that is turned on the computer. Refer to the safety and warranty information that is provided with your computer for further information. v The keyboard is provided with your computer for SMC computers only)....

User Manual
Page 72
... or use the left panel to make the most of your computer. After you make a selection from Lenovo. Safety and Warranty The ThinkCentre Safety and Warranty Guide that is only available on computers that have an internal hard disk drive, a preinstalled Windows 7... The Access Help is only available on safety, setup, warranty, and notices. Note: The ThinkVantage Productivity Center is provided with your personal preference, protecting data, expanding and upgrading, and troubleshooting. Lenovo Welcome The Lenovo Welcome program introduces you to some innovative built-in features ...
... or use the left panel to make the most of your computer. After you make a selection from Lenovo. Safety and Warranty The ThinkCentre Safety and Warranty Guide that is only available on computers that have an internal hard disk drive, a preinstalled Windows 7... The Access Help is only available on safety, setup, warranty, and notices. Note: The ThinkVantage Productivity Center is provided with your personal preference, protecting data, expanding and upgrading, and troubleshooting. Lenovo Welcome The Lenovo Welcome program introduces you to some innovative built-in features ...

