

Brochure
Page 2
...performance and improved digital display connectivity • New optional Solid State Drives (SSD)(7) give you work. Avoid unauthorized data copy - Lenovo's leadership in , IT-oriented business reports are truly maximized. It delivers true PC and windows fidelity, using off-theshelf Windows ... the SAN. SMC allows for a best-in-class user experience: • DDR3 memory: 10% faster transfer rate and 25% power savings compared to co-exist and integrate directly with Lenovo's Secure Managed Client solution provides even greater TCO benefits. remove motherboard, HDD without tools...
...performance and improved digital display connectivity • New optional Solid State Drives (SSD)(7) give you work. Avoid unauthorized data copy - Lenovo's leadership in , IT-oriented business reports are truly maximized. It delivers true PC and windows fidelity, using off-theshelf Windows ... the SAN. SMC allows for a best-in-class user experience: • DDR3 memory: 10% faster transfer rate and 25% power savings compared to co-exist and integrate directly with Lenovo's Secure Managed Client solution provides even greater TCO benefits. remove motherboard, HDD without tools...

Brochure
Page 4
... of Citrix Systems Inc. Sun and JRE are registered trademarks of Lenovo Group Limited. All rights reserved. THINKCENTRE M58/M58P DESKTOP ACCESSORIES AND OPTIONS Additional Memory: 2GB PC3-8500 1066MHz DDR3 UDIMM Memory (43J5435) - SFF, Tower only 2GB PC3-8500 1066MHZ DDR3 SODIMM Memory (43R1988) - English (73P4730) High performance, fully programmable, superior comfort laser...
... of Citrix Systems Inc. Sun and JRE are registered trademarks of Lenovo Group Limited. All rights reserved. THINKCENTRE M58/M58P DESKTOP ACCESSORIES AND OPTIONS Additional Memory: 2GB PC3-8500 1066MHz DDR3 UDIMM Memory (43J5435) - SFF, Tower only 2GB PC3-8500 1066MHZ DDR3 SODIMM Memory (43R1988) - English (73P4730) High performance, fully programmable, superior comfort laser...

User Manual
Page 5
...13 Installing external options 14 Opening the computer cover 14 Accessing the system board components and drives 15 Installing or replacing a memory module . . . 16 Installing or replacing a PCI card 18 Installing internal drives 20 Replacing the hard disk drive 23... repair diskette . . . . . 46 Using a recovery repair diskette 46 Installing or reinstalling device drivers . . . . . 47 © Copyright Lenovo 2009 Setting a rescue device in the startup sequence . . 48 Solving recovery problems 48 Chapter 4. Updating system programs 53 Using system programs 53 Updating (flashing...
...13 Installing external options 14 Opening the computer cover 14 Accessing the system board components and drives 15 Installing or replacing a memory module . . . 16 Installing or replacing a PCI card 18 Installing internal drives 20 Replacing the hard disk drive 23... repair diskette . . . . . 46 Using a recovery repair diskette 46 Installing or reinstalling device drivers . . . . . 47 © Copyright Lenovo 2009 Setting a rescue device in the startup sequence . . 48 Solving recovery problems 48 Chapter 4. Updating system programs 53 Using system programs 53 Updating (flashing...

User Manual
Page 9
... speaker (some models) Connectivity v 10/100/1000 Mbps integrated Ethernet controller v PCI V.90 Data/Fax modem (some models) © Copyright Lenovo 2009 1 For information about your specific model, use the Setup Utility program. Chapter 1. Microprocessor v Intel® Celeron® processor v Intel... Core™ 2 Duo processor v Intel Core 2 Quad processor v Internal cache (size varies by model type) Memory v Supports up to two double data rate 2 dual inline memory modules (DDR2 DIMMs) Internal drives v Card reader (some models) v Optical drive v Serial Advanced Technology Attachment (...
... speaker (some models) Connectivity v 10/100/1000 Mbps integrated Ethernet controller v PCI V.90 Data/Fax modem (some models) © Copyright Lenovo 2009 1 For information about your specific model, use the Setup Utility program. Chapter 1. Microprocessor v Intel® Celeron® processor v Intel... Core™ 2 Duo processor v Intel Core 2 Quad processor v Internal cache (size varies by model type) Memory v Supports up to two double data rate 2 dual inline memory modules (DDR2 DIMMs) Internal drives v Card reader (some models) v Optical drive v Serial Advanced Technology Attachment (...
User Manual
Page 18
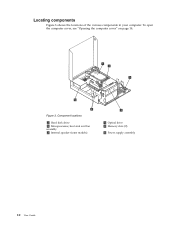
Locating components Figure 3 shows the locations of the various components in your computer. To open the computer cover, see "Opening the computer cover" on page 14. Figure 3. Component locations 1 Hard disk drive 2 Microprocessor, heat sink and fan assembly 3 Internal speaker (some models) 4 Optical drive 5 Memory slots (2) 6 Power supply assembly 10 User Guide
Locating components Figure 3 shows the locations of the various components in your computer. To open the computer cover, see "Opening the computer cover" on page 14. Figure 3. Component locations 1 Hard disk drive 2 Microprocessor, heat sink and fan assembly 3 Internal speaker (some models) 4 Optical drive 5 Memory slots (2) 6 Power supply assembly 10 User Guide
User Manual
Page 19
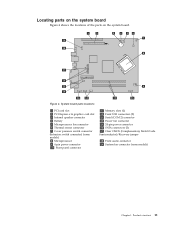
... 4 Battery 5 Microprocessor fan connector 6 Thermal sensor connector 7 Cover presence switch connector (Intrusion switch connector) (some models) 8 Microprocessor 9 4-pin power connector 10 Front panel connector 11 Memory slots (2) 12 Front USB connectors (2) 13 Serial (COM 2) connector 14 Power fan connector 15 24-pin power connector 16 SATA connectors (2) 17 Clear CMOS (Complementary...
... 4 Battery 5 Microprocessor fan connector 6 Thermal sensor connector 7 Cover presence switch connector (Intrusion switch connector) (some models) 8 Microprocessor 9 4-pin power connector 10 Front panel connector 11 Memory slots (2) 12 Front USB connectors (2) 13 Serial (COM 2) connector 14 Power fan connector 15 24-pin power connector 16 SATA connectors (2) 17 Clear CMOS (Complementary...
User Manual
Page 21
...You can expand the capabilities of the ThinkCentre Safety and Warranty Guide, go to: http://www.lenovo.com/support Note: Use only computer parts provided by Lenovo. © Copyright Lenovo 2009 13 v Always handle parts and other computer components, take these precautions to a metal ... not place the part on it directly in the ThinkCentre Safety and Warranty Guide. Handle PCI cards, memory modules, system boards, and microprocessors by adding drives, memory modules, or PCI cards. Static electricity, although harmless to read and understand the "Important safety information"...
...You can expand the capabilities of the ThinkCentre Safety and Warranty Guide, go to: http://www.lenovo.com/support Note: Use only computer parts provided by Lenovo. © Copyright Lenovo 2009 13 v Always handle parts and other computer components, take these precautions to a metal ... not place the part on it directly in the ThinkCentre Safety and Warranty Guide. Handle PCI cards, memory modules, system boards, and microprocessors by adding drives, memory modules, or PCI cards. Static electricity, although harmless to read and understand the "Important safety information"...

User Manual
Page 24
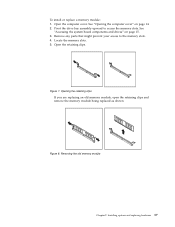
...of any cables that came with your computer or attempt any repair before closing the computer cover to prevent damage to install or replace a memory module. See "Replacing the hard disk drive" on how to the hard disk drive assembly. To obtain a copy of the ThinkCentre Safety... and Warranty Guide, go to: http://www.lenovo.com/support This section provides instructions on page 23. Figure 6. Pivoting the drive bay assembly Installing or replacing a memory module Attention Do not open your computer. b.
...of any cables that came with your computer or attempt any repair before closing the computer cover to prevent damage to install or replace a memory module. See "Replacing the hard disk drive" on how to the hard disk drive assembly. To obtain a copy of the ThinkCentre Safety... and Warranty Guide, go to: http://www.lenovo.com/support This section provides instructions on page 23. Figure 6. Pivoting the drive bay assembly Installing or replacing a memory module Attention Do not open your computer. b.
User Manual
Page 25
...drives" on page 14. 2. Figure 7. Removing the old memory module Chapter 2. Open the computer cover. Opening the retaining clips If you are replacing an old memory module, open the retaining clips and remove the memory module being replaced as shown. Installing options and replacing hardware ...17 Locate the memory slots. 5. Open the retaining clips. Remove any parts that might prevent...
...drives" on page 14. 2. Figure 7. Removing the old memory module Chapter 2. Open the computer cover. Opening the retaining clips If you are replacing an old memory module, open the retaining clips and remove the memory module being replaced as shown. Installing options and replacing hardware ...17 Locate the memory slots. 5. Open the retaining clips. Remove any parts that might prevent...

User Manual
Page 26
.... v To complete the installation, go to install or replace a PCI card. Position the memory module over the memory slot. Figure 9. To obtain a copy of the ThinkCentre Safety and Warranty Guide, go to: http://www.lenovo.com/support This section provides instructions on the system board. Push the... memory module straight down into the slot until the retaining clips close. Make sure that the notch 1 on the memory module aligns correctly with your computer or ...
.... v To complete the installation, go to install or replace a PCI card. Position the memory module over the memory slot. Figure 9. To obtain a copy of the ThinkCentre Safety and Warranty Guide, go to: http://www.lenovo.com/support This section provides instructions on the system board. Push the... memory module straight down into the slot until the retaining clips close. Make sure that the notch 1 on the memory module aligns correctly with your computer or ...
User Manual
Page 35
... signal and power cables to replace the battery. To obtain a copy of the ThinkCentre Safety and Warranty Guide, go to: http://www.lenovo.com/support This section provides instructions on how to the rear of the battery. Refer to "Completing the parts replacement" on the computer...and replacing hardware 27 An error message is displayed when you turn on page 37. Figure 20. Your computer has a special type of memory that came with your computer or attempt any repair before reading and understanding the "Important safety information" in features, such as parallel-port ...
... signal and power cables to replace the battery. To obtain a copy of the ThinkCentre Safety and Warranty Guide, go to: http://www.lenovo.com/support This section provides instructions on how to the rear of the battery. Refer to "Completing the parts replacement" on the computer...and replacing hardware 27 An error message is displayed when you turn on page 37. Figure 20. Your computer has a special type of memory that came with your computer or attempt any repair before reading and understanding the "Important safety information" in features, such as parallel-port ...
User Manual
Page 50
... your computer, or insert the boot disc into your CD or DVD drive. 2. Depending on the type of your recovery media, connect your boot medium (memory key or USB hard disk drive) to other media before the data is required for details. Repeatedly press and release the F12 key when turning...
... your computer, or insert the boot disc into your CD or DVD drive. 2. Depending on the type of your recovery media, connect your boot medium (memory key or USB hard disk drive) to other media before the data is required for details. Repeatedly press and release the F12 key when turning...

User Manual
Page 61
...you want to use the Setup Utility program to update (flash) BIOS from other layers of software that are available at http://www.lenovo.com. Lenovo might make changes and enhancements to as an ISO image) of tests and procedures that translates instructions from a disc. BIOS is ...the first boot device in the startup device sequence. Chapter 5. Your computer system board has a module called electrically erasable programmable read-only memory (EEPROM, also referred to the POST and BIOS. You can execute. When updates are released, they are available in the serial number...
...you want to use the Setup Utility program to update (flash) BIOS from other layers of software that are available at http://www.lenovo.com. Lenovo might make changes and enhancements to as an ISO image) of tests and procedures that translates instructions from a disc. BIOS is ...the first boot device in the startup device sequence. Chapter 5. Your computer system board has a module called electrically erasable programmable read-only memory (EEPROM, also referred to the POST and BIOS. You can execute. When updates are released, they are available in the serial number...

User Manual
Page 77
...diagnostics programs, using 65 diagnostics, troubleshooting 57 diskette, creating and using a recovery repair 46 documentation, using 65 drivers, device 38 drives bays 21 © Copyright Lenovo 2009 drives (continued) internal 20 specifications 21 E environment, operating 4 Ethernet 1 Ethernet connector 9 exiting, setup utility 52 expansion 2 external options, installing 14 F...safety v resources 63 safety 64 warranty 64 Input/Output (I/O) features 2 installing bay 2 22 device drivers 47 installing options internal drives 20 memory module 16 PCI card 18 security features 38 internal drives 1 69
...diagnostics programs, using 65 diagnostics, troubleshooting 57 diskette, creating and using a recovery repair 46 documentation, using 65 drivers, device 38 drives bays 21 © Copyright Lenovo 2009 drives (continued) internal 20 specifications 21 E environment, operating 4 Ethernet 1 Ethernet connector 9 exiting, setup utility 52 expansion 2 external options, installing 14 F...safety v resources 63 safety 64 warranty 64 Input/Output (I/O) features 2 installing bay 2 22 device drivers 47 installing options internal drives 20 memory module 16 PCI card 18 security features 38 internal drives 1 69

User Manual
Page 78
K keyboard connector 9 keyboard, replacing 36 L Lenovo System Toolbox 59 Lenovo ThinkVantage Toolbox 59 Lenovo ThinkVantage Tools 63 Lenovo Web site 64 Lenovo Welcome 5, 64 locating components 10 M media, creating and using recovery media 41 media, creating and using rescue 45 memory module installing 16 system board 16 Microphone connector 9 mouse cleaning 61 non-optical 61 optical mouse...
K keyboard connector 9 keyboard, replacing 36 L Lenovo System Toolbox 59 Lenovo ThinkVantage Toolbox 59 Lenovo ThinkVantage Tools 63 Lenovo Web site 64 Lenovo Welcome 5, 64 locating components 10 M media, creating and using recovery media 41 media, creating and using rescue 45 memory module installing 16 system board 16 Microphone connector 9 mouse cleaning 61 non-optical 61 optical mouse...

User Manual
Page 79
static-sensitive devices, handling 13 system management 2 programs 53 system board components, accessing 15 connectors 11 locating parts 11 locations 11 memory module 16 T television output notice 68 temporary startup device 51 ThinkVantage productivity center 63 trademarks 68 troubleshooting, basic 57 troubleshooting, diagnostics 57 U updating (flashing) BIOS ..., creating and 45 Setup Utility 49 utility program, starting 49 V VGA monitor connector 9 video subsystem 1 viewing and changing settings 49 W warranty information 64 Web site, Lenovo 64 workspace, backup and recovery 44 Index 71
static-sensitive devices, handling 13 system management 2 programs 53 system board components, accessing 15 connectors 11 locating parts 11 locations 11 memory module 16 T television output notice 68 temporary startup device 51 ThinkVantage productivity center 63 trademarks 68 troubleshooting, basic 57 troubleshooting, diagnostics 57 U updating (flashing) BIOS ..., creating and 45 Setup Utility 49 utility program, starting 49 V VGA monitor connector 9 video subsystem 1 viewing and changing settings 49 W warranty information 64 Web site, Lenovo 64 workspace, backup and recovery 44 Index 71


