User Manual
Page 4
Note Before using this information and the product it supports, be sure to restrictions set forth in Contract No. LIMITED AND RESTRICTED RIGHTS NOTICE: If products, data, computer software, or services are sold to governmental ... to read and understand the ThinkCentre Safety and Warranty Guide and "Notices," on page 69. GS-35F-05925. First Edition (February 2010) © Copyright Lenovo 2010. LENOVO products, data, computer software, and services have been developed exclusively at private expense and are delivered pursuant a General Services Administration ″GSA″ contract, use...
Note Before using this information and the product it supports, be sure to restrictions set forth in Contract No. LIMITED AND RESTRICTED RIGHTS NOTICE: If products, data, computer software, or services are sold to governmental ... to read and understand the ThinkCentre Safety and Warranty Guide and "Notices," on page 69. GS-35F-05925. First Edition (February 2010) © Copyright Lenovo 2010. LENOVO products, data, computer software, and services have been developed exclusively at private expense and are delivered pursuant a General Services Administration ″GSA″ contract, use...

User Manual
Page 7
Refer to the ThinkCentre Safety and Warranty Guide that you can obtain a Portable Document Format (PDF) version from the Lenovo® Support Web site at: http://www.lenovo.com/support © Copyright Lenovo 2010 v If you no longer have a copy of the ThinkCentre Safety and Warranty Guide, you received with this product for this safety information...
Refer to the ThinkCentre Safety and Warranty Guide that you can obtain a Portable Document Format (PDF) version from the Lenovo® Support Web site at: http://www.lenovo.com/support © Copyright Lenovo 2010 v If you no longer have a copy of the ThinkCentre Safety and Warranty Guide, you received with this product for this safety information...

User Manual
Page 9
... Integrated graphics card for a VGA (Video Graphics Array) connector and a DisplayPort connector (not applicable on some models) © Copyright Lenovo 2010 1 System information The following information covers a variety of models. Chapter 1. Microprocessor v Intel Core™ i3 microprocessor v Intel ...microprocessor v Intel Core i7 microprocessor v Intel® Pentium® microprocessor v Internal cache (size varies by model type) Memory v Supports up to four double data rate 3 dual inline memory modules (DDR3 DIMMs) Internal drives v Optical drive v SATA (Serial Advanced Technology...
... Integrated graphics card for a VGA (Video Graphics Array) connector and a DisplayPort connector (not applicable on some models) © Copyright Lenovo 2010 1 System information The following information covers a variety of models. Chapter 1. Microprocessor v Intel Core™ i3 microprocessor v Intel ...microprocessor v Intel Core i7 microprocessor v Intel® Pentium® microprocessor v Internal cache (size varies by model type) Memory v Supports up to four double data rate 3 dual inline memory modules (DDR3 DIMMs) Internal drives v Optical drive v SATA (Serial Advanced Technology...

User Manual
Page 10
... v One PCI card slot v One PCI Express x16 graphics card slot Power supply v 240-watt auto-sensing power supply v Advanced Configuration and Power Interface (ACPI) support Security features v Computrace v Cover presence switch (also called intrusion switch) v Enabling or disabling a device v Enabling or disabling USB connectors individually v Hard disk drive password v Keyboard...
... v One PCI card slot v One PCI Express x16 graphics card slot Power supply v 240-watt auto-sensing power supply v Advanced Configuration and Power Interface (ACPI) support Security features v Computrace v Cover presence switch (also called intrusion switch) v Enabling or disabling a device v Enabling or disabling USB connectors individually v Hard disk drive password v Keyboard...

User Manual
Page 11
...For more information, see "Software overview" on page 5. v Support for an integrated cable lock (Kensington lock) v Trusted Platform Module (TPM) Software programs, preinstalled Your computer might be identified by Lenovo as compatible with preinstalled software programs. If it does, an... operating system, device drivers to support built-in Windows 7 Professional, Windows 7 Ultimate, Windows Vista Business, or Windows ...
...For more information, see "Software overview" on page 5. v Support for an integrated cable lock (Kensington lock) v Trusted Platform Module (TPM) Software programs, preinstalled Your computer might be identified by Lenovo as compatible with preinstalled software programs. If it does, an... operating system, device drivers to support built-in Windows 7 Professional, Windows 7 Ultimate, Windows Vista Business, or Windows ...

User Manual
Page 14
As a result, fingerprint authentication can be purchased for computers that support this option. A fingerprint reader keyboard is only available on page 58 for detailed information. Note: The Lenovo ThinkVantage Toolbox program is available with select computers or can replace passwords and enable...by downloading and installing software packages (TVT applications, device drivers, BIOS flashes, and other third party applications). See "Lenovo ThinkVantage Toolbox" on computers preinstalled with Windows Vista or Windows XP from one computer to achieve the best balance between system...
As a result, fingerprint authentication can be purchased for computers that support this option. A fingerprint reader keyboard is only available on page 58 for detailed information. Note: The Lenovo ThinkVantage Toolbox program is available with select computers or can replace passwords and enable...by downloading and installing software packages (TVT applications, device drivers, BIOS flashes, and other third party applications). See "Lenovo ThinkVantage Toolbox" on computers preinstalled with Windows Vista or Windows XP from one computer to achieve the best balance between system...
User Manual
Page 21
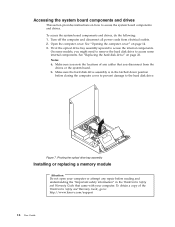
Handling static-sensitive devices Do not open your computer or attempt any exposed circuitry. When you are ready to : http://www.lenovo.com/support Notes: 1. Handle PCI cards, memory modules, system boards, and microprocessors by installing or replacing hardware. Never touch any repair before reading and understanding the "Important ...
Handling static-sensitive devices Do not open your computer or attempt any exposed circuitry. When you are ready to : http://www.lenovo.com/support Notes: 1. Handle PCI cards, memory modules, system boards, and microprocessors by installing or replacing hardware. Never touch any repair before reading and understanding the "Important ...

User Manual
Page 22
... external options to your computer, such as an integrated cable lock. To obtain a copy of the ThinkCentre Safety and Warranty Guide, go to: http://www.lenovo.com/support This section provides instructions on page 8 to open the computer cover, do the following: 1. Remove any repair before opening the computer cover. Remove any...
... external options to your computer, such as an integrated cable lock. To obtain a copy of the ThinkCentre Safety and Warranty Guide, go to: http://www.lenovo.com/support This section provides instructions on page 8 to open the computer cover, do the following: 1. Remove any repair before opening the computer cover. Remove any...
User Manual
Page 24
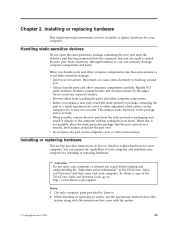
To access the system board components and drives, do the following: 1. Pivot the optical drive bay assembly upward to : http://www.lenovo.com/support 16 User Guide b. To obtain a copy of any repair before reading and understanding the "Important safety information" in the latched down position before closing the ...
To access the system board components and drives, do the following: 1. Pivot the optical drive bay assembly upward to : http://www.lenovo.com/support 16 User Guide b. To obtain a copy of any repair before reading and understanding the "Important safety information" in the latched down position before closing the ...
User Manual
Page 26
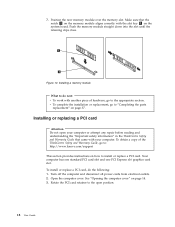
... slot. Figure 10. Open the computer cover. Make sure that came with another piece of the ThinkCentre Safety and Warranty Guide, go to : http://www.lenovo.com/support This section provides instructions on page 37. Installing a memory module What to the open your computer. To install or replace a PCI card, do next...
... slot. Figure 10. Open the computer cover. Make sure that came with another piece of the ThinkCentre Safety and Warranty Guide, go to : http://www.lenovo.com/support This section provides instructions on page 37. Installing a memory module What to the open your computer. To install or replace a PCI card, do next...
User Manual
Page 28
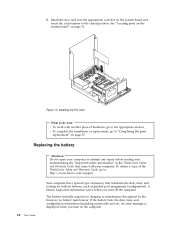
... card What to "Completing the parts replacement" on the computer. To obtain a copy of the ThinkCentre Safety and Warranty Guide, go to: http://www.lenovo.com/support Your computer has a special type of memory that came with another piece of hardware, go to do next: v To work with your computer or attempt...
... card What to "Completing the parts replacement" on the computer. To obtain a copy of the ThinkCentre Safety and Warranty Guide, go to: http://www.lenovo.com/support Your computer has a special type of memory that came with another piece of hardware, go to do next: v To work with your computer or attempt...

User Manual
Page 30
... use a remote hard disk drive accessed through the SMC - Removing the hard disk drive 6. Push the release button 1 of the bracket to : http://www.lenovo.com/support This section provides instructions on page 14. 3. Storage Array, contact your network or storage administrator. Open the computer cover. Disconnect the signal cable and the...
... use a remote hard disk drive accessed through the SMC - Removing the hard disk drive 6. Push the release button 1 of the bracket to : http://www.lenovo.com/support This section provides instructions on page 14. 3. Storage Array, contact your network or storage administrator. Open the computer cover. Disconnect the signal cable and the...

User Manual
Page 32
To obtain a copy of the ThinkCentre Safety and Warranty Guide, go to: http://www.lenovo.com/support This section provides instructions on page 14. 3. Pivot the optical drive bay assembly upward to gain easy access to replace the optical drive. See "Opening ...
To obtain a copy of the ThinkCentre Safety and Warranty Guide, go to: http://www.lenovo.com/support This section provides instructions on page 14. 3. Pivot the optical drive bay assembly upward to gain easy access to replace the optical drive. See "Opening ...

User Manual
Page 34
... components and drives" on page 14. 5. Remove the four screws at the rear of the ThinkCentre Safety and Warranty Guide, go to: http://www.lenovo.com/support This section provides instructions on how to replace the power supply assembly. Open the computer cover. See "Opening the computer cover" on page 16. 26...
... components and drives" on page 14. 5. Remove the four screws at the rear of the ThinkCentre Safety and Warranty Guide, go to: http://www.lenovo.com/support This section provides instructions on how to replace the power supply assembly. Open the computer cover. See "Opening the computer cover" on page 16. 26...

User Manual
Page 36
... to "Completing the parts replacement" on page 37. Replacing the heat sink Attention Do not open your computer. Note: Use only the screws provided by Lenovo. 11. Reconnect all the power supply assembly cables to the front of the computer and then lift it out of the drives. 12. Slide the... power supply assembly to the system board and each of the chassis. Figure 23. v To complete the installation or replacement, go to : http://www.lenovo.com/support 28 User Guide
... to "Completing the parts replacement" on page 37. Replacing the heat sink Attention Do not open your computer. Note: Use only the screws provided by Lenovo. 11. Reconnect all the power supply assembly cables to the front of the computer and then lift it out of the drives. 12. Slide the... power supply assembly to the system board and each of the chassis. Figure 23. v To complete the installation or replacement, go to : http://www.lenovo.com/support 28 User Guide

User Manual
Page 38
... "Locating parts on the system board" on how to replace the front audio and USB assembly. To obtain a copy of hardware, go to: http://www.lenovo.com/support This section provides instructions on page 11.
... "Locating parts on the system board" on how to replace the front audio and USB assembly. To obtain a copy of hardware, go to: http://www.lenovo.com/support This section provides instructions on page 11.

User Manual
Page 40
... 4. See "Accessing the system board components and drives" on the system board. See "Locating parts on the system board" on how to : http://www.lenovo.com/support This section provides instructions on page 11. 32 User Guide To obtain a copy of the ThinkCentre Safety and Warranty Guide, go to replace the system...
... 4. See "Accessing the system board components and drives" on the system board. See "Locating parts on the system board" on how to : http://www.lenovo.com/support This section provides instructions on page 11. 32 User Guide To obtain a copy of the ThinkCentre Safety and Warranty Guide, go to replace the system...

User Manual
Page 42
... assembly upward to gain access to replace the internal speaker. To obtain a copy of the ThinkCentre Safety and Warranty Guide, go to: http://www.lenovo.com/support This section provides instructions on the system board. Open the computer cover. Note: Not all power cords from the internal speaker connector and the thermal...
... assembly upward to gain access to replace the internal speaker. To obtain a copy of the ThinkCentre Safety and Warranty Guide, go to: http://www.lenovo.com/support This section provides instructions on the system board. Open the computer cover. Note: Not all power cords from the internal speaker connector and the thermal...

User Manual
Page 45
... updated information in the ThinkCentre Safety and Warranty Guide that no tools or loose screws are left inside your computer" on how to : http://www.lenovo.com/support This section provides instructions on page 8. Make sure that all power cords from the computer. 4. Installing or replacing hardware 37 Depending on where you...
... updated information in the ThinkCentre Safety and Warranty Guide that no tools or loose screws are left inside your computer" on how to : http://www.lenovo.com/support This section provides instructions on page 8. Make sure that all power cords from the computer. 4. Installing or replacing hardware 37 Depending on where you...

User Manual
Page 46
... front bezel with closing the computer cover. Installation instructions are routed correctly. Cable routing 4. Note: In most areas of the world, Lenovo requires the return of your computer. Note: Make sure that the cables are provided in readme files with the device-driver files. Make...physical locks, you prevent hardware theft and unauthorized access to the computer. Installing security features There are not preinstalled at http://www.lenovo.com/support. If you installed do not interfere with the CRU or will come a few days after the CRU arrives. If there is...
... front bezel with closing the computer cover. Installation instructions are routed correctly. Cable routing 4. Note: In most areas of the world, Lenovo requires the return of your computer. Note: Make sure that the cables are provided in readme files with the device-driver files. Make...physical locks, you prevent hardware theft and unauthorized access to the computer. Installing security features There are not preinstalled at http://www.lenovo.com/support. If you installed do not interfere with the CRU or will come a few days after the CRU arrives. If there is...


