

User Guide
Page 5
... hard disk drives and configuring RAID 25 Installing SATA or SAS hard disk drives . . . . 25 Entering the Marvell BIOS Setup to configure SATA or SAS RAID 25 © Copyright Lenovo 2009, 2010 Configuring the Marvell BIOS Setup to enable SATA or SAS RAID 0, 1, 5, or 10 functionality . . 26 Configuring the Marvell BIOS Setup to set an optional hot spare hard disk drive 26 Configuring the Marvell BIOS Setup to delete an optional hot spare hard disk drive 26 Configuring the Marvell BIOS Setup to delete an array 27 Chapter 7. Using the Setup Utility . . . 21 Starting the Setup Utility...
... hard disk drives and configuring RAID 25 Installing SATA or SAS hard disk drives . . . . 25 Entering the Marvell BIOS Setup to configure SATA or SAS RAID 25 © Copyright Lenovo 2009, 2010 Configuring the Marvell BIOS Setup to enable SATA or SAS RAID 0, 1, 5, or 10 functionality . . 26 Configuring the Marvell BIOS Setup to set an optional hot spare hard disk drive 26 Configuring the Marvell BIOS Setup to delete an optional hot spare hard disk drive 26 Configuring the Marvell BIOS Setup to delete an array 27 Chapter 7. Using the Setup Utility . . . 21 Starting the Setup Utility...

User Guide
Page 7
... about updating POST/BIOS and how to find safety information for manually programming your hard disk drive to view and change the configuration settings of helpful resources available from a POST/BIOS update failure. v Chapter 9, "Recovery information," on page 37 provides instructions on how to use the ThinkVantage® Rescue and Recovery® program to create product recovery discs, back up data, recover software, and restore the entire contents of light sources...
... about updating POST/BIOS and how to find safety information for manually programming your hard disk drive to view and change the configuration settings of helpful resources available from a POST/BIOS update failure. v Chapter 9, "Recovery information," on page 37 provides instructions on how to use the ThinkVantage® Rescue and Recovery® program to create product recovery discs, back up data, recover software, and restore the entire contents of light sources...

User Guide
Page 20
..., you experience any problems during the installation process. Making a 12 User Guide 9. When the power-on self-test (POST) is turned on this computer. If you time and trouble in the future: v Create a diagnostic CD/DVD image or rescue medium. Turning on computer power Turn on the monitor and other external devices first, and then turn on page 45. Note: Some models might occur. You can cause hardware failures. If you do...
..., you experience any problems during the installation process. Making a 12 User Guide 9. When the power-on self-test (POST) is turned on this computer. If you time and trouble in the future: v Create a diagnostic CD/DVD image or rescue medium. Turning on computer power Turn on the monitor and other external devices first, and then turn on page 45. Note: Some models might occur. You can cause hardware failures. If you do...
User Guide
Page 21
... "Creating and using rescue media" on your specific computer and lists those updates only. v To shut down the Microsoft Windows Vista® operating system, open the Start menu from the Windows desktop and click Shut down. Installing external options For information about installing external options for your operating system discs or diskettes. After 30 days, you must renew the license to "Installing external options" in the ThinkStation Hardware Installation and Replacement Guide. This prevents the loss of Windows components (such...
... "Creating and using rescue media" on your specific computer and lists those updates only. v To shut down the Microsoft Windows Vista® operating system, open the Start menu from the Windows desktop and click Shut down. Installing external options For information about installing external options for your operating system discs or diskettes. After 30 days, you must renew the license to "Installing external options" in the ThinkStation Hardware Installation and Replacement Guide. This prevents the loss of Windows components (such...

User Guide
Page 22
... "Using the Setup Utility," on page 21. 14 User Guide Microprocessor v Intel® Xeon® dual-core processor v Intel Xeon Quad Core processor v Intel Xeon six-core processor v Internal cache (size varies by model type) Audio subsystem v Integrated high-definition (HD) audio Internal drives v 3.5-inch standard half-high diskette drive (optional) v Card reader (optional) v Optical drive v Serial Advanced Technology Attachment (SATA) internal hard disk drive or Serial attached SCSI (SAS) internal hard disk drive Video subsystem v Graphics card (varies by model type) Memory v Supports up...
... "Using the Setup Utility," on page 21. 14 User Guide Microprocessor v Intel® Xeon® dual-core processor v Intel Xeon Quad Core processor v Intel Xeon six-core processor v Internal cache (size varies by model type) Audio subsystem v Integrated high-definition (HD) audio Internal drives v 3.5-inch standard half-high diskette drive (optional) v Card reader (optional) v Optical drive v Serial Advanced Technology Attachment (SATA) internal hard disk drive or Serial attached SCSI (SAS) internal hard disk drive Video subsystem v Graphics card (varies by model type) Memory v Supports up...

User Guide
Page 23
...) 2.0 v Automatic power-on startup v Preboot Execution Environment (PXE) v Remote Administration v System Management (SM) Basic Input/Output System (BIOS) and SM software v Wake on LAN v Wake on Ring (in the Setup Utility program, this feature is called Serial Port Ring Detect for either a 3.5-inch diskette drive or a card reader v One PCI Express x1 card slot v One PCI Express x4 card slot (mechanical x16) v Three optical drive bays v Two PCI Express 2.0 x16 card slots v Two 32-bit PCI card slots Chapter 3. Setting up...
...) 2.0 v Automatic power-on startup v Preboot Execution Environment (PXE) v Remote Administration v System Management (SM) Basic Input/Output System (BIOS) and SM software v Wake on LAN v Wake on Ring (in the Setup Utility program, this feature is called Serial Port Ring Detect for either a 3.5-inch diskette drive or a card reader v One PCI Express x1 card slot v One PCI Express x4 card slot (mechanical x16) v Three optical drive bays v Two PCI Express 2.0 x16 card slots v Two 32-bit PCI card slots Chapter 3. Setting up...

User Guide
Page 30
... 0-9). However, to change , or delete the password you want to access the Setup Utility program. Note: A password can be easily compromised. Start the Setup Utility program. See "Starting the Setup Utility program" on the right side of the screen to set a strong password, use a strong password that cannot be any configuration settings, you can type either password. For more information, see "Password considerations." 22 User Guide Administrator Password Setting an Administrator Password deters unauthorized users from changing configuration settings. For security...
... 0-9). However, to change , or delete the password you want to access the Setup Utility program. Note: A password can be easily compromised. Start the Setup Utility program. See "Starting the Setup Utility program" on the right side of the screen to set a strong password, use a strong password that cannot be any configuration settings, you can type either password. For more information, see "Password considerations." 22 User Guide Administrator Password Setting an Administrator Password deters unauthorized users from changing configuration settings. For security...
User Guide
Page 37
... operating system. Make sure the optical drive you turn on your computer. You can use is a set as flash memory). Turn off the computer and back on . Chapter 7. The POST is set of tests and procedures that are available as an ISO image) of the diagnostics program to as the first boot device in the serial number and then press Enter. 5. You can easily update the POST, the BIOS, and the Setup Utility...
... operating system. Make sure the optical drive you turn on your computer. You can use is a set as flash memory). Turn off the computer and back on . Chapter 7. The POST is set of tests and procedures that are available as an ISO image) of the diagnostics program to as the first boot device in the serial number and then press Enter. 5. You can easily update the POST, the BIOS, and the Setup Utility...
User Guide
Page 38
... ThinkStation Hardware Installation and Replacement Guide. 4. In the Enter a product number field, type your operating system: 1. Select BIOS in the ThinkStation Hardware Installation and Replacement Guide. 3. Access the system board. To update (flash) the BIOS from your machine type: a. Do the following procedure commonly called Boot-block Recovery. 1. Click Downloads and drivers. c. Recovering from electrical outlets, and remove the computer cover. Refer to "Removing the cover" in the Refine results field to easily locate all power cords from a POST/BIOS update failure...
... ThinkStation Hardware Installation and Replacement Guide. 4. In the Enter a product number field, type your operating system: 1. Select BIOS in the ThinkStation Hardware Installation and Replacement Guide. 3. Access the system board. To update (flash) the BIOS from your machine type: a. Do the following procedure commonly called Boot-block Recovery. 1. Click Downloads and drivers. c. Recovering from electrical outlets, and remove the computer cover. Refer to "Removing the cover" in the Refine results field to easily locate all power cords from a POST/BIOS update failure...

User Guide
Page 41
... power cord is turned on . Troubleshooting and diagnostics This chapter describes some basic troubleshooting and diagnostic programs. If your computer for a list of the computer and into a working electrical outlet. Action Verify that : v The computer is plugged into the rear of service and support telephone numbers. © Copyright Lenovo 2009, 2010 33 Refer to the rear of service and support telephone numbers. v No keys are set correctly. v The monitor is turned on...
... power cord is turned on . Troubleshooting and diagnostics This chapter describes some basic troubleshooting and diagnostic programs. If your computer for a list of the computer and into a working electrical outlet. Action Verify that : v The computer is plugged into the rear of service and support telephone numbers. © Copyright Lenovo 2009, 2010 33 Refer to the rear of service and support telephone numbers. v No keys are set correctly. v The monitor is turned on...

User Guide
Page 42
... running the diagnostic programs, save and print the log files created by the diagnostic programs. You will not start ) Notes: 1. The computer beeps multiple times before the operating system starts. v The keyboard is securely connected to a USB connector on the computer. v The mouse is securely connected to the mouse connector on the front or rear of service and support telephone numbers. v The mouse is on your computer to "Cleaning an optical mouse...
... running the diagnostic programs, save and print the log files created by the diagnostic programs. You will not start ) Notes: 1. The computer beeps multiple times before the operating system starts. v The keyboard is securely connected to a USB connector on the computer. v The mouse is securely connected to the mouse connector on the front or rear of service and support telephone numbers. v The mouse is on your computer to "Cleaning an optical mouse...

User Guide
Page 45
.... Note: On Windows 7, you can create recovery media using discs only. On Windows Vista and Windows XP, you can create recovery media using discs or external USB storage devices. Then, follow the instructions on Windows 7, click Start → All Programs → Lenovo ThinkVantage Tools → Factory Recovery Disks. Note: The recovery operations you can perform using recovery media Recovery media enable you transfer the computer to the factory default settings. As a precautionary measure, it is important to use the following purposes: v Restore the product preinstalled...
.... Note: On Windows 7, you can create recovery media using discs only. On Windows Vista and Windows XP, you can create recovery media using discs or external USB storage devices. Then, follow the instructions on Windows 7, click Start → All Programs → Lenovo ThinkVantage Tools → Factory Recovery Disks. Note: The recovery operations you can perform using recovery media Recovery media enable you transfer the computer to the factory default settings. As a precautionary measure, it is important to use the following purposes: v Restore the product preinstalled...

User Guide
Page 46
Depending on the type of your recovery media, connect your boot medium (memory key or USB hard disk drive) to reinstall some software programs or device drivers. Insert the boot disc into your CD or DVD drive. 2. Select the CD or DVD drive as the startup device and press Enter. Then, follow the instructions on the system drive or the hard disk drive will be deleted and replaced by the factory default settings. 1. When the Startup Device Menu window opens, release the F12 key. 4. Depending on Windows XP, do the...
Depending on the type of your recovery media, connect your boot medium (memory key or USB hard disk drive) to reinstall some software programs or device drivers. Insert the boot disc into your CD or DVD drive. 2. Select the CD or DVD drive as the startup device and press Enter. Then, follow the instructions on the system drive or the hard disk drive will be deleted and replaced by the factory default settings. 1. When the Startup Device Menu window opens, release the F12 key. 4. Depending on Windows XP, do the...
User Guide
Page 51
... factory-installed devices are located on the screen. Go to complete the installation. This file might have a preinstalled operating system and the documentation and software media for factory-installed devices are also available at http://www.lenovo.com/ support. Open the DRIVERS folder. Follow the instructions to the C:\SWTOOLS directory. 4. Using a recovery repair diskette This section provides instructions on the computer. 2. Insert the recovery repair diskette into the diskette drive. 3. Turn on how to install the device driver...
... factory-installed devices are located on the screen. Go to complete the installation. This file might have a preinstalled operating system and the documentation and software media for factory-installed devices are also available at http://www.lenovo.com/ support. Open the DRIVERS folder. Follow the instructions to the C:\SWTOOLS directory. 4. Using a recovery repair diskette This section provides instructions on the computer. 2. Insert the recovery repair diskette into the diskette drive. 3. Turn on how to install the device driver...

User Guide
Page 52
... a SETUP.EXE file. It is set as the first boot device in a safe place. 44 User Guide See "Creating and using recovery media" on page 41. Setting a rescue device in the startup sequence Before you start the Rescue and Recovery workspace. See "Creating and using a recovery repair diskette" on the screen. Note: If you are unable to access the Rescue and Recovery workspace or the Windows environment from an internal hard disk drive, a disc, a USB hard disk drive, or other external devices...
... a SETUP.EXE file. It is set as the first boot device in a safe place. 44 User Guide See "Creating and using recovery media" on page 41. Setting a rescue device in the startup sequence Before you start the Rescue and Recovery workspace. See "Creating and using a recovery repair diskette" on the screen. Note: If you are unable to access the Rescue and Recovery workspace or the Windows environment from an internal hard disk drive, a disc, a USB hard disk drive, or other external devices...

User Guide
Page 54
... and services to help and service. v Purchase upgrades and extended hardware repair services. v Find the service and support phone numbers for hardware, operating systems, application programs, network setup and configuration, and custom installations. Most computers come with Windows 7 or Windows Vista from the Lenovo Support Web site at: http://www.lenovo.com/support Calling for service During the warranty period you experience a problem with your computer, see "Diagnostic programs" on page 33. You can use to...
... and services to help and service. v Purchase upgrades and extended hardware repair services. v Find the service and support phone numbers for hardware, operating systems, application programs, network setup and configuration, and custom installations. Most computers come with Windows 7 or Windows Vista from the Lenovo Support Web site at: http://www.lenovo.com/support Calling for service During the warranty period you experience a problem with your computer, see "Diagnostic programs" on page 33. You can use to...
User Guide
Page 60
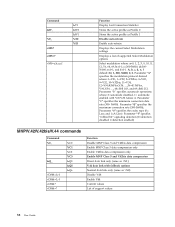
... settings Displays a list of support values 52 User Guide Command &W_ %E_ +MS? +MS=? +MS=a,b,c,e,f &V1 &W0 &W1 %E0 %E1 Function Display Last Connection Statistics Stores the active profile as Profile 0 Stores the active profile as \N0) Disable V.44 Enable V.44 Current values List of supported Select Modulation options Select modulation where: a=0, 1, 2, 3, 9, 10, 11, 12, 56, 64, 69; and f=0-1. Parameter "e" specifies the codec type...
... settings Displays a list of support values 52 User Guide Command &W_ %E_ +MS? +MS=? +MS=a,b,c,e,f &V1 &W0 &W1 %E0 %E1 Function Display Last Connection Statistics Stores the active profile as Profile 0 Stores the active profile as \N0) Disable V.44 Enable V.44 Current values List of supported Select Modulation options Select modulation where: a=0, 1, 2, 3, 9, 10, 11, 12, 56, 64, 69; and f=0-1. Parameter "e" specifies the codec type...

User Guide
Page 69
... a recovery repair diskette 42 and using rescue media 41 creating and using recovery media 37 customer support center 46 D deleting password 22 device drivers installing 43 reinstalling 43 diagnostic CD/DVD image 12 diagnostics programs, using 46 diagnostics, troubleshooting 33 diskette, creating and using a recovery repair 42 documentation, using 46 © Copyright Lenovo 2009, 2010 E electrical outlets 4 enabling, disabling device 23 environment, operating 17 Ethernet 15 exiting, Setup Utility 24 expansion adapters 15 external options, installing 13 F failure, recovering from POST/BIOS 30...
... a recovery repair diskette 42 and using rescue media 41 creating and using recovery media 37 customer support center 46 D deleting password 22 device drivers installing 43 reinstalling 43 diagnostic CD/DVD image 12 diagnostics programs, using 46 diagnostics, troubleshooting 33 diskette, creating and using a recovery repair 42 documentation, using 46 © Copyright Lenovo 2009, 2010 E electrical outlets 4 enabling, disabling device 23 environment, operating 17 Ethernet 15 exiting, Setup Utility 24 expansion adapters 15 external options, installing 13 F failure, recovering from POST/BIOS 30...
User Guide
Page 70
... setting password 22 rescue device 44 up your computer 5 settings advanced 24 changing 21 viewing 21 Setup Utility 21 Setup Utility program, starting 21 Setup Utility, exiting 24 software installing 12 overview 19 recovering 37 solving recovery problems 44 speed, memory 57 starting the Setup Utility program 21 startup device 23 sequence, changing 24 temporary, selecting 23 system management 15 programs 29 T television output notice 60 temporary startup device 23 trademarks 60 troubleshooting, basic 33 troubleshooting, diagnostics 33 turning on power 12 U updating (flashing) BIOS...
... setting password 22 rescue device 44 up your computer 5 settings advanced 24 changing 21 viewing 21 Setup Utility 21 Setup Utility program, starting 21 Setup Utility, exiting 24 software installing 12 overview 19 recovering 37 solving recovery problems 44 speed, memory 57 starting the Setup Utility program 21 startup device 23 sequence, changing 24 temporary, selecting 23 system management 15 programs 29 T television output notice 60 temporary startup device 23 trademarks 60 troubleshooting, basic 33 troubleshooting, diagnostics 33 turning on power 12 U updating (flashing) BIOS...

User Guide
Page 71
updating (flashing) BIOS 30 user, password 22 using diagnostic programs 46 documentation 46 other services 47 passwords 21 recovery repair diskette, creating and using 42 rescue media, creating and 41 Setup Utility 21 V video subsystem 14 viewing and changing settings 21 voice, commands 54 W warranty information 46 workspace, arranging 3 workspace, backup and recovery 40 Index 63
updating (flashing) BIOS 30 user, password 22 using diagnostic programs 46 documentation 46 other services 47 passwords 21 recovery repair diskette, creating and using 42 rescue media, creating and 41 Setup Utility 21 V video subsystem 14 viewing and changing settings 21 voice, commands 54 W warranty information 46 workspace, arranging 3 workspace, backup and recovery 40 Index 63


