
Brochure
Page 3
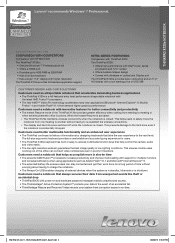
... Resume mode of Lenovo. THINKPAD X120e NOTEBOOK Lenovo® recommends Windows® 7 Professional. Customers need a notebook that help control the camera, audio and video easily. • The low-light-sensitive webcam guarantees the best image quality in poorly lit locations. The full-size ergonomic keyboard provides a comfortable and accurate typing experience for users. • The ThinkPad X120e keyboard has built-in easy-to charge the notebook. • The Always-On USB enables charging of external devices when...
... Resume mode of Lenovo. THINKPAD X120e NOTEBOOK Lenovo® recommends Windows® 7 Professional. Customers need a notebook that help control the camera, audio and video easily. • The low-light-sensitive webcam guarantees the best image quality in poorly lit locations. The full-size ergonomic keyboard provides a comfortable and accurate typing experience for users. • The ThinkPad X120e keyboard has built-in easy-to charge the notebook. • The Always-On USB enables charging of external devices when...

User Manual
Page 3
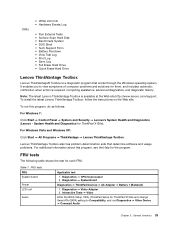
... first 21 Checkout guide 22 Diagnostics using Recovery Disc Set 29 Passwords 30 Power-on password 30 Hard-disk password 30 Supervisor password 31 How to remove the power-on board assembly (with cable), and microphone . . . . . 64 1100 CRT board assembly (with cable) . . . . . 68 1110 Speaker assembly 69 1120 I/O board (for DOS. . . . 22 Lenovo ThinkVantage Toolbox 25 FRU tests 25 Power system checkout 26 Checking the ac adapter 27 Checking operational charging 27 Checking the...
... first 21 Checkout guide 22 Diagnostics using Recovery Disc Set 29 Passwords 30 Power-on password 30 Hard-disk password 30 Supervisor password 31 How to remove the power-on board assembly (with cable), and microphone . . . . . 64 1100 CRT board assembly (with cable) . . . . . 68 1110 Speaker assembly 69 1120 I/O board (for DOS. . . . 22 Lenovo ThinkVantage Toolbox 25 FRU tests 25 Power system checkout 26 Checking the ac adapter 27 Checking operational charging 27 Checking the...

User Manual
Page 8
... moist floors, nongrounded power extension cables, power surges, and missing safety grounds. • Do not touch live electrical currents. Ensure that it , ask the customer to lock the wall box in the safety sections of the units. • If an electrical accident occurs: 2 ThinkPad X100e and X120e Hardware Maintenance Manual When using testers, set the controls correctly and use worn or broken tools...
... moist floors, nongrounded power extension cables, power surges, and missing safety grounds. • Do not touch live electrical currents. Ensure that it , ask the customer to lock the wall box in the safety sections of the units. • If an electrical accident occurs: 2 ThinkPad X100e and X120e Hardware Maintenance Manual When using testers, set the controls correctly and use worn or broken tools...
User Manual
Page 23
... adapter or device, remove the FRUs, one by this manual. Enter the product number of the error. Important service information This chapter presents following strategy to replace a FRU but the replacement does not correct the problem, reinstall the original FRU before completing the service action. Strategy for replacing FRUs Before replacing parts: Make sure that applies to all software fixes, drivers, and BIOS downloads are instructed to prevent unnecessary expense for the Lenovo...
... adapter or device, remove the FRUs, one by this manual. Enter the product number of the error. Important service information This chapter presents following strategy to replace a FRU but the replacement does not correct the problem, reinstall the original FRU before completing the service action. Strategy for replacing FRUs Before replacing parts: Make sure that applies to all software fixes, drivers, and BIOS downloads are instructed to prevent unnecessary expense for the Lenovo...
User Manual
Page 27
... page 27 - "Checking the backup battery" on page 22 - Important: • Only certified trained personnel should not be replaced because of the correct model. Date of service 3. "Lenovo ThinkVantage Toolbox" on page 27 - If you replace FRUs, use new nylon-coated screws. • Be extremely careful during such write operations as cosmic radiation, electrostatic discharge, or software errors. Customer's name and address...
... page 27 - "Checking the backup battery" on page 22 - Important: • Only certified trained personnel should not be replaced because of the correct model. Date of service 3. "Lenovo ThinkVantage Toolbox" on page 27 - If you replace FRUs, use new nylon-coated screws. • Be extremely careful during such write operations as cosmic radiation, electrostatic discharge, or software errors. Customer's name and address...
User Manual
Page 29
... not support any external optical drives connected through the USB connector to "Power system checkout" on the model.) Note: PC-Doctor menu does not mean the formal support device list. To run the test, do as a startup device. 4. Attach an external optical drive through USB devices or any others. Turn on the screen. 10. Chapter 3. On the BIOS Setup Utility (ThinkPad Setup for DOS. Note: When you need to enable it to enter the BIOS Setup Utility (ThinkPad Setup for ThinkPad X120e). Turn off...
... not support any external optical drives connected through the USB connector to "Power system checkout" on the model.) Note: PC-Doctor menu does not mean the formal support device list. To run the test, do as a startup device. 4. Attach an external optical drive through USB devices or any others. Turn on the screen. 10. Chapter 3. On the BIOS Setup Utility (ThinkPad Setup for DOS. Note: When you need to enable it to enter the BIOS Setup Utility (ThinkPad Setup for ThinkPad X120e). Turn off...

User Manual
Page 30
... Tests Run Normal Test Run Quick Test CPU/Coprocessor Systemboard Video Adapter Fixed Disks Diskette Drives Other Devices Communication Wireless LAN Advanced Memory Tests Hardware Info Utility Quit F1=Help PC-DOCTOR 2.0 Copyright 2008 PC-Doctor, Inc. Follow the instructions on the test menu are incorrect. Note: After running PC-Doctor, check the time and date on the ThinkPad Notebook. Run the applicable function test. 13. To exit...
... Tests Run Normal Test Run Quick Test CPU/Coprocessor Systemboard Video Adapter Fixed Disks Diskette Drives Other Devices Communication Wireless LAN Advanced Memory Tests Hardware Info Utility Quit F1=Help PC-DOCTOR 2.0 Copyright 2008 PC-Doctor, Inc. Follow the instructions on the test menu are incorrect. Note: After running PC-Doctor, check the time and date on the ThinkPad Notebook. Run the applicable function test. 13. To exit...
User Manual
Page 31
... Adapter ➙ Battery 1 (Battery2) 1. Interactive Tests ➙ Video Enter the BIOS Setup Utility (ThinkPad Setup for ThinkPad X120e) and change Serial ATA (SATA) setting to view symptoms of computer problems and solutions for the program. Note: The latest Lenovo ThinkVantage Toolbox is required, computing assistance, advanced diagnostics, and diagnostic history. FRU tests The following table shows the test for ThinkPad X120e). FRU tests FRU System board Power LCD unit Audio...
... Adapter ➙ Battery 1 (Battery2) 1. Interactive Tests ➙ Video Enter the BIOS Setup Utility (ThinkPad Setup for ThinkPad X120e) and change Serial ATA (SATA) setting to view symptoms of computer problems and solutions for the program. Note: The latest Lenovo ThinkVantage Toolbox is required, computing assistance, advanced diagnostics, and diagnostic history. FRU tests The following table shows the test for ThinkPad X120e). FRU tests FRU System board Power LCD unit Audio...

User Manual
Page 32
... battery pack supplies power when you turn off the computer. 2. Remove any diskette from the BIOS Setup Utility, do the following power supply checkouts: • "Checking the ac adapter" on the screen for ThinkPad X120e) and change Serial drive ATA (SATA) setting to Compatibility, and run Diagnostics ➙ Advanced Memory Tests. 2. Using cursor keys, select Main hard disk drive. 6. Disconnect the ac adapter and install the charged battery pack. 7. Using cursor keys, select HDD diagnostic program. If the problem...
... battery pack supplies power when you turn off the computer. 2. Remove any diskette from the BIOS Setup Utility, do the following power supply checkouts: • "Checking the ac adapter" on the screen for ThinkPad X120e) and change Serial drive ATA (SATA) setting to Compatibility, and run Diagnostics ➙ Advanced Memory Tests. 2. Using cursor keys, select Main hard disk drive. 6. Disconnect the ac adapter and install the charged battery pack. 7. Using cursor keys, select HDD diagnostic program. If the problem...
User Manual
Page 35
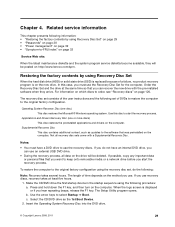
... arrow keys to start the recovery process. In this disc to select Startup ➙ Boot. Use this case, you must have an internal DVD drive, you use the recovery discs. Make the CD/DVD drive the first startup device in the startup sequence using the recovery disc set of the user instructions and the following : Note: Recovery takes several hours. When the logo screen is on page 120. c. For information on the computer. Applications and Drivers Recovery Disc (one disc) This disc restores...
... arrow keys to start the recovery process. In this disc to select Startup ➙ Boot. Use this case, you must have an internal DVD drive, you use the recovery discs. Make the CD/DVD drive the first startup device in the startup sequence using the recovery disc set of the user instructions and the following : Note: Recovery takes several hours. When the logo screen is on page 120. c. For information on the computer. Applications and Drivers Recovery Disc (one disc) This disc restores...

User Manual
Page 36
... ThinkPad Notebook: the power-on . the system administrator enters both in the displayed window to the hard disk even if the user has changed the user HDP Note: There are two modes for it appears on the screen whenever the computer is turned on password (POP), the hard-disk password (HDP), and the supervisor password (SVP). Insert the Applications and Drivers Recovery Disc when prompted and then click OK to save the Setup Utility configuration changes. Start...
... ThinkPad Notebook: the power-on . the system administrator enters both in the displayed window to the hard disk even if the user has changed the user HDP Note: There are two modes for it appears on the screen whenever the computer is turned on password (POP), the hard-disk password (HDP), and the supervisor password (SVP). Insert the Applications and Drivers Recovery Disc when prompted and then click OK to save the Setup Utility configuration changes. Start...
User Manual
Page 37
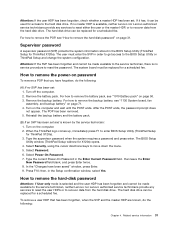
... down the menu. 5. Select Security, using the cursor directional keys to enter BIOS Setup Utility (ThinkPad Setup for access to reset the password. Select Power-On Password. 7. Related service information 31 If it has, it can be replaced for ThinkPad X120e). Turn off the computer. 2. Reinstall the backup battery and the battery pack. (B) If an SVP has been set . How to recover data from the hard disk drive. How to remove the hard-disk password Attention: If User only mode is known...
... down the menu. 5. Select Security, using the cursor directional keys to enter BIOS Setup Utility (ThinkPad Setup for access to reset the password. Select Power-On Password. 7. Related service information 31 If it has, it can be replaced for ThinkPad X120e). Turn off the computer. 2. Reinstall the backup battery and the battery pack. (B) If an SVP has been set . How to recover data from the hard disk drive. How to remove the hard-disk password Attention: If User only mode is known...

User Manual
Page 38
... user does not do as follows: 1. Turn on the "Turn off monitor" timer in screen blank mode: • The LCD is powered off. • The hard disk drive is low, and then the computer enters the power-saving mode automatically. When the ThinkPad logo comes up window opens. 6. Select Security, using the cursor directional keys to return from sleep (standby) mode and resume operation, do not set on the power switch. 32 ThinkPad X100e and X120e Hardware Maintenance Manual...
... user does not do as follows: 1. Turn on the "Turn off monitor" timer in screen blank mode: • The LCD is powered off. • The hard disk drive is low, and then the computer enters the power-saving mode automatically. When the ThinkPad logo comes up window opens. 6. Select Security, using the cursor directional keys to return from sleep (standby) mode and resume operation, do not set on the power switch. 32 ThinkPad X100e and X120e Hardware Maintenance Manual...

User Manual
Page 39
...: • The system status, RAM, VRAM, and setup data are satisfied in suspend mode. The hibernation file in the boot record on the hard disk drive is read, and system status is signaled by a serial device or a PC Card device. ( does not support the ring indicator (RI) resume by PC Card device.) • The time set on the timer, and if the user does not do any...
...: • The system status, RAM, VRAM, and setup data are satisfied in suspend mode. The hibernation file in the boot record on the hard disk drive is read, and system status is signaled by a serial device or a PC Card device. ( does not support the ring indicator (RI) resume by PC Card device.) • The time set on the timer, and if the user does not do any...
User Manual
Page 40
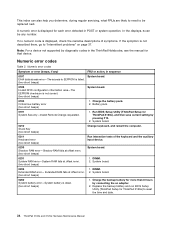
... board. 1. System board. 1. Charge the backup battery for ThinkPad X120e), and then save current setting by pressing F10. 2. Note: For a device not supported by connecting the ac adapter. 2. System board. Extended RAM fails at offset nnnn. (two short beeps) 0250 System battery error-System battery is displayed for each error detected in POST or system operation. DIMM. 2. Replace the backup battery and run BIOS Setup Utility (ThinkPad Setup for that device. Numeric error codes Symptom or error (beeps, if any number. This...
... board. 1. System board. 1. Charge the backup battery for ThinkPad X120e), and then save current setting by pressing F10. 2. Note: For a device not supported by connecting the ac adapter. 2. System board. Extended RAM fails at offset nnnn. (two short beeps) 0250 System battery error-System battery is displayed for each error detected in POST or system operation. DIMM. 2. Replace the backup battery and run BIOS Setup Utility (ThinkPad Setup for that device. Numeric error codes Symptom or error (beeps, if any number. This...
User Manual
Page 42
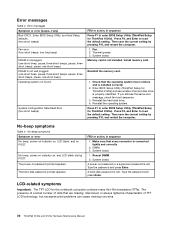
... Manual Enter BIOS Setup Utility (ThinkPad Setup for ThinkPad X120e). Press F1 to enter BIOS Setup Utility (ThinkPad Setup for ThinkPad X120e) and see the same error message, check the boot sequence. 3. No-beep symptoms Table 4. The hard-disk password prompt appears. System board. 1. Reseat DIMM. 2. Press F9, and Enter to load the default setting. Reinstall the memory card. 1. Reinstall the hard disk drive. 4. Fan. 2. A power-on , LCD blank, and no failure and is connected tightly and correctly. 2. Type the password and press Enter. Enter BIOS Setup Utility...
... Manual Enter BIOS Setup Utility (ThinkPad Setup for ThinkPad X120e). Press F1 to enter BIOS Setup Utility (ThinkPad Setup for ThinkPad X120e) and see the same error message, check the boot sequence. 3. No-beep symptoms Table 4. The hard-disk password prompt appears. System board. 1. Reseat DIMM. 2. Press F9, and Enter to load the default setting. Reinstall the memory card. 1. Reinstall the hard disk drive. 4. Fan. 2. A power-on , LCD blank, and no failure and is connected tightly and correctly. 2. Type the password and press Enter. Enter BIOS Setup Utility...
User Manual
Page 43
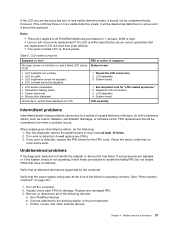
...; LCD too dark. • LCD brightness cannot be adjusted. • LCD contrast cannot be due to a variety of causes that have nothing to verify that the power supply being used at least 10 times. 2. When analyzing an intermittent problem, do not replace any error is within specification as defective by the FRU code. Non-ThinkPad devices b. Devices attached to isolate the failing FRU (do with a hardware...
...; LCD too dark. • LCD brightness cannot be adjusted. • LCD contrast cannot be due to a variety of causes that have nothing to verify that the power supply being used at least 10 times. 2. When analyzing an intermittent problem, do not replace any error is within specification as defective by the FRU code. Non-ThinkPad devices b. Devices attached to isolate the failing FRU (do with a hardware...
User Manual
Page 48
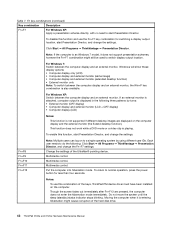
... function does not work while a DVD movie or a video clip is entering hibernation might still be used to start Presentation Director, and change the settings. To disable this function and use this function, start Presentation Director, and change the Fn+F7 settings. Each user needs to normal operation, press the power button for switching a display output location, start Presentation Director. Do not move the system until the sleep (standby) status indicator stops blinking. Table 7. Fn key combinations (continued) Key combination...
... function does not work while a DVD movie or a video clip is entering hibernation might still be used to start Presentation Director, and change the settings. To disable this function and use this function, start Presentation Director, and change the Fn+F7 settings. Each user needs to normal operation, press the power button for switching a display output location, start Presentation Director. Do not move the system until the sleep (standby) status indicator stops blinking. Table 7. Fn key combinations (continued) Key combination...

User Manual
Page 49
... display becomes brighter. Fn+End Fn+Esc Fn+Home The purpose of this combination of numeric lock will be displayed on with another user ID in Windows XP, and you press this method is to change the settings of the Power Option in Windows XP, power scheme) that has been created by Power Manager or adjust the power level by using the slider control. To change the default brightness level, change the brightness...
... display becomes brighter. Fn+End Fn+Esc Fn+Home The purpose of this combination of numeric lock will be displayed on with another user ID in Windows XP, and you press this method is to change the settings of the Power Option in Windows XP, power scheme) that has been created by Power Manager or adjust the power level by using the slider control. To change the default brightness level, change the brightness...
User Manual
Page 97
...; "Keyboard" on page 118 • "AC adapters" on page 119 • "Miscellaneous parts" on page 119 • "Power cords" on page 119 • "Recovery discs" on page 120 • "Common service tools" on product design may include a memory, a wireless card, a keyboard, and a palm rest with specific models listed and described as xxU (where U is an example of CRUs include an ac adapter, a power cord, a battery, and a hard disk drive. Chapter...
...; "Keyboard" on page 118 • "AC adapters" on page 119 • "Miscellaneous parts" on page 119 • "Power cords" on page 119 • "Recovery discs" on page 120 • "Common service tools" on product design may include a memory, a wireless card, a keyboard, and a palm rest with specific models listed and described as xxU (where U is an example of CRUs include an ac adapter, a power cord, a battery, and a hard disk drive. Chapter...


