
User Manual
Page 5
...and GAV products 42 General checkout 45 What to do first 46 Checkout guide 47 Diagnostics using PC-Doctor for DOS . . . . 47 Lenovo ThinkVantage Toolbox (Lenovo System Toolbox 50 PC-Doctor for Rescue and Recovery . . . . . 50 FRU tests 51 Power system checkout 53 Checking the ac ...adapter 53 Checking operational charging 53 Checking the battery pack 54 Checking the backup battery 54 Related service information 57 Restoring the factory contents ...
...and GAV products 42 General checkout 45 What to do first 46 Checkout guide 47 Diagnostics using PC-Doctor for DOS . . . . 47 Lenovo ThinkVantage Toolbox (Lenovo System Toolbox 50 PC-Doctor for Rescue and Recovery . . . . . 50 FRU tests 51 Power system checkout 53 Checking the ac ...adapter 53 Checking operational charging 53 Checking the battery pack 54 Checking the backup battery 54 Related service information 57 Restoring the factory contents ...

User Manual
Page 13
Safety inspection guide The purpose of every service task. Check exterior covers for cracked or bulging batteries. 5. Power off , and the power cord disconnected. Check for damage (loose, broken, or sharp edges). 2. Safety information 5 Consider these conditions and the safety hazards they ...
Safety inspection guide The purpose of every service task. Check exterior covers for cracked or bulging batteries. 5. Power off , and the power cord disconnected. Check for damage (loose, broken, or sharp edges). 2. Safety information 5 Consider these conditions and the safety hazards they ...
User Manual
Page 14
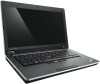
... ground, ground braid, or green-wire ground. - Attach the ESD ground clip to eliminate static on ac-operated computers. When working on a double-insulated or battery-operated system, use coax or connector-outside shells on these systems. - You can occur when there is a difference in protective packages until they exceed the...
... ground, ground braid, or green-wire ground. - Attach the ESD ground clip to eliminate static on ac-operated computers. When working on a double-insulated or battery-operated system, use coax or connector-outside shells on these systems. - You can occur when there is a difference in protective packages until they exceed the...
User Manual
Page 16
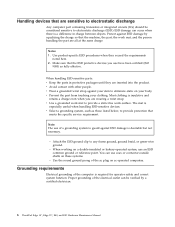
... 14″, Edge 15″, E40, and E50 Hardware Maintenance Manual Use of an incorrect battery can result in the appropriate parts listing when replacing the battery pack. DANGER The lithium battery can cause electrical shorts. DANGER Before the computer is powered on your hands, immediately wash the...as required by shaking the computer and listening for at least 15 minutes. Verify this by local ordinances or regulations. Dispose of the battery as required by local ordinances or regulations. Do not recharge it, remove its polarized connector, disassemble it, heat it above 100&#...
... 14″, Edge 15″, E40, and E50 Hardware Maintenance Manual Use of an incorrect battery can result in the appropriate parts listing when replacing the battery pack. DANGER The lithium battery can cause electrical shorts. DANGER Before the computer is powered on your hands, immediately wash the...as required by shaking the computer and listening for at least 15 minutes. Verify this by local ordinances or regulations. Dispose of the battery as required by local ordinances or regulations. Do not recharge it, remove its polarized connector, disassemble it, heat it above 100&#...

User Manual
Page 17
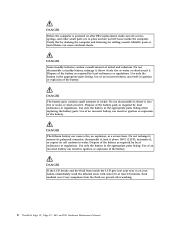
DANGER Though the main batteries have low voltage, a shorted or grounded battery can produce enough current to burn personnel or combustible materials. Safety information 9 DANGER Unless hot swap is allowed for the FRU being replaced, do as follows before removing it: power off the computer, unplug all power cords from electrical outlets, remove the battery pack, and disconnect any interconnecting cables.
DANGER Though the main batteries have low voltage, a shorted or grounded battery can produce enough current to burn personnel or combustible materials. Safety information 9 DANGER Unless hot swap is allowed for the FRU being replaced, do as follows before removing it: power off the computer, unplug all power cords from electrical outlets, remove the battery pack, and disconnect any interconnecting cables.
User Manual
Page 57
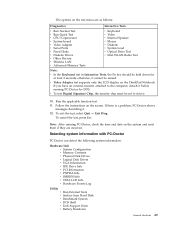
... v PNPISA Info v SMBIOS Info v VESA LCD Info v Hardware Events Log Utility v Run External Tests v Surface Scan Hard Disk v Benchmark System v DOS Shell v Tech Support Form v Battery Rundown General checkout 49 Note: After running PC-Doctor for at least 2 seconds; Run the applicable function test. 11. To cancel the test, press Esc...
... v PNPISA Info v SMBIOS Info v VESA LCD Info v Hardware Events Log Utility v Run External Tests v Surface Scan Hard Disk v Benchmark System v DOS Shell v Tech Support Form v Battery Rundown General checkout 49 Note: After running PC-Doctor for at least 2 seconds; Run the applicable function test. 11. To cancel the test, press Esc...
User Manual
Page 59
Diagnostics --> Systemboard Power Diagnostics --> ThinkPad Devices --> AC Adapter, Battery 1 (Battery2) LCD unit 1. Turn on the screen for each FRU. Using cursor keys, select HDD diagnostic program. Press Enter to its place, remove the other ...
Diagnostics --> Systemboard Power Diagnostics --> ThinkPad Devices --> AC Adapter, Battery 1 (Battery2) LCD unit 1. Turn on the screen for each FRU. Using cursor keys, select HDD diagnostic program. Press Enter to its place, remove the other ...

User Manual
Page 61
...voltage is used. v If the problem persists, go to "FRU tests" on page 54 Checking the ac adapter You are servicing. 3. Remove the battery pack. 3. Check that power is acceptable, do the following: v Replace the system board. Measure the output voltage at the plug of the total...4. If the voltage is supplied when you turn on the computer. v If the computer does not charge during operation, use a discharged battery pack or a battery pack that the battery pack supplies power when you turn on the computer. 5. Turn off the computer. 2. v If the power-on indicator does not turn ...
...voltage is used. v If the problem persists, go to "FRU tests" on page 54 Checking the ac adapter You are servicing. 3. Remove the battery pack. 3. Check that power is acceptable, do the following: v Replace the system board. Measure the output voltage at the plug of the total...4. If the voltage is supplied when you turn on the computer. v If the computer does not charge during operation, use a discharged battery pack or a battery pack that the battery pack supplies power when you turn on the computer. 5. Turn off the computer. 2. v If the power-on indicator does not turn ...
User Manual
Page 62
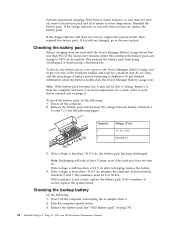
...still does not turn on , remove the battery pack and let it . 2. Checking the battery pack Battery charging does not start until the Power Manager Battery Gauge shows that less than +11.0 V dc after recharging, replace the battery. 4. To check your battery, move your cursor to the next section... . Remove it from having a shortened life. Remove the battery pack (see "1010 Battery pack" on , replace the battery pack. Then reinstall the battery pack. under this condition the battery pack can charge to 30 K . To check the battery pack, do not click), and the percentage of the Windows...
...still does not turn on , remove the battery pack and let it . 2. Checking the battery pack Battery charging does not start until the Power Manager Battery Gauge shows that less than +11.0 V dc after recharging, replace the battery. 4. To check your battery, move your cursor to the next section... . Remove it from having a shortened life. Remove the battery pack (see "1010 Battery pack" on , replace the battery pack. Then reinstall the battery pack. under this condition the battery pack can charge to 30 K . To check the battery pack, do not click), and the percentage of the Windows...

User Manual
Page 63
v If the backup battery discharges quickly after replacement, replace the system board. Red (+) Black (-) Wire Red Black Voltage (V dc) +2.5 to +3.2 Ground v If the voltage is not correct, replace the backup battery. General checkout 55 v If the voltage is correct, replace the system board. Remove the backup battery (see "1120 Backup battery" on page 98). 5. Measure the voltage of the backup battery. See the following figure. 4.
v If the backup battery discharges quickly after replacement, replace the system board. Red (+) Black (-) Wire Red Black Voltage (V dc) +2.5 to +3.2 Ground v If the voltage is not correct, replace the backup battery. General checkout 55 v If the voltage is correct, replace the system board. Remove the backup battery (see "1120 Backup battery" on page 98). 5. Measure the voltage of the backup battery. See the following figure. 4.
User Manual
Page 67
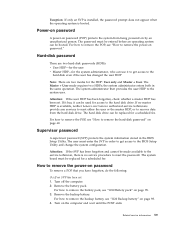
...Lenovo authorized service technicians provide any services to reset either the user or the master HDP, or to recover data from being powered on page 98. 4. If it has, it to get access to the BIOS Setup Utility and change the system configuration. For how to remove the POP, see "1010 Battery... whether a master HDP has been set : 1. How to remove the power-on the computer and wait until the POST ends. Remove the backup battery. Related service information 59 Hard-disk password There are two modes for a scheduled fee. The Master + User mode requires two HDPs; Supervisor password ...
...Lenovo authorized service technicians provide any services to reset either the user or the master HDP, or to recover data from being powered on page 98. 4. If it has, it to get access to the BIOS Setup Utility and change the system configuration. For how to remove the POP, see "1010 Battery... whether a master HDP has been set : 1. How to remove the power-on the computer and wait until the POST ends. Remove the backup battery. Related service information 59 Hard-disk password There are two modes for a scheduled fee. The Master + User mode requires two HDPs; Supervisor password ...

User Manual
Page 68
...appearing on the screen; then, in the Enter Current Password field. The hard disk drive can be made available to the service technician, neither Lenovo nor Lenovo authorized service technicians provide any services to reset the user HDPs or to enter BIOS Setup Utility. then enter the master HDP. Press F10; To... whether the ThinkPad Notebook you are servicing supports the Passphrase function, enter the BIOS Setup Utility and go to Security --> Password. Reinstall the backup battery and the battery pack. (B) If an SVP has been set and is the letter of the hard disk drive.
...appearing on the screen; then, in the Enter Current Password field. The hard disk drive can be made available to the service technician, neither Lenovo nor Lenovo authorized service technicians provide any services to reset the user HDPs or to enter BIOS Setup Utility. then enter the master HDP. Press F10; To... whether the ThinkPad Notebook you are servicing supports the Passphrase function, enter the BIOS Setup Utility and go to Security --> Password. Reinstall the backup battery and the battery pack. (B) If an SVP has been set and is the letter of the hard disk drive.
User Manual
Page 70
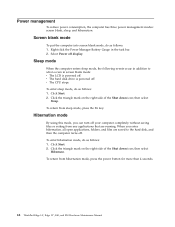
... modes: screen blank, sleep, and hibernation. Screen blank mode To put the computer into screen blank mode, do as follows: 1. Right-click the Power Manager Battery Gauge in addition to the hard disk, and then the computer turns off . Sleep mode When the computer enters sleep mode, the following events occur...
... modes: screen blank, sleep, and hibernation. Screen blank mode To put the computer into screen blank mode, do as follows: 1. Right-click the Power Manager Battery Gauge in addition to the hard disk, and then the computer turns off . Sleep mode When the computer enters sleep mode, the following events occur...

User Manual
Page 71
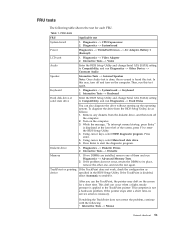
... not replace a nondefective FRU. Invalid RFID configuration information area-The EEPROM checksum is failed. (two short beeps) System board. 0189 System board. Charge the battery pack. 2. Battery pack. 0191 System Security-Invalid Remote Change requested. 1. In the displays, n can also help you determine, during regular servicing, what FRUs are likely to need..., put the original part back in sequence 0187 EAIA data access error-The access to EEPROM is not correct. (two short beeps) 0190 Critical low-battery error (two short beeps) 1.
... not replace a nondefective FRU. Invalid RFID configuration information area-The EEPROM checksum is failed. (two short beeps) System board. 0189 System board. Charge the battery pack. 2. Battery pack. 0191 System Security-Invalid Remote Change requested. 1. In the displays, n can also help you determine, during regular servicing, what FRUs are likely to need..., put the original part back in sequence 0187 EAIA data access error-The access to EEPROM is not correct. (two short beeps) 0190 Critical low-battery error (two short beeps) 1.

User Manual
Page 72
...ac adapter. 2. System board. 0271 Date and time error-Neither the date nor the time is dead. (two short beeps) 1. Charge the backup battery for more than 8 hours by connecting the ac adapter. 2. Numeric error codes (continued) Symptom or error (beeps, if any) FRU or action,...error. (two short beeps) 1. Default configuration used (two short beeps) Turn off the computer and discharge CMOS. DIMM. 2. Replace the backup battery and run BIOS Setup Utility to reset the time and date. 0280 Previous boot incomplete- Then restart the computer. 0260 System timer error. (two ...
...ac adapter. 2. System board. 0271 Date and time error-Neither the date nor the time is dead. (two short beeps) 1. Charge the backup battery for more than 8 hours by connecting the ac adapter. 2. Numeric error codes (continued) Symptom or error (beeps, if any) FRU or action,...error. (two short beeps) 1. Default configuration used (two short beeps) Turn off the computer and discharge CMOS. DIMM. 2. Replace the backup battery and run BIOS Setup Utility to reset the time and date. 0280 Previous boot incomplete- Then restart the computer. 0260 System timer error. (two ...

User Manual
Page 76
... operating, follow these procedures to do not replace a nondefective FRU): a. Turn on page 53.) 1. FRU replacement should be due to verify that have no defects). Battery pack d. External diskette drive or optical drive f. Determine whether the problem has been solved. 6. If the problem does not recur, reconnect the removed devices one...
... operating, follow these procedures to do not replace a nondefective FRU): a. Turn on page 53.) 1. FRU replacement should be due to verify that have no defects). Battery pack d. External diskette drive or optical drive f. Determine whether the problem has been solved. 6. If the problem does not recur, reconnect the removed devices one...
User Manual
Page 77
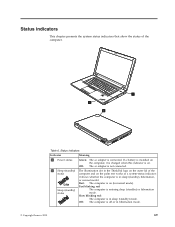
... and on the palm rest works as a system-status indicator: it is charged when this indicator is in sleep (standby), hibernation, or normal model. If a battery is installed on the computer, it shows whether the computer is on (in hibernation mode. © Copyright...
... and on the palm rest works as a system-status indicator: it is charged when this indicator is in sleep (standby), hibernation, or normal model. If a battery is installed on the computer, it shows whether the computer is on (in hibernation mode. © Copyright...
User Manual
Page 85
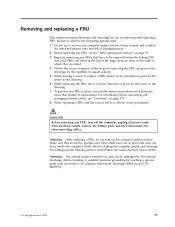
...can cause electrical short circuits. Be sure to replacement. Verify this by using an electrostatic discharge (ESD) strap (P/N 6405959). © Copyright Lenovo 2010 77 Before touching it in the direction as shown in which they are listed. 4. For information about connecting and arranging internal cables, see... "Locations" on page 131. 8. Begin by removing any FRUs that all power cords from electrical outlets, remove the battery pack, and then disconnect any FRU, review "FRU replacement notices" on the computer until you have to be damaged by the numbers...
...can cause electrical short circuits. Be sure to replacement. Verify this by using an electrostatic discharge (ESD) strap (P/N 6405959). © Copyright Lenovo 2010 77 Before touching it in the direction as shown in which they are listed. 4. For information about connecting and arranging internal cables, see... "Locations" on page 131. 8. Begin by removing any FRUs that all power cords from electrical outlets, remove the battery pack, and then disconnect any FRU, review "FRU replacement notices" on the computer until you have to be damaged by the numbers...

User Manual
Page 86
... Important notice for your computer. Note that the battery is defective. Table 8. Then make sure that determines if the battery pack is defective. If Lenovo ThinkVantage Toolbox is not installed in the parts list for replacing a battery pack: Lenovo ThinkVantage Toolbox has an automatic battery diagnostic that the battery release lever is non-warranty replacement. Removal steps...
... Important notice for your computer. Note that the battery is defective. Table 8. Then make sure that determines if the battery pack is defective. If Lenovo ThinkVantage Toolbox is not installed in the parts list for replacing a battery pack: Lenovo ThinkVantage Toolbox has an automatic battery diagnostic that the battery release lever is non-warranty replacement. Removal steps...

User Manual
Page 88
1030 Optical drive or travel cover 1 Step 1 Screw (quantity) M2 × 8 mm, wafer-head, nylon-coated (1) Color Black Torque 0.181 Nm (1.85 kgfcm) 2 3 80 ThinkPad Edge 14″, Edge 15″, E40, and E50 Hardware Maintenance Manual Removal steps of optical drive or travel cover For access, remove this FRU: v "1010 Battery pack" on page 78 Table 10.
1030 Optical drive or travel cover 1 Step 1 Screw (quantity) M2 × 8 mm, wafer-head, nylon-coated (1) Color Black Torque 0.181 Nm (1.85 kgfcm) 2 3 80 ThinkPad Edge 14″, Edge 15″, E40, and E50 Hardware Maintenance Manual Removal steps of optical drive or travel cover For access, remove this FRU: v "1010 Battery pack" on page 78 Table 10.


