UDS2100 - Quick Start Guide
Page 6
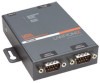
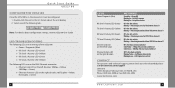
... Steady On = Power OK Blinking 2x = No DHCP response Blinking 2x = Setup Menu active Off = No data activity Blinking = Data being received by UDS2100 on channel 1 Off = No data activity Blinking = Data being transmitted from UDS2100 on channel 1 Off = No data activity Blinking = Data being received by...For questions and technical support, please check our online knowledge base at www.lantronix.com/support Lantronix 15353 Barranca Parkway, Irvine, CA 92618, USA Phone: (949) 453-3990 or Fax: (949) 453-3995 www.lantronix.com WWW.LANTRONIX.COM 9 Double-click the unit in the device list, it can ...
... Steady On = Power OK Blinking 2x = No DHCP response Blinking 2x = Setup Menu active Off = No data activity Blinking = Data being received by UDS2100 on channel 1 Off = No data activity Blinking = Data being transmitted from UDS2100 on channel 1 Off = No data activity Blinking = Data being received by...For questions and technical support, please check our online knowledge base at www.lantronix.com/support Lantronix 15353 Barranca Parkway, Irvine, CA 92618, USA Phone: (949) 453-3990 or Fax: (949) 453-3995 www.lantronix.com WWW.LANTRONIX.COM 9 Double-click the unit in the device list, it can ...
UDS2100 - User Guide
Page 3
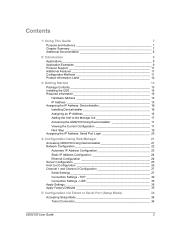
UDP 33 Apply Settings 35 Apply Factory Defaults 35 5: Configuration via Telnet or Serial Port (Setup Mode) 36 Accessing Setup Mode 36 Telnet Connection 36 UDS2100 User Guide 3 Contents 1: Using This Guide 7 Purpose and Audience 7 Chapter Summary 7 Additional Documentation 8 2: Introduction 9 Applications...DeviceInstaller 16 Installing DeviceInstaller 16 Assigning an IP Address 16 Adding the Unit to the Manage List 17 Accessing the UDS2100 Using DeviceInstaller 17 Viewing the Current Configuration 17 Next Step 19 Assigning the IP Address: Serial Port Login 20 ...
UDP 33 Apply Settings 35 Apply Factory Defaults 35 5: Configuration via Telnet or Serial Port (Setup Mode) 36 Accessing Setup Mode 36 Telnet Connection 36 UDS2100 User Guide 3 Contents 1: Using This Guide 7 Purpose and Audience 7 Chapter Summary 7 Additional Documentation 8 2: Introduction 9 Applications...DeviceInstaller 16 Installing DeviceInstaller 16 Assigning an IP Address 16 Adding the Unit to the Manage List 17 Accessing the UDS2100 Using DeviceInstaller 17 Viewing the Current Configuration 17 Next Step 19 Assigning the IP Address: Serial Port Login 20 ...
UDS2100 - User Guide
Page 4
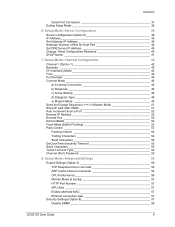
...Number of Bits for Host Part 40 Set DNS Server IP Address 40 Change Telnet Configuration Password 40 DHCP Name 41 7: Setup Mode: Channel Configuration 42 Channel 1 (Option 1 42 Baudrate 42 I/F (Interface) Mode 43 Flow 43 Port Number 44...Send Characters 54 DisConnTime (Inactivity Timeout 55 Send Characters 55 Telnet Terminal Type 55 Channel (Port) Password 55 8: Setup Mode: Advanced Settings 56 Expert Settings (Option 5 56 TCP Keepalive time in seconds 56 ARP Cache timeout in... connection type 57 Security Settings (Option 6 57 Disable SNMP 58 UDS2100 User Guide 4
...Number of Bits for Host Part 40 Set DNS Server IP Address 40 Change Telnet Configuration Password 40 DHCP Name 41 7: Setup Mode: Channel Configuration 42 Channel 1 (Option 1 42 Baudrate 42 I/F (Interface) Mode 43 Flow 43 Port Number 44...Send Characters 54 DisConnTime (Inactivity Timeout 55 Send Characters 55 Telnet Terminal Type 55 Channel (Port) Password 55 8: Setup Mode: Advanced Settings 56 Expert Settings (Option 5 56 TCP Keepalive time in seconds 56 ARP Cache timeout in... connection type 57 Security Settings (Option 6 57 Disable SNMP 58 UDS2100 User Guide 4
UDS2100 - User Guide
Page 5
...to Hexadecimal Conversions Error! Bookmark not defined. Contents SNMP Community Name 58 Disable Telnet Setup 58 Disable TFTP Firmware Update 58 Disable Port 77FE (Hex 59 Disable Web Server 59 Disable Web Setup 59 Disable ECHO Ports 59 Enable Enhanced Password 59 Default Settings (Option 7 59 ...11: Troubleshooting and Contact Information 67 LEDs 67 Problems and Error Messages 69 Technical Support 71 12: Connections and Pinouts 72 UDS2100 Serial Ports 72 Serial Connector Pinouts 72 Network Port 73 Reset Button 73 Ethernet Connector Pinouts 73 Power Plug 73 13: ...
...to Hexadecimal Conversions Error! Bookmark not defined. Contents SNMP Community Name 58 Disable Telnet Setup 58 Disable TFTP Firmware Update 58 Disable Port 77FE (Hex 59 Disable Web Server 59 Disable Web Setup 59 Disable ECHO Ports 59 Enable Enhanced Password 59 Default Settings (Option 7 59 ...11: Troubleshooting and Contact Information 67 LEDs 67 Problems and Error Messages 69 Technical Support 71 12: Connections and Pinouts 72 UDS2100 Serial Ports 72 Serial Connector Pinouts 72 Network Port 73 Reset Button 73 Ethernet Connector Pinouts 73 Power Plug 73 13: ...
UDS2100 - User Guide
Page 6
... Control Options 54 Table 9-1. Monitor Mode Commands 65 Table 11-1. UDS2100 Technical Specifications 74 UDS2100 User Guide 6 UDS2100 Connected to Serial Device and Network 14 Figure 4-1. Lantronix Web Manager 22 Figure 4-2. Server Settings 25 Figure 4-4. Hostlist Settings 27 Figure 4-5. UDP Connection Settings 34 Figure 5-1. Setup Menu Options 37 Figure 6-1. DB9 Male RS232 Serial DTE Connector...
... Control Options 54 Table 9-1. Monitor Mode Commands 65 Table 11-1. UDS2100 Technical Specifications 74 UDS2100 User Guide 6 UDS2100 Connected to Serial Device and Network 14 Figure 4-1. Lantronix Web Manager 22 Figure 4-2. Server Settings 25 Figure 4-4. Hostlist Settings 27 Figure 4-5. UDP Connection Settings 34 Figure 5-1. Setup Menu Options 37 Figure 6-1. DB9 Male RS232 Serial DTE Connector...
UDS2100 - User Guide
Page 7
...and Audience This guide provides the information needed to Information contact Lantronix Technical Support. 12: Connections and Pinouts Provides descriptions and ... such as port and server properties. 5: Configuration via Telnet or Serial Port (Setup Mode) Provides instructions for accessing Setup Mode (command line interface) using a Telnet connection through the network or a ... Contact Describes common problems and error messages and how to configure, use, and update the UDS2100 device server. Chapter Summary Table 1-1. It is for system administrators and those responsible for the...
...and Audience This guide provides the information needed to Information contact Lantronix Technical Support. 12: Connections and Pinouts Provides descriptions and ... such as port and server properties. 5: Configuration via Telnet or Serial Port (Setup Mode) Provides instructions for accessing Setup Mode (command line interface) using a Telnet connection through the network or a ... Contact Describes common problems and error messages and how to configure, use, and update the UDS2100 device server. Chapter Summary Table 1-1. It is for system administrators and those responsible for the...
UDS2100 - User Guide
Page 11
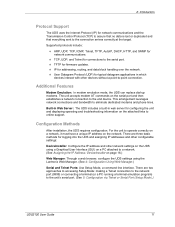
...) on page 16.) Web Manager: Through a web browser, configure the UDS settings using the Lantronix Web Manager. (See 4: Configuration Using Web Manager.) Serial and Telnet Ports: Use Setup Mode, a command line interface. TCP, UDP, and Telnet for configuring the unit and displaying ...the IP Address: DeviceInstaller on a PC attached to the unit's serial port. (See 5: Configuration via Telnet or Serial Port (Setup Mode).) UDS2100 User Guide 11 This arrangement leverages network connections and bandwidth to the end device. Additional Features Modem Emulation: In modem emulation mode, ...
...) on page 16.) Web Manager: Through a web browser, configure the UDS settings using the Lantronix Web Manager. (See 4: Configuration Using Web Manager.) Serial and Telnet Ports: Use Setup Mode, a command line interface. TCP, UDP, and Telnet for configuring the unit and displaying ...the IP Address: DeviceInstaller on a PC attached to the unit's serial port. (See 5: Configuration via Telnet or Serial Port (Setup Mode).) UDS2100 User Guide 11 This arrangement leverages network connections and bandwidth to the end device. Additional Features Modem Emulation: In modem emulation mode, ...
UDS2100 - User Guide
Page 19
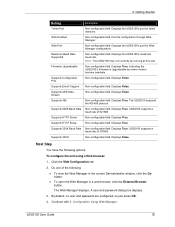
... unit using a Web browser: 1. 3: Getting Started Setting Description Telnet Port Non-configurable field. Click the Web Configuration tab. 2. Note: The UDS2100 may not currently be running at this rate. Supports HTTP Setup Non-configurable field. Supports Configurable Pins Non-configurable field. Displays False. Next Step You have the following : To view the...
... unit using a Web browser: 1. 3: Getting Started Setting Description Telnet Port Non-configurable field. Click the Web Configuration tab. 2. Note: The UDS2100 may not currently be running at this rate. Supports HTTP Setup Non-configurable field. Supports Configurable Pins Non-configurable field. Displays False. Next Step You have the following : To view the...

UDS2100 - User Guide
Page 20
...to IP address. 4. To enter Setup Mode, cycle the unit's power (power off and back on). Select 0 (Server Configuration) and follow the prompts until you get to the unit's serial port. Do one second to enter three lowercase x characters. UDS2100 User Guide 20 Continue with 5:... Configuration via Telnet or Serial Port (Setup Mode). You have one of the unit. To configure the unit using a serial connection: 1. Note:...
...to IP address. 4. To enter Setup Mode, cycle the unit's power (power off and back on). Select 0 (Server Configuration) and follow the prompts until you get to the unit's serial port. Do one second to enter three lowercase x characters. UDS2100 User Guide 20 Continue with 5:... Configuration via Telnet or Serial Port (Setup Mode). You have one of the unit. To configure the unit using a serial connection: 1. Note:...
UDS2100 - User Guide
Page 21
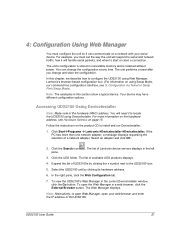
... can communicate on the product CD to install and run DeviceInstaller. 1. Click Start Programs Lantronix DeviceInstaller DeviceInstaller. Your device may have different configuration options. Accessing UDS2100 Using DeviceInstaller Note: Make note of available UDS products displays. 4. Select an adapter and...see 5: Configuration via Telnet or Serial Port (Setup Mode). To open your serial device. The unit's configuration is stored in this chapter, we describe how to configure the UDS2100 using Web Manager, Lantronix's browser-based configuration tool. (For information on...
... can communicate on the product CD to install and run DeviceInstaller. 1. Click Start Programs Lantronix DeviceInstaller DeviceInstaller. Your device may have different configuration options. Accessing UDS2100 Using DeviceInstaller Note: Make note of available UDS products displays. 4. Select an adapter and...see 5: Configuration via Telnet or Serial Port (Setup Mode). To open your serial device. The unit's configuration is stored in this chapter, we describe how to configure the UDS2100 using Web Manager, Lantronix's browser-based configuration tool. (For information on...

UDS2100 - User Guide
Page 36
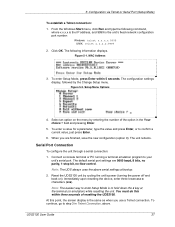
... 2. Use a terminal or terminal emulation program to port 9999. The series of prompts at any time. The unit's configuration is called Setup Mode. To complete the configuration, continue with your Lantronix Sales Associate. You can change the configuration at which you enter configuration settings is stored in the configuration chapters show a typical... use DeviceInstaller to configure the unit over the network, establish a Telnet connection to access the serial port locally. Select the device from your serial device. UDS2100 User Guide 36
... 2. Use a terminal or terminal emulation program to port 9999. The series of prompts at any time. The unit's configuration is called Setup Mode. To complete the configuration, continue with your Lantronix Sales Associate. You can change the configuration at which you enter configuration settings is stored in the configuration chapters show a typical... use DeviceInstaller to configure the unit over the network, establish a Telnet connection to access the serial port locally. Select the device from your serial device. UDS2100 User Guide 36
UDS2100 - User Guide
Page 37
...emulation program to confirm a current value, just press Enter. 6. Reset the UDS2100 unit by cycling the unit's power (turning the power off and back on the menu by the Change Setup menu. You must do this point, the screen display is the unit's fixed... configuration settings display, followed by entering the number of resetting the UDS2100. Serial Port Connection To configure the unit through a serial connection: 1. Immediately upon resetting the device, enter three lowercase x characters (xxx). The unit reboots. Setup Menu Options 4. field and pressing Enter. 5. At this within ...
...emulation program to confirm a current value, just press Enter. 6. Reset the UDS2100 unit by cycling the unit's power (turning the power off and back on the menu by the Change Setup menu. You must do this point, the screen display is the unit's fixed... configuration settings display, followed by entering the number of resetting the UDS2100. Serial Port Connection To configure the unit through a serial connection: 1. Immediately upon resetting the device, enter three lowercase x characters (xxx). The unit reboots. Setup Menu Options 4. field and pressing Enter. 5. At this within ...

UDS2100 - User Guide
Page 38
UDS2100 User Guide 38 To exit the configuration mode without save all changes and reboot the device, select option 9 Save and exit from the Change Setup menu. select option 8 Exit without saving any changes or rebooting. All values are stored in nonvolatile memory. 5: Configuration via Telnet or Serial Port (Setup Mode) Exiting Setup Mode To exit setup mode: You have two options: To save from the Change Setup menu.
UDS2100 User Guide 38 To exit the configuration mode without save all changes and reboot the device, select option 9 Save and exit from the Change Setup menu. select option 8 Exit without saving any changes or rebooting. All values are stored in nonvolatile memory. 5: Configuration via Telnet or Serial Port (Setup Mode) Exiting Setup Mode To exit setup mode: You have two options: To save from the Change Setup menu.

UDS2100 - User Guide
Page 39
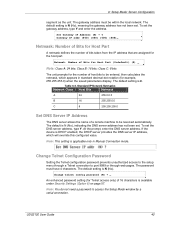
... (Option 0) The unit's basic network parameters display when you can manually configure to force the UDS2100 to other LAN segments. To disable an option, set to the same LAN UDS2100 User Guide 39 Table 6-1. Network Settings IP Address If DHCP is not used , the third octet...gateway address, or router, allows communication to disable AutoIP, DHCP, or BootP. The gateway address should be set the appropriate bit. 6: Setup Mode: Server Configuration This chapter explains how to assign IP addresses, enter the IP address manually. The IP Address, Set Gateway IP Address...
... (Option 0) The unit's basic network parameters display when you can manually configure to force the UDS2100 to other LAN segments. To disable an option, set to the same LAN UDS2100 User Guide 39 Table 6-1. Network Settings IP Address If DHCP is not used , the third octet...gateway address, or router, allows communication to disable AutoIP, DHCP, or BootP. The gateway address should be set the appropriate bit. 6: Setup Mode: Server Configuration This chapter explains how to assign IP addresses, enter the IP address manually. The IP Address, Set Gateway IP Address...
UDS2100 - User Guide
Page 40
... which appears in Manual Connection mode. Change Telnet Configuration Password Setting the Telnet configuration password prevents unauthorized access to the setup menu through a Telnet connection to access the Setup Mode window by a serial connection. The default setting is N (No), indicating the DNS server address has not...only) of 16 characters is N (No). To set the gateway address, type Y and enter the address. Note: This setting is 0. UDS2100 User Guide 40 To set the DNS server address, type Y. At the prompt, enter the DNS server address. The password must be entered...
... which appears in Manual Connection mode. Change Telnet Configuration Password Setting the Telnet configuration password prevents unauthorized access to the setup menu through a Telnet connection to access the Setup Mode window by a serial connection. The default setting is N (No), indicating the DNS server address has not...only) of 16 characters is N (No). To set the gateway address, type Y and enter the address. Note: This setting is 0. UDS2100 User Guide 40 To set the DNS server address, type Y. At the prompt, enter the DNS server address. The password must be entered...
UDS2100 - User Guide
Page 41
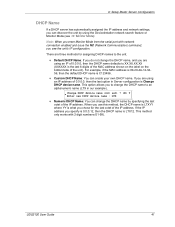
... option in our example). This option allows you to the unit. If the IP address you specify is 0.0.0.12, then the DHCP name is C123456. UDS2100 User Guide 41 Default DHCP Name: If you do not change the DHCP name to XX.XX.XX.XX (XXXXXX is the last 6 digits of... of the unit). Change DHCP device name (not set) ? (N) Y Enter new DHCP device name : LTX Numeric DHCP Name: You can create your own DHCP name. 6: Setup Mode: Server Configuration DHCP Name If a DHCP server has automatically assigned the IP address and network settings, you can discover the unit by specifying the...
... option in our example). This option allows you to the unit. If the IP address you specify is 0.0.0.12, then the DHCP name is C123456. UDS2100 User Guide 41 Default DHCP Name: If you do not change the DHCP name to XX.XX.XX.XX (XXXXXX is the last 6 digits of... of the unit). Change DHCP device name (not set) ? (N) Y Enter new DHCP device name : LTX Numeric DHCP Name: You can create your own DHCP name. 6: Setup Mode: Server Configuration DHCP Name If a DHCP server has automatically assigned the IP address and network settings, you can discover the unit by specifying the...

UDS2100 - User Guide
Page 42
.....) Channel 1 (Option 1) Note: The procedure is the same for the serial connection. Select Channel 1 (option 1) from the Change Setup menu to define how the serial port responds to configure the serial ports. Figure 7-1. Serial Port Settings Baudrate The unit and attached serial device..., such as a modem, must enter some values in parenthesis. Baudrate (9600) ? _ UDS2100 User Guide 42 The following sections describe the configurable parameters within the Channel configuration menu. Error! Valid baud rates are 300, 600, ...
.....) Channel 1 (Option 1) Note: The procedure is the same for the serial connection. Select Channel 1 (option 1) from the Change Setup menu to define how the serial port responds to configure the serial ports. Figure 7-1. Serial Port Settings Baudrate The unit and attached serial device..., such as a modem, must enter some values in parenthesis. Baudrate (9600) ? _ UDS2100 User Guide 42 The following sections describe the configurable parameters within the Channel configuration menu. Error! Valid baud rates are 300, 600, ...

UDS2100 - User Guide
Page 43
...0101 1101 5D Flow Flow control sets the local handshaking method for that particular option, which can be set to select flow control options: UDS2100 User Guide 43 This might influence performance. Flow (00) ? _ Use the following table demonstrates how to build some common Interface Mode settings... Parity, 1 stop bits are blank represent "don't care" bits for stopping serial input/output. The default setting is 00. 7: Setup Mode: Channel Configuration I/F (Interface) Mode The Interface (I/F) Mode is a bit-coded byte entered in the table that are implemented by the software.
...0101 1101 5D Flow Flow control sets the local handshaking method for that particular option, which can be set to select flow control options: UDS2100 User Guide 43 This might influence performance. Flow (00) ? _ Use the following table demonstrates how to build some common Interface Mode settings... Parity, 1 stop bits are blank represent "don't care" bits for stopping serial input/output. The default setting is 00. 7: Setup Mode: Channel Configuration I/F (Interface) Mode The Interface (I/F) Mode is a bit-coded byte entered in the table that are implemented by the software.
UDS2100 - User Guide
Page 44
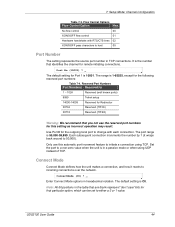
... outgoing local port to change with RTS/CTS lines 02 XON/XOFF pass characters to a non-zero value when the unit is in TCP connections. 7: Setup Mode: Channel Configuration Table 7-3. The range is 1-65535, except for Port 1 is the number that particular option, which can be set to initiate a connection using... in the table that are blank represent "don't care" bits for that identifies the channel for this automatic port increment feature to either a 0 or 1 value. UDS2100 User Guide 44
... outgoing local port to change with RTS/CTS lines 02 XON/XOFF pass characters to a non-zero value when the unit is in TCP connections. 7: Setup Mode: Channel Configuration Table 7-3. The range is 1-65535, except for Port 1 is the number that particular option, which can be set to initiate a connection using... in the table that are blank represent "don't care" bits for that identifies the channel for this automatic port increment feature to either a 0 or 1 value. UDS2100 User Guide 44

UDS2100 - User Guide
Page 45
... In 0 1 0 Always Accept 1 1 0 b) Response Nothing (quiet) 0 Character response (C=connect, D=disconnect, N=unreachable) 1 c) Active Startup No active startup 0 0 0 0 With any incoming connection when a connection is asserted. UDS2100 User Guide 45 7: Setup Mode: Channel Configuration Table 7-5. Always Accept Accepts any character 0 0 0 1 With active Modem Control In 0 0 1 0 With a specific start character 0 0 1 1 Manual connection 0 1 0 0 Autostart 0 1 0 1 Hostlist 0 0 1 0 d) Datagram...
... In 0 1 0 Always Accept 1 1 0 b) Response Nothing (quiet) 0 Character response (C=connect, D=disconnect, N=unreachable) 1 c) Active Startup No active startup 0 0 0 0 With any incoming connection when a connection is asserted. UDS2100 User Guide 45 7: Setup Mode: Channel Configuration Table 7-5. Always Accept Accepts any character 0 0 0 1 With active Modem Control In 0 0 1 0 With a specific start character 0 0 1 1 Manual connection 0 1 0 0 Autostart 0 1 0 1 Hostlist 0 0 1 0 d) Datagram...