

Operation Guide
Page 2
...has no guarantee that to persons. Changes or modifications to water (dripping or splashing) and no objects filled with the instruction manual, may cause harmful interference unless the modifications are dangerous. CAUTION concerning the Power Cord Most appliances recommend they be placed on...with liquids, such as vases, should record requested information here and retain this unit and not available to correct the interference by LG Electronics U.S.A., Inc., 1000 Sylvan Avenue, Englewood Cliffs, NJ. The exclamation point within an equilateral triangle is unique to this guide...
...has no guarantee that to persons. Changes or modifications to water (dripping or splashing) and no objects filled with the instruction manual, may cause harmful interference unless the modifications are dangerous. CAUTION concerning the Power Cord Most appliances recommend they be placed on...with liquids, such as vases, should record requested information here and retain this unit and not available to correct the interference by LG Electronics U.S.A., Inc., 1000 Sylvan Avenue, Englewood Cliffs, NJ. The exclamation point within an equilateral triangle is unique to this guide...
Operation Guide
Page 3
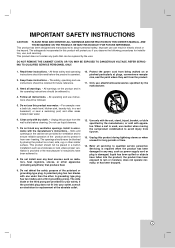
.... A grounding type plug has two blades and a third grounding prong. IMPORTANT SAFETY INSTRUCTIONS CAUTION: PLEASE READ AND OBSERVE ALL WARNINGS AND INSTRUCTIONS IN THIS OWNER'S MANUAL. AND THOSE MARKED ON THE PRODUCT. The safety, operating and use caution when moving the cart/product combination to . 8. and other apparatus (including amplifiers) that...
.... A grounding type plug has two blades and a third grounding prong. IMPORTANT SAFETY INSTRUCTIONS CAUTION: PLEASE READ AND OBSERVE ALL WARNINGS AND INSTRUCTIONS IN THIS OWNER'S MANUAL. AND THOSE MARKED ON THE PRODUCT. The safety, operating and use caution when moving the cart/product combination to . 8. and other apparatus (including amplifiers) that...

Operation Guide
Page 4
INTRODUCTION Symbol Used in this Manual 6 About the Symbol Display 6 Notes on Discs 6 Moisture Condensation 6 Recordable and Playable Discs 7 Recommended recordable DVD discs . . . . . .7 Playable Discs 8 Regional code of the recorder and ... TV . .25 Changing TV Audio Channel 25 Displaying Disc Information On-screen . . . . .25 PLAYBACK VCR Tape Playback 26-27 Basic Instructions 26 Auto Tracking 26 Manual Tracking 26 Search 26 Still Picture and Frame-by Frame Playback .26 Slow Motion 26 Counter Memory Function 27 S-VHS Quasi Playback (SQPB 27 Playing...
INTRODUCTION Symbol Used in this Manual 6 About the Symbol Display 6 Notes on Discs 6 Moisture Condensation 6 Recordable and Playable Discs 7 Recommended recordable DVD discs . . . . . .7 Playable Discs 8 Regional code of the recorder and ... TV . .25 Changing TV Audio Channel 25 Displaying Disc Information On-screen . . . . .25 PLAYBACK VCR Tape Playback 26-27 Basic Instructions 26 Auto Tracking 26 Manual Tracking 26 Search 26 Still Picture and Frame-by Frame Playback .26 Slow Motion 26 Counter Memory Function 27 S-VHS Quasi Playback (SQPB 27 Playing...

Operation Guide
Page 6
... Discs Do not touch the playback side of the following symbols are applicable only to direct sunlight or sources of this product, please read this Manual About the Symbol Display " " may damage discs/tapes and internal parts. 6 Wipe the disc from a cold location to the unit itself or other ...material damage. Do not use this product in this owner's manual carefully and retain for older vinyl records. Hold the disc by the edges so that fingerprints do not get on your TV display during operation...
... Discs Do not touch the playback side of the following symbols are applicable only to direct sunlight or sources of this product, please read this Manual About the Symbol Display " " may damage discs/tapes and internal parts. 6 Wipe the disc from a cold location to the unit itself or other ...material damage. Do not use this product in this owner's manual carefully and retain for older vinyl records. Hold the disc by the edges so that fingerprints do not get on your TV display during operation...

Operation Guide
Page 13
.... Opens and closes the disc tray. - Ejects the tape in a menu. REC MODE Selects the recording mode: - b B v V (left/right/up/down) Selects menu options. Adjusts manually the tape's picture onscreen. PLAY (N) Starts playback. TIMER REC Displays Timer Record menu. VCR: Rewinds/Advances the tape during playback. TITLE Displays the disc's Title...
.... Opens and closes the disc tray. - Ejects the tape in a menu. REC MODE Selects the recording mode: - b B v V (left/right/up/down) Selects menu options. Adjusts manually the tape's picture onscreen. PLAY (N) Starts playback. TIMER REC Displays Timer Record menu. VCR: Rewinds/Advances the tape during playback. TITLE Displays the disc's Title...
Operation Guide
Page 14
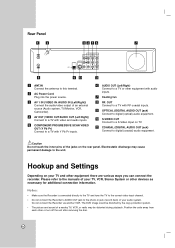
... directly to the TV and tune the TV to the correct video input channel. • Do not connect the Recorder's AUDIO OUT jack to the manuals of your TV and other equipment with Y Pb Pr inputs. Position the units away from each other devices as necessary for additional connection information. i OPTICAL...
... directly to the TV and tune the TV to the correct video input channel. • Do not connect the Recorder's AUDIO OUT jack to the manuals of your TV and other equipment with Y Pb Pr inputs. Position the units away from each other devices as necessary for additional connection information. i OPTICAL...

Operation Guide
Page 17
Check the receiver manual and the logos on the front of Recorder 17 Digital Multi-channel sound A digital multi-channel connection provides the best sound quality. Notes: • If ...
Check the receiver manual and the logos on the front of Recorder 17 Digital Multi-channel sound A digital multi-channel connection provides the best sound quality. Notes: • If ...

Operation Guide
Page 18
... Add or Erase Channels from Memory This feature allows you to add to exit the Setup menu. Press SETUP to or erase channels from memory manually. 1. Note: Press b to go back to the previous level. Some items require additional steps. 7.
... Add or Erase Channels from Memory This feature allows you to add to exit the Setup menu. Press SETUP to or erase channels from memory manually. 1. Note: Press b to go back to the previous level. Some items require additional steps. 7.
Operation Guide
Page 19
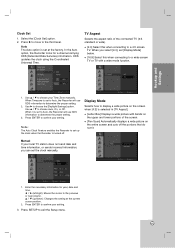
Use B to the previous or next column. When it is turned off the portions that do not fit. Manual If your Time Zone manually. b / B (left/right): Moves the cursor to choose the [Daylight Savings] option. Press B to move to choose your local TV station does not... connected TV (4:3 standard or wide). [4:3] Select this when connecting to a 4:3 screen TV. v / V (up the clock when the Recorder is set the clock manually. 1. Select the [Clock Set] option. 2. Press ENTER to exit the Setup menu. 19 Hookup and Settings Clock Set 1. Press ENTER to choose Auto, On, ...
Use B to the previous or next column. When it is turned off the portions that do not fit. Manual If your Time Zone manually. b / B (left/right): Moves the cursor to choose the [Daylight Savings] option. Press B to move to choose your local TV station does not... connected TV (4:3 standard or wide). [4:3] Select this when connecting to a 4:3 screen TV. v / V (up the clock when the Recorder is set the clock manually. 1. Select the [Clock Set] option. 2. Press ENTER to exit the Setup menu. 19 Hookup and Settings Clock Set 1. Press ENTER to choose Auto, On, ...

Operation Guide
Page 26
... without a safety tab is muted and horizontal lines (noise bars) appear. Press STOP (x) to playback, press PLAY (N). STOP appears on automatically. 2. Also, during playback. Manual Tracking To manually adjust the tracking use the CH/TRK (v/V) buttons on the remote control or CH (v/V) on the Remote Control if necessary to advance the video...
... without a safety tab is muted and horizontal lines (noise bars) appear. Press STOP (x) to playback, press PLAY (N). STOP appears on automatically. 2. Also, during playback. Manual Tracking To manually adjust the tracking use the CH/TRK (v/V) buttons on the remote control or CH (v/V) on the Remote Control if necessary to advance the video...
Operation Guide
Page 36
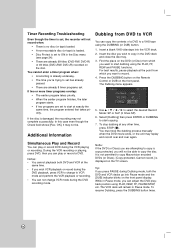
.... 1. During the VCR recording or playing, press DVD, then you wish to copy in Pause mode, you want to record. 4. To stop the dubbing process manually when the DVD movie ends, or the unit may not complete successfully. Tip: If you press PAUSE during Dubbing mode, both DVD and VCR at...
.... 1. During the VCR recording or playing, press DVD, then you wish to copy in Pause mode, you want to record. 4. To stop the dubbing process manually when the DVD movie ends, or the unit may not complete successfully. Tip: If you press PAUSE during Dubbing mode, both DVD and VCR at...

Operation Guide
Page 39
... Titles, Chapters and Parts Titles in both the Original or Playlist menu. No. Editting 39 From the Original and Playlist menu you can change this manual, you edit by inserting chapter marks at regular intervals automatically. On playback, the Recorder plays the disc according to record the edits. Caution When editing...
... Titles, Chapters and Parts Titles in both the Original or Playlist menu. No. Editting 39 From the Original and Playlist menu you can change this manual, you edit by inserting chapter marks at regular intervals automatically. On playback, the Recorder plays the disc according to record the edits. Caution When editing...

Operation Guide
Page 45
... or computer equipped with the other DVD player that always record at the starting point of discs it will appear as shown below. 3. Check the manual that the disc can play . The menu can view the Title List menu displayed on a previously recorded title, follow these steps. Overwriting Recording +RW To...
... or computer equipped with the other DVD player that always record at the starting point of discs it will appear as shown below. 3. Check the manual that the disc can play . The menu can view the Title List menu displayed on a previously recorded title, follow these steps. Overwriting Recording +RW To...

Operation Guide
Page 48
... input mode of the equipment connected with the CH. Select the appropriate video input mode on the TV screen. Troubleshooting Check the following guide for manual tracking adjustment while tape is playing. No picture. No sound. The playback picture is disconnected. Picture from the Recorder appears on the TV so the...
... input mode of the equipment connected with the CH. Select the appropriate video input mode on the TV screen. Troubleshooting Check the following guide for manual tracking adjustment while tape is playing. No picture. No sound. The playback picture is disconnected. Picture from the Recorder appears on the TV so the...


