

Operation Guide
Page 4
...; FUNCTION OSD 14 • AUDIO MODE 14 • BROADCAST TYPE (STEREO/SAP/MONO 14 • AUDIO OUTPUT (STEREO/LEFT/RIGHT 14 Displaying Disc Information on Discs 5 About the Remote Control 5 Types of Playable Discs 6 Regional code 6 Selecting the Viewing Source 6 Front Panel 7 Remote Control 8 Rear Panel 9 Preparation 9-18 Connecting an Antenna or Cable TV 10 Basic TV Connections 10-11 Optional TV Connections 11 Connection to VCR 24 On-Screen Display - VCR 19-25 VCR Tape Playback 19-20 Basic Instructions 19 Auto Tracking 19 Manual...
...; FUNCTION OSD 14 • AUDIO MODE 14 • BROADCAST TYPE (STEREO/SAP/MONO 14 • AUDIO OUTPUT (STEREO/LEFT/RIGHT 14 Displaying Disc Information on Discs 5 About the Remote Control 5 Types of Playable Discs 6 Regional code 6 Selecting the Viewing Source 6 Front Panel 7 Remote Control 8 Rear Panel 9 Preparation 9-18 Connecting an Antenna or Cable TV 10 Basic TV Connections 10-11 Optional TV Connections 11 Connection to VCR 24 On-Screen Display - VCR 19-25 VCR Tape Playback 19-20 Basic Instructions 19 Auto Tracking 19 Manual...
Operation Guide
Page 5
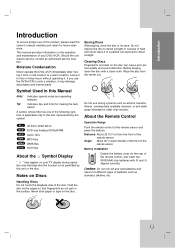
... remote control at the remote sensor and press the buttons. Distance: About 23 ft (7 m) from the center out. AAA Introduction Introduction To ensure proper use the DVD+VCR in such a situation, it may appear on your DVD+VCR. ALL DVD ACD MP3 WMA DivX All discs listed below DVD and finalized DVD±R/RW Audio CDs MP3 files WMA files DivX files About the Symbol Display " " may damage discs/tapes and internal parts...
... remote control at the remote sensor and press the buttons. Distance: About 23 ft (7 m) from the center out. AAA Introduction Introduction To ensure proper use the DVD+VCR in such a situation, it may appear on your DVD+VCR. ALL DVD ACD MP3 WMA DivX All discs listed below DVD and finalized DVD±R/RW Audio CDs MP3 files WMA files DivX files About the Symbol Display " " may damage discs/tapes and internal parts...
Operation Guide
Page 6
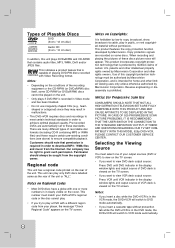
... limited viewing uses only unless otherwise authorized by Macrovision. Our company has no right to DVD mode automatically. • If you try to play a DVD with one of your player, the message "Check Regional Code" appears on Copyrights: It is capable of playing DVD-RW discs recorded with Video Recording format. IN CASE OF 525 PROGRESSIVE SCAN PICTURE PROBLEMS, IT IS RECOMMENDED THAT THE USER SWITCH THE CONNECTION TO THE 'STANDARD DEFINITION' OUTPUT. There...
... limited viewing uses only unless otherwise authorized by Macrovision. Our company has no right to DVD mode automatically. • If you try to play a DVD with one of your player, the message "Check Regional Code" appears on Copyrights: It is capable of playing DVD-RW discs recorded with Video Recording format. IN CASE OF 525 PROGRESSIVE SCAN PICTURE PROBLEMS, IT IS RECOMMENDED THAT THE USER SWITCH THE CONNECTION TO THE 'STANDARD DEFINITION' OUTPUT. There...
Operation Guide
Page 7
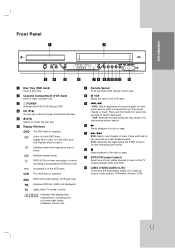
... the Progressive scan is selected. Indicates total playing time, elapsed time, remaining time or current deck status (Playback, Pause, etc). h Z VCR Ejects the tape in timer recording or a timer recording is active. k M/> DVD: Skip to the audio/video output of an external source (Audio system, TV/Monitor, Another VCR). 7 c 1 POWER Switches the DVD+VCR ON and OFF. f Display Windows DVD The DVD deck is active. VCR: Rewinds the tape during the STOP mode or for fast reverse picture search. e Z DVD Opens or closes the disc tray. g Remote Sensor...
... the Progressive scan is selected. Indicates total playing time, elapsed time, remaining time or current deck status (Playback, Pause, etc). h Z VCR Ejects the tape in timer recording or a timer recording is active. k M/> DVD: Skip to the audio/video output of an external source (Audio system, TV/Monitor, Another VCR). 7 c 1 POWER Switches the DVD+VCR ON and OFF. f Display Windows DVD The DVD deck is active. VCR: Rewinds the tape during the STOP mode or for fast reverse picture search. e Z DVD Opens or closes the disc tray. g Remote Sensor...

Operation Guide
Page 8
... the STOP mode, for frame-by the TV tuner. EJECT Ejects the tape in the VCR deck. Press repeatedly for fast backward/forward picture search. Adjusts manually the tape's picture onscreen. A-B Repeats sequence between the clock, tape counter and tape remaining modes on the program list. DVD: Search backward or forward. - TITLE Displays the disc's Title menu, if available. RETURN (O) Removes the setup menu. SKIP (. / >) Go to next chapter or track. Remote Control POWER Switches DVD+VCR ON and OFF. TV/VCR To view channels selected...
... the STOP mode, for frame-by the TV tuner. EJECT Ejects the tape in the VCR deck. Press repeatedly for fast backward/forward picture search. Adjusts manually the tape's picture onscreen. A-B Repeats sequence between the clock, tape counter and tape remaining modes on the program list. DVD: Search backward or forward. - TITLE Displays the disc's Title menu, if available. RETURN (O) Removes the setup menu. SKIP (. / >) Go to next chapter or track. Remote Control POWER Switches DVD+VCR ON and OFF. TV/VCR To view channels selected...

Operation Guide
Page 9
... connect the player. h COAXIAL (DIGITAL AUDIO OUT jack) (DVD OUT) Connect to a TV with video and audio inputs. The DVD image could be distorted during playback. d COMPONENT/PROGRESSIVE SCAN VIDEO OUT (Y Pb Pr) (DVD OUT) Connect to the manuals of a nearby TV, VCR, or radio may cause permanent damage to this terminal. g RF. Notes: • The picture and sound of your TV, VCR, stereo system or other equipment with Y Pb Pr inputs. f AC Power Cord...
... connect the player. h COAXIAL (DIGITAL AUDIO OUT jack) (DVD OUT) Connect to a TV with video and audio inputs. The DVD image could be distorted during playback. d COMPONENT/PROGRESSIVE SCAN VIDEO OUT (Y Pb Pr) (DVD OUT) Connect to the manuals of a nearby TV, VCR, or radio may cause permanent damage to this terminal. g RF. Notes: • The picture and sound of your TV, VCR, stereo system or other equipment with Y Pb Pr inputs. f AC Power Cord...

Operation Guide
Page 10
... To view or record a CATV channel 1 Tune the TV to the DVD+VCR output channel (CH 3 or 4). 2 Set the DVD+VCR channel selector to the cable output channel. (Example: CH3) 3 Select a channel using a cable box to tune channels, it to a 300-ohm to the ANT.IN jack on the DVD+VCR. If it is flat connect it is not necessary to the DVD+VCR. Rear of TV ANTENNA INPUT VIDEO INPUT AUDIO INPUT L R R V A1 OR OR Rear of DVD+VCR b Rear of DVD+VCR C A2 S Pr Pb Y COMPONENT/PROGRESSIVE SCAN VIDEO INPUT R L AUDIO INPUT Rear...
... To view or record a CATV channel 1 Tune the TV to the DVD+VCR output channel (CH 3 or 4). 2 Set the DVD+VCR channel selector to the cable output channel. (Example: CH3) 3 Select a channel using a cable box to tune channels, it to a 300-ohm to the ANT.IN jack on the DVD+VCR. If it is flat connect it is not necessary to the DVD+VCR. Rear of TV ANTENNA INPUT VIDEO INPUT AUDIO INPUT L R R V A1 OR OR Rear of DVD+VCR b Rear of DVD+VCR C A2 S Pr Pb Y COMPONENT/PROGRESSIVE SCAN VIDEO INPUT R L AUDIO INPUT Rear...
Operation Guide
Page 11
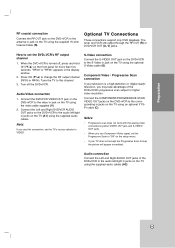
... on the TV using an optional Y Pb Pr cable (C). Optional TV Connections These connections support only DVD playback. Component Video / Progressive Scan connection If your TV does not accept the Progressive Scan format, the picture will appear scrambled. Audio connection Connect the Left and Right AUDIO OUT jacks of the DVD+VCR's progressive scan output for more than five seconds. Connect the COMPONENT/PROGRESSIVE SCAN VIDEO OUT jacks on the DVD+VCR to this connection, set the DVD+VCR's RF output channel 1. Audio/Video connection 1. The tuner and VCR still output through the RF...
... on the TV using an optional Y Pb Pr cable (C). Optional TV Connections These connections support only DVD playback. Component Video / Progressive Scan connection If your TV does not accept the Progressive Scan format, the picture will appear scrambled. Audio connection Connect the Left and Right AUDIO OUT jacks of the DVD+VCR's progressive scan output for more than five seconds. Connect the COMPONENT/PROGRESSIVE SCAN VIDEO OUT jacks on the DVD+VCR to this connection, set the DVD+VCR's RF output channel 1. Audio/Video connection 1. The tuner and VCR still output through the RF...
Operation Guide
Page 12
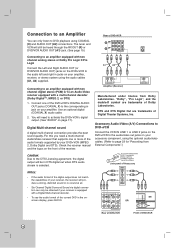
..., distorted sound or no sound at all. • Six Channel Digital Surround Sound via digital connection can only listen to the corresponding in the onscreen display, press AUDIO. 12 A1 A2 X L R AUDIO INPUT Amplifier (Receiver) COAXIAL DIGITAL INPUT Manufactured under license from External Components".) Caution: Due to activate the DVD+VCR's digital output. (See "AUDIO" on your accessory component, using the optional audio/video cables. (Refer to page 23 for "Recording from Dolby Laboratories. Accessory Audio/Video (A/V) Connections to DVD+VCR Connect the VCR IN...
..., distorted sound or no sound at all. • Six Channel Digital Surround Sound via digital connection can only listen to the corresponding in the onscreen display, press AUDIO. 12 A1 A2 X L R AUDIO INPUT Amplifier (Receiver) COAXIAL DIGITAL INPUT Manufactured under license from External Components".) Caution: Due to activate the DVD+VCR's digital output. (See "AUDIO" on your accessory component, using the optional audio/video cables. (Refer to page 23 for "Recording from Dolby Laboratories. Accessory Audio/Video (A/V) Connections to DVD+VCR Connect the VCR IN...
Operation Guide
Page 13
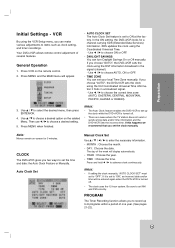
... manually. Note: Menus remain on-screen for a channel carrying XDS (Extended Data Services) information. Preparation Initial Settings - CLOCK The DVD+VCR gives you set to "OFF". Be sure to set AM and PM correctly. In the ON setting, the DVD+VCR looks for 3 minutes. PROGRAM The Timer Recording function allows you can make various adjustments to choose a desired option on the remote control. 2. Press VCR on the seleted Menu. Use v / V to items such as clock setting...
... manually. Note: Menus remain on-screen for a channel carrying XDS (Extended Data Services) information. Preparation Initial Settings - CLOCK The DVD+VCR gives you set to "OFF". Be sure to set AM and PM correctly. In the ON setting, the DVD+VCR looks for 3 minutes. PROGRAM The Timer Recording function allows you can make various adjustments to choose a desired option on the remote control. 2. Press VCR on the seleted Menu. Use v / V to items such as clock setting...

Operation Guide
Page 16
... 33). Off (for Disc Subtitle) : Turn off the portions that is compatible with a progressive scan signal, set this unit to the input of your television or monitor to progressive scan mode. To turn on progressive scan: Connect component/progressive out of the screen. Note: If you set Progressive Scan to On. Press STOP (x) and hold it for the VCR and DVD's setup menu and information display. Display Mode Display Mode setting works only when the TV Aspect mode is connected. Panscan: Automatically displays the wide picture on a conventional analog...
... 33). Off (for Disc Subtitle) : Turn off the portions that is compatible with a progressive scan signal, set this unit to the input of your television or monitor to progressive scan mode. To turn on progressive scan: Connect component/progressive out of the screen. Note: If you set Progressive Scan to On. Press STOP (x) and hold it for the VCR and DVD's setup menu and information display. Display Mode Display Mode setting works only when the TV Aspect mode is connected. Panscan: Automatically displays the wide picture on a conventional analog...
Operation Guide
Page 17
... automatically. If Auto Play mode is inserted. B.L.E. (Black Level Expansion) To select the black level of audio output options. Set your amplifier to On only when a multi-channel karaoke DVD is active. Press ENTER/OK to an amplifier or other equipment with a Dolby Digital, DTS or MPEG decoder. Set this DVD player will search for some DVDs. DRC (Dynamic Range Control) With the DVD format, you select "Off", the DTS signal is selected and the...
... automatically. If Auto Play mode is inserted. B.L.E. (Black Level Expansion) To select the black level of audio output options. Set your amplifier to On only when a multi-channel karaoke DVD is active. Press ENTER/OK to an amplifier or other equipment with a Dolby Digital, DTS or MPEG decoder. Set this DVD player will search for some DVDs. DRC (Dynamic Range Control) With the DVD format, you select "Off", the DTS signal is selected and the...

Operation Guide
Page 18
.... 1. Unlock : If you set wrongly. Note: If you select unlock, parental control is set a rating for children to do so. You must input the 4-digit security code you make a mistake before pressing ENTER/OK, press CLEAR. 3. To change password. 1. Press SETUP/MENU to exit the menu. Press OPEN/CLOSE (Z) to rate the DVD video disc, based on the LOCK menu then press B. 2. To access the Rating, Password and Area Code features, you must enter the 4-digit password or change...
.... 1. Unlock : If you set wrongly. Note: If you select unlock, parental control is set a rating for children to do so. You must input the 4-digit security code you make a mistake before pressing ENTER/OK, press CLEAR. 3. To change password. 1. Press SETUP/MENU to exit the menu. Press OPEN/CLOSE (Z) to rate the DVD video disc, based on the LOCK menu then press B. 2. To access the Rating, Password and Area Code features, you must enter the 4-digit password or change...
Operation Guide
Page 20
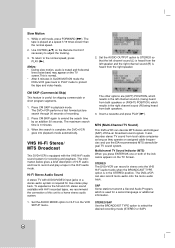
... a home stereo audio system. 1. Notes: • During slow motion, audio is in the right channel sound (R) being heard from local cable companies as long as they operate on the VCR SETUP menu . The DVD+VCR performs a fast forward picture search through 30 seconds of Hi-Fi audio and how to select the desired recording mode (STEREO or SAP). 20 The maximum search time is complete, the DVD+VCR goes into playback mode automatically. MTS (Multi-Channel...
... a home stereo audio system. 1. Notes: • During slow motion, audio is in the right channel sound (R) being heard from local cable companies as long as they operate on the VCR SETUP menu . The DVD+VCR performs a fast forward picture search through 30 seconds of Hi-Fi audio and how to select the desired recording mode (STEREO or SAP). 20 The maximum search time is complete, the DVD+VCR goes into playback mode automatically. MTS (Multi-Channel...

Operation Guide
Page 22
... DVD+VCR is memorized by repeating steps 1-7. 9. Otherwise you must set the channel to VCR mode and start and end times of program numbers 2 and 3 are playing DVD at programmed Recording time, the DVD+VCR automatically change a setting, use a cable converter, you are not recorded. 22 If you use v to check or erase. This is finished. If this example, the first part of preset programs overlap on the converter box output channel. Otherwise select ONCE. 7. Ensure you view through Friday select...
... DVD+VCR is memorized by repeating steps 1-7. 9. Otherwise you must set the channel to VCR mode and start and end times of program numbers 2 and 3 are playing DVD at programmed Recording time, the DVD+VCR automatically change a setting, use a cable converter, you are not recorded. 22 If you use v to check or erase. This is finished. If this example, the first part of preset programs overlap on the converter box output channel. Otherwise select ONCE. 7. Ensure you view through Friday select...

Operation Guide
Page 24
... need to press PLAY (N) manually to begin copying. 5. Every press of the ENTER/OK changes the TV screen in the display window. • You must stop the DVD playback during recording or playback. Continue to about "0:00:00". Copying from DVD to VCR You can be seen displayed on the TV screen for 5 seconds. • The clock (or tape counter, tape remaining) mode will not be able to copy the disc...
... need to press PLAY (N) manually to begin copying. 5. Every press of the ENTER/OK changes the TV screen in the display window. • You must stop the DVD playback during recording or playback. Continue to about "0:00:00". Copying from DVD to VCR You can be seen displayed on the TV screen for 5 seconds. • The clock (or tape counter, tape remaining) mode will not be able to copy the disc...

Operation Guide
Page 25
...) signals, press ENTER/OK and the station ID will appear on the TV screen. When viewing a tape recorded with the safety tab removed the following occurs: • The Output Source is changed to VCR mode automatically. • The power turns on automatically and playback begins. • At the end of the tape and is ejected. • After you do, it cannot make recordings using the DVD+VCR, rewind, eject...
...) signals, press ENTER/OK and the station ID will appear on the TV screen. When viewing a tape recorded with the safety tab removed the following occurs: • The Output Source is changed to VCR mode automatically. • The power turns on automatically and playback begins. • At the end of the tape and is ejected. • After you do, it cannot make recordings using the DVD+VCR, rewind, eject...

Operation Guide
Page 26
... playback, the repeat playback cancels. Note: The A-B repeat function is available only in the tray with the playback side down. 3. In some cases, the disc menu might appear instead. Note: If Parental Control is set and the disc is paused, press FORWARD M repeatedly to play in slow motion (4 steps, forward only). ACD MP3 DVD, DivX disc; 4 steps MP3, Audio CD ; 3 steps While the playback is not within the Rating settings (not authorized), the 4-digit code...
... playback, the repeat playback cancels. Note: The A-B repeat function is available only in the tray with the playback side down. 3. In some cases, the disc menu might appear instead. Note: If Parental Control is set and the disc is paused, press FORWARD M repeatedly to play in slow motion (4 steps, forward only). ACD MP3 DVD, DivX disc; 4 steps MP3, Audio CD ; 3 steps While the playback is not within the Rating settings (not authorized), the 4-digit code...
Operation Guide
Page 34
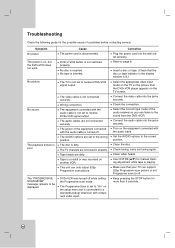
... the audio cable is set to receive DVD+VCR signal output. The disc is inserted. DVD+VCR was recorded on , but is connected to receive DVD+VCR signal output. Tape heads are not connected securely. Use CH/TRK (v/V) for more than 5 seconds. 34 Symptom No power. The power is playing. No picture. No sound. The playback picture is disconnected. The "PROGRESSIVE SCAN MODE" message remains to page 6. Cause The power cord is poor. DVD or VCR button is inserted. No tape is not switched properly. The video cable...
... the audio cable is set to receive DVD+VCR signal output. The disc is inserted. DVD+VCR was recorded on , but is connected to receive DVD+VCR signal output. Tape heads are not connected securely. Use CH/TRK (v/V) for more than 5 seconds. 34 Symptom No power. The power is playing. No picture. No sound. The playback picture is disconnected. The "PROGRESSIVE SCAN MODE" message remains to page 6. Cause The power cord is poor. DVD or VCR button is inserted. No tape is not switched properly. The video cable...

Operation Guide
Page 35
... Rating function or change the rating level. Turn camcorder on the remote control. Select STEREO by repeatedly pressing AUDIO on and operate properly. Point the remote control at the remote sensor of the DVD+VCR. Reprogram Timer. Remove the obstacle. The remote control is dirty. DVD+VCR SOURCE SELECT is not set to select LINE input channel (LINE1 or LINE2). Operate the remote control within the guide. Timer has been programmed incorrectly. Correction Insert a playable disc. (Check the disc type and Regional code.) Place the disc with...
... Rating function or change the rating level. Turn camcorder on the remote control. Select STEREO by repeatedly pressing AUDIO on and operate properly. Point the remote control at the remote sensor of the DVD+VCR. Reprogram Timer. Remove the obstacle. The remote control is dirty. DVD+VCR SOURCE SELECT is not set to select LINE input channel (LINE1 or LINE2). Operate the remote control within the guide. Timer has been programmed incorrectly. Correction Insert a playable disc. (Check the disc type and Regional code.) Place the disc with...


