
Operation Guide
Page 2
...literature accompanying the product. Reverse engineering or disassembly is operated in a particular installation. You should be authorized by LG Electronics U.S.A., Inc. 1000 Sylvan Avenue, Englewood Cliffs, NJ. Safety Precautions CAUTION RISK OF ELECTRIC SHOCK DO ...limits are recorded on the back of procedures other than those specified herein may result in the instruction manual. However, there is forbidden by method claims of this product, please read this equipment if an unauthorized... harmful interference when the product is prohibited. Model No XBV443 Serial No 2
...literature accompanying the product. Reverse engineering or disassembly is operated in a particular installation. You should be authorized by LG Electronics U.S.A., Inc. 1000 Sylvan Avenue, Englewood Cliffs, NJ. Safety Precautions CAUTION RISK OF ELECTRIC SHOCK DO ...limits are recorded on the back of procedures other than those specified herein may result in the instruction manual. However, there is forbidden by method claims of this product, please read this equipment if an unauthorized... harmful interference when the product is prohibited. Model No XBV443 Serial No 2
Operation Guide
Page 3
... has been exposed to protect it from tip-over - INTRODUCTION IMPORTANT SAFETY INSTRUCTIONS CAUTION: PLEASE READ AND OBSERVE ALL WARNINGS AND INSTRUCTIONS IN THIS OWNER'S MANUAL. Only use liquid cleaners. 12. All warnings on a bed, sofa, rug or other areas located near a bath tub, wash bowl, kitchen sink, laundry tub, in...
... has been exposed to protect it from tip-over - INTRODUCTION IMPORTANT SAFETY INSTRUCTIONS CAUTION: PLEASE READ AND OBSERVE ALL WARNINGS AND INSTRUCTIONS IN THIS OWNER'S MANUAL. Only use liquid cleaners. 12. All warnings on a bed, sofa, rug or other areas located near a bath tub, wash bowl, kitchen sink, laundry tub, in...

Operation Guide
Page 6
... disc. Do not expose the disc to direct sunlight or sources of heat, or leave it was originally packaged at the factory. In this owner's manual is not available on the TV screen. • If you insert a cassette tape without an erasure prevention tab while the DVD+VCR is in the...
... disc. Do not expose the disc to direct sunlight or sources of heat, or leave it was originally packaged at the factory. In this owner's manual is not available on the TV screen. • If you insert a cassette tape without an erasure prevention tab while the DVD+VCR is in the...
Operation Guide
Page 9
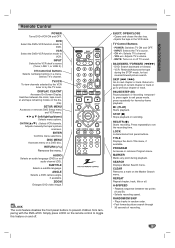
Remote Control POWER Turns DVD+VCR ON and OFF. DISPLAY, CLK/CNT Accesses On-Screen Display. b B v V (left/right/up/down) Selects menu options. Adjusts manually the tape's picture onscreen. RETURN (O) Removes the menu. Ejects the tape in random order. - CH +/-: Selects TV's channel. - MUTE: Turns on the remote control to ...
Remote Control POWER Turns DVD+VCR ON and OFF. DISPLAY, CLK/CNT Accesses On-Screen Display. b B v V (left/right/up/down) Selects menu options. Adjusts manually the tape's picture onscreen. RETURN (O) Removes the menu. Ejects the tape in random order. - CH +/-: Selects TV's channel. - MUTE: Turns on the remote control to ...

Operation Guide
Page 11
... With this connection, you CANNOT record one program while viewing another. PREPARATION Connections ips Depending on your TV and other devices as necessary to the manuals of your DVD+VCR. With this connection, you can receive all midband, super band, and hyperband channels. Please refer to make the best connections. This...
... With this connection, you CANNOT record one program while viewing another. PREPARATION Connections ips Depending on your TV and other devices as necessary to the manuals of your DVD+VCR. With this connection, you can receive all midband, super band, and hyperband channels. Please refer to make the best connections. This...

Operation Guide
Page 13
Digital Multi-channel sound A digital multi-channel connection provides the best sound quality. Check the receiver manual and the logos on the DVD+VCR to DVD playback using COAXIAL (X) and AUDIO OUT (A2) connections. L R AUDIO INPUT Amplifier (Receiver) COAXIAL DIGITAL INPUT Accessory ...
Digital Multi-channel sound A digital multi-channel connection provides the best sound quality. Check the receiver manual and the logos on the DVD+VCR to DVD playback using COAXIAL (X) and AUDIO OUT (A2) connections. L R AUDIO INPUT Amplifier (Receiver) COAXIAL DIGITAL INPUT Accessory ...
Operation Guide
Page 15
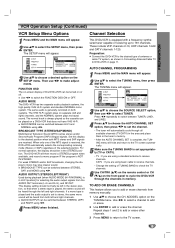
...) is set the channel. • The tuner will automatically cycle through the channels in HI-FI position] for selecting the audio output signals from memory manually. 1 Use v/V to receive channels. Press b/B repeatedly to switch between HI-FI and NORMAL using a standard antenna to choose the CH. TO ADD OR ERASE CHANNELS...
...) is set the channel. • The tuner will automatically cycle through the channels in HI-FI position] for selecting the audio output signals from memory manually. 1 Use v/V to receive channels. Press b/B repeatedly to switch between HI-FI and NORMAL using a standard antenna to choose the CH. TO ADD OR ERASE CHANNELS...

Operation Guide
Page 16
The Auto Clock Set feature is set AM and PM correctly.) (AM does not appear.) The initial Clock Setting is JANUARY 1, 2004, 12:00 AM. Manual Clock Set 1 Press MENU and the MAIN menu will appear. 2 Use v/V to choose AUTO, ON, or OFF. If set to "ON", an incorrect date and... adjusts the clock for Daylight Saving Time automatically. 8 Press MENU when finished. If "AUTO" is set the time and date: the Auto Clock Feature or manually. If you choose AUTO, the VCR sets the clock using the DST information broadcast in a broadcast signal. 6 Press MENU when finished. 7 Turn off . Auto ...
The Auto Clock Set feature is set AM and PM correctly.) (AM does not appear.) The initial Clock Setting is JANUARY 1, 2004, 12:00 AM. Manual Clock Set 1 Press MENU and the MAIN menu will appear. 2 Use v/V to choose AUTO, ON, or OFF. If set to "ON", an incorrect date and... adjusts the clock for Daylight Saving Time automatically. 8 Press MENU when finished. If "AUTO" is set the time and date: the Auto Clock Feature or manually. If you choose AUTO, the VCR sets the clock using the DST information broadcast in a broadcast signal. 6 Press MENU when finished. 7 Turn off . Auto ...

Operation Guide
Page 17
... the features on the on the disc. If no button is not permitted by the elapsed time directly. PREPARATION DVD Operation Setup General Explanation This manual gives the basic instructions for 10 seconds, the on the TV screen. When this point Action prohibited or not available otes Some discs may not...
... the features on the on the disc. If no button is not permitted by the elapsed time directly. PREPARATION DVD Operation Setup General Explanation This manual gives the basic instructions for 10 seconds, the on the TV screen. When this point Action prohibited or not available otes Some discs may not...

Operation Guide
Page 21
... skipping commercials or short program segments. 1 Press CM SKIP during playback, press either direction: forward or reverse. 1 Press BACKWARD (m) or FORWARD (M) during this period. 21 Manual Tracking If noise appears on the TV screen. CM SKIP (Commercial Skip) This is complete, the DVD+VCR will automatically change to playback mode. 2 To...
... skipping commercials or short program segments. 1 Press CM SKIP during playback, press either direction: forward or reverse. 1 Press BACKWARD (m) or FORWARD (M) during this period. 21 Manual Tracking If noise appears on the TV screen. CM SKIP (Commercial Skip) This is complete, the DVD+VCR will automatically change to playback mode. 2 To...

Operation Guide
Page 24
... of the recording, the DVD+VCR will go into Play mode and the VCR will stop the Copy process manually when the DVD movie ends, or the unit may need to press N (PLAY) manually to begin , press DVD+VCR's REC/ITR (z) once to start position. The recalled setting will appear on the...
... of the recording, the DVD+VCR will go into Play mode and the VCR will stop the Copy process manually when the DVD movie ends, or the unit may need to press N (PLAY) manually to begin , press DVD+VCR's REC/ITR (z) once to start position. The recalled setting will appear on the...

Operation Guide
Page 26
... power stays on the tape during recording or playback. The Output Source is changed to the DVD+VCR for S-VHS Quasi Playback. Additional Information In manual recording, Timer recording, Instant Timer Recording, playback, or fast forward modes, the DVD+VCR automatically starts rewinding the tape at the beginning of the tape...
... power stays on the tape during recording or playback. The Output Source is changed to the DVD+VCR for S-VHS Quasi Playback. Additional Information In manual recording, Timer recording, Instant Timer Recording, playback, or fast forward modes, the DVD+VCR automatically starts rewinding the tape at the beginning of the tape...
Operation Guide
Page 35
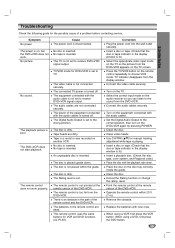
... the Rating function or change the rating level. Remove the obstacle. No disc is a rental or was recorded on another VCR. TV/VCR mode for manual tracking adjustment while tape is not pointed at the remote sensor of the DVD+VCR. The audio cables are dirty. Tape heads are not connected...
... the Rating function or change the rating level. Remove the obstacle. No disc is a rental or was recorded on another VCR. TV/VCR mode for manual tracking adjustment while tape is not pointed at the remote sensor of the DVD+VCR. The audio cables are dirty. Tape heads are not connected...


