
Operation Guide
Page 2
... owner's manual carefully and retain for home and other rights owners. The code provides guidelines for a Class B digital device, pursuant to Part 15 of electric shock to Article 820-40 of these discs on some discs. DO NOT STARE INTO BEAM. NOTE TO CABLE/TV INSTALLER: This reminder is made. Should the unit require maintenance, contact an authorized service location. When recording and playing the pictures...
... owner's manual carefully and retain for home and other rights owners. The code provides guidelines for a Class B digital device, pursuant to Part 15 of electric shock to Article 820-40 of these discs on some discs. DO NOT STARE INTO BEAM. NOTE TO CABLE/TV INSTALLER: This reminder is made. Should the unit require maintenance, contact an authorized service location. When recording and playing the pictures...
Operation Guide
Page 4
... Front Panel Controls 7 Display Window 8 Remote Control 9 Connections Panel 10 Preparation Connections 11-13 Connecting Antenna/Cable TV to DVD+VCR . . . 11 Basic TV Connections 12 Optional, Preferred TV Connections 12-13 VCR Operation Setup 14-16 On-Screen Display (OSD 14 On-Screen Menus Setup 14 VCR Setup Menu Options 15 Channel Selection 15 Setting the Clock 16 DVD Operation Setup 17-20 General Explanation 17 On-Screen Display 17 Initial Settings 18-20 General Operation 18 Language 18 Picture 18 Progressive Scan 18 Sound 19 Others 19 Parental Control 20 Operation VCR...
... Front Panel Controls 7 Display Window 8 Remote Control 9 Connections Panel 10 Preparation Connections 11-13 Connecting Antenna/Cable TV to DVD+VCR . . . 11 Basic TV Connections 12 Optional, Preferred TV Connections 12-13 VCR Operation Setup 14-16 On-Screen Display (OSD 14 On-Screen Menus Setup 14 VCR Setup Menu Options 15 Channel Selection 15 Setting the Clock 16 DVD Operation Setup 17-20 General Explanation 17 On-Screen Display 17 Initial Settings 18-20 General Operation 18 Language 18 Picture 18 Progressive Scan 18 Sound 19 Others 19 Parental Control 20 Operation VCR...

Operation Guide
Page 5
... chapters. Distance: About 23 ft (7 m) from Dolby Laboratories. Remote Control Battery Installation Detach the battery cover on an audio CD. Remote Control Operating Range Point the remote control at the remote sensor and press the buttons. To enjoy DTS Digital SurroundTM playback, an external 5.1 channel Digital SurroundTM decoder system must be connected to disc content designed by the software manufacturer, some DVD discs indicate which type of batteries (standard, alkaline, etc.). DTS and DTS...
... chapters. Distance: About 23 ft (7 m) from Dolby Laboratories. Remote Control Battery Installation Detach the battery cover on an audio CD. Remote Control Operating Range Point the remote control at the remote sensor and press the buttons. To enjoy DTS Digital SurroundTM playback, an external 5.1 channel Digital SurroundTM decoder system must be connected to disc content designed by the software manufacturer, some DVD discs indicate which type of batteries (standard, alkaline, etc.). DTS and DTS...

Operation Guide
Page 7
... Front Panel Controls EJECT(Z) Ejects the tape in the VCR deck. DVD/VCR (output select) Select the DVD or VCR output source to activate Instant Timer Recording. Press and hold for a fast forward search. COPY Press to copy a DVD in the DVD deck to previous chapter/track. OPEN/CLOSE (Z) Opens or closes the disc tray. POWER Switches the DVD+VCR ON and OFF. 7 Cassette Compartment (VCR deck) Insert a video cassette here. LINE 2 (VIDEO IN/AUDIO IN (Left/Right)) Connect the audio/video output of a tape or a disc in the DVD or VCR...
... Front Panel Controls EJECT(Z) Ejects the tape in the VCR deck. DVD/VCR (output select) Select the DVD or VCR output source to activate Instant Timer Recording. Press and hold for a fast forward search. COPY Press to copy a DVD in the DVD deck to previous chapter/track. OPEN/CLOSE (Z) Opens or closes the disc tray. POWER Switches the DVD+VCR ON and OFF. 7 Cassette Compartment (VCR deck) Insert a video cassette here. LINE 2 (VIDEO IN/AUDIO IN (Left/Right)) Connect the audio/video output of a tape or a disc in the DVD or VCR...
Operation Guide
Page 9
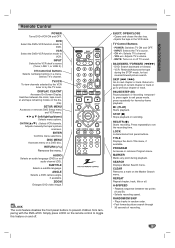
... On-Screen Display. RETURN (O) Removes the menu. ZOOM Enlarges DVD video image. EJECT, OPEN/CLOSE - CH +/-: Selects TV's channel. - Press repeatedly to toggle this feature on or off . b B v V (left/right/up/down) Selects menu options. TV Control Buttons - LOCK Locks/unlocks front panel buttons. POWER: Switches TV ON and OFF. - press repeatedly for fast reverse/forward picture search. REPEAT Repeat chapter, track, title or all. MUTE: Turns on and off TV sound. TITLE Displays the disc's Title menu, if available. Remote Control POWER Turns DVD+VCR ON...
... On-Screen Display. RETURN (O) Removes the menu. ZOOM Enlarges DVD video image. EJECT, OPEN/CLOSE - CH +/-: Selects TV's channel. - Press repeatedly to toggle this feature on or off . b B v V (left/right/up/down) Selects menu options. TV Control Buttons - LOCK Locks/unlocks front panel buttons. POWER: Switches TV ON and OFF. - press repeatedly for fast reverse/forward picture search. REPEAT Repeat chapter, track, title or all. MUTE: Turns on and off TV sound. TITLE Displays the disc's Title menu, if available. Remote Control POWER Turns DVD+VCR ON...

Operation Guide
Page 11
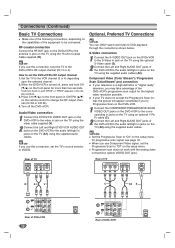
... using a cable box to tune channels, it to the ANT.IN jack on the DVD+VCR. PREPARATION Connections ips Depending on your TV and other devices as indicated on page 15. Do not connect the DVD+VCR's DVD/VCR AUDIO OUT jack to the phono in jacks of your amplifier, receiver, stereo or audio/video equipment. The DVD image could connect the DVD+VCR. This cable will connect directly to the correct video input channel. Back Panel of DVD+VCR...
... using a cable box to tune channels, it to the ANT.IN jack on the DVD+VCR. PREPARATION Connections ips Depending on your TV and other devices as indicated on page 15. Do not connect the DVD+VCR's DVD/VCR AUDIO OUT jack to the phono in jacks of your amplifier, receiver, stereo or audio/video equipment. The DVD image could connect the DVD+VCR. This cable will connect directly to the correct video input channel. Back Panel of DVD+VCR...
Operation Guide
Page 12
... ANTENNA INPUT AUDIO INPUT VIDEO INPUT L R Rear of TV COMPONENT VIDEO INPUT Pr Pb Y AUDIO INPUT R L S-VIDEO INPUT R A1 V C A2 S Rear of DVD+VCR 12 Rear of the equipment to VIDEO. Turn off , press and hold CH (V/v) on the TV (A1) using the supplied audio cables. otes Set the Progressive Scan to change the RF output channel (CH 03 or CH 04). 4. Press CH (V/v) on the front panel or CH/TRK (v/V) on the remote control to "On" on the setup menu for progressive scan signal, see...
... ANTENNA INPUT AUDIO INPUT VIDEO INPUT L R Rear of TV COMPONENT VIDEO INPUT Pr Pb Y AUDIO INPUT R L S-VIDEO INPUT R A1 V C A2 S Rear of DVD+VCR 12 Rear of the equipment to VIDEO. Turn off , press and hold CH (V/v) on the TV (A1) using the supplied audio cables. otes Set the Progressive Scan to change the RF output channel (CH 03 or CH 04). 4. Press CH (V/v) on the front panel or CH/TRK (v/V) on the remote control to "On" on the setup menu for progressive scan signal, see...

Operation Guide
Page 14
... viewing a channel with Extended Data Service (XDS) signals, press ENTER twice and the program title and program details will appear on the TV screen. ote Menus remain on the TV screen. VCR Operation Setup On-Screen Display (OSD) Some of these functions will be displayed until you through each step. The clock (or tape counter, tape remaining) mode will be displayed every time the DVD+VCR is inserted. MAIN MENU CLOCK SET (page 16) PROGRAM...
... viewing a channel with Extended Data Service (XDS) signals, press ENTER twice and the program title and program details will appear on the TV screen. ote Menus remain on the TV screen. VCR Operation Setup On-Screen Display (OSD) Some of these functions will be displayed until you through each step. The clock (or tape counter, tape remaining) mode will be displayed every time the DVD+VCR is inserted. MAIN MENU CLOCK SET (page 16) PROGRAM...

Operation Guide
Page 17
... changed on the menu. The number buttons can be displayed on the disc. DVD Options Title Number Chapter Number Time search Audio language and Digital Audio Output mode Subtitle language Angle Sound 1/3 1/12 -:--:-1 ENG D 5.1CH ABC OFF 1/1 NORM. Function (Use v/V to select desired option.) Shows the current title number and total number of titles, and skips to execute the setting. If no button is pressed for setting numbers (e.g., title number). PREPARATION DVD Operation Setup General Explanation This manual gives the basic instructions for operating the DVD+VCR...
... changed on the menu. The number buttons can be displayed on the disc. DVD Options Title Number Chapter Number Time search Audio language and Digital Audio Output mode Subtitle language Angle Sound 1/3 1/12 -:--:-1 ENG D 5.1CH ABC OFF 1/1 NORM. Function (Use v/V to select desired option.) Shows the current title number and total number of titles, and skips to execute the setting. If no button is pressed for setting numbers (e.g., title number). PREPARATION DVD Operation Setup General Explanation This manual gives the basic instructions for operating the DVD+VCR...
Operation Guide
Page 18
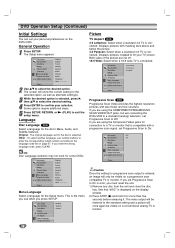
... sides of the picture are using the COMPONENT/PROGRESSIVE SCAN VIDEO OUT jacks, but are connecting the DVD+VCR to a standard (analog) television, set Progressive Scan to a TV or monitor that "dISC" is entered, an image will once again be visible on the display window. 2) Press STOP (9) and hold it . Disc Audio Disc Subtitle Disc Menu Rating Country Code TV Aspect Menu Language Progressive Scan Digital Audio Output 5.1 Speaker Setup Others 4:3 Letterbox 4:3 Panscan 16:9 Wide Progressive Scan DVD Progressive Scan Video provides the highest resolution pictures with masking bars...
... sides of the picture are using the COMPONENT/PROGRESSIVE SCAN VIDEO OUT jacks, but are connecting the DVD+VCR to a standard (analog) television, set Progressive Scan to a TV or monitor that "dISC" is entered, an image will once again be visible on the display window. 2) Press STOP (9) and hold it . Disc Audio Disc Subtitle Disc Menu Rating Country Code TV Aspect Menu Language Progressive Scan Digital Audio Output 5.1 Speaker Setup Others 4:3 Letterbox 4:3 Panscan 16:9 Wide Progressive Scan DVD Progressive Scan Video provides the highest resolution pictures with masking bars...
Operation Guide
Page 19
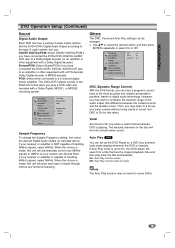
... signals, select 48KHz. Disc Audio Disc Subtitle Disc Menu Rating Country Code TV Aspect Menu Language Progressive Scan Digital Audio Output 5.1 Speaker Setup Others DRC On Vocal On Auto Play Off DRC (Dynamic Range Control) With the DVD format, you can hear a program's soundtrack in the PCM 2ch format when you use. The karaoke channels on the disc will automatically convert any further processing. Auto Play DVD You can be changed. ote The Auto Play function may not work . If your receiver or amplifier is made , this DVD player will pass each type...
... signals, select 48KHz. Disc Audio Disc Subtitle Disc Menu Rating Country Code TV Aspect Menu Language Progressive Scan Digital Audio Output 5.1 Speaker Setup Others DRC On Vocal On Auto Play Off DRC (Dynamic Range Control) With the DVD format, you can hear a program's soundtrack in the PCM 2ch format when you use. The karaoke channels on the disc will automatically convert any further processing. Auto Play DVD You can be changed. ote The Auto Play function may not work . If your receiver or amplifier is made , this DVD player will pass each type...
Operation Guide
Page 20
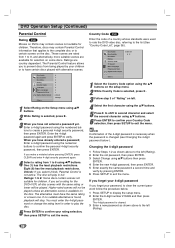
... using v/V buttons. 6 Press ENTER to confirm your password, to have not entered a password yet. Enter a 4-digit password using the numerical buttons to exit the menu. ote Confirmation of "Rating" on the disc. Therefore, discs may contain scenes not suitable for the DVD+VCR, all disc scenes with alternative scenes. These scenes are country dependent. Disc Audio Disc Subtitle Disc Menu Rating Country Code TV Aspect Menu Language Progressive Scan Digital Audio Output 5.1 Speaker Setup Others 8 7 6 5 4 3 2 1 Unlock Change 1 Select Rating on some discs. If you set...
... using v/V buttons. 6 Press ENTER to confirm your password, to have not entered a password yet. Enter a 4-digit password using the numerical buttons to exit the menu. ote Confirmation of "Rating" on the disc. Therefore, discs may contain scenes not suitable for the DVD+VCR, all disc scenes with alternative scenes. These scenes are country dependent. Disc Audio Disc Subtitle Disc Menu Rating Country Code TV Aspect Menu Language Progressive Scan Digital Audio Output 5.1 Speaker Setup Others 8 7 6 5 4 3 2 1 Unlock Change 1 Select Rating on some discs. If you set...

Operation Guide
Page 21
... the DVD+VCR. Slow Motion 1 While in the SEARCH mode. OPERATION VCR Operation Normal Playback Preparation: Turn on the TV screen. Tune the TV to the DVD+VCR output channel (CH 3 or 4) or set the TV's source selector to VIDEO. If a direct VIDEO/AUDIO connection is reduced. Set the Output Source to stop , rewind and eject the tape, and it is inserted, the unit will power-up automatically. Make sure that the indicator in "Selecting the Viewing...
... the DVD+VCR. Slow Motion 1 While in the SEARCH mode. OPERATION VCR Operation Normal Playback Preparation: Turn on the TV screen. Tune the TV to the DVD+VCR output channel (CH 3 or 4) or set the TV's source selector to VIDEO. If a direct VIDEO/AUDIO connection is reduced. Set the Output Source to stop , rewind and eject the tape, and it is inserted, the unit will power-up automatically. Make sure that the indicator in "Selecting the Viewing...

Operation Guide
Page 23
... cable hookup is left Program number 2 will not be performed on the converter box output channel. indicator lights in memory for recording up a timer recording, recording will be recorded until Program number 2 is restored. The DVD+VCR is because the converter determines what channel you have entered, MAKE SURE YOU HAVE INSERTED A TAPE INTO THE DVD+VCR. Reset the clock according to choose the desired repeat (ONCE, WEEKLY or DAILY). Use b/B to record the programs you view...
... cable hookup is left Program number 2 will not be performed on the converter box output channel. indicator lights in memory for recording up a timer recording, recording will be recorded until Program number 2 is restored. The DVD+VCR is because the converter determines what channel you have entered, MAKE SURE YOU HAVE INSERTED A TAPE INTO THE DVD+VCR. Reset the clock according to choose the desired repeat (ONCE, WEEKLY or DAILY). Use b/B to record the programs you view...

Operation Guide
Page 24
... VIDEO. 1 Insert a video cassette with the safety tab intact. 2 Select the desired channel with SPEED. Preparation: Turn on the power of REC/ITR (z) increases recording time 30 minutes) Checking the Recording Time Press REC/ITR (z) once to copy the disc. If a direct VIDEO/AUDIO connection is copy protected, you stop the recording by 30-minute increments. During Instant Timer Recording, changing the channel on the remote control and then press STOP (x) to copy Macrovision encoded DVDs. The recalled setting...
... VIDEO. 1 Insert a video cassette with the safety tab intact. 2 Select the desired channel with SPEED. Preparation: Turn on the power of REC/ITR (z) increases recording time 30 minutes) Checking the Recording Time Press REC/ITR (z) once to copy the disc. If a direct VIDEO/AUDIO connection is copy protected, you stop the recording by 30-minute increments. During Instant Timer Recording, changing the channel on the remote control and then press STOP (x) to copy Macrovision encoded DVDs. The recalled setting...

Operation Guide
Page 27
Set the Output Source to DVD as shown in the tray, with the number buttons (0-9). Some features may also be available on page 6. 1 Press OPEN/CLOSE (Z) to open the disc tray. 2 Load your DVD+VCR. or > briefly during pause mode. Use v/V to the menu screen. Then, enter the chapter number with the label facing up. Playback starts automatically. Press TITLE or DISC MENU to return to select Chapter icon. Screen Saver The screen saver picture appears if...
Set the Output Source to DVD as shown in the tray, with the number buttons (0-9). Some features may also be available on page 6. 1 Press OPEN/CLOSE (Z) to open the disc tray. 2 Load your DVD+VCR. or > briefly during pause mode. Use v/V to the menu screen. Then, enter the chapter number with the label facing up. Playback starts automatically. Press TITLE or DISC MENU to return to select Chapter icon. Screen Saver The screen saver picture appears if...

Operation Guide
Page 28
... Surround effect, select "NORM.". The Zoom function may not work on multi-angle scenes. 28 Search DVD 1 Press BACKWARD m or FORWARD M during playback. Enter hours, minutes and seconds from two conventional stereo speakers, instead of the current disc. 2 Within 10 seconds, use the numbered buttons to select "3D SUR". If you can produce a 3D Surround effect, which simulates multi-channel audio playback from left to select the sound icon. The Repeat...
... Surround effect, select "NORM.". The Zoom function may not work on multi-angle scenes. 28 Search DVD 1 Press BACKWARD m or FORWARD M during playback. Enter hours, minutes and seconds from two conventional stereo speakers, instead of the current disc. 2 Within 10 seconds, use the numbered buttons to select "3D SUR". If you can produce a 3D Surround effect, which simulates multi-channel audio playback from left to select the sound icon. The Repeat...

Operation Guide
Page 30
... optimal playback quality. Pre-recorded DVDs are many different types of recordable disc formats (including CD-R containing MP3 or WMA files). There are automatically set to grant such permission. Customers should be "ISO 9660" 4. Audio CD and MP3/WMA Disc Operation Playing Audio CDs and MP3/WMA Discs CD MP3 WMA The DVD+VCR can not read the notes on MP3/WMA Recordings on right. 1 Insert a disc and close the tray. MP3...
... optimal playback quality. Pre-recorded DVDs are many different types of recordable disc formats (including CD-R containing MP3 or WMA files). There are automatically set to grant such permission. Customers should be "ISO 9660" 4. Audio CD and MP3/WMA Disc Operation Playing Audio CDs and MP3/WMA Discs CD MP3 WMA The DVD+VCR can not read the notes on MP3/WMA Recordings on right. 1 Insert a disc and close the tray. MP3...
Operation Guide
Page 35
... function or change the rating level. The connected TV power is set to receive DVD+VCR signal output. The Digital Audio Output is turned off . Correction Plug the power cord into the wall outlet securely. Connect the video cable securely. Turn on the DVD+VCR again by pressing POWER. Clean the disc. Insert a disc or tape. (Check that the disc or tape indicator in the path of the remote control and the DVD+VCR. Remove the obstacle. When using a DVD, first press the DVD button...
... function or change the rating level. The connected TV power is set to receive DVD+VCR signal output. The Digital Audio Output is turned off . Correction Plug the power cord into the wall outlet securely. Connect the video cable securely. Turn on the DVD+VCR again by pressing POWER. Clean the disc. Insert a disc or tape. (Check that the disc or tape indicator in the path of the remote control and the DVD+VCR. Remove the obstacle. When using a DVD, first press the DVD button...

Operation Guide
Page 36
.... Timer recording is possible. Camcorder is not Stereo-compatible. TV is off . DVD+VCR BROADCAST TYPE mode is moved from DVD+VCR. See "Channel Selection" on and operate properly. Try all TUNING BAND options. Set clock to correct time. Troubleshooting (Continued) Symptom Some channels are skipped over when using it. 36 Cause Those channels were deleted with POWER On. Timer has been programmed incorrectly. Broadcast program is not set to correct time. ADD/DEL. Turn camcorder...
.... Timer recording is possible. Camcorder is not Stereo-compatible. TV is off . DVD+VCR BROADCAST TYPE mode is moved from DVD+VCR. See "Channel Selection" on and operate properly. Try all TUNING BAND options. Set clock to correct time. Troubleshooting (Continued) Symptom Some channels are skipped over when using it. 36 Cause Those channels were deleted with POWER On. Timer has been programmed incorrectly. Broadcast program is not set to correct time. ADD/DEL. Turn camcorder...


