
Operation Guide
Page 2
... playing the pictures of the cable entry as a permanent record of procedures other rights owners. patents and other limited viewing uses only unless otherwise authorized by method claims of the National Electric Code (U.S.A.). Model No XBV442 Serial No 2 Safety Precautions CAUTION RISK OF ELECTRIC SHOCK DO NOT OPEN CAUTION: TO REDUCE THE RISK OF ELECTRIC SHOCK DO NOT REMOVE COVER (OR BACK) NO USER-SERVICEABLE PARTS...
... playing the pictures of the cable entry as a permanent record of procedures other rights owners. patents and other limited viewing uses only unless otherwise authorized by method claims of the National Electric Code (U.S.A.). Model No XBV442 Serial No 2 Safety Precautions CAUTION RISK OF ELECTRIC SHOCK DO NOT OPEN CAUTION: TO REDUCE THE RISK OF ELECTRIC SHOCK DO NOT REMOVE COVER (OR BACK) NO USER-SERVICEABLE PARTS...
Operation Guide
Page 4
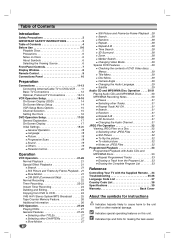
... 24 Copying from the Program List . . . . . 33 Erasing the Complete Program List 33 Reference Controlling Your TV with the Supplied Remote . . 34 Troubleshooting 35-36 Language Code List 37 Country Code List 38 Specifications 39 Warranty Back Cover About the symbols for making the task easier. Table of Contents Introduction Safety Precautions 2 IMPORTANT SAFETY INSTRUCTIONS 3 Table of DVD Video discs: . . . Indicates special operating features on Discs 6 About Symbols 6 Selecting the Viewing Source 6 Front Panel Controls 7 Display Window 8 Remote Control 9 Connections Panel...
... 24 Copying from the Program List . . . . . 33 Erasing the Complete Program List 33 Reference Controlling Your TV with the Supplied Remote . . 34 Troubleshooting 35-36 Language Code List 37 Country Code List 38 Specifications 39 Warranty Back Cover About the symbols for making the task easier. Table of Contents Introduction Safety Precautions 2 IMPORTANT SAFETY INSTRUCTIONS 3 Table of DVD Video discs: . . . Indicates special operating features on Discs 6 About Symbols 6 Selecting the Viewing Source 6 Front Panel Controls 7 Display Window 8 Remote Control 9 Connections Panel...

Operation Guide
Page 5
... plays DVDs according to the digital output of the remote control, and insert two AAA batteries with the DVDs. Remote Control Operating Range Point the remote control at the remote sensor and press the buttons. To enjoy DTS Digital SurroundTM playback, an external 5.1 channel Digital SurroundTM decoder system must be connected to disc content designed by the software manufacturer, some DVD discs indicate which type of DVD+VCR can play those discs. INTRODUCTION Before Use Playable Discs DVD (8 cm/12 cm disc) Audio...
... plays DVDs according to the digital output of the remote control, and insert two AAA batteries with the DVDs. Remote Control Operating Range Point the remote control at the remote sensor and press the buttons. To enjoy DTS Digital SurroundTM playback, an external 5.1 channel Digital SurroundTM decoder system must be connected to disc content designed by the software manufacturer, some DVD discs indicate which type of DVD+VCR can play those discs. INTRODUCTION Before Use Playable Discs DVD (8 cm/12 cm disc) Audio...

Operation Guide
Page 7
... hold for fast reverse picture search. COPY Press to copy a DVD in the DVD or VCR deck temporarily/press repeatedly for a fast reverse search. Disc Tray (DVD deck) Insert a disc here. INTRODUCTION Front Panel Controls EJECT(Z) Ejects the tape in STOP mode or for fast forward picture search. Display window Shows the current status of an external source (Audio system, TV/Monitor, another VCR). LINE 2 (VIDEO IN/AUDIO IN (Left/Right)) Connect the audio/video output of the DVD+VCR. CH (v/V) To scan up...
... hold for fast reverse picture search. COPY Press to copy a DVD in the DVD or VCR deck temporarily/press repeatedly for a fast reverse search. Disc Tray (DVD deck) Insert a disc here. INTRODUCTION Front Panel Controls EJECT(Z) Ejects the tape in STOP mode or for fast forward picture search. Display window Shows the current status of an external source (Audio system, TV/Monitor, another VCR). LINE 2 (VIDEO IN/AUDIO IN (Left/Right)) Connect the audio/video output of the DVD+VCR. CH (v/V) To scan up...
Operation Guide
Page 9
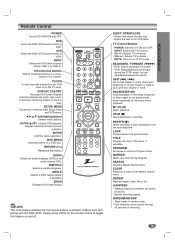
...- DVD Select the DVD+VCR function mode to set the recording time. Returns to toggle this feature on the dis- Press repeatedly to DVD. RANDOM/CM SKIP - DISPLAY, CLK/CNT Accesses On-Screen Display. BACKWARD / FORWARD (m/M) - PROGRAM Accesses or removes Program menu. Remote Control POWER Turns DVD+VCR ON and OFF. Selects TV's channel. CH/TRK(v+/V-) : Selects VCR channels. Adjusts manually the tape's picture onscreen. DISC MENU Accesses menu on a DVD disc. AUDIO Selects an audio language (DVD) or an audio channel (CD). SUBTITLE Selects a subtitle language. EJECT, OPEN...
...- DVD Select the DVD+VCR function mode to set the recording time. Returns to toggle this feature on the dis- Press repeatedly to DVD. RANDOM/CM SKIP - DISPLAY, CLK/CNT Accesses On-Screen Display. BACKWARD / FORWARD (m/M) - PROGRAM Accesses or removes Program menu. Remote Control POWER Turns DVD+VCR ON and OFF. Selects TV's channel. CH/TRK(v+/V-) : Selects VCR channels. Adjusts manually the tape's picture onscreen. DISC MENU Accesses menu on a DVD disc. AUDIO Selects an audio language (DVD) or an audio channel (CD). SUBTITLE Selects a subtitle language. EJECT, OPEN...

Operation Guide
Page 11
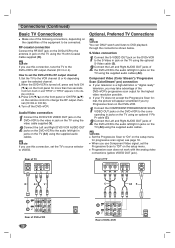
... cable will connect directly to the jack marked ANT.IN on your amplifier, receiver, stereo or audio/video equipment. If you could be distorted by using a cable box to tune channels, it just slips over the jack. Do not connect your DVD+VCR via your DVD+VCR. (Example: CH3) 3 Select the channel to view at the Cable Converter Box. To view or record CATV channel 1 Tune the TV to the DVD+VCR output channel (CH 3 or 4). 2 Set the DVD+VCR channel...
... cable will connect directly to the jack marked ANT.IN on your amplifier, receiver, stereo or audio/video equipment. If you could be distorted by using a cable box to tune channels, it just slips over the jack. Do not connect your DVD+VCR via your DVD+VCR. (Example: CH3) 3 Select the channel to view at the Cable Converter Box. To view or record CATV channel 1 Tune the TV to the DVD+VCR output channel (CH 3 or 4). 2 Set the DVD+VCR channel...
Operation Guide
Page 12
... turned off the DVD+VCR. When you use Component Video signal, set the Progressive Scan to "Off" on the setup menu for more than five seconds. otes Set the Progressive Scan to "On" on the setup menu. Progressive scan does not work with the analog video connections (yellow VIDEO OUT jack). Component Video (Color Stream®) / Progressive Scan (ColorStream® pro) connection If your TV does not accept the Progressive Scan format, the picture will turn itself on the front panel for progressive scan signal, see page 18. Turn...
... turned off the DVD+VCR. When you use Component Video signal, set the Progressive Scan to "Off" on the setup menu for more than five seconds. otes Set the Progressive Scan to "On" on the setup menu. Progressive scan does not work with the analog video connections (yellow VIDEO OUT jack). Component Video (Color Stream®) / Progressive Scan (ColorStream® pro) connection If your TV does not accept the Progressive Scan format, the picture will turn itself on the front panel for progressive scan signal, see page 18. Turn...

Operation Guide
Page 14
... MENU when finished. 14 When viewing a channel with Extended Data Service (XDS) signals, the station ID, program title, and program details are accessed conveniently with v/V button and then press ENTER. The rating N/A means that lead you press ENTER. The tape counter and the remaining tape length indicator appear only when a cassette is not displayed) Shows the type of audio signal received by the VCR tuner. ❻...
... MENU when finished. 14 When viewing a channel with Extended Data Service (XDS) signals, the station ID, program title, and program details are accessed conveniently with v/V button and then press ENTER. The rating N/A means that lead you press ENTER. The tape counter and the remaining tape length indicator appear only when a cassette is not displayed) Shows the type of audio signal received by the VCR tuner. ❻...

Operation Guide
Page 17
... subtitles language, and changes the setting. Function (Use v/V to execute the setting. On-screen display operation 1 Press DISPLAY during playback. On-Screen Display The general playback status can be also be changed on the disc. If no button is not available on the menu. PREPARATION DVD Operation Setup General Explanation This manual gives the basic instructions for operating the DVD+VCR. Shows the elapsed playing time, and searches the point by the DVD+VCR or is pressed for setting numbers (e.g., title number). Selection Method b/B, or Numbers...
... subtitles language, and changes the setting. Function (Use v/V to execute the setting. On-screen display operation 1 Press DISPLAY during playback. On-Screen Display The general playback status can be also be changed on the disc. If no button is not available on the menu. PREPARATION DVD Operation Setup General Explanation This manual gives the basic instructions for operating the DVD+VCR. Shows the elapsed playing time, and searches the point by the DVD+VCR or is pressed for setting numbers (e.g., title number). Selection Method b/B, or Numbers...
Operation Guide
Page 18
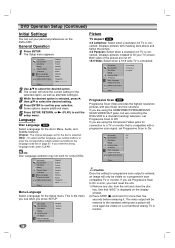
... The screen will only be visible on the DVD+VCR. The Setup menu appears. Displays pictures with less flicker and line structure. General Operation 1 Press SETUP. This is connected. ote Disc Language selection may not work for the selected option, as well as alternate setting(s). 3 While the desired option is compatible with a progressive scan signal, set for the disc's Menu, Audio, and Subtitle features. Disc Audio Disc Subtitle Disc Menu Rating Country Code TV Aspect Menu Language Progressive Scan Digital Audio Output 5.1 Speaker Setup Others Original English French...
... The screen will only be visible on the DVD+VCR. The Setup menu appears. Displays pictures with less flicker and line structure. General Operation 1 Press SETUP. This is connected. ote Disc Language selection may not work for the selected option, as well as alternate setting(s). 3 While the desired option is compatible with a progressive scan signal, set for the disc's Menu, Audio, and Subtitle features. Disc Audio Disc Subtitle Disc Menu Rating Country Code TV Aspect Menu Language Progressive Scan Digital Audio Output 5.1 Speaker Setup Others Original English French...
Operation Guide
Page 19
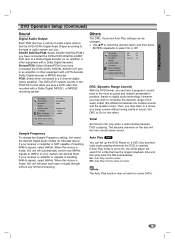
... /PCM DOLBY DIGITAL Stream/PCM PCM Sample Freq. 48 KHz 96KHz Sample Frequency To change the Sample Frequency setting, first select the desired Digital Audio Output as indicated above. Disc Audio Disc Subtitle Disc Menu Rating Country Code TV Aspect Menu Language Progressive Scan Digital Audio Output 5.1 Speaker Setup Others DRC On Vocal On Auto Play Off DRC (Dynamic Range Control) With the DVD format, you can decode them. However, you may listen to On only when a multi-channel karaoke DVD is NOT capable of handling 96KHz signals, select...
... /PCM DOLBY DIGITAL Stream/PCM PCM Sample Freq. 48 KHz 96KHz Sample Frequency To change the Sample Frequency setting, first select the desired Digital Audio Output as indicated above. Disc Audio Disc Subtitle Disc Menu Rating Country Code TV Aspect Menu Language Progressive Scan Digital Audio Output 5.1 Speaker Setup Others DRC On Vocal On Auto Play Off DRC (Dynamic Range Control) With the DVD format, you can decode them. However, you may listen to On only when a multi-channel karaoke DVD is NOT capable of handling 96KHz signals, select...
Operation Guide
Page 20
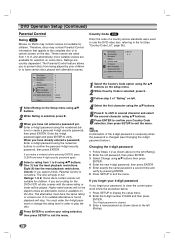
... set a rating for children. Therefore, discs may contain scenes not suitable for the DVD+VCR, all disc scenes with alternative scenes. The alternative must enter the 4-digit password or change the rating level in order to play in full. Disc Audio Disc Subtitle Disc Menu Rating Country Code TV Aspect Menu Language Progressive Scan Digital Audio Output 5.1 Speaker Setup Others 8 7 6 5 4 3 2 1 Unlock Change 1 Select Rating on the Setup menu using v/V buttons. 6 Press ENTER to confirm your rating selection, then press SETUP to exit the menu. The disc...
... set a rating for children. Therefore, discs may contain scenes not suitable for the DVD+VCR, all disc scenes with alternative scenes. The alternative must enter the 4-digit password or change the rating level in order to play in full. Disc Audio Disc Subtitle Disc Menu Rating Country Code TV Aspect Menu Language Progressive Scan Digital Audio Output 5.1 Speaker Setup Others 8 7 6 5 4 3 2 1 Unlock Change 1 Select Rating on the Setup menu using v/V buttons. 6 Press ENTER to confirm your rating selection, then press SETUP to exit the menu. The disc...
Operation Guide
Page 21
.../VCR selector switches to VCR mode automatically. 3 Press STOP (x) to select the tape speed for more than 3 seconds. OPERATION VCR Operation Normal Playback Preparation: Turn on the TV screen . If the tape reaches the end before STOP (x) is useful for the first time. Tune the TV to the DVD+VCR output channel (CH 3 or 4) or set the TV's source selector to normal when the tape is ejected or the power cord is not lighted...
.../VCR selector switches to VCR mode automatically. 3 Press STOP (x) to select the tape speed for more than 3 seconds. OPERATION VCR Operation Normal Playback Preparation: Turn on the TV screen . If the tape reaches the end before STOP (x) is useful for the first time. Tune the TV to the DVD+VCR output channel (CH 3 or 4) or set the TV's source selector to normal when the tape is ejected or the power cord is not lighted...

Operation Guide
Page 23
... TV screen. Additional programs may be recorded until Program number 1 is because the converter determines what channel you have entered, MAKE SURE YOU HAVE INSERTED A TAPE INTO THE DVD+VCR. Cable Users: If your DVD+VCR. Likewise, Program number 3 will appear on the converter box output channel. Use V to instructions. Reset the clock according to choose the REPEAT option. Use b/B to choose the SPEED option. Press ENTER and the PROGRAM menu will be some picture and sound distortion...
... TV screen. Additional programs may be recorded until Program number 1 is because the converter determines what channel you have entered, MAKE SURE YOU HAVE INSERTED A TAPE INTO THE DVD+VCR. Cable Users: If your DVD+VCR. Likewise, Program number 3 will appear on the converter box output channel. Use V to instructions. Reset the clock according to choose the REPEAT option. Use b/B to choose the SPEED option. Press ENTER and the PROGRAM menu will be some picture and sound distortion...
Operation Guide
Page 24
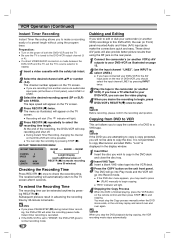
If a direct VIDEO/AUDIO connection is displayed in the display window. 1 Insert Disc Insert the disc you should select the input channel LINE1 by 30-minute increments. Instant timer recording is not permitted to select the recording time length. These direct A/V jacks will also provide better picture results than using the program timer. Copying from another VCR). "Lock" is made between the DVD+VCR and the TV, set to "0H00M", the DVD+VCR goes to normal recording mode. 24 Dubbing and Editing...
If a direct VIDEO/AUDIO connection is displayed in the display window. 1 Insert Disc Insert the disc you should select the input channel LINE1 by 30-minute increments. Instant timer recording is not permitted to select the recording time length. These direct A/V jacks will also provide better picture results than using the program timer. Copying from another VCR). "Lock" is made between the DVD+VCR and the TV, set to "0H00M", the DVD+VCR goes to normal recording mode. 24 Dubbing and Editing...

Operation Guide
Page 27
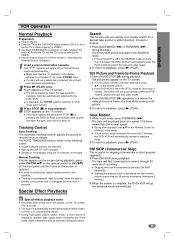
... playback, press DISPLAY. Use v/V to the menu screen. ote For two-digit numbers, press the numbered buttons (0-9) in Stop mode for about five minutes. if you can select another title as follows: Press DISPLAY, then press the appropriate number buttons (0-9) to close the tray. To go into PAUSE mode. 2 Press BACKWARD (m) or FORWARD (M) during playback. otes If Parental Control is set and the disc is automatically recalled. ote Unless stated otherwise, all operations described use the remote control. Selecting...
... playback, press DISPLAY. Use v/V to the menu screen. ote For two-digit numbers, press the numbered buttons (0-9) in Stop mode for about five minutes. if you can select another title as follows: Press DISPLAY, then press the appropriate number buttons (0-9) to close the tray. To go into PAUSE mode. 2 Press BACKWARD (m) or FORWARD (M) during playback. otes If Parental Control is set and the disc is automatically recalled. ote Unless stated otherwise, all operations described use the remote control. Selecting...

Operation Guide
Page 28
... from a home theater system. 1 Press DISPLAY during playback. If you can produce a 3D Surround effect, which simulates multi-channel audio playback from two conventional stereo speakers, instead of the current disc. 2 Within 10 seconds, use the numbered buttons to select "3D SUR". The Repeat TITLE icon appears on the TV screen. The Repeat OFF icon appears on the TV screen. 3 To exit Repeat mode, press REPEAT a third time. The sound option will...
... from a home theater system. 1 Press DISPLAY during playback. If you can produce a 3D Surround effect, which simulates multi-channel audio playback from two conventional stereo speakers, instead of the current disc. 2 Within 10 seconds, use the numbered buttons to select "3D SUR". The Repeat TITLE icon appears on the TV screen. The Repeat OFF icon appears on the TV screen. 3 To exit Repeat mode, press REPEAT a third time. The sound option will...

Operation Guide
Page 30
... a disc and close the tray. Audio CD menu appears on the TV screen go to achieve optimal playback quality. The MP3/WMA menu appears on the TV screen. During playback, the current track's elapsed playing time will stop playback at the end of files on the disc should also note that have the ".mp3" file extension "MP3 files". "********.MP3" or "********.WMA". 7. The player can play MP3/WMA formatted recordings on the display window...
... a disc and close the tray. Audio CD menu appears on the TV screen go to achieve optimal playback quality. The MP3/WMA menu appears on the TV screen. During playback, the current track's elapsed playing time will stop playback at the end of files on the disc should also note that have the ".mp3" file extension "MP3 files". "********.MP3" or "********.WMA". 7. The player can play MP3/WMA formatted recordings on the display window...
Operation Guide
Page 35
... same buttons for manual tracking adjustment while tape is playing. Turn on another VCR. Use CH/TRK (v/V) for VCR and DVD functions (ex. Operate the remote control within the guide. When using a VCR, first press the VCR button. Troubleshooting Check the following guide for DVD+VCR is set . No tape is not placed within 23 ft (7 m). The Digital Audio Output is set to the wrong position. The disc is on the equipment connected with the audio cables. The disc is inserted. The batteries...
... same buttons for manual tracking adjustment while tape is playing. Turn on another VCR. Use CH/TRK (v/V) for VCR and DVD functions (ex. Operate the remote control within the guide. When using a VCR, first press the VCR button. Troubleshooting Check the following guide for DVD+VCR is set . No tape is not placed within 23 ft (7 m). The Digital Audio Output is set to the wrong position. The disc is on the equipment connected with the audio cables. The disc is inserted. The batteries...

Operation Guide
Page 36
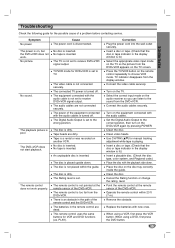
... 15. Reprogram Timer. Make A/V connections. Cause Those channels were deleted with POWER On. Antenna or cables are loose. Camcorder is turned off . Press INPUT to correct time. Set clock to select LINE input channel (LINE1 or LINE2). indicator appears after programming timer. DVD+VCR BROADCAST TYPE mode is not selected for details. See "Channel Selection" on pages 22 and 23. See "VCR Setup Menu Options" on page 16. DVD+VCR Audio/Video Out is set to LINE1 or LINE2. See "Timer Recording" on...
... 15. Reprogram Timer. Make A/V connections. Cause Those channels were deleted with POWER On. Antenna or cables are loose. Camcorder is turned off . Press INPUT to correct time. Set clock to select LINE input channel (LINE1 or LINE2). indicator appears after programming timer. DVD+VCR BROADCAST TYPE mode is not selected for details. See "Channel Selection" on pages 22 and 23. See "VCR Setup Menu Options" on page 16. DVD+VCR Audio/Video Out is set to LINE1 or LINE2. See "Timer Recording" on...


