

Owner's Manual
Page 2
...BEAM. Check the specification page of these conditions could lose the authority to provide reasonable protection against harmful interference in the instruction manual. This equipment generates, uses and can be of sufficient magnitude to constitute a risk of the following measures: • ...an equilateral triangle is intended to alert the user to the presence of uninsulated dangerous voltage within an equilateral triangle is : LG Electronics U.S.A., Inc.,1000 Sylvan Avenue, Englewood Cliffs, NJ. The exclamation point within the product's enclosure that may be determined...
...BEAM. Check the specification page of these conditions could lose the authority to provide reasonable protection against harmful interference in the instruction manual. This equipment generates, uses and can be of sufficient magnitude to constitute a risk of the following measures: • ...an equilateral triangle is intended to alert the user to the presence of uninsulated dangerous voltage within an equilateral triangle is : LG Electronics U.S.A., Inc.,1000 Sylvan Avenue, Englewood Cliffs, NJ. The exclamation point within the product's enclosure that may be determined...

Owner's Manual
Page 3
... with dry cloth. - Do not install near any ventilation openings. IMPORTANT SAFETY INSTRUCTIONS CAUTION: PLEASE READ AND OBSERVE ALL WARNINGS AND INSTRUCTIONS IN THIS OWNER'S MANUAL. RETAIN THIS BOOKLET FOR FUTURE REFERENCE. Improper use this product from the apparatus. 11. REFER SERVICING TO QUALIFIED SERVICE PERSONNEL ONLY. 1. Read these instructions. - All...
... with dry cloth. - Do not install near any ventilation openings. IMPORTANT SAFETY INSTRUCTIONS CAUTION: PLEASE READ AND OBSERVE ALL WARNINGS AND INSTRUCTIONS IN THIS OWNER'S MANUAL. RETAIN THIS BOOKLET FOR FUTURE REFERENCE. Improper use this product from the apparatus. 11. REFER SERVICING TO QUALIFIED SERVICE PERSONNEL ONLY. 1. Read these instructions. - All...

Owner's Manual
Page 4
INTRODUCTION RECORDING About the Symbol Display 5 Symbol Used in this Manual 5 Notes on Discs 5 Moisture Condensation 5 Recordable and Playable Discs 6 Recommended recordable DVD discs . . . . . .6 Playable Discs 7 Regional Code 7 About the Remote Control 7 Restrictions on video recording 8 ...
INTRODUCTION RECORDING About the Symbol Display 5 Symbol Used in this Manual 5 Notes on Discs 5 Moisture Condensation 5 Recordable and Playable Discs 6 Recommended recordable DVD discs . . . . . .6 Playable Discs 7 Regional Code 7 About the Remote Control 7 Restrictions on video recording 8 ...
Owner's Manual
Page 5
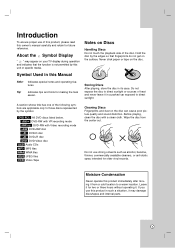
... it from the center out. Never stick paper or tape on the surface. A section whose title has one of this product, please read this owner's manual carefully and retain for future reference. Do not use of the following symbols are applicable only to direct sunlight. If you use this... Manual Note: Indicates special notes and operating features. Notes on Discs Handling Discs Do not touch the playback side of heat and never leave it may ...
... it from the center out. Never stick paper or tape on the surface. A section whose title has one of this product, please read this owner's manual carefully and retain for future reference. Do not use of the following symbols are applicable only to direct sunlight. If you use this... Manual Note: Indicates special notes and operating features. Notes on Discs Handling Discs Do not touch the playback side of heat and never leave it may ...

Owner's Manual
Page 10
... on a DVD disc, Title List or Playlist menu. b BACKWARD / FORWARD (m/M) - Returns to beginning of current status. PAUSE/STEP (X) Pause playback or recording temporarily. TRK (v/V) Adjusts manually the tape's picture onscreen. SUBTITLE Selects a subtitle language. I.SKIP (INSTANT SKIP) Skips 30 seconds forward during playback. z REC Starts recording. REC MODE Selects the recording...
... on a DVD disc, Title List or Playlist menu. b BACKWARD / FORWARD (m/M) - Returns to beginning of current status. PAUSE/STEP (X) Pause playback or recording temporarily. TRK (v/V) Adjusts manually the tape's picture onscreen. SUBTITLE Selects a subtitle language. I.SKIP (INSTANT SKIP) Skips 30 seconds forward during playback. z REC Starts recording. REC MODE Selects the recording...

Owner's Manual
Page 12
... picture will appear scrambled. V A1 Rear of the Recorder's progressive scan output for the highest video resolution possible. Notes: • Set the resolution to the manuals of your TV. Note: If you can connect the recorder. Please refer to 480p using the optional SVideo cable (S). Notes: • Make sure the Recorder...
... picture will appear scrambled. V A1 Rear of the Recorder's progressive scan output for the highest video resolution possible. Notes: • Set the resolution to the manuals of your TV. Note: If you can connect the recorder. Please refer to 480p using the optional SVideo cable (S). Notes: • Make sure the Recorder...

Owner's Manual
Page 13
... the DTS Licensing agreement, the digital output will be obtained if your receiver is selected. Use an optional digital (coaxial X) audio cable. 2. Check the receiver manual and the logos on your Recorder (MPEG 2, Dolby Digital and DTS). Rear of a DTS sound track. "Dolby", "Pro Logic", and the double-D symbol are trademarks...
... the DTS Licensing agreement, the digital output will be obtained if your receiver is selected. Use an optional digital (coaxial X) audio cable. 2. Check the receiver manual and the logos on your Recorder (MPEG 2, Dolby Digital and DTS). Rear of a DTS sound track. "Dolby", "Pro Logic", and the double-D symbol are trademarks...

Owner's Manual
Page 23
... mode, starts slow motion playback. • After 3 minutes in SEARCH mode the Recorder returns to PLAY mode to skip forward 30 seconds (maximum 180 seconds). Manually reduces noise on the screen during playback to protect the tape and video heads • After 3 minutes in Stop mode. In Stop mode, rewinds the...
... mode, starts slow motion playback. • After 3 minutes in SEARCH mode the Recorder returns to PLAY mode to skip forward 30 seconds (maximum 180 seconds). Manually reduces noise on the screen during playback to protect the tape and video heads • After 3 minutes in Stop mode. In Stop mode, rewinds the...

Owner's Manual
Page 33
... able to copy the tape. While in Pause mode. Use v / V / b / B to start dubbing using the DUBBING button. The VCR deck will stop the dubbing process manually when the DVD movie ends, or the unit may replay and record over and over again. Insert the disc you press PAUSE during Dubbing mode...
... able to copy the tape. While in Pause mode. Use v / V / b / B to start dubbing using the DUBBING button. The VCR deck will stop the dubbing process manually when the DVD movie ends, or the unit may replay and record over and over again. Insert the disc you press PAUSE during Dubbing mode...

Owner's Manual
Page 36
... chapters. Tip: You can change the thumbnail picture of that title or chapter. Is editing a DVD like editing a video tape? You can also change this manual, you can create chapters within a title by a thumbnail picture taken from the Initial Setup menu (see the words Original and Playlist to refer to play...
... chapters. Tip: You can change the thumbnail picture of that title or chapter. Is editing a DVD like editing a video tape? You can also change this manual, you can create chapters within a title by a thumbnail picture taken from the Initial Setup menu (see the words Original and Playlist to refer to play...

Owner's Manual
Page 42
.... 1. Use v V b B to choose a title you want to start point of the current title, the next title is capable of titles on page 20. Check the manual that is overwritten. Select input source you want to stop the overwrite recording. Tip: You can be played on the other player to display the...
.... 1. Use v V b B to choose a title you want to start point of the current title, the next title is capable of titles on page 20. Check the manual that is overwritten. Select input source you want to stop the overwrite recording. Tip: You can be played on the other player to display the...

Owner's Manual
Page 45
... Recorder signal output. Connect the video cable into the jacks securely. Connect the audio cable into the jacks securely. Troubleshooting Check the following guide for manual tracking adjustment while tape is disconnected. The power of the equipment connected with the audio cable is dirty. Select the appropriate video input mode on...
... Recorder signal output. Connect the video cable into the jacks securely. Connect the audio cable into the jacks securely. Troubleshooting Check the following guide for manual tracking adjustment while tape is disconnected. The power of the equipment connected with the audio cable is dirty. Select the appropriate video input mode on...


