
Owner's Manual (English)
Page 2
... the power cord is faulty in any toys or objects on or apply impact to allow the proper operation of all safeguards incorporated in the specifications of time. There are no user serviceable components inside , even when the power is not operating properly. It can cause electric shock. Some internal parts...
... the power cord is faulty in any toys or objects on or apply impact to allow the proper operation of all safeguards incorporated in the specifications of time. There are no user serviceable components inside , even when the power is not operating properly. It can cause electric shock. Some internal parts...

Owner's Manual (English)
Page 18
... set the offset level. Set your own blue color levels. 17 Set your own gamma value. : -50 / 0 / 50 On the monitor, high gamma values display whitish images and low gamma values display high contrast images. M E N U : Exit : Decrease : Increase AUTO/SET : Select ...E N U : Exit : Decrease : Increase BLUE AUTO/SET : Select another sub-menu • sRGB: Set the screen color to fit the sRGB standard color specification. • 6500K: Slightly reddish white. • 9300K: Slightly bluish white. Set your own green color levels. Set your own red color levels. HDMI input CONTRAST...
... set the offset level. Set your own blue color levels. 17 Set your own gamma value. : -50 / 0 / 50 On the monitor, high gamma values display whitish images and low gamma values display high contrast images. M E N U : Exit : Decrease : Increase AUTO/SET : Select ...E N U : Exit : Decrease : Increase BLUE AUTO/SET : Select another sub-menu • sRGB: Set the screen color to fit the sRGB standard color specification. • 6500K: Slightly reddish white. • 9300K: Slightly bluish white. Set your own green color levels. Set your own red color levels. HDMI input CONTRAST...

Owner's Manual (English)
Page 20
... AUTO/SET : Select another sub-menu POWER INDICATOR FACTORY RESET Use this function to set the power indicator on the front side of the monitor to ON or OFF. If this function when white and black colors are displayed. If necessary, perform the white balance function again. Press ..., it will automatically be turned on the screen. Restore all factory default settings except "LANGUAGE." The white balance function is different the required specifications, the color level may deteriorate due to video signal distortion. If you set ON at any time, the power indicator will go off....
... AUTO/SET : Select another sub-menu POWER INDICATOR FACTORY RESET Use this function to set the power indicator on the front side of the monitor to ON or OFF. If this function when white and black colors are displayed. If necessary, perform the white balance function again. Press ..., it will automatically be turned on the screen. Restore all factory default settings except "LANGUAGE." The white balance function is different the required specifications, the color level may deteriorate due to video signal distortion. If you set ON at any time, the power indicator will go off....

Owner's Manual (English)
Page 24
... and your display again. No image appears G Is the power cord of this manual and configure your display is out of the display. See the 'Specifications' section of the • Check and see a "CHECK SIGNAL CABLE" message on the screen? properly to turn on the keyboard to bring up the screen...
... and your display again. No image appears G Is the power cord of this manual and configure your display is out of the display. See the 'Specifications' section of the • Check and see a "CHECK SIGNAL CABLE" message on the screen? properly to turn on the keyboard to bring up the screen...
Owner's Manual (English)
Page 27
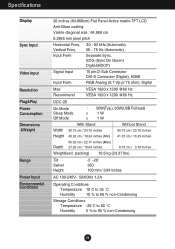
Specifications Display Sync Input Video Input Resolution Plug&Play Power Consumption Dimensions &Weight Range Power Input Environmental Conditions 26 inches (64.868cm) Flat Panel Active matrix-TFT LCD Anti-Glare coating Visible diagonal size : 64.868 cm 0.2865 mm pixel pitch Horizontal Freq. 30 - 83 kHz (Automatic) Vertical Freq. 56 - 75 Hz (Automatic...
Specifications Display Sync Input Video Input Resolution Plug&Play Power Consumption Dimensions &Weight Range Power Input Environmental Conditions 26 inches (64.868cm) Flat Panel Active matrix-TFT LCD Anti-Glare coating Visible diagonal size : 64.868 cm 0.2865 mm pixel pitch Horizontal Freq. 30 - 83 kHz (Automatic) Vertical Freq. 56 - 75 Hz (Automatic...

Owner's Manual (English)
Page 28
Specifications Stand Base Power cord USB Attached ( ), Detached ( O ) Wall-outlet type or PC-outlet type Standard USB 2.0, Self-Power Data Rate Max 480 Mbps Power Consumption Max 2.5W x 4 NOTE Information in this document is subject to change without notice. 27
Specifications Stand Base Power cord USB Attached ( ), Detached ( O ) Wall-outlet type or PC-outlet type Standard USB 2.0, Self-Power Data Rate Max 480 Mbps Power Consumption Max 2.5W x 4 NOTE Information in this document is subject to change without notice. 27

Owner's Manual (English)
Page 29
Specifications Preset Modes (Resolution) - D-sub(Analog) / DVI(Digital) INPUT Display Modes (Resolution) 1 VGA 640 x 480 2 VESA 640 x 480 3 VESA 720 x 480 4 VGA 720 x 400 5 VESA 800 x ... HDMI Vedio INPUT Display Modes (Resolution) 1 480P 2 576P 3 720P 4 720P 5 1080i 6 1080i 7 1080P 8 1080P Horizontal Freq. (kHz) 31.50 31.25 37.50 45.00 28.12 33.75 56.25 67.50 Vertical Freq. (Hz) 60.00 50.00 50.00 60.00 50.00 60.00 50.00 60.00...
Specifications Preset Modes (Resolution) - D-sub(Analog) / DVI(Digital) INPUT Display Modes (Resolution) 1 VGA 640 x 480 2 VESA 640 x 480 3 VESA 720 x 480 4 VGA 720 x 400 5 VESA 800 x ... HDMI Vedio INPUT Display Modes (Resolution) 1 480P 2 576P 3 720P 4 720P 5 1080i 6 1080i 7 1080P 8 1080P Horizontal Freq. (kHz) 31.50 31.25 37.50 45.00 28.12 33.75 56.25 67.50 Vertical Freq. (Hz) 60.00 50.00 50.00 60.00 50.00 60.00 50.00 60.00...

Owner's Manual (English)
Page 30
... stand-type or wall mount type and is purchased. Separate the head and the stand with Wall mount plate. Installing the Wall mount plate This monitor satisfies the specifications of a screwdriver. 3. After moving the product to face downward, make sure to place it on a soft cloth or a cushion to avoid surface damage...
... stand-type or wall mount type and is purchased. Separate the head and the stand with Wall mount plate. Installing the Wall mount plate This monitor satisfies the specifications of a screwdriver. 3. After moving the product to face downward, make sure to place it on a soft cloth or a cushion to avoid surface damage...
