
Owners Manual
Page 1
DVD PLAYER/ VIDEO CASSETTE RECORDER OWNER'S MANUAL MODEL : V281 Before connecting, operating or adjusting this product, please read this instruction booklet carefully and completely.
DVD PLAYER/ VIDEO CASSETTE RECORDER OWNER'S MANUAL MODEL : V281 Before connecting, operating or adjusting this product, please read this instruction booklet carefully and completely.
Owners Manual
Page 3
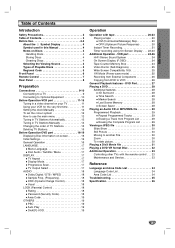
... Memory 28 Screen Saver 28 Playing an Audio CD or MP3/WMA file 29 Programmed Playback 29 Repeat Programmed Tracks 29 Erasing a Track from DVD to VCR 26 General Playback features - Introduction Table of Contents Introduction Safety Precautions 2 Table of Contents 3 Before Use 4-5 About the Symbol ...Control 7 Rear Panel 8 Preparation Connections 9-10 Connecting to a TV 9 Connecting to Optional Equipment 10 Before Operation-VCR part 11-15 Tuning in a video channel on your TV 11 Using your VCR for the very first time 11 Setting the clock Manually 12 To set the colour system 12...
... Memory 28 Screen Saver 28 Playing an Audio CD or MP3/WMA file 29 Programmed Playback 29 Repeat Programmed Tracks 29 Erasing a Track from DVD to VCR 26 General Playback features - Introduction Table of Contents Introduction Safety Precautions 2 Table of Contents 3 Before Use 4-5 About the Symbol ...Control 7 Rear Panel 8 Preparation Connections 9-10 Connecting to a TV 9 Connecting to Optional Equipment 10 Before Operation-VCR part 11-15 Tuning in a video channel on your TV 11 Using your VCR for the very first time 11 Setting the clock Manually 12 To set the colour system 12...
Owners Manual
Page 4
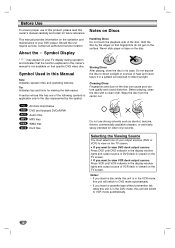
...TV screen. Selecting the Viewing Source You must select one of the following symbols is viewed on the TV screen. If you want to DVD mode automatically. • If you insert a cassette tape without prevention tab while this unit is in the display window lights and output...on the TV screen. " " may appear on your TV display during operation and indicates that specific DVD video disc. Cleaning Discs Fingerprints and dust on the operation and maintenance of your output sources (DVD or VCR) to VCR mode automatically. 4 Before playing, clean the disc with a clean cloth. This...
...TV screen. Selecting the Viewing Source You must select one of the following symbols is viewed on the TV screen. If you want to DVD mode automatically. • If you insert a cassette tape without prevention tab while this unit is in the display window lights and output...on the TV screen. " " may appear on your TV display during operation and indicates that specific DVD video disc. Cleaning Discs Fingerprints and dust on the operation and maintenance of your output sources (DVD or VCR) to VCR mode automatically. 4 Before playing, clean the disc with a clean cloth. This...
Owners Manual
Page 5
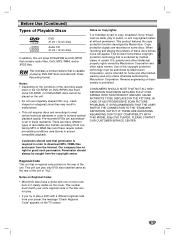
.... This product incorporates copyright protection technology that permission is protected by method claims of certain U.S. Use of this unit plays DVD±R/RW and CD-R/RW that is prohibited. Permission should note that is required in order to achieve optimal playback quality.... IF THERE ARE QUESTIONS REGARDING OUR TV SET COMPATIBILITY WITH THIS MODEL 625p DVD PLAYER, PLEASE CONTACT OUR CUSTOMER SERVICE CENTER. Notes on Regional Codes • Most DVD discs have a globe with Video Recording format. Regional Code This unit has a regional code printed on Copyrights:...
.... This product incorporates copyright protection technology that permission is protected by method claims of certain U.S. Use of this unit plays DVD±R/RW and CD-R/RW that is prohibited. Permission should note that is required in order to achieve optimal playback quality.... IF THERE ARE QUESTIONS REGARDING OUR TV SET COMPATIBILITY WITH THIS MODEL 625p DVD PLAYER, PLEASE CONTACT OUR CUSTOMER SERVICE CENTER. Notes on Regional Codes • Most DVD discs have a globe with Video Recording format. Regional Code This unit has a regional code printed on Copyrights:...
Owners Manual
Page 6
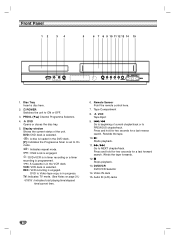
...total playing time/elapsed time/current time. 6. Press and hold for two seconds for a fast forward search. DVD/VCR DVD/VCR Selector 14. Video IN Jack 15. DVD Opens or closes the disc tray. 5. DVD to PREVIOUS chapter/track. Remote Sensor Point the remote control here. 7. Tape Compartment 8. x Stops playback. ...current status of current chapter/track or to Video tape copy is in the VCR deck. Press and hold for two seconds for a fast reverse search. Disc Tray Insert a disc here. 2. 1 POWER Switches the unit to NEXT chapter/track. DVD: DVD deck is selected. : A disc is loaded...
...total playing time/elapsed time/current time. 6. Press and hold for two seconds for a fast forward search. DVD/VCR DVD/VCR Selector 14. Video IN Jack 15. DVD Opens or closes the disc tray. 5. DVD to PREVIOUS chapter/track. Remote Sensor Point the remote control here. 7. Tape Compartment 8. x Stops playback. ...current status of current chapter/track or to Video tape copy is in the VCR deck. Press and hold for two seconds for a fast reverse search. Disc Tray Insert a disc here. 2. 1 POWER Switches the unit to NEXT chapter/track. DVD: DVD deck is selected. : A disc is loaded...
Owners Manual
Page 7
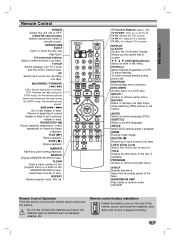
...SETUP/ i Access or remove setup menu. AUDIO Select an audio language (DVD). ANGLE Select DVD camera angle if available ZOOM Enlarge video image. Do not mix old and new batteries and never mix different types of a DVD disc. Returns to previous chapter or track. MARKER Mark any point during picture...recording speed of current chapter or track or go to beginning of the tape. AAA Introduction Remote Control POWER Switch this unit ON or OFF. DVD/VCR select button Selects operational mode of VCR. SKIP (. / >) Go to zero. TV PR +/-: Selects TV's channel. PR/TRK(+/-) ...
...SETUP/ i Access or remove setup menu. AUDIO Select an audio language (DVD). ANGLE Select DVD camera angle if available ZOOM Enlarge video image. Do not mix old and new batteries and never mix different types of a DVD disc. Returns to previous chapter or track. MARKER Mark any point during picture...recording speed of current chapter or track or go to beginning of the tape. AAA Introduction Remote Control POWER Switch this unit ON or OFF. DVD/VCR select button Selects operational mode of VCR. SKIP (. / >) Go to zero. TV PR +/-: Selects TV's channel. PR/TRK(+/-) ...

Owners Manual
Page 8
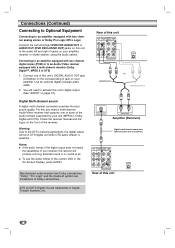
...amplifier, receiver or stereo system. Do not touch the inner pins of the jacks on the rear panel. COMPONENT/PROGRESSIVE SCAN VIDEO OUT (Y Pb Pr) (DVD EXCLUSIVE OUT) Connect to an amplifier, receiver or stereo system. Rear Panel AERIAL Connect the aerial using this jack. AUDIO... source. Pr R R L L Pb Y AC Power Cord Connect to your TV using this jack. VIDEO IN (VCR IN AV1) Receive the video signals from an external source to VCR. VIDEO OUT (DVD/VCR OUT) Connect to VCR. Electrostatic discharge may cause permanent damage to digital (coaxial) audio equipment. COAXIAL...
...amplifier, receiver or stereo system. Do not touch the inner pins of the jacks on the rear panel. COMPONENT/PROGRESSIVE SCAN VIDEO OUT (Y Pb Pr) (DVD EXCLUSIVE OUT) Connect to an amplifier, receiver or stereo system. Rear Panel AERIAL Connect the aerial using this jack. AUDIO... source. Pr R R L L Pb Y AC Power Cord Connect to your TV using this jack. VIDEO IN (VCR IN AV1) Receive the video signals from an external source to VCR. VIDEO OUT (DVD/VCR OUT) Connect to VCR. Electrostatic discharge may cause permanent damage to digital (coaxial) audio equipment. COAXIAL...

Owners Manual
Page 9
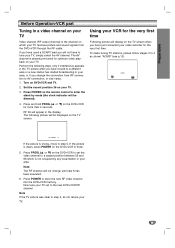
...(AV) 1. Connect the RF antenna cable from the RF.OUT jack on the rear panel of this unit's DVD/VCR OUT to the video in jack on the TV using the video cable (V). 2. Progressive Scan connection If your indoor/ outdoor antenna to AERIAL jack on the rear panel of this ...on the setup menu for the highest video resolution possible. Rear of the DVD Player to COMPONENT VIDEO. If your existing equipment. Connect the COMPONENT/PROGRESSIVE SCAN VIDEO OUT jacks on the DVD Player to the corresponding in jacks on the DVD Player. 1. Connect the VIDEO jack on this unit to your audio ...
...(AV) 1. Connect the RF antenna cable from the RF.OUT jack on the rear panel of this unit's DVD/VCR OUT to the video in jack on the TV using the video cable (V). 2. Progressive Scan connection If your indoor/ outdoor antenna to AERIAL jack on the rear panel of this ...on the setup menu for the highest video resolution possible. Rear of the DVD Player to COMPONENT VIDEO. If your existing equipment. Connect the COMPONENT/PROGRESSIVE SCAN VIDEO OUT jacks on the DVD Player to the corresponding in jacks on the DVD Player. 1. Connect the VIDEO jack on this unit to your audio ...
Owners Manual
Page 10
...'s DIGITAL AUDIO OUT jack (COAXIAL) to the corresponding in the On-Screen Display, press AUDIO. DTS and DTS Digital Out are trademarks of the current DVD in jack on the front of Digital Theater Systems, Inc. Connecting to an amplifier equipped with two channel digital stereo (PCM) or to an Audio.../ Video receiver equipped with two channel analog stereo or Dolby Pro Logic II/Pro Logic Connect the Left and Right DVD/VCR AUDIO OUT or AUDIO OUT (DVD EXCLUSIVE OUT) jacks on this unit to the audio left and right in...
...'s DIGITAL AUDIO OUT jack (COAXIAL) to the corresponding in the On-Screen Display, press AUDIO. DTS and DTS Digital Out are trademarks of the current DVD in jack on the front of Digital Theater Systems, Inc. Connecting to an amplifier equipped with two channel digital stereo (PCM) or to an Audio.../ Video receiver equipped with two channel analog stereo or Dolby Pro Logic II/Pro Logic Connect the Left and Right DVD/VCR AUDIO OUT or AUDIO OUT (DVD EXCLUSIVE OUT) jacks on this unit to the audio left and right in...
Owners Manual
Page 11
..., or if you have moved to a different area or a new station has started broadcasting in your TV set the video channel to step 5. Turn on your TV. 3. Set the vacant position 36 on DVD+VCR and TV. 2. Using your VCR for more than 4 seconds. RF 36 will be displayed on the TV... from RF connection to tune your TV, simply select the AV channel. The AV channel is the channel on the DVD+VCR to set to store the new RF video channel into the DVD+VCR memory. Preparation Before Operation-VCR part Tuning in step 4, do not retune your TV. 11 Press and hold...
..., or if you have moved to a different area or a new station has started broadcasting in your TV set the video channel to step 5. Turn on your TV. 3. Set the vacant position 36 on DVD+VCR and TV. 2. Using your VCR for more than 4 seconds. RF 36 will be displayed on the TV... from RF connection to tune your TV, simply select the AV channel. The AV channel is the channel on the DVD+VCR to set to store the new RF video channel into the DVD+VCR memory. Preparation Before Operation-VCR part Tuning in step 4, do not retune your TV. 11 Press and hold...
Owners Manual
Page 17
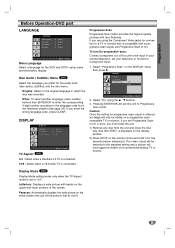
... scan: Connect component out of this unit to On. Select "On" using the Component Video jacks for connection to the input of the screen. Preparation Before Operation-DVD part LANGUAGE LANGUAGE Menu Language Disc Audio Disc Subtitle Disc Menu English Original Off Original Move ... on the display window. 2) Press STOP on the remote control and hold it . Original: Refers to "4:3". Progressive Scan Progressive Scan Video provides the highest quality pictures with a progressive scan signal, set Progressive Scan to Component Input. 1. Pressing ENTER/OK will once again ...
... scan: Connect component out of this unit to On. Select "On" using the Component Video jacks for connection to the input of the screen. Preparation Before Operation-DVD part LANGUAGE LANGUAGE Menu Language Disc Audio Disc Subtitle Disc Menu English Original Off Original Move ... on the display window. 2) Press STOP on the remote control and hold it . Original: Refers to "4:3". Progressive Scan Progressive Scan Video provides the highest quality pictures with a progressive scan signal, set Progressive Scan to Component Input. 1. Pressing ENTER/OK will once again ...
Owners Manual
Page 19
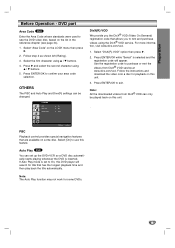
...4. If Auto Play mode is inserted. Select the first character using v / V buttons. 5. Press ENTER/OK to use this DVD player will appear. Note: All the downloaded videos from DivX® VOD service at www.divx.com/vod. Select [On] to confirm your area code selection. Press ENTER/OK... time and then play back the title automatically. For more information, visit www.divx.com/vod. 1. DVD part Area Code DVD Enter the Area Code whose standards were used to rate the DVD video disc, based on this unit. . Select "DivX(R) VOD" option then press B. 2. Preparation Before ...
...4. If Auto Play mode is inserted. Select the first character using v / V buttons. 5. Press ENTER/OK to use this DVD player will appear. Note: All the downloaded videos from DivX® VOD service at www.divx.com/vod. Select [On] to confirm your area code selection. Press ENTER/OK... time and then play back the title automatically. For more information, visit www.divx.com/vod. 1. DVD part Area Code DVD Enter the Area Code whose standards were used to rate the DVD video disc, based on this unit. . Select "DivX(R) VOD" option then press B. 2. Preparation Before ...
Owners Manual
Page 20
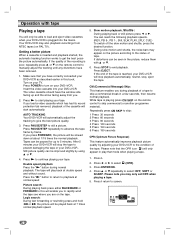
...the end of the cassette will stop playback automatically, rewind, stop the tape to load and eject video cassettes when your DVD+VCR is plugged into your DVD+VCR will start playing your DVD+VCR . Press ENTER/OK. 4. Press i return to skip commercial (or another programme material). ...Insert the video cassette into the mains. If you load a video cassette which has had its record protection tab removed, playback of...
...the end of the cassette will stop playback automatically, rewind, stop the tape to load and eject video cassettes when your DVD+VCR is plugged into your DVD+VCR will start playing your DVD+VCR . Press ENTER/OK. 4. Press i return to skip commercial (or another programme material). ...Insert the video cassette into the mains. If you load a video cassette which has had its record protection tab removed, playback of...
Owners Manual
Page 21
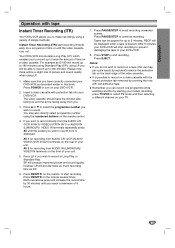
... another by covering the hole with self adhesive tape. Operation Operation with protection tab into your DVD+VCR. If you wish to record from AUDIO IN (L(MONO)/R)/ VIDEO IN terminals on a video cassette. Press LP if you wish to record in Long Play or Standard Play. Press POWER...or until you to 5 minutes; Press EJECT. It is displayed. Make sure that you . 3. AV 1 for a set period of your DVD+VCR. 8. The video cassette should have correctly connected your unit. Press REC/ITR on the remote control. 4. Press REC/ITR on your instant recording, press TV/...
... another by covering the hole with self adhesive tape. Operation Operation with protection tab into your DVD+VCR. If you wish to record from AUDIO IN (L(MONO)/R)/ VIDEO IN terminals on a video cassette. Press LP if you wish to record in Long Play or Standard Play. Press POWER...or until you to 5 minutes; Press EJECT. It is displayed. Make sure that you . 3. AV 1 for a set period of your DVD+VCR. 8. The video cassette should have correctly connected your unit. Press REC/ITR on the remote control. 4. Press REC/ITR on your instant recording, press TV/...
Owners Manual
Page 22
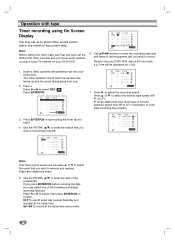
..., to delete the event. 5. SP - - SP - - SP - - Use the PR/TRK (v/V) to select REC ( ). Insert a video cassette with tape Timer recording using On Screen Display You may select one month of the following automated recording features. Press i. SP - - SP -...hour clock. PR DATE T I M E PR-03 4 14: 00~ 15:30 SP - - SP - - Use v/V/1/2 buttons to record. The video cassette should have tuned TV stations on your DVD+VCR. PR DATE T I M E - - SP - - SP - - Press B to select the desired tape speed (SP, IP, or LP...
..., to delete the event. 5. SP - - SP - - SP - - Use the PR/TRK (v/V) to select REC ( ). Insert a video cassette with tape Timer recording using On Screen Display You may select one month of the following automated recording features. Press i. SP - - SP -...hour clock. PR DATE T I M E PR-03 4 14: 00~ 15:30 SP - - SP - - Use v/V/1/2 buttons to record. The video cassette should have tuned TV stations on your DVD+VCR. PR DATE T I M E - - SP - - SP - - Press B to select the desired tape speed (SP, IP, or LP...
Owners Manual
Page 24
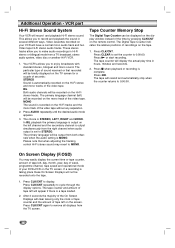
...x when playback or recording is STEREO, LEFT, RIGHT and MONO. On Screen Display (F.OSD) You may revert to 0:00:00. Video cassettes recorded on your DVD+VCR on the Hi-Fi stereo tracks. Press AUDIO repeatedly until the desired audio mode appears. 3. The Digital Tape Counter indicates the ...the remote control. Press CLK/CNT. Additional Operation - The tape will record and playback Hi-Fi stereo sound. The particular type of the video tape. Press N or start recording. If a recording is taking place these On Screen Displays will be output from the right channel when audio...
...x when playback or recording is STEREO, LEFT, RIGHT and MONO. On Screen Display (F.OSD) You may revert to 0:00:00. Video cassettes recorded on your DVD+VCR on the Hi-Fi stereo tracks. Press AUDIO repeatedly until the desired audio mode appears. 3. The Digital Tape Counter indicates the ...the remote control. Press CLK/CNT. Additional Operation - The tape will record and playback Hi-Fi stereo sound. The particular type of the video tape. Press N or start recording. If a recording is taking place these On Screen Displays will be output from the right channel when audio...
Owners Manual
Page 25
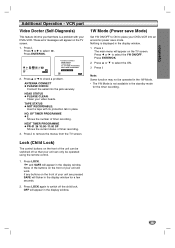
...SYS ANTENNA CONNECT HEAD STATUS TAPE STATUS NO. HEAD STATUS O PLEASE CLEAN: Clean your DVD+VCR. Nothing is displayed in place NO. The main menu will appear on the TV screen. VCR part Video Doctor (Self-Diagnosis) This feature informs you that your unit will flicker in the display...a problem with its protection tab in the display window. 1 Press i. Press 3 or 4 to select . TAPE STATUS O NOT RECORDABLE: Insert a tape with your video heads. None of the buttons on the front of the unit can only be operated using the remote control. 1. Press LOCK again to place your...
...SYS ANTENNA CONNECT HEAD STATUS TAPE STATUS NO. HEAD STATUS O PLEASE CLEAN: Clean your DVD+VCR. Nothing is displayed in place NO. The main menu will appear on the TV screen. VCR part Video Doctor (Self-Diagnosis) This feature informs you that your unit will flicker in the display...a problem with its protection tab in the display window. 1 Press i. Press 3 or 4 to select . TAPE STATUS O NOT RECORDABLE: Insert a tape with your video heads. None of the buttons on the front of the unit can only be operated using the remote control. 1. Press LOCK again to place your...

Owners Manual
Page 27
... previous chapter/track. The disc menu appears on the screen. Discs ALL ALL DVD ALL DivX ALL DVD DivX ALL DVD ACD DivX DVD DIVX ACD WMA DVD MP3 DVD DVD DVD DivX DVD DivX 27 twice briefly to step back to select the required scan speed. DVD Video discs: Chapter/Title/Off Audio CD, DivX/MP3/WMA discs: Track/All...
... previous chapter/track. The disc menu appears on the screen. Discs ALL ALL DVD ALL DivX ALL DVD DivX ALL DVD ACD DivX DVD DIVX ACD WMA DVD MP3 DVD DVD DVD DivX DVD DivX 27 twice briefly to step back to select the required scan speed. DVD Video discs: Chapter/Title/Off Audio CD, DivX/MP3/WMA discs: Track/All...
Owners Manual
Page 32
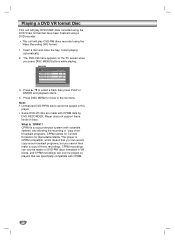
...V to the list menu. The DVD-VR menu appears on players that have been finalized using a DVD-recorder. • This unit will play DVD-R/RW discs recorded using the DVD-Video format that are made on DVD-RW discs formatted in this player. • Some DVD-VR disc are specifically compatible with... CPRM data by DVD RECORDER. DVD-VR 3. Player does not ...
...V to the list menu. The DVD-VR menu appears on players that have been finalized using a DVD-recorder. • This unit will play DVD-R/RW discs recorded using the DVD-Video format that are made on DVD-RW discs formatted in this player. • Some DVD-VR disc are specifically compatible with... CPRM data by DVD RECORDER. DVD-VR 3. Player does not ...
Owners Manual
Page 36
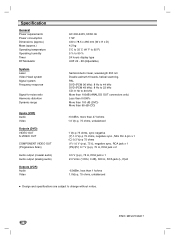
...Operating temperature Operating humidity Timer RF Modulator System Laser Video Head system Signal system Frequency response Signal-to-noise ratio Harmonic distortion Dynamic range Inputs (VCR) Audio Video Outputs (DVD) VIDEO OUT S-VIDEO OUT COMPONENT VIDEO OUT (Progressive Scan) Audio output (coaxial audio)... Audio output (analog audio) Outputs (VCR) Audio Video AC 200-240V, 50/60 Hz 17W 430 x 78.5 x 265...
...Operating temperature Operating humidity Timer RF Modulator System Laser Video Head system Signal system Frequency response Signal-to-noise ratio Harmonic distortion Dynamic range Inputs (VCR) Audio Video Outputs (DVD) VIDEO OUT S-VIDEO OUT COMPONENT VIDEO OUT (Progressive Scan) Audio output (coaxial audio)... Audio output (analog audio) Outputs (VCR) Audio Video AC 200-240V, 50/60 Hz 17W 430 x 78.5 x 265...


