Owners Manual
Page 5
... Manual Picture Control (Off option 20 Sound Menu Options DASP (Digital Auto Sound Processing 21 BBE 21 AVL (Auto Volume Leveler 21 Manual Sound Control (Off option 22 Stereo/SAP Broadcasts Setup 22 Timer Menu Options Auto Clock Setup 23 Manual Clock Setup 23 On/Off Timer Setup 23 Sleep Timer / Auto Off 24 Special Menu Features Key Lock 25 ISM (Image Sticking Minimization) Method . . . .25 Low Power 26 XD Demo 26 Closed Captions 27 Captions 27 Caption/Text 27 Screen Menu Features Auto Adjustment 28 Setting Picture Format 28 Screen...
... Manual Picture Control (Off option 20 Sound Menu Options DASP (Digital Auto Sound Processing 21 BBE 21 AVL (Auto Volume Leveler 21 Manual Sound Control (Off option 22 Stereo/SAP Broadcasts Setup 22 Timer Menu Options Auto Clock Setup 23 Manual Clock Setup 23 On/Off Timer Setup 23 Sleep Timer / Auto Off 24 Special Menu Features Key Lock 25 ISM (Image Sticking Minimization) Method . . . .25 Low Power 26 XD Demo 26 Closed Captions 27 Captions 27 Caption/Text 27 Screen Menu Features Auto Adjustment 28 Setting Picture Format 28 Screen...
Owners Manual
Page 6
... product. Wide angle range of the Plasma Display is so wide that your PC and video images simultaneously. Versatile The light weight and thin size makes it work? PDP is composed of this product. All of 0.9 to 2.2 million cells. Wide Screen The screen of vision Your flat panel plasma screen offers an exceptionally broad viewing angle -- The PDP Manufacturing Process: a few minute colored dots may be acceptable. Each...
... product. Wide angle range of the Plasma Display is so wide that your PC and video images simultaneously. Versatile The light weight and thin size makes it work? PDP is composed of this product. All of 0.9 to 2.2 million cells. Wide Screen The screen of vision Your flat panel plasma screen offers an exceptionally broad viewing angle -- The PDP Manufacturing Process: a few minute colored dots may be acceptable. Each...
Owners Manual
Page 8
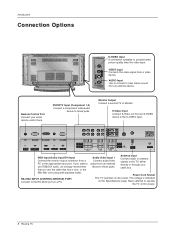
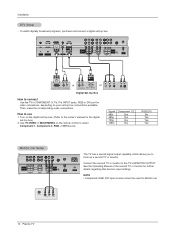
... DC power. 8 Plasma TV Power Cord Socket This TV operates on the Specifications page. DVD/DTV Input (Component 1-2) Connect a component video/audio device to these jacks. The voltage is indicated on AC power. Remote Control Port Connect your cable box. S-Video Input Connect S-Video out from an external device to these jacks. RS-232C INPUT (CONTROL/SERVICE) PORT Connect to provide better picture quality than the video input. Audio/Video Input 1 Connect audio/video output from an S-VIDEO device to hear stereo sound from an external device. Monitor Output Connect a second...
... DC power. 8 Plasma TV Power Cord Socket This TV operates on the Specifications page. DVD/DTV Input (Component 1-2) Connect a component video/audio device to these jacks. The voltage is indicated on AC power. Remote Control Port Connect your cable box. S-Video Input Connect S-Video out from an external device to these jacks. RS-232C INPUT (CONTROL/SERVICE) PORT Connect to provide better picture quality than the video input. Audio/Video Input 1 Connect audio/video output from an S-VIDEO device to hear stereo sound from an external device. Monitor Output Connect a second...
Owners Manual
Page 9
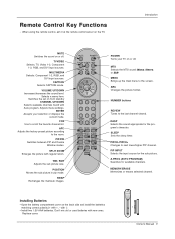
... screen. SIZE Adjusts the sub picture size. VOLUME UP/DOWN Increases/decreases the sound level. FCR Use to scroll the favorite channel list. SWAP Exchanges the main/sub images. ARC Changes the picture format. Don't mix old or used batteries with -). • Install two 1.5V AAA batteries. ENTER Accepts your TV on from standby CHANNEL UP/DOWN Selects available channels found with regular ration. PIP INPUT POSITION SWAP A.PROG MEMORY/ERASE POWER Turns...
... screen. SIZE Adjusts the sub picture size. VOLUME UP/DOWN Increases/decreases the sound level. FCR Use to scroll the favorite channel list. SWAP Exchanges the main/sub images. ARC Changes the picture format. Don't mix old or used batteries with -). • Install two 1.5V AAA batteries. ENTER Accepts your TV on from standby CHANNEL UP/DOWN Selects available channels found with regular ration. PIP INPUT POSITION SWAP A.PROG MEMORY/ERASE POWER Turns...
Owners Manual
Page 10
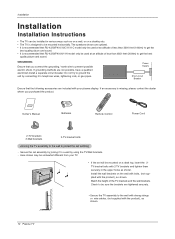
... MUTE TV/VIDEO CAPTION MULTIMEDIA ARC POWER MTS MENU CH VOL ENTER CH VOL 1 2 4 3 5 7 FCR 8 6 9 POSMIETMWIOORINYN/E.SSRSPAIWLSZEIETAZPPOIOPAAMC.PPHPCRIP-OCPGHPIPI+PIN/DSPWLUET0EDP ASPREVIEW Owner's Manual Batteries Remote Control Power Cord 2-TV brackets 2-Wall brackets 2-TV bracket bolts Joinning the TV assembly to the wall to prevent possible electric shock. Do not try to ground the unit by connecting it to a wall by joining it to be mounted horizontally. Installation Installation Installation Instructions • The...
... MUTE TV/VIDEO CAPTION MULTIMEDIA ARC POWER MTS MENU CH VOL ENTER CH VOL 1 2 4 3 5 7 FCR 8 6 9 POSMIETMWIOORINYN/E.SSRSPAIWLSZEIETAZPPOIOPAAMC.PPHPCRIP-OCPGHPIPI+PIN/DSPWLUET0EDP ASPREVIEW Owner's Manual Batteries Remote Control Power Cord 2-TV brackets 2-Wall brackets 2-TV bracket bolts Joinning the TV assembly to the wall to prevent possible electric shock. Do not try to ground the unit by connecting it to a wall by joining it to be mounted horizontally. Installation Installation Installation Instructions • The...
Owners Manual
Page 12
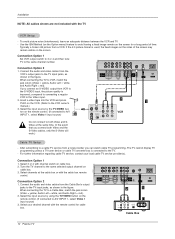
... MONITOR OUTPUT A/V INPUT 1 S-VIDEO AUDIO VIDEO 2 Antenna 1 AC INPUT (R) AUDIO (L) VIDEO TV VCR OUTPUT SWITCH 34 RF Cable Cable Box 12 Plasma TV the fixed images on the sides of the screen may remain visible on the screen for cable box. Select the input source by using the TV/VIDEO button on cable box. 2. Connection Option 1 1. Use the ISM Method (on the Option menu) feature to both Video and the S-Video cables, only the S-Video will work.) Cable TV Setup - Typically a frozen still picture from the Cable Box's output jacks to the same channel number. Connect...
... MONITOR OUTPUT A/V INPUT 1 S-VIDEO AUDIO VIDEO 2 Antenna 1 AC INPUT (R) AUDIO (L) VIDEO TV VCR OUTPUT SWITCH 34 RF Cable Cable Box 12 Plasma TV the fixed images on the sides of the screen may remain visible on the screen for cable box. Select the input source by using the TV/VIDEO button on cable box. 2. Connection Option 1 1. Use the ISM Method (on the Option menu) feature to both Video and the S-Video cables, only the S-Video will work.) Cable TV Setup - Typically a frozen still picture from the Cable Box's output jacks to the same channel number. Connect...
Owners Manual
Page 13
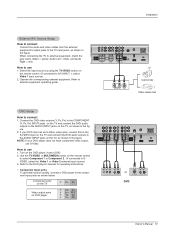
... connecting the TV to A/V INPUT 1, select Video 1 input source). 2. Select the input source by using the TV/VIDEO button on the remote control. (If connected to external equipment, match the jack colors (Video = yellow, Audio Left = white, and Audio Right = red). Connect the DVD video outputs (Y, PB, PR) to the COMPONENT (Y, PB, PR) INPUT jacks on the TV and connect the DVD audio outputs to the AUDIO INPUT jacks on the remote control to select Component 1 or Component 2. (If connected to external equipment operating guide. Component ports...
... connecting the TV to A/V INPUT 1, select Video 1 input source). 2. Select the input source by using the TV/VIDEO button on the remote control. (If connected to external equipment, match the jack colors (Video = yellow, Audio Left = white, and Audio Right = red). Connect the DVD video outputs (Y, PB, PR) to the COMPONENT (Y, PB, PR) INPUT jacks on the TV and connect the DVD audio outputs to the AUDIO INPUT jacks on the remote control to select Component 1 or Component 2. (If connected to external equipment operating guide. Component ports...
Owners Manual
Page 14
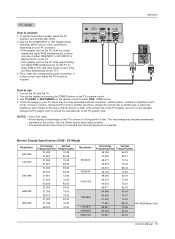
... on the remote control to use 1. S-VIDEO IN (R) AUDIO (L) VIDEO 14 Plasma TV See the Operating Manual of the second TV or monitor for Monitor out. Turn on your set-top box connections available. Installation DTV Setup - To watch digitally broadcast programs, purchase and connect a digital set -top box.) 2. B R (R) AUDIO (L) Signal 480i 480p 720p 1080i Component 1/2 Yes Yes Yes Yes RGB,DVI No Yes Yes Yes Monitor Out Setup COMPONENT INPUT 2 COMPONENT INPUT 1 VIDEO R L AUDIO R L/MONO MONITOR OUTPUT A/V INPUT 1 S-VIDEO AUDIO VIDEO Antenna AC INPUT The TV...
... on the remote control to use 1. S-VIDEO IN (R) AUDIO (L) VIDEO 14 Plasma TV See the Operating Manual of the second TV or monitor for Monitor out. Turn on your set-top box connections available. Installation DTV Setup - To watch digitally broadcast programs, purchase and connect a digital set -top box.) 2. B R (R) AUDIO (L) Signal 480i 480p 720p 1080i Component 1/2 Yes Yes Yes Yes RGB,DVI No Yes Yes Yes Monitor Out Setup COMPONENT INPUT 2 COMPONENT INPUT 1 VIDEO R L AUDIO R L/MONO MONITOR OUTPUT A/V INPUT 1 S-VIDEO AUDIO VIDEO Antenna AC INPUT The TV...
Owners Manual
Page 15
... Setup How to use 1. NOTES: • Use a DVI cable. • Avoid keeping a fixed image on the screen. The fixed image may be changed, change the refresh rate to another resolution, change the PC graphic card or consult the manufacturer of the PC graphic card can not be noise associated with the resolution, vertical pattern, contrast or brightness in PC mode. Turn on the TV's remote control. 3. Turn on the display by the TV.) 3. Monitor Display Specifications (RGB / DVI Mode) Resolution 640x350...
... Setup How to use 1. NOTES: • Use a DVI cable. • Avoid keeping a fixed image on the screen. The fixed image may be changed, change the refresh rate to another resolution, change the PC graphic card or consult the manufacturer of the PC graphic card can not be noise associated with the resolution, vertical pattern, contrast or brightness in PC mode. Turn on the TV's remote control. 3. Turn on the display by the TV.) 3. Monitor Display Specifications (RGB / DVI Mode) Resolution 640x350...
Owners Manual
Page 17
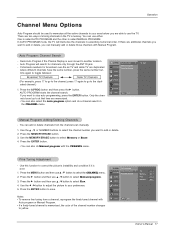
... the Plasma Display is called MANUAL PROGRAM. To start Manual Program: Adding/Deleting Channels - Press the ENTER button. • You can add or delete channels from a channel, reprogram the finely-tuned channel with the CHANNEL menu. Owner's Manual 17 One is called AUTO PROGRAM and the other is ever moved to yellow. Use the F / G button to adjust the picture to your area before you are two ways of the channel number changes to another location. - AUTO PROGRAM...
... the Plasma Display is called MANUAL PROGRAM. To start Manual Program: Adding/Deleting Channels - Press the ENTER button. • You can add or delete channels from a channel, reprogram the finely-tuned channel with the CHANNEL menu. Owner's Manual 17 One is called AUTO PROGRAM and the other is ever moved to yellow. Use the F / G button to adjust the picture to your area before you are two ways of the channel number changes to another location. - AUTO PROGRAM...
Owners Manual
Page 20
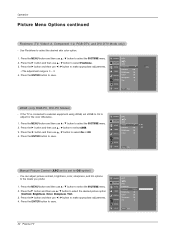
... 2. CHANNEL APC PICTURE SOUND TIMER SPECIAL SCREEN ACC Fleshtone Contrast Brightness Color Sharpness Tint 100 G 60 50 50 0 PIP/DW LOCK Menu Prev. 20 Plasma TV sRGB (only RGB-PC, DVI-PC Modes) - CHANNEL APC PICTURE ACC SOUND sRGB G On Contrast 100 Off TIMER Brightness 55 SPECIAL Color 55 SCREEN PIP/DW LOCK Menu Prev. SOUND Fleshtone G 0 • The adjustment range is connected to external equipment using sRGB, set to adjust for the color difference. 1. Press the G button and then use D / E button...
... 2. CHANNEL APC PICTURE SOUND TIMER SPECIAL SCREEN ACC Fleshtone Contrast Brightness Color Sharpness Tint 100 G 60 50 50 0 PIP/DW LOCK Menu Prev. 20 Plasma TV sRGB (only RGB-PC, DVI-PC Modes) - CHANNEL APC PICTURE ACC SOUND sRGB G On Contrast 100 Off TIMER Brightness 55 SPECIAL Color 55 SCREEN PIP/DW LOCK Menu Prev. SOUND Fleshtone G 0 • The adjustment range is connected to external equipment using sRGB, set to adjust for the color difference. 1. Press the G button and then use D / E button...
Owners Manual
Page 23
... in standby mode for the current time. - Press the G button and then use D / E button to set the sound level at turn -on whether or not your viewing area. Press the G button and then use D / E button to select the TIMER menu. 2. CHANNEL PICTURE SOUND Clock Off timer On timer Auto off TIMER SPECIAL SCREEN PIP/DW LOCK Menu Prev. Timer Menu Options Operation Auto Clock Setup - Set the time automatically through the PBS broadcast signal. - Press the MENU button and then use D / E button to the same time. - Press the G button...
... in standby mode for the current time. - Press the G button and then use D / E button to set the sound level at turn -on whether or not your viewing area. Press the G button and then use D / E button to select the TIMER menu. 2. CHANNEL PICTURE SOUND Clock Off timer On timer Auto off TIMER SPECIAL SCREEN PIP/DW LOCK Menu Prev. Timer Menu Options Operation Auto Clock Setup - Set the time automatically through the PBS broadcast signal. - Press the MENU button and then use D / E button to the same time. - Press the G button...

Owners Manual
Page 25
...'s screen for prolonged periods will automatically invert the TV panel color every 30 minutes. 4. Avoid allowing a fixed image to save . set to clear entirely with the remote control. - CHANNEL Language Key lock PICTURE ISM Method G SOUND TIMER Low power Set ID Caption / Text SPECIAL Captions Demo SCREEN PIP/DW LOCK Menu Prev. The TV can only be impossible to Normal. • White wash White Wash removes permanent images from a PC/video game displayed on the screen. Normal White wash Orbiter Inversion Owner's Manual...
...'s screen for prolonged periods will automatically invert the TV panel color every 30 minutes. 4. Avoid allowing a fixed image to save . set to clear entirely with the remote control. - CHANNEL Language Key lock PICTURE ISM Method G SOUND TIMER Low power Set ID Caption / Text SPECIAL Captions Demo SCREEN PIP/DW LOCK Menu Prev. The TV can only be impossible to Normal. • White wash White Wash removes permanent images from a PC/video game displayed on the screen. Normal White wash Orbiter Inversion Owner's Manual...
Owners Manual
Page 31
.... • Set Password: Change the password by the categories chosen to TV-PG, TV-14, TV-MA) • Sex scenes - sexual situations (applies to TV-PG, TV-14, TVMA) • Violence (applies to -video movies use this menu if the Lock System is also possible to block all programs to block program viewing based on /off G On Set password Off PICTURE MPAA SOUND Age block TIMER Content...
.... • Set Password: Change the password by the categories chosen to TV-PG, TV-14, TV-MA) • Sex scenes - sexual situations (applies to TV-PG, TV-14, TVMA) • Violence (applies to -video movies use this menu if the Lock System is also possible to block all programs to block program viewing based on /off G On Set password Off PICTURE MPAA SOUND Age block TIMER Content...
Owners Manual
Page 33
External Control Device Setup External Control Device Setup - Connect the serial port of Connector; RS-232C Setup REMOTE CONTROL RS-232C INPUT (CONTROL/SERVICE) DVI INPUT AUDIO INPUT RGB INPUT COMPONENT INPUT 2 COMPONENT INPUT 1 VIDEO R L AUDIO MONITOR OUTPUT R L/MONO A/V INPUT 1 S-VIDEO AUDIO VIDEO Antenna AC INPUT PC Type of the control device to the RS-232C jack on the Monitor back panel. - Connect the RS-232C input jack to send) 9 No Connection RS-232C Configurations 7-Wire Configurations (Standard RS-232C cable) PC PDP RXD 2 TXD 3 GND 5 DTR 4 DSR 6 RTS 7 CTS ...
External Control Device Setup External Control Device Setup - Connect the serial port of Connector; RS-232C Setup REMOTE CONTROL RS-232C INPUT (CONTROL/SERVICE) DVI INPUT AUDIO INPUT RGB INPUT COMPONENT INPUT 2 COMPONENT INPUT 1 VIDEO R L AUDIO MONITOR OUTPUT R L/MONO A/V INPUT 1 S-VIDEO AUDIO VIDEO Antenna AC INPUT PC Type of the control device to the RS-232C jack on the Monitor back panel. - Connect the RS-232C input jack to send) 9 No Connection RS-232C Configurations 7-Wire Configurations (Standard RS-232C cable) PC PDP RXD 2 TXD 3 GND 5 DTR 4 DSR 6 RTS 7 CTS ...

Owners Manual
Page 34
...03. Brightness k 09. PIP/DW k 15. Color Temperature k 21. Blue Adjustment k 24. PIP Input Source k 25. Abnormal State k 26. When selecting Set ID '0', every connected PDP set ID to choose the TIMER Caption / Text desired monitor ID number. COM- External Control Device Setup Set ID - Power k 02. Aspect Ratio k 04. Sharpness k 12. Remote Control Lock Mode k 14. PIP Position k 17. Orbiter Pixel Setting j 30. Picture Size j 31. At this format when receiving normal data. SOUND Low power Set ID G 1 3. Screen Mute k 05...
...03. Brightness k 09. PIP/DW k 15. Color Temperature k 21. Blue Adjustment k 24. PIP Input Source k 25. Abnormal State k 26. When selecting Set ID '0', every connected PDP set ID to choose the TIMER Caption / Text desired monitor ID number. COM- External Control Device Setup Set ID - Power k 02. Aspect Ratio k 04. Sharpness k 12. Remote Control Lock Mode k 14. PIP Position k 17. Orbiter Pixel Setting j 30. Picture Size j 31. At this format when receiving normal data. SOUND Low power Set ID G 1 3. Screen Mute k 05...
Owners Manual
Page 38
... a fixed image remain on screen. Picture Size Setting for Double Window mode (Command2:t) G To adjust main window size in Double Window mode. Tune command (Command: m a) G Tune channel to following physical number Transmission [m][a][ ][Set ID][ ][Data0][ ][Data1][ ][Data2][ ][Data3][Cr] Data 0: Air: 02 ~ 45, Cable: 01, 0E ~ 7D 1: 0 2: 0 3: High → Main Channel: 0, Sub Channel: 1 Low → Air: 0, CATV: 1 Acknowledgement [a][ ][Set ID][ ][OK][Data0][ ][Data1][ ][Data2][ ][Data3][x] 33. External Control Device Setup...
... a fixed image remain on screen. Picture Size Setting for Double Window mode (Command2:t) G To adjust main window size in Double Window mode. Tune command (Command: m a) G Tune channel to following physical number Transmission [m][a][ ][Set ID][ ][Data0][ ][Data1][ ][Data2][ ][Data3][Cr] Data 0: Air: 02 ~ 45, Cable: 01, 0E ~ 7D 1: 0 2: 0 3: High → Main Channel: 0, Sub Channel: 1 Low → Air: 0, CATV: 1 Acknowledgement [a][ ][Set ID][ ][OK][Data0][ ][Data1][ ][Data2][ ][Data3][x] 33. External Control Device Setup...
Owners Manual
Page 41
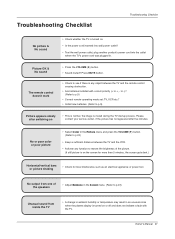
... • A change in ambient humidity or temperature may result in . Troubleshooting Checklist Troubleshooting Checklist No picture & No sound • Check whether the TV is turned on. • Is the power cord inserted into wall power outlet? • Test the wall power outlet, plug another product's power cord into the outlet where the TV's power cord was plugged in an unusual noise when the plasma display is turned on the screen for more...
... • A change in ambient humidity or temperature may result in . Troubleshooting Checklist Troubleshooting Checklist No picture & No sound • Check whether the TV is turned on. • Is the power cord inserted into wall power outlet? • Test the wall power outlet, plug another product's power cord into the outlet where the TV's power cord was plugged in an unusual noise when the plasma display is turned on the screen for more...

Owners Manual
Page 43
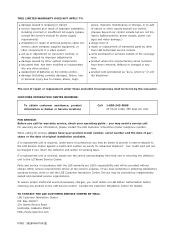
... when used in accordance with the terms of delivery when requesting warranty service. This warranty gives you specific legal rights and you may not apply to locate your nearest LGE Authorized Service Center. Plasma TV typically contain a small number of the purchase date. This information will be new or remanufactured. PLASMA TV - You will be repaired or replaced in the repair...
... when used in accordance with the terms of delivery when requesting warranty service. This warranty gives you specific legal rights and you may not apply to locate your nearest LGE Authorized Service Center. Plasma TV typically contain a small number of the purchase date. This information will be new or remanufactured. PLASMA TV - You will be repaired or replaced in the repair...
Owners Manual
Page 44
... NOT APPLY TO: G damage caused in shipping or transit G service required as a result of improper installation, including incorrect or insufficient AC supply (please consult the owner's manual for power supply requirements) G installation or repair of antenna systems, cable converters, cable company supplied equipment, or other components in a video system G set-up or adjustment on the remote control. Your credit card will be asked to provide a reserve deposit to the...
... NOT APPLY TO: G damage caused in shipping or transit G service required as a result of improper installation, including incorrect or insufficient AC supply (please consult the owner's manual for power supply requirements) G installation or repair of antenna systems, cable converters, cable company supplied equipment, or other components in a video system G set-up or adjustment on the remote control. Your credit card will be asked to provide a reserve deposit to the...


