Owner's Manual (English)
Page 4
...TV (HDMI 10 Connections to your TV (Component 11 Connections to your TV (S-Video 12 Controlling Your TV with the Supplied Multi-brand Remote Control 13 Connection to an Amplifier 14 Accessory Audio/Video (A/V) Connections to Recorder 15 Connecting a Digital Camcorder 15 Connecting the IR control... Dubbing from VCR to DVD 48 Recording from DV Input 49 SETTINGS AND ADJUSTMENTS Initial Settings 50 General Settings 51 Language Settings 52 Audio Settings 53 Lock (Parental Control) Settings 53-55 Recording Settings 56-57 Disc Settings 58 REFERENCE Remote Control 59 Front Panel 60 ...
...TV (HDMI 10 Connections to your TV (Component 11 Connections to your TV (S-Video 12 Controlling Your TV with the Supplied Multi-brand Remote Control 13 Connection to an Amplifier 14 Accessory Audio/Video (A/V) Connections to Recorder 15 Connecting a Digital Camcorder 15 Connecting the IR control... Dubbing from VCR to DVD 48 Recording from DV Input 49 SETTINGS AND ADJUSTMENTS Initial Settings 50 General Settings 51 Language Settings 52 Audio Settings 53 Lock (Parental Control) Settings 53-55 Recording Settings 56-57 Disc Settings 58 REFERENCE Remote Control 59 Front Panel 60 ...
Owner's Manual (English)
Page 13
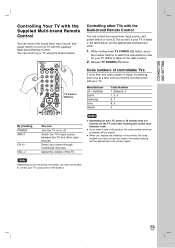
...column). 2. VOL +/- Switch the TV's input source between the TV and other TVs with the Multi-brand Remote Control You can control the sound level, input source, and power switch of non-LG TVs as well. While holding down through memorized channels. Scans up or down TV POWER (1) button, press ...to control your TV, some of the buttons. 13 Code numbers of controllable TVs If more than one that works with your LG TV with the supplied Multi-brand Remote Control. Release TV POWER (1) button. Adjust the volume of the TV. CONNECTION AND SETTING Controlling Your TV with the Supplied Multi...
...column). 2. VOL +/- Switch the TV's input source between the TV and other TVs with the Multi-brand Remote Control You can control the sound level, input source, and power switch of non-LG TVs as well. While holding down through memorized channels. Scans up or down TV POWER (1) button, press ...to control your TV, some of the buttons. 13 Code numbers of controllable TVs If more than one that works with your LG TV with the supplied Multi-brand Remote Control. Release TV POWER (1) button. Adjust the volume of the TV. CONNECTION AND SETTING Controlling Your TV with the Supplied Multi...
Owner's Manual (English)
Page 16
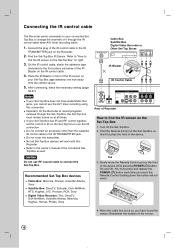
... IR Blaster in front of the device while pressing POWER (1) button On and Off. If your Set-Top Box approximately one inch away from the remote sensor. 5. When the cable box turns on the IR control cable. 4. Caution Do not use this Recorder. After connecting, make the necessary setting (page 56... OUT IR Blaster Front IR Control Cable Rear of Recorder How to the flat surface just below of the IR Blaster on , you move the Remote Control across the front of the IR sensor on your Set-Top Box has IR and RF control together, set the control to IR on...
... IR Blaster in front of the device while pressing POWER (1) button On and Off. If your Set-Top Box approximately one inch away from the remote sensor. 5. When the cable box turns on the IR control cable. 4. Caution Do not use this Recorder. After connecting, make the necessary setting (page 56... OUT IR Blaster Front IR Control Cable Rear of Recorder How to the flat surface just below of the IR Blaster on , you move the Remote Control across the front of the IR sensor on your Set-Top Box has IR and RF control together, set the control to IR on...
Owner's Manual (English)
Page 19
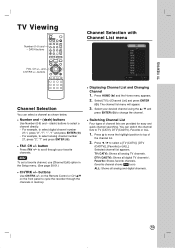
... analog channel number 27, press "2", "7" and press ENTER ( ). TV VIEWING TV Viewing Number (0-9) and - DASH buttons Channel Selection with Channel List menu FAV. on the Remote Control or CH v/V on the front panel to cycle the recorder through your desired channel using the v / V and press ENTER ( ) to top of channel lists...
... analog channel number 27, press "2", "7" and press ENTER ( ). TV VIEWING TV Viewing Number (0-9) and - DASH buttons Channel Selection with Channel List menu FAV. on the Remote Control or CH v/V on the front panel to cycle the recorder through your desired channel using the v / V and press ENTER ( ) to top of channel lists...
Owner's Manual (English)
Page 28
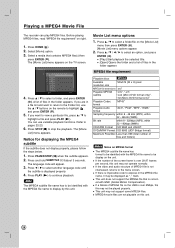
... you want to return to display by this unit may not be displayed as "_" mark. Select [Movie] option. 3. Press v / V to select a folder/file on the remote to highlight a file and press PLAY (N). The language code will appear. 3. The [Movie List] menu appears on the TV screen. Playable discs MPEG4 Available resolution...
... you want to return to display by this unit may not be displayed as "_" mark. Select [Movie] option. 3. Press v / V to select a folder/file on the remote to highlight a file and press PLAY (N). The language code will appear. 3. The [Movie List] menu appears on the TV screen. Playable discs MPEG4 Available resolution...
Owner's Manual (English)
Page 33
... Copyright on page 3 for a fixed length of time, see [Instant Timer Recording] on any of the Recorder's external inputs. 1. buttons don't work in VCR Recording mode. DVD RECORDING 33 Press PLAY (N). Press STOP (x) to return to stop recording. 1. OR You can record from . Load a recordable disc. 4.... continues until at least 30 seconds after recording starts. (MLP mode: after 1 minute) This function does not work , press INPUT (on remote) repeatedly to record it using CopyGuard, you will hear the playback audio. • You can switch between PIP window and Main window screen by...
... Copyright on page 3 for a fixed length of time, see [Instant Timer Recording] on any of the Recorder's external inputs. 1. buttons don't work in VCR Recording mode. DVD RECORDING 33 Press PLAY (N). Press STOP (x) to return to stop recording. 1. OR You can record from . Load a recordable disc. 4.... continues until at least 30 seconds after recording starts. (MLP mode: after 1 minute) This function does not work , press INPUT (on remote) repeatedly to record it using CopyGuard, you will hear the playback audio. • You can switch between PIP window and Main window screen by...
Owner's Manual (English)
Page 38
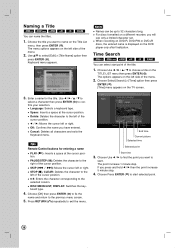
... (N): Inserts a space at the cursor position. End time Current picture Selected time Selected point Start time 3. Choose Press ENTER ( ) to the left or right. Tips Remote Control buttons for the title. If you will see only a limited character set.
... (N): Inserts a space at the cursor position. End time Current picture Selected time Selected point Start time 3. Choose Press ENTER ( ) to the left or right. Tips Remote Control buttons for the title. If you will see only a limited character set.
Owner's Manual (English)
Page 47
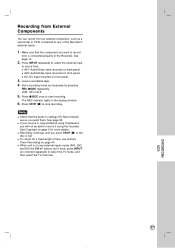
... inputs. 1. To record for more details. Make sure that the Audio In settings DV Record Audio are as necessary by pressing REC MODE repeatedly. VCR: SP or SLP 5. The REC indicator lights in the display window. 6. AV1: Audio/Video Input mounted on front panel. 3. AV2: Audio/...Video Input mounted on remote) repeatedly to stop recording. When unit is full. See page 15. 2. See Copyright on page 44. Recording from External Components You can record from...
... inputs. 1. To record for more details. Make sure that the Audio In settings DV Record Audio are as necessary by pressing REC MODE repeatedly. VCR: SP or SLP 5. The REC indicator lights in the display window. 6. AV1: Audio/Video Input mounted on front panel. 3. AV2: Audio/...Video Input mounted on remote) repeatedly to stop recording. When unit is full. See page 15. 2. See Copyright on page 44. Recording from External Components You can record from...
Owner's Manual (English)
Page 48
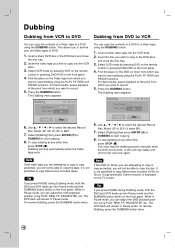
... any other time, press STOP (x). Use v / V / b / B to a Video tape using the PLAY, FF, REW and PAUSE functions. Select VCR mode by pressing DVD on the remote control or pressing DVD/VCR on the front panel. Insert a blank video tape into Pause mode and the DUBBING button blinks on the front panel... can copy the contents of a DVD to select the desired Record Rec. The Dubbing menu appears. Select DVD mode by pressing VCR on the remote control or pressing DVD/VCR on the TV screen. Mode: XP, SP, LP, EP or MLP. 7. To stop the dubbing process manually when the DVD movie ...
... any other time, press STOP (x). Use v / V / b / B to a Video tape using the PLAY, FF, REW and PAUSE functions. Select VCR mode by pressing DVD on the remote control or pressing DVD/VCR on the front panel. Insert a blank video tape into Pause mode and the DUBBING button blinks on the front panel... can copy the contents of a DVD to select the desired Record Rec. The Dubbing menu appears. Select DVD mode by pressing VCR on the remote control or pressing DVD/VCR on the TV screen. Mode: XP, SP, LP, EP or MLP. 7. To stop the dubbing process manually when the DVD movie ...
Owner's Manual (English)
Page 49
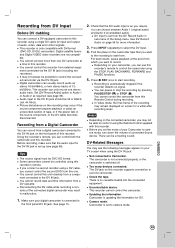
... DV IN jack. You can choose between Audio 1 (original audio) and Audio 2 (overdubbed audio). Before you can use this recorder's remote to control the camcorder using a single DV cable for DV. Picture disturbance on page 56 for a while after recording stops. Some camcorders ... can connect a DV-equipped camcorder to this recorder using the STOP, PLAY, BACKWARD, FORWARD and PAUSE functions. 5. Depending on this Remote Control during recording. It may remain displayed on the connected camcorder, you require. You cannot record date and time information from this recorder...
... DV IN jack. You can choose between Audio 1 (original audio) and Audio 2 (overdubbed audio). Before you can use this recorder's remote to control the camcorder using a single DV cable for DV. Picture disturbance on page 56 for a while after recording stops. Some camcorders ... can connect a DV-equipped camcorder to this recorder using the STOP, PLAY, BACKWARD, FORWARD and PAUSE functions. 5. Depending on this Remote Control during recording. It may remain displayed on the connected camcorder, you require. You cannot record date and time information from this recorder...
Owner's Manual (English)
Page 57
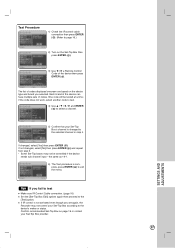
... code will be controlled if the device needs sub channel input - Confirm recommended Set-Top Box on the Set-Top Box then press ENTER ( ). 3) Use b / B a Remote Control Code of the device then press ENTER ( ). Test Procedure 1) Check the IR control cable connection then press ENTER ( ). (Refer to page 16.) 2) Turn on...
... code will be controlled if the device needs sub channel input - Confirm recommended Set-Top Box on the Set-Top Box then press ENTER ( ). 3) Use b / B a Remote Control Code of the device then press ENTER ( ). Test Procedure 1) Check the IR control cable connection then press ENTER ( ). (Refer to page 16.) 2) Turn on...
Owner's Manual (English)
Page 59
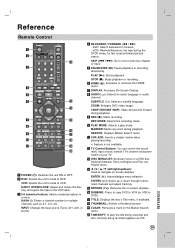
... the unit's mode to DVD. c 0-9 numerical buttons: Selects numbered options in the VCR deck. d BACKWARD / FORWARD (m / M): - i REC (z): Starts recording. MARKER: Marks any point during playback. n b / B / v / V (left/right/up...2-1, 2-2, etc. ENTER ( ): Acknowledges menu selection. s CLEAR: Removes a mark on -screen displays. ZOOM: Enlarges DVD video image. REFERENCE 59 VCR: Rewinds/Advances the tape during the STOP mode, for multiple channels such as PIP. Reference Remote Control a b l c d e f m n g o h p i q j r * k s t a POWER (1): Switches the unit...
... the unit's mode to DVD. c 0-9 numerical buttons: Selects numbered options in the VCR deck. d BACKWARD / FORWARD (m / M): - i REC (z): Starts recording. MARKER: Marks any point during playback. n b / B / v / V (left/right/up...2-1, 2-2, etc. ENTER ( ): Acknowledges menu selection. s CLEAR: Removes a mark on -screen displays. ZOOM: Enlarges DVD video image. REFERENCE 59 VCR: Rewinds/Advances the tape during the STOP mode, for multiple channels such as PIP. Reference Remote Control a b l c d e f m n g o h p i q j r * k s t a POWER (1): Switches the unit...

Owner's Manual (English)
Page 60
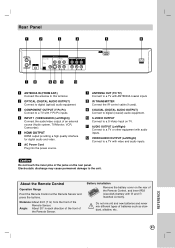
... VCR (or VCR to exit pause mode. COMPONENT: 480p, 480i q Cassette Compartment (VCR deck) Insert a video cassette here. 60 VCR The VCR deck is not displayed.) e Remote Sensor Point the recorder Remote Control here. f USB Port Connect an USB Flash Drive. i Z VCR Ejects the tape in the VCR ... /AUDIO (Left/Right)) Connect the audio/video output of the Recorder. d Display window Shows the current status of an external source (Audio system, TV/ Monitor, VCR, Camcorder, etc.). Press repeatedly to set the recording time. Front Panel a b c d e fg h i / I CH CH jkl m n DV IN 2 op q a...
... VCR (or VCR to exit pause mode. COMPONENT: 480p, 480i q Cassette Compartment (VCR deck) Insert a video cassette here. 60 VCR The VCR deck is not displayed.) e Remote Sensor Point the recorder Remote Control here. f USB Port Connect an USB Flash Drive. i Z VCR Ejects the tape in the VCR ... /AUDIO (Left/Right)) Connect the audio/video output of the Recorder. d Display window Shows the current status of an external source (Audio system, TV/ Monitor, VCR, Camcorder, etc.). Press repeatedly to set the recording time. Front Panel a b c d e fg h i / I CH CH jkl m n DV IN 2 op q a...
Owner's Manual (English)
Page 61
... output of the jacks on the rear panel. Caution Do not touch the inner pins of an external source (Audio system, TV/Monitor, VCR, Camcorder). e HDMI OUTPUT HDMI output providing a high quality interface for digital audio and video. k AUDIO OUTPUT (Left/Right) Connect to...audio equipment. i COAXIAL (DIGITAL AUDIO OUTPUT) Connect to a TV or other equipment with audio inputs. About the Remote Control Operation Range Point the Remote Control at the Remote Sensor and press the buttons. Battery installation Remove the battery cover on TV. g ANTENNA OUT (TO TV) Connect...
... output of the jacks on the rear panel. Caution Do not touch the inner pins of an external source (Audio system, TV/Monitor, VCR, Camcorder). e HDMI OUTPUT HDMI output providing a high quality interface for digital audio and video. k AUDIO OUTPUT (Left/Right) Connect to...audio equipment. i COAXIAL (DIGITAL AUDIO OUTPUT) Connect to a TV or other equipment with audio inputs. About the Remote Control Operation Range Point the Remote Control at the Remote Sensor and press the buttons. Battery installation Remove the battery cover on TV. g ANTENNA OUT (TO TV) Connect...

Owner's Manual (English)
Page 62
Notes The USB Flash Drive option in VCR mode. The USB Flash Drives which require additional program installation when you have connected it fits into place. This unit is in the HOME menu ...] or MOVIE option. 4. USB Flash Drive which require additional program installation when you have connected it to a computer, is not operating. The contents on the Remote Control. 3. If swallowed, seek medical advice immediately. Do not extract the USB Flash Drive during operation (play the MP3 / WMA / JPEG / MOVIE files contained in...
Notes The USB Flash Drive option in VCR mode. The USB Flash Drives which require additional program installation when you have connected it fits into place. This unit is in the HOME menu ...] or MOVIE option. 4. USB Flash Drive which require additional program installation when you have connected it to a computer, is not operating. The contents on the Remote Control. 3. If swallowed, seek medical advice immediately. Do not extract the USB Flash Drive during operation (play the MP3 / WMA / JPEG / MOVIE files contained in...
Owner's Manual (English)
Page 65
... input mode on the disc tray correctly inside the guide. b The input source setting on the disc tray correctly inside the guide. b The remote's manufacturer code returned to the amplifier is incorrect. Cannot play MP3/WMA/ b The files are not recorded on this unit. The picture is ... (page 14, 53). Do not use a commercially available liquid type cleaning cassette, as it may have the heads cleaned at the remote sensor of the remote control and the unit. b Place the disc on the amplifier or the connection to the default setting when you replaced the batteries. Cannot...
... input mode on the disc tray correctly inside the guide. b The input source setting on the disc tray correctly inside the guide. b The remote's manufacturer code returned to the amplifier is incorrect. Cannot play MP3/WMA/ b The files are not recorded on this unit. The picture is ... (page 14, 53). Do not use a commercially available liquid type cleaning cassette, as it may have the heads cleaned at the remote sensor of the remote control and the unit. b Place the disc on the amplifier or the connection to the default setting when you replaced the batteries. Cannot...
Owner's Manual (English)
Page 70
A Playlist leaves the original titles as they can search them by LG TV's remote control; A Playlist title takes up disc space. Codes used to the TV owner's manual for the details of scan lines. Sampling frequency is sampled regularly ..., the video signal standard, has 480 interlaced (i) scan lines, whereas progressive scanning uses twice the number of SIMPLINK function. Applying code classified by the TV's remote control when this recorder. Play, Pause, Scan, Skip, Stop, Power Off, etc. A unit for a device from the actual recordings on the composition's most important ...
A Playlist leaves the original titles as they can search them by LG TV's remote control; A Playlist title takes up disc space. Codes used to the TV owner's manual for the details of scan lines. Sampling frequency is sampled regularly ..., the video signal standard, has 480 interlaced (i) scan lines, whereas progressive scanning uses twice the number of SIMPLINK function. Applying code classified by the TV's remote control when this recorder. Play, Pause, Scan, Skip, Stop, Power Off, etc. A unit for a device from the actual recordings on the composition's most important ...
Owner's Manual (English)
Page 72
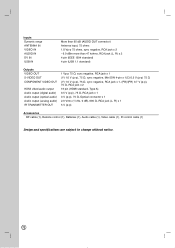
...;, RCA jack x 2 19 pin (HDMI standard, Type A) 0.5 V (p-p), 75 Ω, RCA jack x 1 3 V (p-p), 75 Ω, Optical connector x 1 2.0 Vrms (1 kHz, 0 dB), 600 Ω, RCA jack (L, R) x 1 5 V (p-p) Accessories RF cable (1), Remote control (1), Batteries (1), Audio cable (1), Video cable (1), IR control cable (1) Design and specifications are subject to change without notice. 72
...;, RCA jack x 2 19 pin (HDMI standard, Type A) 0.5 V (p-p), 75 Ω, RCA jack x 1 3 V (p-p), 75 Ω, Optical connector x 1 2.0 Vrms (1 kHz, 0 dB), 600 Ω, RCA jack (L, R) x 1 5 V (p-p) Accessories RF cable (1), Remote control (1), Batteries (1), Audio cable (1), Video cable (1), IR control cable (1) Design and specifications are subject to change without notice. 72
Owner's Manual (English)
Page 73
..., 12 HDMI 10 Component 11 S-Video 12 Amplifier 14 Recorder 15 Digital Camcorder 15 IR control cable 16 Controlling other TVs with the Multi-brand Remote Control 13 Copy protection 69 Copy-Free 29 Copy-Never 29 Copy-Once 29 Counter 43 CPRM 69 D Delete 34, 37 Deleting a Part 37 DIGITAL...
..., 12 HDMI 10 Component 11 S-Video 12 Amplifier 14 Recorder 15 Digital Camcorder 15 IR control cable 16 Controlling other TVs with the Multi-brand Remote Control 13 Copy protection 69 Copy-Free 29 Copy-Never 29 Copy-Once 29 Counter 43 CPRM 69 D Delete 34, 37 Deleting a Part 37 DIGITAL...
Owner's Manual (English)
Page 74
... PLAY 21, 42, 59 PLAY MODE 23, 59 Playable Discs 7 Playback DVD 21-24 Audio CD or MP3/WMA 25 JPEG 26-27 MPEG4 28 VCR 42-43 Playlist 70 Power cord 2, 61 Power Save Mode 51 Progressive scan 70 Protect 34, 39 R Random 25 Rear Panel 61 REC 59 REC... MODE 59 Record mode DVD 56 VCR 56 Recordable time 71 Recording DVD 29 VCR 44 74 Recording Settings 56 Regional code 6, 70 Remote Control 59 Resetting 67 Resolution 10, 60 Resume playback 21 Rotate 26 S Safety tab 42 Sampling Freq...
... PLAY 21, 42, 59 PLAY MODE 23, 59 Playable Discs 7 Playback DVD 21-24 Audio CD or MP3/WMA 25 JPEG 26-27 MPEG4 28 VCR 42-43 Playlist 70 Power cord 2, 61 Power Save Mode 51 Progressive scan 70 Protect 34, 39 R Random 25 Rear Panel 61 REC 59 REC... MODE 59 Record mode DVD 56 VCR 56 Recordable time 71 Recording DVD 29 VCR 44 74 Recording Settings 56 Regional code 6, 70 Remote Control 59 Resetting 67 Resolution 10, 60 Resume playback 21 Rotate 26 S Safety tab 42 Sampling Freq...

