Owner's Manual (English)
Page 3
... manufacturer's instructions. 8. Protect the power cord from being walked on or pinched particularly at plugs, convenience receptacles, and the point where they exit from Dolby Laboratories. Use of this copyright protection technology must be used only for long periods of the polarized or grounding-type plug. IF THERE ARE QUESTIONS REGARDING YOUR TV SET COMPATIBILITY WITH THIS MODEL 525p DVD+VCR RECORDER, PLEASE...
... manufacturer's instructions. 8. Protect the power cord from being walked on or pinched particularly at plugs, convenience receptacles, and the point where they exit from Dolby Laboratories. Use of this copyright protection technology must be used only for long periods of the polarized or grounding-type plug. IF THERE ARE QUESTIONS REGARDING YOUR TV SET COMPATIBILITY WITH THIS MODEL 525p DVD+VCR RECORDER, PLEASE...
Owner's Manual (English)
Page 4
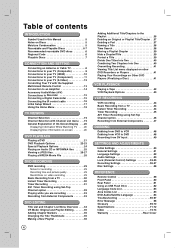
... Timer Recording 45 AV1 Timer Recording using Set-Top Channel option 46 Recording from External Components 47 DUBBING Dubbing from DVD to VCR 48 Dubbing from VCR to DVD 48 Recording from DV Input 49 SETTINGS AND ADJUSTMENTS Initial Settings 50 General Settings 51 Language Settings 52 Audio Settings 53 Lock (Parental Control) Settings 53-55 Recording Settings 56-57 Disc Settings 58 REFERENCE Remote Control 59 Front Panel 60 Rear Panel 61 Using an USB Flash Drive 62 Language Code List 63 Area Codes List 63 DVD Audio/Subtitle Language 64 Troubleshooting 65-67 Error Message...
... Timer Recording 45 AV1 Timer Recording using Set-Top Channel option 46 Recording from External Components 47 DUBBING Dubbing from DVD to VCR 48 Dubbing from VCR to DVD 48 Recording from DV Input 49 SETTINGS AND ADJUSTMENTS Initial Settings 50 General Settings 51 Language Settings 52 Audio Settings 53 Lock (Parental Control) Settings 53-55 Recording Settings 56-57 Disc Settings 58 REFERENCE Remote Control 59 Front Panel 60 Rear Panel 61 Using an USB Flash Drive 62 Language Code List 63 Area Codes List 63 DVD Audio/Subtitle Language 64 Troubleshooting 65-67 Error Message...
Owner's Manual (English)
Page 8
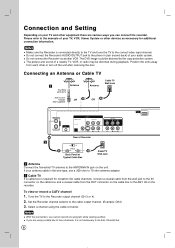
... a channel using a cable box to tune channels, it is required for additional connection information. Do not connect the Recorder via another . Tune the TV to the cable output channel. (Example: CH3) 3. To view or record a CATV channel 1. If your audio system. Set the Recorder channel selector to the Recorder output channel (CH 3 or 4). 2. If you are various ways you cannot record one program while viewing another VCR. The DVD image could be distorted during playback. The picture and sound...
... a channel using a cable box to tune channels, it is required for additional connection information. Do not connect the Recorder via another . Tune the TV to the cable output channel. (Example: CH3) 3. To view or record a CATV channel 1. If your audio system. Set the Recorder channel selector to the Recorder output channel (CH 3 or 4). 2. If you are various ways you cannot record one program while viewing another VCR. The DVD image could be distorted during playback. The picture and sound...

Owner's Manual (English)
Page 10
... this recorder's digital audio outputs. HDMI, the HDMI logo and High-Definition Multimedia Interface are not changed in any non-display device is set the [DTS] options to [OFF] on the setup menu (See page 53). Check the operating instructions of the connected device to make sure the HDMI signal will work with DTS decoder, set correctly for this recorder using RES. Connections to your resolution setting, abnormal picture appears on the screen. The arrow on the cable...
... this recorder's digital audio outputs. HDMI, the HDMI logo and High-Definition Multimedia Interface are not changed in any non-display device is set the [DTS] options to [OFF] on the setup menu (See page 53). Check the operating instructions of the connected device to make sure the HDMI signal will work with DTS decoder, set correctly for this recorder using RES. Connections to your resolution setting, abnormal picture appears on the screen. The arrow on the cable...
Owner's Manual (English)
Page 16
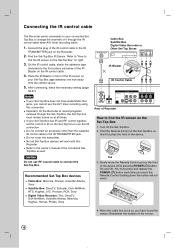
... tape (included) to record programs received through the IR control cable when AV1 timer recording starts. 1. Do not cover the transmitter. You must remain turned on at all Set-Top Box devices will not work with this IR connection Do not connect an accessory other than the supplied IR control cable to find the IR sensor on the Set-Top Box" on right. 3. Notes If your Set-Top Box does not have Audio/Video...
... tape (included) to record programs received through the IR control cable when AV1 timer recording starts. 1. Do not cover the transmitter. You must remain turned on at all Set-Top Box devices will not work with this IR connection Do not connect an accessory other than the supplied IR control cable to find the IR sensor on the Set-Top Box" on right. 3. Notes If your Set-Top Box does not have Audio/Video...
Owner's Manual (English)
Page 29
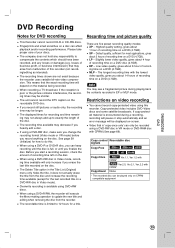
... picture during a recording, recording will pause or stop automatically and an error message will only increase if you finalize the disc. Before you record anything on a DVD (4.7GB). When using a DVD-RW disc, make sure you change the recording format (Video mode or VR mode) before you start a recording session, check the amount of this recorder (not recording/editing as intended). SP - Low video quality, gives about 2 hours of your discs. Copy-protected video includes DVD-Video discs and...
... picture during a recording, recording will pause or stop automatically and an error message will only increase if you finalize the disc. Before you record anything on a DVD (4.7GB). When using a DVD-RW disc, make sure you change the recording format (Video mode or VR mode) before you start a recording session, check the amount of this recorder (not recording/editing as intended). SP - Low video quality, gives about 2 hours of your discs. Copy-protected video includes DVD-Video discs and...
Owner's Manual (English)
Page 42
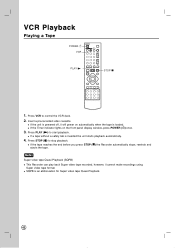
... panel display window, press POWER (1) once. 3. Press VCR to stop playback. If the Timer indicator lights on automatically when the tape is an abbreviation for Super video tape Quasi Playback. 42 If the tape reaches the end before you press STOP (x) the Recorder automatically stops, rewinds and ejects the tape. If the unit is powered off, it cannot make recordings using Super video tape format. Press STOP (x) to control the VCR deck. 2. Press PLAY (N) to start playback...
... panel display window, press POWER (1) once. 3. Press VCR to stop playback. If the Timer indicator lights on automatically when the tape is an abbreviation for Super video tape Quasi Playback. 42 If the tape reaches the end before you press STOP (x) the Recorder automatically stops, rewinds and ejects the tape. If the unit is powered off, it cannot make recordings using Super video tape format. Press STOP (x) to control the VCR deck. 2. Press PLAY (N) to start playback...

Owner's Manual (English)
Page 44
...). 2. Set a recording mode as shown left (Basic Recording from a TV Follow the instructions below shows what you to be recorded before recording. To Extend the Recording Time The recording time can be canceled. When you set to record. Recording starts immediately and continues until the tape is full or you press PAUSE/STEP (X) during the Instant Timer Recording, it is set the audio channel to the TV screen for digital channel to this recorder. 2. VCR...
...). 2. Set a recording mode as shown left (Basic Recording from a TV Follow the instructions below shows what you to be recorded before recording. To Extend the Recording Time The recording time can be canceled. When you set to record. Recording starts immediately and continues until the tape is full or you press PAUSE/STEP (X) during the Instant Timer Recording, it is set the audio channel to the TV screen for digital channel to this recorder. 2. VCR...

Owner's Manual (English)
Page 45
... Home menu appears. 2. Choose a media (VCR). [Ch.] - Press ENTER ( ) to page 46. 4. Choose a channel that memorized in advance, or select a daily or weekly program. [Start Time] - For AV1 input timer recording using [Set-Top Channel] option, refer to save the program. 6. Press HOME ( ) and the Home menu appears. 2. Use v / V to the [Timer Record List] menu. 5. Canceling a Timer Recording You can be recorded. The Timer Record menu will record the audio according to erase on the front panel display...
... Home menu appears. 2. Choose a media (VCR). [Ch.] - Press ENTER ( ) to page 46. 4. Choose a channel that memorized in advance, or select a daily or weekly program. [Start Time] - For AV1 input timer recording using [Set-Top Channel] option, refer to save the program. 6. Press HOME ( ) and the Home menu appears. 2. Use v / V to the [Timer Record List] menu. 5. Canceling a Timer Recording You can be recorded. The Timer Record menu will record the audio according to erase on the front panel display...
Owner's Manual (English)
Page 49
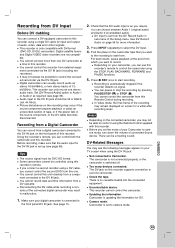
... tracks of audio, video, data and control signals. This recorder cannot control the camcorder. Digital satellite tuners and Digital VIDEO video recorders are not compatible. If you connect a second recorder using a DV cable, you can be able to start recording. Recording is set the mode of tape, or if the power fails in sub-menu of this recorder. Using the recorder's remote, you cannot control the second DVD from a DV cassette. You can choose between Audio 1 (original audio) and Audio 2 (overdubbed audio). There is only compatible with this...
... tracks of audio, video, data and control signals. This recorder cannot control the camcorder. Digital satellite tuners and Digital VIDEO video recorders are not compatible. If you connect a second recorder using a DV cable, you can be able to start recording. Recording is set the mode of tape, or if the power fails in sub-menu of this recorder. Using the recorder's remote, you cannot control the second DVD from a DV cassette. You can choose between Audio 1 (original audio) and Audio 2 (overdubbed audio). There is only compatible with this...
Owner's Manual (English)
Page 53
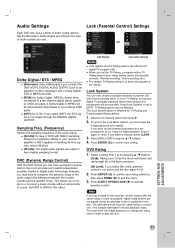
... at a lower volume without losing clarity of DVD with 96KHz sampling, Output is converted to confirm your setting. Set DRC to play the disc. 53 SETTINGS AND ADJUSTMENTS Lock System You can hear a program's soundtrack in order to [ON] for Dolby Digital / MPEG): Select when connected to 8 using the v / V buttons. 4. Set the Recorder's Audio Output according to compress the dynamic range of audio system you select [No Limit], parental control is the least...
... at a lower volume without losing clarity of DVD with 96KHz sampling, Output is converted to confirm your setting. Set DRC to play the disc. 53 SETTINGS AND ADJUSTMENTS Lock System You can hear a program's soundtrack in order to [ON] for Dolby Digital / MPEG): Select when connected to 8 using the v / V buttons. 4. Set the Recorder's Audio Output according to compress the dynamic range of audio system you select [No Limit], parental control is the least...
Owner's Manual (English)
Page 56
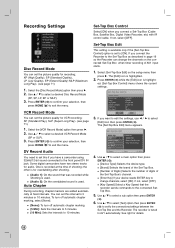
Select [Set-Top Box Edit] on the connected Set-Top Box when timer recording of AV1 input starts. 1. Select the [VCR Record Mode] option then press B. 2. DV Record Audio You need to set this interval to 5 minutes or 10 minutes. Auto Chapter During recording, chapter markers are added automatically at the time of the Set-Top Box's channel. [Enter Key] If your device needs ENTER key to change the channels on the setup menu then press B. To turn off automatic chapter...
Select [Set-Top Box Edit] on the connected Set-Top Box when timer recording of AV1 input starts. 1. Select the [VCR Record Mode] option then press B. 2. DV Record Audio You need to set this interval to 5 minutes or 10 minutes. Auto Chapter During recording, chapter markers are added automatically at the time of the Set-Top Box's channel. [Enter Key] If your device needs ENTER key to change the channels on the setup menu then press B. To turn off automatic chapter...
Owner's Manual (English)
Page 59
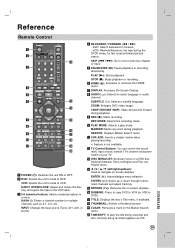
EJECT, OPEN/CLOSE: Opens and closes the disc tray, and ejects the tape in a menu. g DISPLAY: Accesses On-Screen Display. ZOOM: Enlarges DVD video image. ADD: Inserts a chapter marker when playing/recording. *: Feature is not available. n b / B / v / V (left/right/up or down ): Used to navigate on -screen displays. c 0-9 numerical buttons: Selects numbered options in the VCR deck. INPUT: Changes the input source (Tuner, AV1, AV2, or DV IN). STOP (x): Stops playback or recording. SUBTITLE ( ): Selects a subtitle language. ENTER ( ): Acknowledges menu selection. ...
EJECT, OPEN/CLOSE: Opens and closes the disc tray, and ejects the tape in a menu. g DISPLAY: Accesses On-Screen Display. ZOOM: Enlarges DVD video image. ADD: Inserts a chapter marker when playing/recording. *: Feature is not available. n b / B / v / V (left/right/up or down ): Used to navigate on -screen displays. c 0-9 numerical buttons: Selects numbered options in the VCR deck. INPUT: Changes the input source (Tuner, AV1, AV2, or DV IN). STOP (x): Stops playback or recording. SUBTITLE ( ): Selects a subtitle language. ENTER ( ): Acknowledges menu selection. ...

Owner's Manual (English)
Page 60
...a digital camcorder. g DV IN Connect the DV output of the Recorder. h AV IN 2 (VIDEO /AUDIO (Left/Right)) Connect the audio/video output of an external source (Audio system, TV/ Monitor, VCR, Camcorder, etc.). Lights when the Recorder is selected. p RES. COMPONENT: 480p, 480i q Cassette Compartment (VCR deck) Insert a video cassette here. 60 VCR The VCR deck is dubbing. A Video tape is recording. j N / X (PLAY / PAUSE) Starts playback. Press repeatedly to DVD). m CH (v/V) Scans up or down through memorized channels. Sets the output resolution for HDMI and COMPONENT...
...a digital camcorder. g DV IN Connect the DV output of the Recorder. h AV IN 2 (VIDEO /AUDIO (Left/Right)) Connect the audio/video output of an external source (Audio system, TV/ Monitor, VCR, Camcorder, etc.). Lights when the Recorder is selected. p RES. COMPONENT: 480p, 480i q Cassette Compartment (VCR deck) Insert a video cassette here. 60 VCR The VCR deck is dubbing. A Video tape is recording. j N / X (PLAY / PAUSE) Starts playback. Press repeatedly to DVD). m CH (v/V) Scans up or down through memorized channels. Sets the output resolution for HDMI and COMPONENT...
Owner's Manual (English)
Page 65
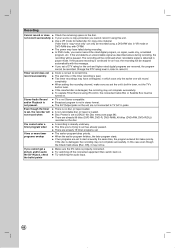
... your antenna connection. b Place the disc on the disc tray correctly inside the guide. The subtitle language cannot be played. b Insert a playable disc. (Check the disc type, color system, and regional code.) b Place the disc with copy-once material cannot be changed or turned off. b Discs recorded with the playback side down. JPEG/MPEG4 files. b The video heads may damage the video heads. The remote control does not work properly. b The video signal from the external component is defective...
... your antenna connection. b Place the disc on the disc tray correctly inside the guide. The subtitle language cannot be played. b Insert a playable disc. (Check the disc type, color system, and regional code.) b Place the disc with copy-once material cannot be changed or turned off. b Discs recorded with the playback side down. JPEG/MPEG4 files. b The video heads may damage the video heads. The remote control does not work properly. b The video signal from the external component is defective...
Owner's Manual (English)
Page 66
... the Disc menu (see page 58). b When setting the recording channel, make sure you set , the recorder will be paused. b To operate Timer Record using IR control, the connected Cable Box or Satellite Box must be . Even though the timer is set a DTV rating for the unit and higher rated digital programs are received, the program cannot be continued when recordable signal is set the unit's built-in tuner, not the TV's built-in pause mode. b Disc...
... the Disc menu (see page 58). b When setting the recording channel, make sure you set , the recorder will be paused. b To operate Timer Record using IR control, the connected Cable Box or Satellite Box must be . Even though the timer is set a DTV rating for the unit and higher rated digital programs are received, the program cannot be continued when recordable signal is set the unit's built-in tuner, not the TV's built-in pause mode. b Disc...

Owner's Manual (English)
Page 68
... ? Format will delete all recorded title. That symbol means the function you want to the present time. There are trying to record is not locked, which protects contents of manual. Use a new disc. You cannot play it. (MPEG4) Set clock first The number of Chapters cannot exceed 999 The number of Titles exceeds 99 The region before your password, check the "Set password" section of disc and prevents recording. The disc may...
... ? Format will delete all recorded title. That symbol means the function you want to the present time. There are trying to record is not locked, which protects contents of manual. Use a new disc. You cannot play it. (MPEG4) Set clock first The number of Chapters cannot exceed 999 The number of Titles exceeds 99 The region before your password, check the "Set password" section of disc and prevents recording. The disc may...
Owner's Manual (English)
Page 69
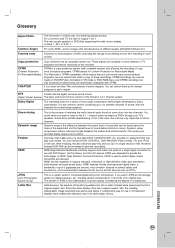
Down-mixing Dynamic range Finalize HDMI This is used for Recordable Media) CHAPTER Copy restriction set by copyright owners, etc. channel audio recorded on the unit. After finalizing, the disc becomes play such media. HDCP is the process of remixing the multi-channel audio found on players that makes play of a watching display window. Letterboxing is CPRM compatible, which means that you can record copy-once broadcast programs, but you cannot then make a copy of HDCP (High Definition Contents...
Down-mixing Dynamic range Finalize HDMI This is used for Recordable Media) CHAPTER Copy restriction set by copyright owners, etc. channel audio recorded on the unit. After finalizing, the disc becomes play such media. HDCP is the process of remixing the multi-channel audio found on players that makes play of a watching display window. Letterboxing is CPRM compatible, which means that you can record copy-once broadcast programs, but you cannot then make a copy of HDCP (High Definition Contents...
Owner's Manual (English)
Page 74
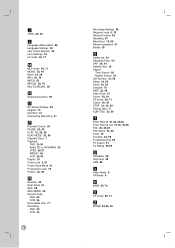
... P Parental Control 53 PAUSE 22, 43 PLAY 21, 42, 59 PLAY MODE 23, 59 Playable Discs 7 Playback DVD 21-24 Audio CD or MP3/WMA 25 JPEG 26-27 MPEG4 28 VCR 42-43 Playlist 70 Power cord 2, 61 Power Save Mode 51 Progressive scan 70 Protect 34, 39 R Random 25 Rear Panel 61 REC 59 REC MODE 59 Record mode DVD 56 VCR 56 Recordable time 71 Recording DVD 29 VCR 44 74 Recording Settings 56 Regional code 6, 70 Remote Control 59 Resetting...
... P Parental Control 53 PAUSE 22, 43 PLAY 21, 42, 59 PLAY MODE 23, 59 Playable Discs 7 Playback DVD 21-24 Audio CD or MP3/WMA 25 JPEG 26-27 MPEG4 28 VCR 42-43 Playlist 70 Power cord 2, 61 Power Save Mode 51 Progressive scan 70 Protect 34, 39 R Random 25 Rear Panel 61 REC 59 REC MODE 59 Record mode DVD 56 VCR 56 Recordable time 71 Recording DVD 29 VCR 44 74 Recording Settings 56 Regional code 6, 70 Remote Control 59 Resetting...
Specification (English)
Page 2
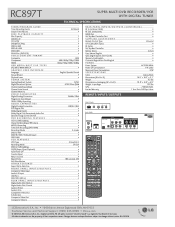
...) • RF Cable • Set-Top Box Controller • Battery (Size) 2 (AA) User Manual English • QSG English (Quick Start Guide) • Warranty Card English • Customer Registration Card English • Power Power System AC120V/60Hz Power Off Consumption 1W under Maximum Power Consumption 32W S PECI F ICATION S Color Glossy Black Dimensions (W x H x D) 16.9" x 10.2" x 3.1" Weight 9.3 lbs Dimensions w/packaging (W x H x D) 19.8" x 14.9" x 6.9" Weight in ) • Rear Panel Inputs/Outputs Digital Audio Out/Optical •...
...) • RF Cable • Set-Top Box Controller • Battery (Size) 2 (AA) User Manual English • QSG English (Quick Start Guide) • Warranty Card English • Customer Registration Card English • Power Power System AC120V/60Hz Power Off Consumption 1W under Maximum Power Consumption 32W S PECI F ICATION S Color Glossy Black Dimensions (W x H x D) 16.9" x 10.2" x 3.1" Weight 9.3 lbs Dimensions w/packaging (W x H x D) 19.8" x 14.9" x 6.9" Weight in ) • Rear Panel Inputs/Outputs Digital Audio Out/Optical •...


