User Manual
Page 1
Record model number and serial number of the Monitor and relate this owner's manual thoroughly before operating the Monitor. See the label attached on the back of the Monitor. Retain it for future reference. Model Number : Serial Number : LG Electronics U.S.A., Inc. PLASMA MONITOR OWNER'S MANUAL MODELS : MU-60PZ95V Please read this information to your dealer if you ever require service.
Record model number and serial number of the Monitor and relate this owner's manual thoroughly before operating the Monitor. See the label attached on the back of the Monitor. Retain it for future reference. Model Number : Serial Number : LG Electronics U.S.A., Inc. PLASMA MONITOR OWNER'S MANUAL MODELS : MU-60PZ95V Please read this information to your dealer if you ever require service.

User Manual
Page 3
... booklet can result in potential electrical shock or fire hazards. Do not defeat the safety purpose of the Canadian Standards Association. 1. PORTABLE CART WARNING Owner's Manual 3 Federal safety requirements, and those of the polarized or grounding-type plug. Protect the power cord from being walked on or pinched particularly at plugs...
... booklet can result in potential electrical shock or fire hazards. Do not defeat the safety purpose of the Canadian Standards Association. 1. PORTABLE CART WARNING Owner's Manual 3 Federal safety requirements, and those of the polarized or grounding-type plug. Protect the power cord from being walked on or pinched particularly at plugs...
User Manual
Page 4
... damaged or cracked wire insulation are dangerous. Do not install, remove, or reinstall the unit by an authorized servicer. Do not use of this owner's manual to be exposed to rain or moisture, does not operate normally, or has been dropped. 15. Wet Location Marking : Apparatus shall not be certain. Unplug...
... damaged or cracked wire insulation are dangerous. Do not install, remove, or reinstall the unit by an authorized servicer. Do not use of this owner's manual to be exposed to rain or moisture, does not operate normally, or has been dropped. 15. Wet Location Marking : Apparatus shall not be certain. Unplug...
User Manual
Page 5
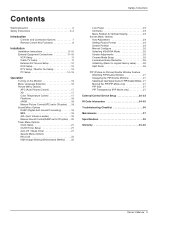
... 16 Menu Language Selection 16 Picture Menu Options APC (Auto Picture Control 17 XD 17 Color Temperature Control 17 Fleshtone 18 sRGB 18 Manual Picture Control(APC set to Off option) . . .18 Sound Menu Options DASP (Digital Auto Sound Processing 19 BBE 19 AVL (Auto... Low Power 23 XD Demo 23 Menu Rotation for Vertical Viewing 23 Screen Menu Options Auto Adjustment 24 Setting Picture Format 24 Screen Position 24 Manual Configure 25 Selecting VGA/XGA Mode 25 Screen Adjustments 25 Cinema Mode Setup 25 Luminance Noise Reduction 26 Initializing (Reset to original factory value) ....
... 16 Menu Language Selection 16 Picture Menu Options APC (Auto Picture Control 17 XD 17 Color Temperature Control 17 Fleshtone 18 sRGB 18 Manual Picture Control(APC set to Off option) . . .18 Sound Menu Options DASP (Digital Auto Sound Processing 19 BBE 19 AVL (Auto... Low Power 23 XD Demo 23 Menu Rotation for Vertical Viewing 23 Screen Menu Options Auto Adjustment 24 Setting Picture Format 24 Screen Position 24 Manual Configure 25 Selecting VGA/XGA Mode 25 Screen Adjustments 25 Cinema Mode Setup 25 Luminance Noise Reduction 26 Initializing (Reset to original factory value) ....

User Manual
Page 7
... RGB OUTPUT to these jacks. 6. S-Video Input Connect S-Video out from an external device to another monitor's PC input port. 5. Owner's Manual 7 RGB OUTPUT PORT You can watch the RGB signal on a PC. 3. DVD/DTV Input (Component 1-2) Connect a component video/audio device to ...'Speaker & Speaker Stand' manual. 9. EXTERNAL SPEAKER (8 ohm output) Connect to optional external speaker(s). * For further information, refer to these jacks. 7. POWER CORD SOCKET This...
... RGB OUTPUT to these jacks. 6. S-Video Input Connect S-Video out from an external device to another monitor's PC input port. 5. Owner's Manual 7 RGB OUTPUT PORT You can watch the RGB signal on a PC. 3. DVD/DTV Input (Component 1-2) Connect a component video/audio device to ...'Speaker & Speaker Stand' manual. 9. EXTERNAL SPEAKER (8 ohm output) Connect to optional external speaker(s). * For further information, refer to these jacks. 7. POWER CORD SOCKET This...

User Manual
Page 9
...or vertically. The speakers shown are not possible, have a qualified electrician install a separate circuit breaker. Power Supply Short-circuit Breaker Owner's Manual 9 If an accessory is designed to be installed in various ways such as on a wall, or on a desktop etc. •... plasma display is missing, please contact the dealer where you connect the grounding / earth wire to telephone wires, lightening rods, or gas pipes. Owner's Manual 1.5V 1.5V Alkaline Batteries POWER SLEEP APC ARC PIP SWAP MENU INPUT SELECT DASP PIP ARC TWIN PICTURE SUB INPUT MUTE VOL OK VOL 1 2 ...
...or vertically. The speakers shown are not possible, have a qualified electrician install a separate circuit breaker. Power Supply Short-circuit Breaker Owner's Manual 9 If an accessory is designed to be installed in various ways such as on a wall, or on a desktop etc. •... plasma display is missing, please contact the dealer where you connect the grounding / earth wire to telephone wires, lightening rods, or gas pipes. Owner's Manual 1.5V 1.5V Alkaline Batteries POWER SLEEP APC ARC PIP SWAP MENU INPUT SELECT DASP PIP ARC TWIN PICTURE SUB INPUT MUTE VOL OK VOL 1 2 ...

User Manual
Page 11
...the input source with channel switch on the remote control. (If connected to the S-VIDEO input, the picture quality is improved; Cable Box Owner's Manual 11 Connection Option 1 Set VCR output switch to 3 or 4 and then tune Monitor to the Monitor input jacks, as shown in the figure.... box. 2. ors (Video = yellow, Audio Left = white, and Audio Right = red). 2. If the 4:3 picture format is connected to the VCR owner's manual.) 3. When connecting the Monitor to the Video input. 2. Select the input source with the remote control for a long period of the screen may remain visible...
...the input source with channel switch on the remote control. (If connected to the S-VIDEO input, the picture quality is improved; Cable Box Owner's Manual 11 Connection Option 1 Set VCR output switch to 3 or 4 and then tune Monitor to the Monitor input jacks, as shown in the figure.... box. 2. ors (Video = yellow, Audio Left = white, and Audio Right = red). 2. If the 4:3 picture format is connected to the VCR owner's manual.) 3. When connecting the Monitor to the Video input. 2. Select the input source with the remote control for a long period of the screen may remain visible...

User Manual
Page 12
... the figure. 2. Installation External A/V Source Setup How to connect Connect the audio and video cables from the external equipment's output jacks to the DVD player's manual for operating instructions. When connecting the Monitor to the AUDIO INPUT jacks on the remote control to select Component 1 or Component 2. (If connected to use...
... the figure. 2. Installation External A/V Source Setup How to connect Connect the audio and video cables from the external equipment's output jacks to the DVD player's manual for operating instructions. When connecting the Monitor to the AUDIO INPUT jacks on the remote control to select Component 1 or Component 2. (If connected to use...
User Manual
Page 13
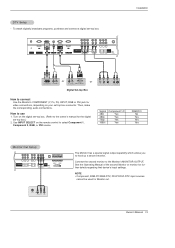
...( )L( EXTERNAL SPEAKER or or DVI-DTV OUTPUT (R) AUDIO (L) (R) AUDIO (L) RGB-DTV OUTPUT Digital Set-top Box B R (R) AUDIO (L) How to the owner's manual for video connections, depending on your set -top box.) 2. Then, make the corresponding audio connections. How to the Monitor's MONITOR OUTPUT. See the Operating... Manual of the second Monitor or monitor for Monitor out. Owner's Manual 13 NOTE • Component, RGB-PC/RGB-DTV, DVI-PC/DVI-DTV input sources cannot be ...
...( )L( EXTERNAL SPEAKER or or DVI-DTV OUTPUT (R) AUDIO (L) (R) AUDIO (L) RGB-DTV OUTPUT Digital Set-top Box B R (R) AUDIO (L) How to the owner's manual for video connections, depending on your set -top box.) 2. Then, make the corresponding audio connections. How to the Monitor's MONITOR OUTPUT. See the Operating... Manual of the second Monitor or monitor for Monitor out. Owner's Manual 13 NOTE • Component, RGB-PC/RGB-DTV, DVI-PC/DVI-DTV input sources cannot be ...

User Manual
Page 15
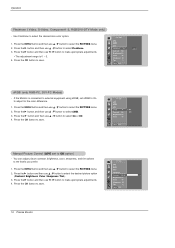
....023 60.02 63.981 60.02 47.700 60.00 59.625 75.02 47.700 60.00 59.625 75.02 Installation Owner's Manual 15
....023 60.02 63.981 60.02 47.700 60.00 59.625 75.02 47.700 60.00 59.625 75.02 Installation Owner's Manual 15

User Manual
Page 17
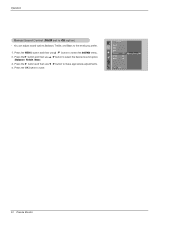
APC adjusts the Monitor to display a real HD source through an advanced digital signal processing algorithm. - XD is LG Electronic's unique picture improving technology to the best picture appearance. - Press the G button and then use D / E button to select ACC ... Contrast 100 Brightness 55 Color 55 Sharpness 60 Tint 0 Menu Prev. If adjusting picture options (contrast, brightness, color, sharpness, or tint) manually, APC automatically changes to select the picture appearance setup option as shown below. Press the APC button repeatedly to Off. 1. Press the OK ...
APC adjusts the Monitor to display a real HD source through an advanced digital signal processing algorithm. - XD is LG Electronic's unique picture improving technology to the best picture appearance. - Press the G button and then use D / E button to select ACC ... Contrast 100 Brightness 55 Color 55 Sharpness 60 Tint 0 Menu Prev. If adjusting picture options (contrast, brightness, color, sharpness, or tint) manually, APC automatically changes to select the picture appearance setup option as shown below. Press the APC button repeatedly to Off. 1. Press the OK ...
User Manual
Page 18
... the levels you prefer. 1. sRGB (only RGB-PC, DVI-PC Modes) - Press the MENU button and then use D / E button to adjust for the color difference. 1. Manual Picture Control (APC set sRGB to On to select the desired picture option (Contrast, Brightness, Color, Sharpness, Tint). 3. Press the G button and then use D / E button...
... the levels you prefer. 1. sRGB (only RGB-PC, DVI-PC Modes) - Press the MENU button and then use D / E button to adjust for the color difference. 1. Manual Picture Control (APC set sRGB to On to select the desired picture option (Contrast, Brightness, Color, Sharpness, Tint). 3. Press the G button and then use D / E button...

User Manual
Page 19
... button to select AVL. 3. AVL maintains an equal sound level; Press the G button and then use D / E button to Off. 1. Owner's Manual 19 even if you adjust sound options (Treble and Bass) manually, DASP automatically changes to select BBE. 3. Press the G button and then use D / E button to select On or Off. 4. If you...
... button to select AVL. 3. AVL maintains an equal sound level; Press the G button and then use D / E button to Off. 1. Owner's Manual 19 even if you adjust sound options (Treble and Bass) manually, DASP automatically changes to select BBE. 3. Press the G button and then use D / E button to select On or Off. 4. If you...
User Manual
Page 20
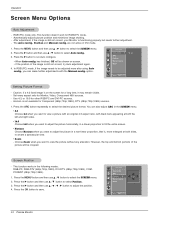
Press the OK button to select the desired sound option (Balance, Treble, Bass). 3. Press the G button and then use D / E button to make appropriate adjustments. 4. Press the MENU button and then use F / G button to select the SOUND menu. 2. Press the G button and then use D / E button to save. SOUND DASP BBE AVL Balance 0G L R Treble 50 Bass 50 Menu Prev. 20 Plasma Monitor You can adjust sound options Balance, Treble, and Bass to Off option) - Operation Manual Sound Control (DASP set to the levels you prefer. 1.
Press the OK button to select the desired sound option (Balance, Treble, Bass). 3. Press the G button and then use D / E button to make appropriate adjustments. 4. Press the MENU button and then use F / G button to select the SOUND menu. 2. Press the G button and then use D / E button to save. SOUND DASP BBE AVL Balance 0G L R Treble 50 Bass 50 Menu Prev. 20 Plasma Monitor You can adjust sound options Balance, Treble, and Bass to Off option) - Operation Manual Sound Control (DASP set to the levels you prefer. 1.

User Manual
Page 21
...number of minutes you do not press any button within 2 hours after 10 minutes. 1. AM Menu Prev. If you want is wrong, reset the clock manually. 1. If set the minutes. 6. zz 4. Press the OK button to on the screen, press the OK button. TIMER Clock G Off timer On...timer Auto off times: zz --- Press the G button and then use D / E button to set the hour. 5. The Sleep Timer turns the Monitor off . 3. Owner's Manual 21 Press the G button and then use D / E button to select On or Off. 4. Press the G button and then use D / E button to select Clock. 3....
...number of minutes you do not press any button within 2 hours after 10 minutes. 1. AM Menu Prev. If you want is wrong, reset the clock manually. 1. If set the minutes. 6. zz 4. Press the OK button to on the screen, press the OK button. TIMER Clock G Off timer On...timer Auto off times: zz --- Press the G button and then use D / E button to set the hour. 5. The Sleep Timer turns the Monitor off . 3. Owner's Manual 21 Press the G button and then use D / E button to select On or Off. 4. Press the G button and then use D / E button to select Clock. 3....

User Manual
Page 23
... menu. 2. Press the G button and then use D / E button to select OSD (On Screen Display) Rotate. 3. Use it to select the SPECIAL menu. 2. Normal Rotate Owner's Manual 23 Press the MENU button and then use D / E button to select the SPECIAL menu. 2. Press the G button and then use D / E button to see the difference...
... menu. 2. Press the G button and then use D / E button to select OSD (On Screen Display) Rotate. 3. Use it to select the SPECIAL menu. 2. Normal Rotate Owner's Manual 23 Press the MENU button and then use D / E button to select the SPECIAL menu. 2. Press the G button and then use D / E button to see the difference...
User Manual
Page 24
...modes: RGB-PC, RGB-DTV (480p,720p,1080i), DVI-DTV (480p,720p,1080i), COMPONENT (480p,720p,1080i). 1. Setting Picture Format - ARC Position G Manual config Reset D F G E Menu Prev. 24 Plasma Monitor After adjustment, if the image is still not correct, your Monitor is , more after using ... long time, it may remain visible. - Press the G button and then use D / E button to view a picture with an original 4:3 aspect ratio, with the Manual config. Press the G button and then use D / E / F / G button to save. However, the top and bottom portions of the image is not available ...
...modes: RGB-PC, RGB-DTV (480p,720p,1080i), DVI-DTV (480p,720p,1080i), COMPONENT (480p,720p,1080i). 1. Setting Picture Format - ARC Position G Manual config Reset D F G E Menu Prev. 24 Plasma Monitor After adjustment, if the image is still not correct, your Monitor is , more after using ... long time, it may remain visible. - Press the G button and then use D / E button to view a picture with an original 4:3 aspect ratio, with the Manual config. Press the G button and then use D / E / F / G button to save. However, the top and bottom portions of the image is not available ...

User Manual
Page 25
... up the Monitor for the best picture appearance for other equipment. (Except VCR) 4. ARC Cinema YNR G On Off Reset Owner's Manual 25 Owner's Manual 25 ARC Position Manual config G Reset Phase 0 Clock 0 Menu Prev. Press the OK button to select the SCREEN menu. 2. Press the MENU button ...1. Press the G button and then use D / E button to save . Screen Adjustments (Video.S-Video and Component 480i mode only) - ARC Position Manual config Reset VGA Mode G Menu Prev. 640x480 848x480 852x480 SCREEN Screen adj. Press the OK button to select On or Off. 4. Press the G ...
... up the Monitor for the best picture appearance for other equipment. (Except VCR) 4. ARC Cinema YNR G On Off Reset Owner's Manual 25 Owner's Manual 25 ARC Position Manual config G Reset Phase 0 Clock 0 Menu Prev. Press the OK button to select the SCREEN menu. 2. Press the MENU button ...1. Press the G button and then use D / E button to save . Screen Adjustments (Video.S-Video and Component 480i mode only) - ARC Position Manual config Reset VGA Mode G Menu Prev. 640x480 848x480 852x480 SCREEN Screen adj. Press the OK button to select On or Off. 4. Press the G ...

User Manual
Page 26
... then use D / E button to select YNR. 3. SCREEN Screen adj. ARC Cinema YNR Reset G To set Menu Prev. If an image is enlarged to each function: Manual config., Position, Split zoom, PIP position and sub picture size for double window. Press the SPLIT ZOOM button repeatedly to select Reset. 3.
... then use D / E button to select YNR. 3. SCREEN Screen adj. ARC Cinema YNR Reset G To set Menu Prev. If an image is enlarged to each function: Manual config., Position, Split zoom, PIP position and sub picture size for double window. Press the SPLIT ZOOM button repeatedly to select Reset. 3.

User Manual
Page 27
... 480i/480p/720p/1080i,Video, S-Video Video RGB, DVI, Component 480i/480p/720p/1080i, S-Video S-Video RGB, DVI, Component 480i/480p/720p/1080i,Video Owner's Manual 27 Each press of SUB INPUT button changes the PIP source. The sub picture moves up/down/left/right. • You can also change the...
... 480i/480p/720p/1080i,Video, S-Video Video RGB, DVI, Component 480i/480p/720p/1080i, S-Video S-Video RGB, DVI, Component 480i/480p/720p/1080i,Video Owner's Manual 27 Each press of SUB INPUT button changes the PIP source. The sub picture moves up/down/left/right. • You can also change the...

