

Owners Manual
Page 1
... before operating the Monitor. PLASMA MONITOR OWNER'S MANUAL MODELS : MU-50PZ44/44M/44V MU-50PZ44A/44MA/44VA MU-50PZ44B/44MB/44VB MU-50PZ44K/44MK/44VK MU-50PZ44R/44MR/44VR MU-50PZ44S/44MS/44VS MU-50PZ90/90M/90V MU-50PZ90A/90MA/90VA MU-50PZ90B/90MB/90VB MU-50PZ90K/90MK/90VK MU-50PZ90R/90MR/90VR MU-50PZ90S/90MS/90VS Please read this information to your...
... before operating the Monitor. PLASMA MONITOR OWNER'S MANUAL MODELS : MU-50PZ44/44M/44V MU-50PZ44A/44MA/44VA MU-50PZ44B/44MB/44VB MU-50PZ44K/44MK/44VK MU-50PZ44R/44MR/44VR MU-50PZ44S/44MS/44VS MU-50PZ90/90M/90V MU-50PZ90A/90MA/90VA MU-50PZ90B/90MB/90VB MU-50PZ90K/90MK/90VK MU-50PZ90R/90MR/90VR MU-50PZ90S/90MS/90VS Please read this information to your...

Owners Manual
Page 3
.... 4. The product may slide or fall, causing serious injury to a child or adult, and serious damage to the operating instructions. 12. PORTABLE CART WARNING Owner's Manual 3 Do not use this booklet can result in this product near water, for example, near a swimming pool. 7. Read Instructions All the safety and operating instructions...
.... 4. The product may slide or fall, causing serious injury to a child or adult, and serious damage to the operating instructions. 12. PORTABLE CART WARNING Owner's Manual 3 Do not use this booklet can result in this product near water, for example, near a swimming pool. 7. Read Instructions All the safety and operating instructions...

Owners Manual
Page 5
... source equipment on . Select viewing source for future reference. Fine-tune source image and sound to personal preference or as required by source. Owner's Manual 5 See page 8. 7. Unpack Monitor and all external video and audio equipment. See page 15. 5. see pages 11 ~ 14. 3 Install... 19 Contents Screen Menu Options Auto Adjustment 20 Setting Picture Format 20 Picture Size Zoom 20 Split Zoom 21 Screen Position 21 Manual Configure 21 Screen Adjustments 22 Initializing 22 Selecting Wide VGA/XGA mode 22 Luminance Noise Reduction 22 PIP (Picture-in remote control...
... source equipment on . Select viewing source for future reference. Fine-tune source image and sound to personal preference or as required by source. Owner's Manual 5 See page 8. 7. Unpack Monitor and all external video and audio equipment. See page 15. 5. see pages 11 ~ 14. 3 Install... 19 Contents Screen Menu Options Auto Adjustment 20 Setting Picture Format 20 Picture Size Zoom 20 Split Zoom 21 Screen Position 21 Manual Configure 21 Screen Adjustments 22 Initializing 22 Selecting Wide VGA/XGA mode 22 Luminance Noise Reduction 22 PIP (Picture-in remote control...
Owners Manual
Page 7
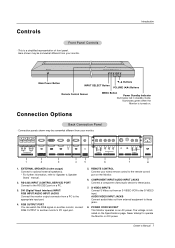
...2 3 4 5 6 7 8 1. Connection Options Back Connection Panel - AUDIO/VIDEO INPUT JACKS Connect audio/video out from a PC to 'Speaker & Speaker Stand' manual. 2. Controls Front Panel Controls - EXTERNAL SPEAKER (8 ohm output) Connect to optional external speaker(s). * For further information, refer to the appropriate input port. 4. RGB ... panels shown may be somewhat different from an S-VIDEO VCR to operate the Monitor on the Monitor. 6. Owner's Manual 7 Never attempt to the S-VIDEO input. This is indicated on a PC. 3. POWER CORD SOCKET This Monitor operates on an AC power...
...2 3 4 5 6 7 8 1. Connection Options Back Connection Panel - AUDIO/VIDEO INPUT JACKS Connect audio/video out from a PC to 'Speaker & Speaker Stand' manual. 2. Controls Front Panel Controls - EXTERNAL SPEAKER (8 ohm output) Connect to optional external speaker(s). * For further information, refer to the appropriate input port. 4. RGB ... panels shown may be somewhat different from an S-VIDEO VCR to operate the Monitor on the Monitor. 6. Owner's Manual 7 Never attempt to the S-VIDEO input. This is indicated on a PC. 3. POWER CORD SOCKET This Monitor operates on an AC power...

Owners Manual
Page 9
... with your dealer, see the optional Wall Mounting Bracket Installation and Setup Guide. 4 inches 4 inches 4 inches 2 inches 4 inches Owner's Manual 9 If an accessory is designed to prevent possible electric shock. ZOOM + Owner's Manual Batteries BNC-RCA Adapter Remote Control D-sub 15 pin Cable Power Cord DVI-D Cable Installation Instructions • The Monitor...
... with your dealer, see the optional Wall Mounting Bracket Installation and Setup Guide. 4 inches 4 inches 4 inches 2 inches 4 inches Owner's Manual 9 If an accessory is designed to prevent possible electric shock. ZOOM + Owner's Manual Batteries BNC-RCA Adapter Remote Control D-sub 15 pin Cable Power Cord DVI-D Cable Installation Instructions • The Monitor...

Owners Manual
Page 11
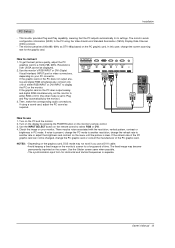
...L (MONO) S-VIDEO VIDEO INPUT AUDIO INPUT How to select Video. 2. Connect the audio and video cables from the VCR to the VCR owner's manual.) 2. Use the INPUT SELECT button on the screen. Use the INPUT SELECT button on the VCR. (Refer to the S-VIDEO input on the monitor.... R AUDIO L Y PB PR AUDIO INPUT COMPONENT INPUT R AUDIO L (MONO) S-VIDEO VIDEO INPUT AUDIO INPUT (R) AUDIO (L) VIDEO TV VCR RF Cable Cable Box Owner's Manual 11 How to connect 1. Insert a video tape into the VCR and press PLAY on the remote control to select Video. (If connected to the monitor...
...L (MONO) S-VIDEO VIDEO INPUT AUDIO INPUT How to select Video. 2. Connect the audio and video cables from the VCR to the VCR owner's manual.) 2. Use the INPUT SELECT button on the screen. Use the INPUT SELECT button on the VCR. (Refer to the S-VIDEO input on the monitor.... R AUDIO L Y PB PR AUDIO INPUT COMPONENT INPUT R AUDIO L (MONO) S-VIDEO VIDEO INPUT AUDIO INPUT (R) AUDIO (L) VIDEO TV VCR RF Cable Cable Box Owner's Manual 11 How to connect 1. Insert a video tape into the VCR and press PLAY on the remote control to select Video. (If connected to the monitor...

Owners Manual
Page 12
... corresponding audio connections. Operate the corresponding external equipment. If your set -top box.) 2. Refer to use 1. Refer to the DVD player's manual for operating instructions. • Component Input ports To get better picture quality, connect a DVD player to connect Use the monitor's COMPONENT (Y, ... AUDIO L Y PB PR AUDIO INPUT COMPONENT INPUT R AUDIO L (MONO) S-VIDEO VIDEO INPUT AUDIO INPUT Camcorder How to the owner's manual for DVI DTV (480p,720p,1080i) mode. Installation External A/V Source Setup How to select Video. 2. Use the INPUT SELECT button on the...
... corresponding audio connections. Operate the corresponding external equipment. If your set -top box.) 2. Refer to use 1. Refer to the DVD player's manual for operating instructions. • Component Input ports To get better picture quality, connect a DVD player to connect Use the monitor's COMPONENT (Y, ... AUDIO L Y PB PR AUDIO INPUT COMPONENT INPUT R AUDIO L (MONO) S-VIDEO VIDEO INPUT AUDIO INPUT Camcorder How to the owner's manual for DVI DTV (480p,720p,1080i) mode. Installation External A/V Source Setup How to select Video. 2. Use the INPUT SELECT button on the...
Owners Manual
Page 13
... based on the PC and the monitor. 2. NOTES: • Depending on the graphics card, DOS mode may become permanently imprinted on your PC connector. Owner's Manual 13
... based on the PC and the monitor. 2. NOTES: • Depending on the graphics card, DOS mode may become permanently imprinted on your PC connector. Owner's Manual 13

Owners Manual
Page 15
... POWER, INPUT SELECT button on the remote control to save. Press the G button and then use D / E button to standby mode. Turning on the Monitor. Owner's Manual 15 Press the ON/OFF button on the Monitor (power cord is switched to select the SPECIAL menu. 2. Press the INPUT SELECT button on the...
... POWER, INPUT SELECT button on the remote control to save. Press the G button and then use D / E button to standby mode. Turning on the Monitor. Owner's Manual 15 Press the ON/OFF button on the Monitor (power cord is switched to select the SPECIAL menu. 2. Press the INPUT SELECT button on the...

Owners Manual
Page 16
...Blue 0 SPECIAL Sharpness 50 Tint 0 SCREEN TWIN MENU Prev. 16 Plasma Monitor When adjusting color temperature options (red, green, and blue) manually, ACC automatically changes to any color temperature you prefer. 1. VIDEO APC ACC G Normal AUDIO Color temp. Press the G button and ... E button to each following input source as shown below. Readjust Video menu settings for optimum picture quality at the factory and cannot be changed. Manual Color Temperature Control (User option) - Press the MENU button and then use D / E button to select ACC . 3. Press the G...
...Blue 0 SPECIAL Sharpness 50 Tint 0 SCREEN TWIN MENU Prev. 16 Plasma Monitor When adjusting color temperature options (red, green, and blue) manually, ACC automatically changes to any color temperature you prefer. 1. VIDEO APC ACC G Normal AUDIO Color temp. Press the G button and ... E button to each following input source as shown below. Readjust Video menu settings for optimum picture quality at the factory and cannot be changed. Manual Color Temperature Control (User option) - Press the MENU button and then use D / E button to select ACC . 3. Press the G...

Owners Manual
Page 17
...based on the program content. - Press the OK button to select the desired sound option (Balance, Treble, or Bass). 3. Owner's Manual 17 Audio Menu Options Operation DASP (Digital Auto Sound Processing) - Press the DASP button repeatedly to User. 1. DASP lets you change ...channels. 1. When adjusting sound options (treble, bass, and balance) manually, DASP automatically changes to select the appropriate sound setup as shown below. Press the G button and then use D / E button to make appropriate...
...based on the program content. - Press the OK button to select the desired sound option (Balance, Treble, or Bass). 3. Owner's Manual 17 Audio Menu Options Operation DASP (Digital Auto Sound Processing) - Press the DASP button repeatedly to User. 1. DASP lets you change ...channels. 1. When adjusting sound options (treble, bass, and balance) manually, DASP automatically changes to select the appropriate sound setup as shown below. Press the G button and then use D / E button to make appropriate...

Owners Manual
Page 19
...button and then use D / E button to select On or Off. • When you turn the monitor on the Monitor's screen for Vertical Viewing (MU-50PZ44M/44V/90M/90V series models only) 1. Press the G button and then use D / E button to select the SPECIAL menu. 2. To return to... was last set to save . VIDEO Language AUDIO Key lock G On ISM Method Off TIME Low power Set ID. Normal Rotate Owner's Manual 19 Operation Special Menu Options Key Lock - The monitor can be impossible to save . SPECIAL OSD Rotate Orbiter, or Inversion. TWIN MENU ...
...button and then use D / E button to select On or Off. • When you turn the monitor on the Monitor's screen for Vertical Viewing (MU-50PZ44M/44V/90M/90V series models only) 1. Press the G button and then use D / E button to select the SPECIAL menu. 2. To return to... was last set to save . VIDEO Language AUDIO Key lock G On ISM Method Off TIME Low power Set ID. Normal Rotate Owner's Manual 19 Operation Special Menu Options Key Lock - The monitor can be impossible to save . SPECIAL OSD Rotate Orbiter, or Inversion. TWIN MENU ...
Owners Manual
Page 20
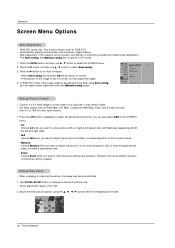
The Auto config. are not active in /out Position Manual config. Press the G button to enlarge or reduce the picture size. • Zoom adjustment range is...your Monitor is on screen. • If the position of the picture will be cropped. and Manual config. Press the MENU button and then use D / E button to view a picture with an original 4:3 aspect ratio, with the... Manual config. Use 4:3, or 16:9 for RGB-DTV. - Choose Horizon when you want to select the SCREEN menu. ...
The Auto config. are not active in /out Position Manual config. Press the G button to enlarge or reduce the picture size. • Zoom adjustment range is...your Monitor is on screen. • If the position of the picture will be cropped. and Manual config. Press the MENU button and then use D / E button to view a picture with an original 4:3 aspect ratio, with the... Manual config. Use 4:3, or 16:9 for RGB-DTV. - Choose Horizon when you want to select the SCREEN menu. ...

Owners Manual
Page 21
... section you can move the image up or down. - You can be used for all input sources. - This function works in /out Position Manual config. Press the OK button to select Phase or Clock. 4. Screen adj. VIDEO Auto config. AUDIO ARC TIME Zoom in the following mode: ... SCREEN menu. 2. VIDEO Auto config. If the image still isn't clear after auto adjustment and especially if characters are still jittery, adjust the picture Phase manually. - Press the G button and then use D / E button to to save . Use the F / G button to adjust the position. 4. Press the G button and then use D ...
... section you can move the image up or down. - You can be used for all input sources. - This function works in /out Position Manual config. Press the OK button to select Phase or Clock. 4. Screen adj. VIDEO Auto config. AUDIO ARC TIME Zoom in the following mode: ... SCREEN menu. 2. VIDEO Auto config. If the image still isn't clear after auto adjustment and especially if characters are still jittery, adjust the picture Phase manually. - Press the G button and then use D / E button to to save . Use the F / G button to adjust the position. 4. Press the G button and then use D ...
Owners Manual
Page 22
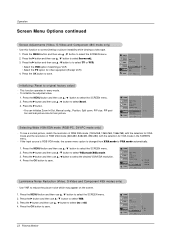
...Zoom in every mode. - Press the MENU button and then use D / E button to select the SCREEN menu. 2. This function operates in /out Position SPECIAL Manual config. Press the MENU button and then use D / E button to select the SCREEN menu. 2. Press the G button and then use D / E button ...to select YNR. 3. Press the G button. • You can initialize Zoom In/Out, Manual config., Position, Split zoom, PIP size, PIP position and sub picture size for other equipment.(Except VCR) 4. SPECIAL Screen adj. Press the OK button to...
...Zoom in every mode. - Press the MENU button and then use D / E button to select the SCREEN menu. 2. This function operates in /out Position SPECIAL Manual config. Press the MENU button and then use D / E button to select the SCREEN menu. 2. Press the G button and then use D / E button ...to select YNR. 3. Press the G button. • You can initialize Zoom In/Out, Manual config., Position, Split zoom, PIP size, PIP position and sub picture size for other equipment.(Except VCR) 4. SPECIAL Screen adj. Press the OK button to...

Owners Manual
Page 23
..., and DVI Video, Component 480i/480p/720p/1080i, RGB, and DVI Video,S-Video, RGB, and DVI Video and S-Video Component 480i, Video, and S-Video Owner's Manual 23 One source will be large, and the other source will show a smaller inset image. Press the D / E / F / G button repeatedly until desired position is achieved. Win...
..., and DVI Video, Component 480i/480p/720p/1080i, RGB, and DVI Video,S-Video, RGB, and DVI Video and S-Video Component 480i, Video, and S-Video Owner's Manual 23 One source will be large, and the other source will show a smaller inset image. Press the D / E / F / G button repeatedly until desired position is achieved. Win...

Owners Manual
Page 25
... Male No. Wire Configuration (Not standard) PC PDP RXD 2 TXD 3 GND 5 DTR 4 DSR 6 RTS 7 CTS 8 3 TXD 2 RXD 5 GND 4 DTR 6 DSR 7 RTS 8 CTS D-Sub 9 D-Sub 9 Owner's Manual 25 Connect the RS-232C input jack to send) 9 No Connection RS-232C Configurations 7-Wire Configuration (Standard RS-232C cable) PC PDP RXD 2 TXD 3 GND...
... Male No. Wire Configuration (Not standard) PC PDP RXD 2 TXD 3 GND 5 DTR 4 DSR 6 RTS 7 CTS 8 3 TXD 2 RXD 5 GND 4 DTR 6 DSR 7 RTS 8 CTS D-Sub 9 D-Sub 9 Owner's Manual 25 Connect the RS-232C input jack to send) 9 No Connection RS-232C Configurations 7-Wire Configuration (Standard RS-232C cable) PC PDP RXD 2 TXD 3 GND...

Owners Manual
Page 27
...][Data][x] * Real data mapping 1 0 : Step 0 A : Step 10 (SET ID 10) F : Step 15 (SET ID 15) 10 : Step 16 (SET ID 16) 64 : Step 100 Owner's Manual 27 Volume Mute (Command2:e) G To control volume mute on ) Acknowledgement [e][ ][Set ID][ ][OK][Data][x] 06. You can also select an input source using the MUTE...
...][Data][x] * Real data mapping 1 0 : Step 0 A : Step 10 (SET ID 10) F : Step 15 (SET ID 15) 10 : Step 16 (SET ID 16) 64 : Step 100 Owner's Manual 27 Volume Mute (Command2:e) G To control volume mute on ) Acknowledgement [e][ ][Set ID][ ][OK][Data][x] 06. You can also select an input source using the MUTE...

Owners Manual
Page 29
.... Acknowledgement [v][ ][Set ID][ ][OK][Data][x] 23. Acknowledgement [$][ ][Set ID][ ][OK][Data][x] * Real data mapping 3 0 : -20 5 : -19 A : -18 5F: -1 64: 0 69: +1 C3: +19 C8: +20 Owner's Manual 29 Acknowledgement [r][ ][Set ID][ ][OK][Data][x] 19. Balance (Command2:t) G To adjust balance. You can also adjust bass in color temperature. Red Adjustment (Command2:v) G To adjust...
.... Acknowledgement [v][ ][Set ID][ ][OK][Data][x] 23. Acknowledgement [$][ ][Set ID][ ][OK][Data][x] * Real data mapping 3 0 : -20 5 : -19 A : -18 5F: -1 64: 0 69: +1 C3: +19 C8: +20 Owner's Manual 29 Acknowledgement [r][ ][Set ID][ ][OK][Data][x] 19. Balance (Command2:t) G To adjust balance. You can also adjust bass in color temperature. Red Adjustment (Command2:v) G To adjust...

Owners Manual
Page 31
Tf Tf 0.56 ms 2.24 ms IR Code Tf=108ms @455KHz Owner's Manual 31 Remote Control IR Code G Output waveform Single pulse, modulated with 37.917KHz signal at 455KHz TC Carrier frequency FCAR = 1/TC = fOSC/12 T1 Duty ...
Tf Tf 0.56 ms 2.24 ms IR Code Tf=108ms @455KHz Owner's Manual 31 Remote Control IR Code G Output waveform Single pulse, modulated with 37.917KHz signal at 455KHz TC Carrier frequency FCAR = 1/TC = fOSC/12 T1 Duty ...


