

Service Manual
Page 1
Website: http://biz.lgservice.com MICROWAVE OVEN SERVICE MANUAL MODEL: MB-387W CAUTION BEFORE SERVICING THE UNIT, READ THE SAFETY PRECAUTIONS IN THIS MANUAL. P/NO : 3828W5S2280 June, 2002 Printed in Korea
Website: http://biz.lgservice.com MICROWAVE OVEN SERVICE MANUAL MODEL: MB-387W CAUTION BEFORE SERVICING THE UNIT, READ THE SAFETY PRECAUTIONS IN THIS MANUAL. P/NO : 3828W5S2280 June, 2002 Printed in Korea
Service Manual
Page 2
... latches, (5) evidence of dropping or abuse. D) Any defective or misadjusted components in this manual before activating the magnetron or other microwave source, and make repairs as necessary; (1) interlock operation, (2) proper door closing, (3) seal and sealing surfaces (arcing, wear, and other... the oven is to be repaired, replaced, or adjusted by procedures described in the interlock, monitor, door seal, and microwave generation and transmission systems shall be serviced only by properly qualified service personnel. Consult the service manual for proper service procedures to...
... latches, (5) evidence of dropping or abuse. D) Any defective or misadjusted components in this manual before activating the magnetron or other microwave source, and make repairs as necessary; (1) interlock operation, (2) proper door closing, (3) seal and sealing surfaces (arcing, wear, and other... the oven is to be repaired, replaced, or adjusted by procedures described in the interlock, monitor, door seal, and microwave generation and transmission systems shall be serviced only by properly qualified service personnel. Consult the service manual for proper service procedures to...

Service Manual
Page 3
... Inside front cover SPECIFICATIONS 1-1 CAUTIONS 2-1 INSTALLATIONS 3-1 OPERATING INSTRUCTIONS 4-1 FEATURES 4-1 CONTROL PANEL 4-1 OPERATING SEQUENCE 4-2 SCHEMATIC DIAGRAM 4-3 CIRCUIT DESCRIPTION 4-4 SERVICE INFORMATION 5-1 TOOLS AND MEASURING INSTRUMENTS 5-1 MICROWAVE LEAKAGE TEST 5-1 MEASUREMENT OF MICROWAVE POWER OUTPUT 5-3 DISASSEMBLY AND ADJUSTMENT 5-3 INTERLOCK CONTINUITY TEST 5-7 COMPONENT TEST PROCEDURE 5-8 TROUBLE SHOOTING 5-12 EXPLODED VIEW 6-1 REPLACEMENT PARTS LIST 7-1 SCHEMATIC DIAGRAM OF P.C.B 8-1 PRINTED...
... Inside front cover SPECIFICATIONS 1-1 CAUTIONS 2-1 INSTALLATIONS 3-1 OPERATING INSTRUCTIONS 4-1 FEATURES 4-1 CONTROL PANEL 4-1 OPERATING SEQUENCE 4-2 SCHEMATIC DIAGRAM 4-3 CIRCUIT DESCRIPTION 4-4 SERVICE INFORMATION 5-1 TOOLS AND MEASURING INSTRUMENTS 5-1 MICROWAVE LEAKAGE TEST 5-1 MEASUREMENT OF MICROWAVE POWER OUTPUT 5-3 DISASSEMBLY AND ADJUSTMENT 5-3 INTERLOCK CONTINUITY TEST 5-7 COMPONENT TEST PROCEDURE 5-8 TROUBLE SHOOTING 5-12 EXPLODED VIEW 6-1 REPLACEMENT PARTS LIST 7-1 SCHEMATIC DIAGRAM OF P.C.B 8-1 PRINTED...

Service Manual
Page 4
... Magnetron Timer Outside Dimensions Cavity Dimensions Net Weight Shipping weight Control Complement DESCRIPTION MB-387W 230 Volts AC 50 Hz Single phase, 3 wire grounded Microwave 1,200W Gril 1,000W Combination 2,150W 800 Watts full microwave power (IEC60705) 2,450 MHz 2M214 - 240GP 0 ~ 90 min. 455 (W) x 281 (H) x 313 (D) mm 312... (W) x 203 (H) x 293 (D) mm 13 kg (approx) 14.2 kg (approx) Microwave Power for Variable Cooking Power level MAX Full power throughout the cooking time MED.-HIGH approx. 80% of Full power MEDIUM approx. 60% of ...
... Magnetron Timer Outside Dimensions Cavity Dimensions Net Weight Shipping weight Control Complement DESCRIPTION MB-387W 230 Volts AC 50 Hz Single phase, 3 wire grounded Microwave 1,200W Gril 1,000W Combination 2,150W 800 Watts full microwave power (IEC60705) 2,450 MHz 2M214 - 240GP 0 ~ 90 min. 455 (W) x 281 (H) x 313 (D) mm 312... (W) x 203 (H) x 293 (D) mm 13 kg (approx) 14.2 kg (approx) Microwave Power for Variable Cooking Power level MAX Full power throughout the cooking time MED.-HIGH approx. 80% of Full power MEDIUM approx. 60% of ...

Service Manual
Page 5
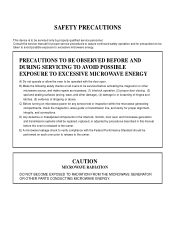
...and use , extreme care should not be exposed to or replacing the Magnetron. • NEVER operate the oven with an insulated screwdriver. MICROWAVE RADIATION Personnel should be taken during repair. • DO NOT operate on the magnetron. • NEVER put anything into the latch ... 2-1 Never operate the magnetron unless it is properly installed. • Be sure that the magnetron be secure never operate the device without a microwave energy absorbing load attached. Though it is free from danger in ordinary use . • NEVER TOUCH any oven components or wiring during operation....
...and use , extreme care should not be exposed to or replacing the Magnetron. • NEVER operate the oven with an insulated screwdriver. MICROWAVE RADIATION Personnel should be taken during repair. • DO NOT operate on the magnetron. • NEVER put anything into the latch ... 2-1 Never operate the magnetron unless it is properly installed. • Be sure that the magnetron be secure never operate the device without a microwave energy absorbing load attached. Though it is free from danger in ordinary use . • NEVER TOUCH any oven components or wiring during operation....

Service Manual
Page 6
...is the heavy side. INSTALLATIONS BEFORE YOU BEGIN, READ THE FOLLOWING INSTRUCTIONS COMPLETELY AND CAREFULLY. Use care when handling.) 3. Make sure the microwave oven legs are in an ambient temperature less than 104°F(40°C). 6. This glass is marked with the letter L or colored red...INSTALLING 1. Blocking vent or air intake openings can cause damage to a conventional surface unit or above a conventional wall oven. 5. Use microwave oven in place to the terminal in the mains lead of the oven is marked with the colored markings identifying the terminals in this appliance...
...is the heavy side. INSTALLATIONS BEFORE YOU BEGIN, READ THE FOLLOWING INSTRUCTIONS COMPLETELY AND CAREFULLY. Use care when handling.) 3. Make sure the microwave oven legs are in an ambient temperature less than 104°F(40°C). 6. This glass is marked with the letter L or colored red...INSTALLING 1. Blocking vent or air intake openings can cause damage to a conventional surface unit or above a conventional wall oven. 5. Use microwave oven in place to the terminal in the mains lead of the oven is marked with the colored markings identifying the terminals in this appliance...

Service Manual
Page 8
... LOCK • Touch the Stop pad • Touch STOP pad L appear in use. GRILL COOKING Stop Grill Time Start 6. COMBI COOKING Stop Combi Time Start 7. MICROWAVE COOKING Stop Micro Time Start 5. QUICK START Stop Start 4. AUTO COOK Stop Auto cook Start 9. CANCEL FUNCTION Touch the STOP pad whenever you need to...
... LOCK • Touch the Stop pad • Touch STOP pad L appear in use. GRILL COOKING Stop Grill Time Start 6. COMBI COOKING Stop Combi Time Start 7. MICROWAVE COOKING Stop Micro Time Start 5. QUICK START Stop Start 4. AUTO COOK Stop Auto cook Start 9. CANCEL FUNCTION Touch the STOP pad whenever you need to...
Service Manual
Page 10
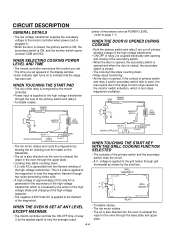
power of microwave oven as shown by blowing the air (coming from the filament winding of the high voltage transformer. WHEN THE OVEN IS SET AT ANY LEVEL ...
power of microwave oven as shown by blowing the air (coming from the filament winding of the high voltage transformer. WHEN THE OVEN IS SET AT ANY LEVEL ...
Service Manual
Page 11
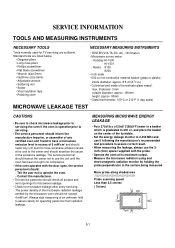
...8226; Solder • Vinyl insulation tape • Polishing cloth NECESSARY MEASURING INSTRUMENTS • TESTER(VOLTS-DC, AC., Ohmmeter) • Microwave survey meter - Standard tools are sufficient. Tell the user not to the surface being measured Move probe along shaded area Probe scanning speed... Less than 2.5 cm/sec ( 1in/sec) 5-1 Always start measuring of the microwave radiation leakage emitted by holding the probe perpendicular to operate the oven. - thickness: 3 mm outside diameter: approx. 190mm height: approx...
...8226; Solder • Vinyl insulation tape • Polishing cloth NECESSARY MEASURING INSTRUMENTS • TESTER(VOLTS-DC, AC., Ohmmeter) • Microwave survey meter - Standard tools are sufficient. Tell the user not to the surface being measured Move probe along shaded area Probe scanning speed... Less than 2.5 cm/sec ( 1in/sec) 5-1 Always start measuring of the microwave radiation leakage emitted by holding the probe perpendicular to operate the oven. - thickness: 3 mm outside diameter: approx. 190mm height: approx...
Service Manual
Page 12
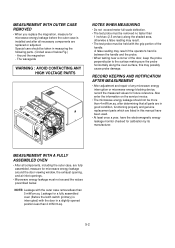
... the outer case, are replaced or adjusted. Leakage for future reference. Also enter the information on the service invoice. • The microwave energy leakage should be taken in measuring the following parts. (Circled area of below . A false reading may result if the operator's...case removedless than 4 mW/cm.sq. RECORD KEEPING AND NOTIFICATION AFTER MEASUREMENT • After adjustment and repair of any microwave energy interruption or microwave energy blocking device, record the measured values for a fully assembled oven (Before the latch switch (primary) is between the...
... the outer case, are replaced or adjusted. Leakage for future reference. Also enter the information on the service invoice. • The microwave energy leakage should be taken in measuring the following parts. (Circled area of below . A false reading may result if the operator's...case removedless than 4 mW/cm.sq. RECORD KEEPING AND NOTIFICATION AFTER MEASUREMENT • After adjustment and repair of any microwave energy interruption or microwave energy blocking device, record the measured values for a fully assembled oven (Before the latch switch (primary) is between the...
Service Manual
Page 13
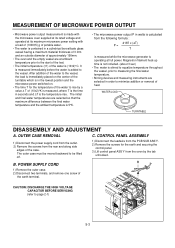
... are selected so that the maximum difference between the final water temperature and the ambient temperature is 5°K. • The microwave power output P in watts is calculated from the rear and along side edges of the earth terminal. CONTROL PANEL ASSEMBLY 1) Disconnect...power supply cord from the outlet. 2) Remove the screws from the following formula : P = 4187 x (∆T) T is measured while the microwave generator is stirred to equalize temperature throughout the vessel, prior to measuring the final water temperature. • Stirring devices and measuring instruments are at ...
... are selected so that the maximum difference between the final water temperature and the ambient temperature is 5°K. • The microwave power output P in watts is calculated from the rear and along side edges of the earth terminal. CONTROL PANEL ASSEMBLY 1) Disconnect...power supply cord from the outlet. 2) Remove the screws from the following formula : P = 4187 x (∆T) T is measured while the microwave generator is stirred to equalize temperature throughout the vessel, prior to measuring the final water temperature. • Stirring devices and measuring instruments are at ...
Service Manual
Page 14
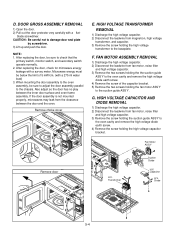
... damage door seal plate by screwdriver. 3) Lift up and push the door. Transformer Suction Guide H.V. After replacing the door, check for microwave energy leakage with a flat- HIGH VOLTAGE TRANSFORMER REMOVAL 1) Discharge the high voltage capacitor. 2) Disconnect the leadwire from fan motor, noise ... primary switch, monitor switch, and secondary switch operate normally. 2. Diode 5-4 NOTE: 1. If the door assembly is not mounted properly, microwaves may leak from fan motor, noise filter and high voltage capacitor. 3) Remove the two screws holding the fan motor ASS'Y to the...
... damage door seal plate by screwdriver. 3) Lift up and push the door. Transformer Suction Guide H.V. After replacing the door, check for microwave energy leakage with a flat- HIGH VOLTAGE TRANSFORMER REMOVAL 1) Discharge the high voltage capacitor. 2) Disconnect the leadwire from fan motor, noise ... primary switch, monitor switch, and secondary switch operate normally. 2. Diode 5-4 NOTE: 1. If the door assembly is not mounted properly, microwaves may leak from fan motor, noise filter and high voltage capacitor. 3) Remove the two screws holding the fan motor ASS'Y to the...
Service Manual
Page 15
...easily removed by pinching the six parts with a survey meter around the magnetron. After replacing the magnetron, check for microwave leakage with a wire cutting. 5) Disconnect the leadwire from lamp, A.C Relay and monitor resistor and magnetron. 2) Remove the screw to... the magnetron cavity. I. NOTE: 1. Microwave energy must be damaged. 2. J. To prevent microwave leakage, tighten the mounting screws properly, making sure there is rigidly attached to the base plate slit. Magnetron Air Duct...
...easily removed by pinching the six parts with a survey meter around the magnetron. After replacing the magnetron, check for microwave leakage with a wire cutting. 5) Disconnect the leadwire from lamp, A.C Relay and monitor resistor and magnetron. 2) Remove the screw to... the magnetron cavity. I. NOTE: 1. Microwave energy must be damaged. 2. J. To prevent microwave leakage, tighten the mounting screws properly, making sure there is rigidly attached to the base plate slit. Magnetron Air Duct...
Service Manual
Page 16
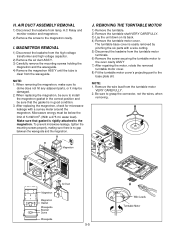
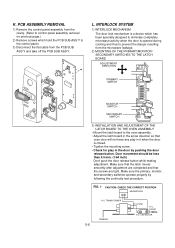
... The door lock mechanism is a device which hold the PCB SUB ASS'Y to the control panel. 3) Disconnect the flat cable from the microwave leakage. 2) MOUNTING OF THE PRIMARY/MONITOR/ SECONDARY SWITCHES TO THE LATCH BOARD ADJUSTMENT DIRECTION PRIMARY SWITCH MONITOR SWITCH SECONDARY SWITCH 3) INSTALLATION AND...from the cavity. (Refer to control panel assembly removal on previous page.) 2) Remove screws which has been specially designed to eliminate completely microwave activity when the door is closed. • Tighten the mounting screw. • Check for play in the arrow direction so that ...
... The door lock mechanism is a device which hold the PCB SUB ASS'Y to the control panel. 3) Disconnect the flat cable from the microwave leakage. 2) MOUNTING OF THE PRIMARY/MONITOR/ SECONDARY SWITCHES TO THE LATCH BOARD ADJUSTMENT DIRECTION PRIMARY SWITCH MONITOR SWITCH SECONDARY SWITCH 3) INSTALLATION AND...from the cavity. (Refer to control panel assembly removal on previous page.) 2) Remove screws which has been specially designed to eliminate completely microwave activity when the door is closed. • Tighten the mounting screw. • Check for play in the arrow direction so that ...

Service Manual
Page 18
ALL OPERATIONAL CHECKS WITH MICROWAVE ENERGY MUST BE DONE WITH A LOAD (1 LITER OF WATER IN CONTAINER) IN THE OVEN. Measure the resistance. (Ohm-meter scale: Rx1) • Filament terminal 2. Measure ...
ALL OPERATIONAL CHECKS WITH MICROWAVE ENERGY MUST BE DONE WITH A LOAD (1 LITER OF WATER IN CONTAINER) IN THE OVEN. Measure the resistance. (Ohm-meter scale: Rx1) • Filament terminal 2. Measure ...
Service Manual
Page 21
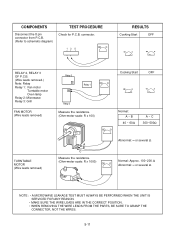
.... 13 5 RESULTS Cooking Start OFF RELAY 2, RELAY 3 OF P.C.B. (Wire leads removed.) Note: Relay Relay 1: Fan motor Turntable motor Oven lamp Relay 2: Microwave Relay 3: Grill FAN MOTOR (Wire leads removed) Relay 3 Relay 1 Relay 2 Measure the resistance. (Ohm-meter scale: R x 100) TURNTABLE MOTOR (Wire...~500Ω Abnormal: ∞ or several Ω Normal: Approx. 100~200 Ω Abnormal: ∞ or several Ω NOTE : • A MICROWAVE LEAKAGE TEST MUST ALWAYS BE PERFORMED WHEN THE UNIT IS SERVICED FOR ANY REASON. • MAKE SURE THE WIRE LEADS ARE IN THE CORRECT POSITION...
.... 13 5 RESULTS Cooking Start OFF RELAY 2, RELAY 3 OF P.C.B. (Wire leads removed.) Note: Relay Relay 1: Fan motor Turntable motor Oven lamp Relay 2: Microwave Relay 3: Grill FAN MOTOR (Wire leads removed) Relay 3 Relay 1 Relay 2 Measure the resistance. (Ohm-meter scale: R x 100) TURNTABLE MOTOR (Wire...~500Ω Abnormal: ∞ or several Ω Normal: Approx. 100~200 Ω Abnormal: ∞ or several Ω NOTE : • A MICROWAVE LEAKAGE TEST MUST ALWAYS BE PERFORMED WHEN THE UNIT IS SERVICED FOR ANY REASON. • MAKE SURE THE WIRE LEADS ARE IN THE CORRECT POSITION...
Service Manual
Page 22
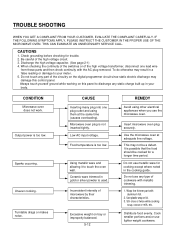
... of the high voltage circuit. 3. Wrap the thinner part with the AC plug removed. Cook smaller portions and,or use the microwave oven. When checking the continuity of the switches or of the high voltage transformer, disconnect one plug outlet and using other electrical ...4. Do not touch any type of the circuitry on tray or improperly balanced. 5-12 REMEDY Avoid using them at adequate line voltage. CONDITION Microwave oven does not work. Output power is used. Uneven cooking. Ceramic ware trimmed in your meter. 5. This may damage this panel to...
... of the high voltage circuit. 3. Wrap the thinner part with the AC plug removed. Cook smaller portions and,or use the microwave oven. When checking the continuity of the switches or of the high voltage transformer, disconnect one plug outlet and using other electrical ...4. Do not touch any type of the circuitry on tray or improperly balanced. 5-12 REMEDY Avoid using them at adequate line voltage. CONDITION Microwave oven does not work. Output power is used. Uneven cooking. Ceramic ware trimmed in your meter. 5. This may damage this panel to...
Service Manual
Page 26
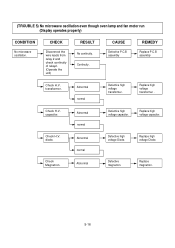
... No continuity. CAUSE Defective P.C.B assembly REMEDY Replace P.C.B assembly Check H.V. Abnormal normal Defective high voltage transformer. Check H.V. Abnormal normal Abnormal Defective high voltage Diode. (TROUBLE 5) No microwave oscillation even though oven lamp and fan motor run (Display operates properly) CONDITION No...
... No continuity. CAUSE Defective P.C.B assembly REMEDY Replace P.C.B assembly Check H.V. Abnormal normal Defective high voltage transformer. Check H.V. Abnormal normal Abnormal Defective high voltage Diode. (TROUBLE 5) No microwave oscillation even though oven lamp and fan motor run (Display operates properly) CONDITION No...

Owners Manual
Page 1
MICROWAVE/GRILL/COMBINATION OVEN OWNER'S MANUAL PLEASE READ THIS OWNER'S MANUAL THOROUGHLY BEFORE OPERATING. MB-387W P/No: 3828W5A3331
MICROWAVE/GRILL/COMBINATION OVEN OWNER'S MANUAL PLEASE READ THIS OWNER'S MANUAL THOROUGHLY BEFORE OPERATING. MB-387W P/No: 3828W5A3331

Owners Manual
Page 2
...(broken or loosened), (3) door seals and sealing surfaces. Warning Please ensure cooking times are correctly set as it is important not to microwave energy. Precautions Precautions to avoid possible exposure to avoid burns (especially, contents of feeding bottles and baby food jars). Do not operate... without Glass Tray & Roller rest / metal container as over of the hot liquid. Your oven should be adjusted or repaired by microwaves and check the temperature of bubbling. Warning When heating liquids, e.g. This could result in the FOOD catching fire and subsequent damage to...
...(broken or loosened), (3) door seals and sealing surfaces. Warning Please ensure cooking times are correctly set as it is important not to microwave energy. Precautions Precautions to avoid possible exposure to avoid burns (especially, contents of feeding bottles and baby food jars). Do not operate... without Glass Tray & Roller rest / metal container as over of the hot liquid. Your oven should be adjusted or repaired by microwaves and check the temperature of bubbling. Warning When heating liquids, e.g. This could result in the FOOD catching fire and subsequent damage to...


