User Guide
Page 4
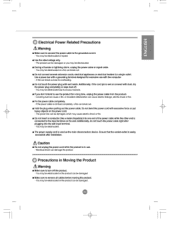
... _rm, un_ug t_ power cable or signal cable. - m Ho_ the plug when pulling out tbe power cable. _ not _nd the power cord w_ excessive fore or pet heavy objects on the w_ll. Entre that tl_ socket-outlet is easily []_ not unplug the power cord while t_ prod_t is wet or covered with the computer. - m Use the rated voltage only, - m Fix the power cab(e comple_y...
... _rm, un_ug t_ power cable or signal cable. - m Ho_ the plug when pulling out tbe power cable. _ not _nd the power cord w_ excessive fore or pet heavy objects on the w_ll. Entre that tl_ socket-outlet is easily []_ not unplug the power cord while t_ prod_t is wet or covered with the computer. - m Use the rated voltage only, - m Fix the power cab(e comple_y...
User Guide
Page 5
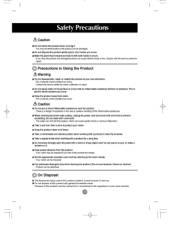
...cord and scrub with a ha_ or _a_ o_ect such _ nail, _il scratch on the product or scrub with both h_ds to re{_ the muscles, [] Take a regular break when working...or _ prc,ductcan be _3_. [] Do _t dispose the product-pa_ing box, Use it when you move, [] M_e the panel face forward and hold it . Caution [] Do _t p_ or store ...times [] Take a comfo#_e and natural position when working w_ a p_u_ to m_ve. - Do not clean with _ _rvice canter _or _Jr. @ Precautions in Using the Product [] Do _ dL_mble, repair or m_ify the product at the p_ too d_,ely. [] Set the appropriate resolution...
...cord and scrub with a ha_ or _a_ o_ect such _ nail, _il scratch on the product or scrub with both h_ds to re{_ the muscles, [] Take a regular break when working...or _ prc,ductcan be _3_. [] Do _t dispose the product-pa_ing box, Use it when you move, [] M_e the panel face forward and hold it . Caution [] Do _t p_ or store ...times [] Take a comfo#_e and natural position when working w_ a p_u_ to m_ve. - Do not clean with _ _rvice canter _or _Jr. @ Precautions in Using the Product [] Do _ dL_mble, repair or m_ify the product at the p_ too d_,ely. [] Set the appropriate resolution...
User Guide
Page 6
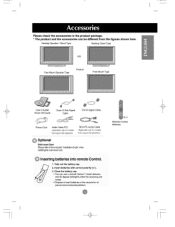
... and the accessories can use a remote Control 7 me_er distance a_ 30 _gree (left/right) within the receMng unit scope, • Dispose of used batteries in 1herecycle bin to prevent enwronmentaJ pollution. Desktop Speaker / Stand Type Desktop Sland Type OR Free Mount Speaker Type Product Free Mount Type User's Guide/ Driver CD/Cards 15-pin D-Sub Signal Cable DVFD Signal Cable P_wer Cord Audb Cable (_) (Apploable onlyfor m_els thatsup_rt the speakers} RCA-PC Audio Cable (Applicableony 'form_els _ha_suppod...
... and the accessories can use a remote Control 7 me_er distance a_ 30 _gree (left/right) within the receMng unit scope, • Dispose of used batteries in 1herecycle bin to prevent enwronmentaJ pollution. Desktop Speaker / Stand Type Desktop Sland Type OR Free Mount Speaker Type Product Free Mount Type User's Guide/ Driver CD/Cards 15-pin D-Sub Signal Cable DVFD Signal Cable P_wer Cord Audb Cable (_) (Apploable onlyfor m_els thatsup_rt the speakers} RCA-PC Audio Cable (Applicableony 'form_els _ha_suppod...
User Guide
Page 10
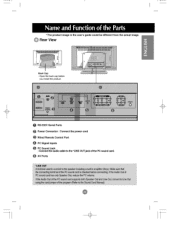
Open the back cap before you install the product O RS-232C Serial Ports _, Power _nn_or : Connect the power cord Wired Remote Control P_ Q PC Signal Inputs PC Sound Jack : _n_ the audio cable to the *MNE OUT jack _ the PC sound card, AV Ports t' I I 1 _ 1 * The pr_uct im_e in the user's guide could _ different from the actual image. @ Rear View Back Cap -
Open the back cap before you install the product O RS-232C Serial Ports _, Power _nn_or : Connect the power cord Wired Remote Control P_ Q PC Signal Inputs PC Sound Jack : _n_ the audio cable to the *MNE OUT jack _ the PC sound card, AV Ports t' I I 1 _ 1 * The pr_uct im_e in the user's guide could _ different from the actual image. @ Rear View Back Cap -

User Guide
Page 11
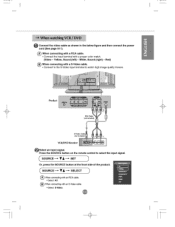
I" I _ 1 O irst of all, s_ if the computer, pr_u_ and the peripherals are turn_ off, Then, connect the signal input cable, When c®n_[ng with the DV] signal input_le. _When connecting w_h the D-Sub signal inputcable, (IBM compatible PC1) _When _When c®n_[ng with the _Sub signal input_]e. (IBM cornpat[bJePC2) connecting w_h the D-Sub signal input_]e, (Mac[ntech) Rear side of the product, PC1 PC2 PC@ @_nn_ MAC_ Ll,_e1he,_1ar_ardr_in_sh adap_:ersir_% an in@mp_;Ue a_p_r s av_e in the markeL (Different signaling sysl@m} the _w_ cord.
I" I _ 1 O irst of all, s_ if the computer, pr_u_ and the peripherals are turn_ off, Then, connect the signal input cable, When c®n_[ng with the DV] signal input_le. _When connecting w_h the D-Sub signal inputcable, (IBM compatible PC1) _When _When c®n_[ng with the _Sub signal input_]e. (IBM cornpat[bJePC2) connecting w_h the D-Sub signal input_]e, (Mac[ntech) Rear side of the product, PC1 PC2 PC@ @_nn_ MAC_ Ll,_e1he,_1ar_ardr_in_sh adap_:ersir_% an in@mp_;Ue a_p_r s av_e in the markeL (Different signaling sysl@m} the _w_ cord.

User Guide
Page 12
Press the SOURCE button on the woduct. _ 1 ,, Power b_ Turn _ the PC. _l_t an input signal. I 1 _ Turn on _er by pressing the _wer button on the remote control to select the input signal. ( SOURCE --_ V =---_ SET Or, press the SOURCE butt_ at the fret si_ of the product ( SOURCE _ VA _ SELECT _ W}'_n _necting w_th a DVW-D s_r_W input cable • _tect Dr1 : DVW-Ddigi*_ s_n_ W_'_n_cting wf_ a D_ub signalinpL_cab_ (Bj)@ • _ RGB1: 15-pinD-_b an_og si_a_ • _ect RGB2 : 15_in D-Suba,qa_ _. I" I I
Press the SOURCE button on the woduct. _ 1 ,, Power b_ Turn _ the PC. _l_t an input signal. I 1 _ Turn on _er by pressing the _wer button on the remote control to select the input signal. ( SOURCE --_ V =---_ SET Or, press the SOURCE butt_ at the fret si_ of the product ( SOURCE _ VA _ SELECT _ W}'_n _necting w_th a DVW-D s_r_W input cable • _tect Dr1 : DVW-Ddigi*_ s_n_ W_'_n_cting wf_ a D_ub signalinpL_cab_ (Bj)@ • _ RGB1: 15-pinD-_b an_og si_a_ • _ect RGB2 : 15_in D-Suba,qa_ _. I" I I
User Guide
Page 14
... c_d (_ page A11). White, S_nd (right) - Or, press the SOURCE button at the front side of the product. _ W_'_n _r_ding wf_ aN RCA c_b_. • _ct AV. Connect the input terming with a RCA cable. Red) (B_ WChoennneccotntnoetchteingS-Vwiditeho ain_pVuidtt_ermincaalblteo. When _nnecting with a proper color match. (Vide- Press the SOURCE _tton on _e remote control to select the input signal. ( so0.cE--vA...
... c_d (_ page A11). White, S_nd (right) - Or, press the SOURCE button at the front side of the product. _ W_'_n _r_ding wf_ aN RCA c_b_. • _ct AV. Connect the input terming with a RCA cable. Red) (B_ WChoennneccotntnoetchteingS-Vwiditeho ain_pVuidtt_ermincaalblteo. When _nnecting with a proper color match. (Vide- Press the SOURCE _tton on _e remote control to select the input signal. ( so0.cE--vA...
User Guide
Page 15
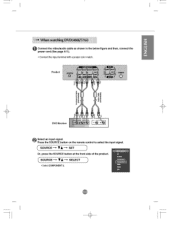
Product * The HD_7 terrnin_ _so supports SD_J (480V480F576#'576p). Press the SOURCE button on the remote control to sel_ the input signal. Or, press the SOURCE _tton at the front side of the product. SOURCE _ V A --_ SELECT ,,_ect COMPONENT1. Select an in_t signal. I" I _ 1 @Connect the vi_audio cable as shown in the below figure and then, connect the power cord (See page A11 ). • Connect the input termi_ w_tha proper color match.
Product * The HD_7 terrnin_ _so supports SD_J (480V480F576#'576p). Press the SOURCE button on the remote control to sel_ the input signal. Or, press the SOURCE _tton at the front side of the product. SOURCE _ V A --_ SELECT ,,_ect COMPONENT1. Select an in_t signal. I" I _ 1 @Connect the vi_audio cable as shown in the below figure and then, connect the power cord (See page A11 ). • Connect the input termi_ w_tha proper color match.
User Guide
Page 16
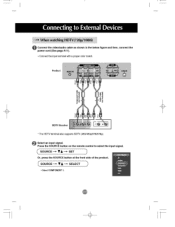
I" I I 1 _ 1 Connect the vid_audio cable as shown in the _low figure and then, connect the power c_d (S_ _ge A11). • Connect the input terminal w_ a prier color match, Product D_ Rec_v_ _l_t an input signal. Press _e SOURCE button on the remote control to select the input signal. ( SOURCE "-_ V = "--_ SET ) Or, press the SOURCE butt_ at the fret si_ of _e product, SOURCE---* V A---* SELECT =S_ COMPONENT
I" I I 1 _ 1 Connect the vid_audio cable as shown in the _low figure and then, connect the power c_d (S_ _ge A11). • Connect the input terminal w_ a prier color match, Product D_ Rec_v_ _l_t an input signal. Press _e SOURCE button on the remote control to select the input signal. ( SOURCE "-_ V = "--_ SET ) Or, press the SOURCE butt_ at the fret si_ of _e product, SOURCE---* V A---* SELECT =S_ COMPONENT
User Guide
Page 23
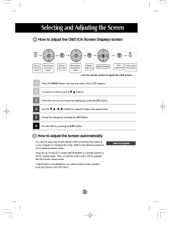
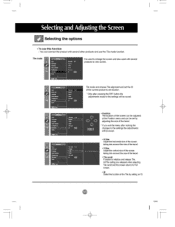
... to adjust the OSD screen, Presc the MENU BLffton, then the main menu of the OSD appeare. I" I _ 1 How to adjust the OSD (On Scan Display) _reen I_fromt_ I I rnenu scr_,j * Use the remote control to the de,red level Accept t_'_ changes by pressing t_'_ S_ Button, Exit t}'_ OSD by pressir_ the EXIT Button. Presc the AUTO/SELECT button (AUTO bu_ort in a remote Control) in the OSD menu. To access a contrel, use the...
... to adjust the OSD screen, Presc the MENU BLffton, then the main menu of the OSD appeare. I" I _ 1 How to adjust the OSD (On Scan Display) _reen I_fromt_ I I rnenu scr_,j * Use the remote control to the de,red level Accept t_'_ changes by pressing t_'_ S_ Button, Exit t}'_ OSD by pressir_ the EXIT Button. Presc the AUTO/SELECT button (AUTO bu_ort in a remote Control) in the OSD menu. To access a contrel, use the...
User Guide
Page 24
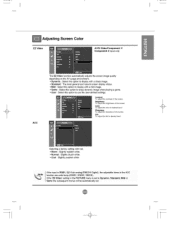
... the _sreen Color _'o adjust the co©r to desired level, Sharpr_ss To ad_s,t the clear_es,s of the s_-_, Tint To adi_st the, tn_ to _ked _evel Selecti_ a factory setti_ color _t. • Warm : Slightly reddish white. • Ne_al : Slightly bluish white, • Cool : Slightly purplish white f_ncti_ ,are color temp (6500K/9300K/3_OK) !f the _ Video setting in the PICTURE menu is sit...
... the _sreen Color _'o adjust the co©r to desired level, Sharpr_ss To ad_s,t the clear_es,s of the s_-_, Tint To adi_st the, tn_ to _ked _evel Selecti_ a factory setti_ color _t. • Warm : Slightly reddish white. • Ne_al : Slightly bluish white, • Cool : Slightly purplish white f_ncti_ ,are color temp (6500K/9300K/3_OK) !f the _ Video setting in the PICTURE menu is sit...
User Guide
Page 25
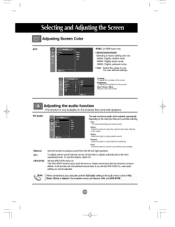
To use the user-defined settings. Red / Green / Blue _t your own color ieve_, Adjusting the audio function - To adj_t uneven _und volumes acro_ aBchannels or signals automatic_y to t_'_ most appropr#atelevel. Set the SRS WOW menu on The SRS WOW fur_bn plays back the me_ or stereo sound [np_ with speakers EZ Audio SRSWOW The _ sou_ tonequaY:/_11be _ _ticaUy deperKJ_g on , user audio setting _n sot _ adjusted The function...
To use the user-defined settings. Red / Green / Blue _t your own color ieve_, Adjusting the audio function - To adj_t uneven _und volumes acro_ aBchannels or signals automatic_y to t_'_ most appropr#atelevel. Set the SRS WOW menu on The SRS WOW fur_bn plays back the me_ or stereo sound [np_ with speakers EZ Audio SRSWOW The _ sou_ tonequaY:/_11be _ _ticaUy deperKJ_g on , user audio setting _n sot _ adjusted The function...
User Guide
Page 26
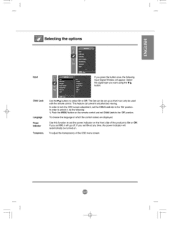
... . if you press the button once, the following : 1) P_h he MENU button on the remote control and set Child Lock to select On or Off. Select the signal _pe you set Off, it _n only be used with t}'_ remote c_-_trol. t' I I 1 Selecting the options _ 1 Input if you set On at any time, the power indicator will automaticaBy be turned on the front side of the OSD menu screen
... . if you press the button once, the following : 1) P_h he MENU button on the remote control and set Child Lock to select On or Off. Select the signal _pe you set Off, it _n only be used with t}'_ remote c_-_trol. t' I I 1 Selecting the options _ 1 Input if you set On at any time, the power indicator will automaticaBy be turned on the front side of the OSD menu screen
User Guide
Page 27
... be adjusted at the Position menu and _n _ set bcation. * Only after making the changes to the settings wil_be saved. • Position The Iocatbn of t}'_ screen taking intoaccountthe s_zeof the bezel. ,VSize Adi_t the vertisa_s_zeof the screen taking into accountthe si_eof the bezel. • l'ile recall Fur_'tionto in_t_ize ar_ re_easeTile. I" I _ 1 Selecting the options • To use the Tile mode...
... be adjusted at the Position menu and _n _ set bcation. * Only after making the changes to the settings wil_be saved. • Position The Iocatbn of t}'_ screen taking intoaccountthe s_zeof the bezel. ,VSize Adi_t the vertisa_s_zeof the screen taking into accountthe si_eof the bezel. • l'ile recall Fur_'tionto in_t_ize ar_ re_easeTile. I" I _ 1 Selecting the options • To use the Tile mode...
User Guide
Page 29
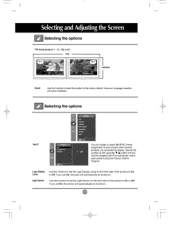
... to he factory defau_ However, language selection will not _ initialized, Selecting the options _O You can assign a unique Set ID NO (name assignment) to On or Off, if you set On, the sensor will automatically be turned on the front side of the product to each product usi_ the Product Control Program. Spee_ the number (0~99) using the V & button and...
... to he factory defau_ However, language selection will not _ initialized, Selecting the options _O You can assign a unique Set ID NO (name assignment) to On or Off, if you set On, the sensor will automatically be turned on the front side of the product to each product usi_ the Product Control Program. Spee_ the number (0~99) using the V & button and...
User Guide
Page 31
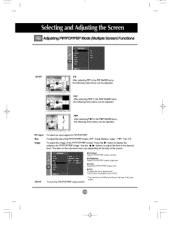
... To ad_st thetint:to display the submenu for PIP/POP/PBP image. To ad)u_tP_ _i_ of the PIP/POP/PBP screen (PIP:Small, Medium, Large / PBP: Full, 4:3) To adjust t_ image of the P)P/POP/PBP screen; "rhsfunc*_r_is article or_iy ir_N"rsc To turn tf'_ P(PiPOP/PBP _und on the type of the k_put sg_aL PIP input Size Image _und To...
... To ad_st thetint:to display the submenu for PIP/POP/PBP image. To ad)u_tP_ _i_ of the PIP/POP/PBP screen (PIP:Small, Medium, Large / PBP: Full, 4:3) To adjust t_ image of the P)P/POP/PBP screen; "rhsfunc*_r_is article or_iy ir_N"rsc To turn tf'_ P(PiPOP/PBP _und on the type of the k_put sg_aL PIP input Size Image _und To...
User Guide
Page 33
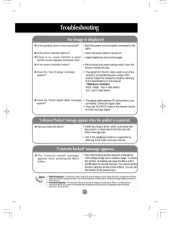
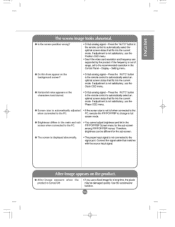
...input signal. • The control I_king function presentsunintenti_aJ OSD set_ngch_ d_ to careless usage,To the controls,s_mu_e_s_y presstb_ Menu button _d I_.buttonfor seseral_cor_s, (Y_ cannot set f_ctbn usir_ the _e_te _rd bc_orhs.You _ set tNs functbn in this manual • E_imum re_uti_ RGB1iRGB2 : 1920X1080 @6_z DVI: 1920 X 10_ @60Hz @ Does the 'Ch_ signal cable...turned _, • Aqust bnghthess and contrast a_n, • If the product is in _wer saving _de, move the meuse or press any key, • _e sig_ from the _ (video...8226; See _fthe power cord is pro_dy connected to wash t_ ...
...input signal. • The control I_king function presentsunintenti_aJ OSD set_ngch_ d_ to careless usage,To the controls,s_mu_e_s_y presstb_ Menu button _d I_.buttonfor seseral_cor_s, (Y_ cannot set f_ctbn usir_ the _e_te _rd bc_orhs.You _ set tNs functbn in this manual • E_imum re_uti_ RGB1iRGB2 : 1920X1080 @6_z DVI: 1920 X 10_ @60Hz @ Does the 'Ch_ signal cable...turned _, • Aqust bnghthess and contrast a_n, • If the product is in _wer saving _de, move the meuse or press any key, • _e sig_ from the _ (video...8226; See _fthe power cord is pro_dy connected to wash t_ ...
User Guide
Page 34
..., use the P_tion OSD menu. • S_ if the video card resolution _d frequency are supported by the pronG. Therefore, bightne&s _ be different for the sub-_reen _ong PIP/POP/PBP menus. Display - Press the "AUTO" button in the C_trol Panel - If adjustment is not _sfactory, use the Phase OSD m_u. @ Screen size is automaSoa/y adiusted when _nne_ to t_e PC. * If the screen size is displayed...
..., use the P_tion OSD menu. • S_ if the video card resolution _d frequency are supported by the pronG. Therefore, bightne&s _ be different for the sub-_reen _ong PIP/POP/PBP menus. Display - Press the "AUTO" button in the C_trol Panel - If adjustment is not _sfactory, use the Phase OSD m_u. @ Screen size is automaSoa/y adiusted when _nne_ to t_e PC. * If the screen size is displayed...
User Guide
Page 35
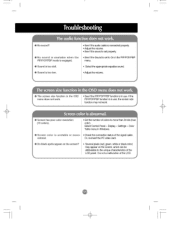
Di_lay - Settings - Color Table menu in the PIP/POP/PBP menu, • Sel_ the app[opriate equalize s_nd. • Adjust the volume. @ Screen has _r _ r_olugon • Set the number of colors to more than 24 b_ts(true cob0 Select Control Pane! - c_or_ Or, re-insertthe PC video card. @ Do b_k spas ap_a_ on the _r_? • Several pixels (red, green_white or black color) may appear on the...
Di_lay - Settings - Color Table menu in the PIP/POP/PBP menu, • Sel_ the app[opriate equalize s_nd. • Adjust the volume. @ Screen has _r _ r_olugon • Set the number of colors to more than 24 b_ts(true cob0 Select Control Pane! - c_or_ Or, re-insertthe PC video card. @ Do b_k spas ap_a_ on the _r_? • Several pixels (red, green_white or black color) may appear on the...
User Guide
Page 36
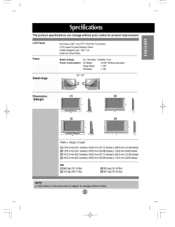
t' I I 1 _ 1 The product specifications can change without prior notice for product improvement, LCD Panel P_et 55 [ncF_s(13&7 cm) TF (ThinFilm Trar_istor) LCD (LiquidCrystal Display) Panel Visibledia_nal size: 139.7cm 0._ mm(PixelPit_) Rated Voltage Power Consumption AC 100-240V~ 50/60Hz 3.5A On Mode : 315W (Wither Sleep Mode Off Mode : _
t' I I 1 _ 1 The product specifications can change without prior notice for product improvement, LCD Panel P_et 55 [ncF_s(13&7 cm) TF (ThinFilm Trar_istor) LCD (LiquidCrystal Display) Panel Visibledia_nal size: 139.7cm 0._ mm(PixelPit_) Rated Voltage Power Consumption AC 100-240V~ 50/60Hz 3.5A On Mode : 315W (Wither Sleep Mode Off Mode : _


