

User Guide
Page 10
... Switch Product PC C Using the Internet. LAN Network Product PC Network Product PC Connect the LAN cNaebtlweoarnkd install the eZ-Net Manager program on the monitor. 9 Connecting to External Devices When using the LAN Connect the LAN cable as on the CD-ROM. Note • Using LAN establishes communication between ...your PC and the monitor and enables to use the OSD menus on the PC as well as shown in the enclosed CD-ROM. For more information about the program...
... Switch Product PC C Using the Internet. LAN Network Product PC Network Product PC Connect the LAN cNaebtlweoarnkd install the eZ-Net Manager program on the monitor. 9 Connecting to External Devices When using the LAN Connect the LAN cable as on the CD-ROM. Note • Using LAN establishes communication between ...your PC and the monitor and enables to use the OSD menus on the PC as well as shown in the enclosed CD-ROM. For more information about the program...

User Guide
Page 11
Connecting to External Devices Daisy Chain Monitors Use this function when displaying ANALOG RGB inputs of a PC to the other product. • To use cable distributor. 10 We recommend that you should use different products connected to each other Connect one end of the signal input cable(15-pin D-Sub Signal Cable) to the RGB OUT connector of product 1 and connect the other end to the RGB IN connector of other products. 15-pin D-Sub Signal Cable PC Product 1 Product 2 Product 3 Product 4 Note • When multi-connecting in/out cascade format, no loss cables are recommended.
Connecting to External Devices Daisy Chain Monitors Use this function when displaying ANALOG RGB inputs of a PC to the other product. • To use cable distributor. 10 We recommend that you should use different products connected to each other Connect one end of the signal input cable(15-pin D-Sub Signal Cable) to the RGB OUT connector of product 1 and connect the other end to the RGB IN connector of other products. 15-pin D-Sub Signal Cable PC Product 1 Product 2 Product 3 Product 4 Note • When multi-connecting in/out cascade format, no loss cables are recommended.

User Guide
Page 16
Connecting to other monitors. We recommend that you can connect the AV Out to External Devices Watching AV Outputs - When using AV input, you should use cable distributor. 15 Video/TV BNC Cable (not included) Audio Cable (not included) Product BNC Cable (not included) Audio Cable (not included) Video/TV Note • When multi-connecting in/out cascade format, no loss cables are recommended.
Connecting to other monitors. We recommend that you can connect the AV Out to External Devices Watching AV Outputs - When using AV input, you should use cable distributor. 15 Video/TV BNC Cable (not included) Audio Cable (not included) Product BNC Cable (not included) Audio Cable (not included) Video/TV Note • When multi-connecting in/out cascade format, no loss cables are recommended.
User Guide
Page 23
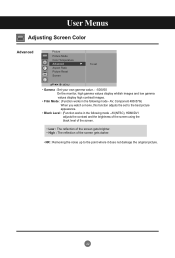
AV, Component 480i/576i) When you watch a movie, this function adjusts the set MENU • Gamma : Set your own gamma value. : -50/0/50 On the monitor, high gamma values display whitish images and low gamma values display high contrast images. • Film Mode : (Function works in the following mode - AV(NTSC), ...
AV, Component 480i/576i) When you watch a movie, this function adjusts the set MENU • Gamma : Set your own gamma value. : -50/0/50 On the monitor, high gamma values display whitish images and low gamma values display high contrast images. • Film Mode : (Function works in the following mode - AV(NTSC), ...
User Guide
Page 27
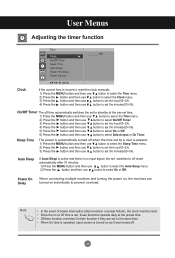
... when the time set by a user is turned on individually to set the minutes(00~59). Power On Delay When connecting multiple monitors and turning the power on, the monitors are set to the same time. • When On time is operated, input screen is passed. 1) Press the MENU button and then...
... when the time set by a user is turned on individually to set the minutes(00~59). Power On Delay When connecting multiple monitors and turning the power on, the monitors are set to the same time. • When On time is operated, input screen is passed. 1) Press the MENU button and then...
User Guide
Page 29
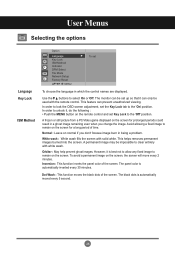
... the panel color of the screen. A frozen or still picture from a PC/Video game displayed on the screen. Orbiter : May help prevent ghost images. The monitor can be set To choose the language in being a problem. However, it can prevent unauthorized viewing. Use the buttons to remain on the screen for...
... the panel color of the screen. A frozen or still picture from a PC/Video game displayed on the screen. Orbiter : May help prevent ghost images. The monitor can be set To choose the language in being a problem. However, it can prevent unauthorized viewing. Use the buttons to remain on the screen for...

User Guide
Page 43
... RXD GND DSR DTR CTS RTS D-Sub 9 (Female) D-Sub 9 (Female) 3-Wire Configurations (Not Standard) PC RXD 2 TXD 3 GND 5 DTR 4 DSR 6 RTS 7 CTS 8 Monitor 3 2 5 6 4 7 8 TXD RXD GND DTR DSR RTS CTS D-Sub 9 (Female) D-Sub 9 (Female) LLLL LLL Communication Parameter Baud Rate : 9600buad Rate (UART) Data Length : 8bits Parity Bit : ...
... RXD GND DSR DTR CTS RTS D-Sub 9 (Female) D-Sub 9 (Female) 3-Wire Configurations (Not Standard) PC RXD 2 TXD 3 GND 5 DTR 4 DSR 6 RTS 7 CTS 8 Monitor 3 2 5 6 4 7 8 TXD RXD GND DTR DSR RTS CTS D-Sub 9 (Female) D-Sub 9 (Female) LLLL LLL Communication Parameter Baud Rate : 9600buad Rate (UART) Data Length : 8bits Parity Bit : ...

User Guide
Page 54
... (Power on and signal exist) 1 : No signal (Power on) 2 : Turn the monitor off by remote control 3 : Turn the monitor off by sleep time function 4 : Turn the monitor off by RS-232C function 8 : Turn the monitor off by off time function 9 : Turn the monitor off by auto off status when Stand-by mode. Transmission [j][p][ ][Set ID...
... (Power on and signal exist) 1 : No signal (Power on) 2 : Turn the monitor off by remote control 3 : Turn the monitor off by sleep time function 4 : Turn the monitor off by RS-232C function 8 : Turn the monitor off by off time function 9 : Turn the monitor off by auto off status when Stand-by mode. Transmission [j][p][ ][Set ID...


