
Owner's Manual (English)
Page 2
...taking proper measures, electrical shock or fire can occur. Additionally, vinyl packing can smell smoke or other odors or hear a strange sound unplug the power cord and contact the service center. - If you continue to internal heat. The product can be injured. Anti-moisture material is not blocked. Do... not put heavy objects on the pathway. - Do not leave the power or signal cable unattended on the product or sit upon it. - Install the product in installing the Product Warning Keep away from heat sources ...
...taking proper measures, electrical shock or fire can occur. Additionally, vinyl packing can smell smoke or other odors or hear a strange sound unplug the power cord and contact the service center. - If you continue to internal heat. The product can be injured. Anti-moisture material is not blocked. Do... not put heavy objects on the pathway. - Do not leave the power or signal cable unattended on the product or sit upon it. - Install the product in installing the Product Warning Keep away from heat sources ...
Owner's Manual (English)
Page 3
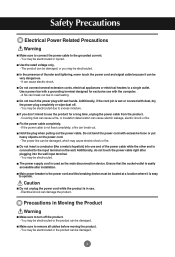
...can be damaged, or you don't intend to operate. Ensure that the socket-outlet is connected to turn off . - Caution Do not unplug the power cord while the product is used as the main disconnection device. You may be very dangerous. - It can damage the product. Do not connect several ...overheating. Additionally, if the cord pin is not fixed completely, a fire can break out due to remove all cables before moving the product. - Fix the power cable completely. - Use the rated voltage only. - A fire can break out. Precautions in use the product for exclusive use with wet hands. Main...
...can be damaged, or you don't intend to operate. Ensure that the socket-outlet is connected to turn off . - Caution Do not unplug the power cord while the product is used as the main disconnection device. You may be very dangerous. - It can damage the product. Do not connect several ...overheating. Additionally, if the cord pin is not fixed completely, a fire can break out due to remove all cables before moving the product. - Fix the power cable completely. - Use the rated voltage only. - A fire can break out. Precautions in use the product for exclusive use with wet hands. Main...

Owner's Manual (English)
Page 4
...away from the product. - Fire or electric shock accident can cause electric shock or serious malfunction. When cleaning the brown tube surface, unplug the power cord and scrub with a product for a long time. Keep the proper distance from water. - Product can be impaired. On Disposal The ... of your local authority. 3 If you drop the product, the damaged product can occur. - When cleaning the brown tube surface, unplug the power cord and scrub with a product to move . Set the appropriate resolution and clock by referring to careless handling of explosion or fire due to...
...away from the product. - Fire or electric shock accident can cause electric shock or serious malfunction. When cleaning the brown tube surface, unplug the power cord and scrub with a product for a long time. Keep the proper distance from water. - Product can be impaired. On Disposal The ... of your local authority. 3 If you drop the product, the damaged product can occur. - When cleaning the brown tube surface, unplug the power cord and scrub with a product to move . Set the appropriate resolution and clock by referring to careless handling of explosion or fire due to...
Owner's Manual (English)
Page 5
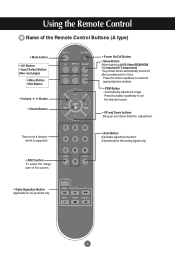
...the intended screen. • UP and Down buttons Bring up and down direction adjustment. • Auto Button Automatic adjustment function (Operational for LG products only 4 Automatically adjusts the image. Using the Remote Control Name of the Remote Control Buttons (A type) • Mute button •...• Menu Button • Exit Button • Volume Button • Check Button There is not a function which is supported • Power On/Off Button • Sleep Button When watching AV/S-Video/RGB/HDMI • Component1/ Component2 The product will be automatically turned off after ...
...the intended screen. • UP and Down buttons Bring up and down direction adjustment. • Auto Button Automatic adjustment function (Operational for LG products only 4 Automatically adjusts the image. Using the Remote Control Name of the Remote Control Buttons (A type) • Mute button •...• Menu Button • Exit Button • Volume Button • Check Button There is not a function which is supported • Power On/Off Button • Sleep Button When watching AV/S-Video/RGB/HDMI • Component1/ Component2 The product will be automatically turned off after ...
Owner's Manual (English)
Page 7
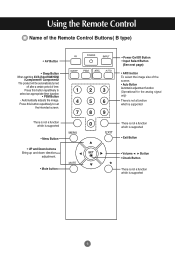
... a function which is supported • Menu Button • UP and Down buttons Bring up and down direction adjustment. • Mute button 123 456 789 0 • Power On/Off Button • Input Select Button (See next page) • ARC button To select the image size of time. Automatically adjusts the image. Press...
... a function which is supported • Menu Button • UP and Down buttons Bring up and down direction adjustment. • Mute button 123 456 789 0 • Power On/Off Button • Input Select Button (See next page) • ARC button To select the image size of time. Automatically adjusts the image. Press...
Owner's Manual (English)
Page 11
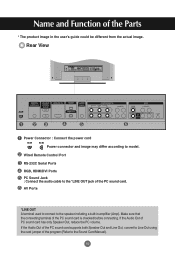
...) OUT HDMI/DVI IN IN RGB IN RGB OUT AUDIO (RGB/DVI) COMPONENT IN VIDEO Y P B P R L-AUDIO-R 1 2 VIDEO AV IN L-AUDIO-R AV OUT S-VIDEO Power Connector : Connect the power cord Power connector and image may differ according to the Sound Card Manual). 10 Make sure that the connecting terminal of the Parts * The product...
...) OUT HDMI/DVI IN IN RGB IN RGB OUT AUDIO (RGB/DVI) COMPONENT IN VIDEO Y P B P R L-AUDIO-R 1 2 VIDEO AV IN L-AUDIO-R AV OUT S-VIDEO Power Connector : Connect the power cord Power connector and image may differ according to the Sound Card Manual). 10 Make sure that the connecting terminal of the Parts * The product...
Owner's Manual (English)
Page 12
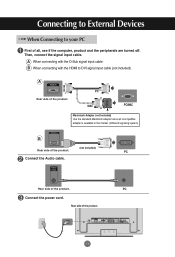
... D-Sub signal input cable. AUDIO (RGB/DVI) Rear side of all, see if the computer, product and the peripherals are turned off. PC Connect the power cord. A When connecting with the HDMI to your PC First of the product. Connecting to External Devices When Connecting to DVI signal input cable (not...
... D-Sub signal input cable. AUDIO (RGB/DVI) Rear side of all, see if the computer, product and the peripherals are turned off. PC Connect the power cord. A When connecting with the HDMI to your PC First of the product. Connecting to External Devices When Connecting to DVI signal input cable (not...
Owner's Manual (English)
Page 13
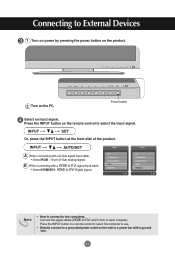
... Select an input signal. Press the INPUT button in a remote control to select the computer to use. • Directly connect to a grounded power outlet on the wall or a power bar with a D-Sub signal input cable. • Select RGB : 15-pin D-Sub analog signal. Press the INPUT button on the PC. INPUT SET... signal cables (HDMI to DVI and D-Sub) to DVI Digital signal. Note • How to connect to two computers. Connecting to External Devices 1 Turn on power by pressing the power button on the product. 2 Turn on the remote control to select the input signal.
... Select an input signal. Press the INPUT button in a remote control to select the computer to use. • Directly connect to a grounded power outlet on the wall or a power bar with a D-Sub signal input cable. • Select RGB : 15-pin D-Sub analog signal. Press the INPUT button on the PC. INPUT SET... signal cables (HDMI to DVI and D-Sub) to DVI Digital signal. Note • How to connect to two computers. Connecting to External Devices 1 Turn on power by pressing the power button on the product. 2 Turn on the remote control to select the input signal.
Owner's Manual (English)
Page 15
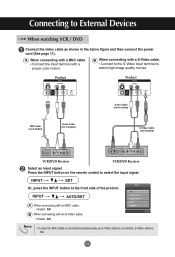
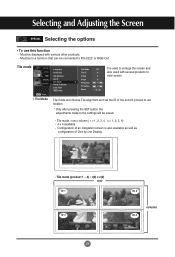
... connecting with a proper color match. Note • In case the BNC cable is connected simultaneously as shown in the below figure and then connect the power cord (See page 11). Connecting to select the input signal. A When connecting with a BNC cable. • Connect the input terminal with an S-Video cable. •...
... connecting with a proper color match. Note • In case the BNC cable is connected simultaneously as shown in the below figure and then connect the power cord (See page 11). Connecting to select the input signal. A When connecting with a BNC cable. • Connect the input terminal with an S-Video cable. •...
Owner's Manual (English)
Page 16
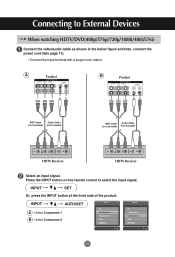
... When watching HDTV/DVD(480p/576p/720p/1080i/480i/576i) Connect the video/audio cable as shown in the below figure and then, connect the power cord (See page 11). • Connect the input terminal with a proper color match. A Product COMPONENT IN VIDEO Y P B P R L-AUDIO-R 1 2 B Product COMPONENT IN VIDEO Y P B P R L-AUDIO-R 1 2 BNC Cable...
... When watching HDTV/DVD(480p/576p/720p/1080i/480i/576i) Connect the video/audio cable as shown in the below figure and then, connect the power cord (See page 11). • Connect the input terminal with a proper color match. A Product COMPONENT IN VIDEO Y P B P R L-AUDIO-R 1 2 B Product COMPONENT IN VIDEO Y P B P R L-AUDIO-R 1 2 BNC Cable...

Owner's Manual (English)
Page 17
... the VCR/DVD/Set-top Box (480p/576p/720p/1080i) Connect the video/audio cable as shown in the below figure and then connect the power cord (See page 11). Product A HDMI/DVI IN RGB IN AUDIO (RGB/DVI) Product HDMI/DVI IN RGB IN AUDIO (RGB/DVI) Product B HDMI/DVI...
... the VCR/DVD/Set-top Box (480p/576p/720p/1080i) Connect the video/audio cable as shown in the below figure and then connect the power cord (See page 11). Product A HDMI/DVI IN RGB IN AUDIO (RGB/DVI) Product HDMI/DVI IN RGB IN AUDIO (RGB/DVI) Product B HDMI/DVI...
Owner's Manual (English)
Page 20
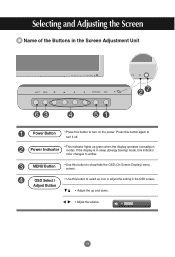
... to turn on mode). If the display is in sleep (Energy Saving) mode, this button to show/hide the OSD (On Screen Display) menu screen. Power Indicator • This Indicator lights up and down. • Adjust the volume. 19 OSD Select / Adjust Button • Use this button to select an icon... or adjust the setting in the OSD screen. • Adjust the up green when the display operates normally(on the power. Selecting and Adjusting the Screen Name of the Buttons in the Screen Adjustment Unit...
... to turn on mode). If the display is in sleep (Energy Saving) mode, this button to show/hide the OSD (On Screen Display) menu screen. Power Indicator • This Indicator lights up and down. • Adjust the volume. 19 OSD Select / Adjust Button • Use this button to select an icon... or adjust the setting in the OSD screen. • Adjust the up green when the display operates normally(on the power. Selecting and Adjusting the Screen Name of the Buttons in the Screen Adjustment Unit...

Owner's Manual (English)
Page 27
... button to set the hour(01~23). 4) Press the button and then use button to set to the same time. Note In the event of power interruption (disconnection or power failure), the clock must be reset.
... button to set the hour(01~23). 4) Press the button and then use button to set to the same time. Note In the event of power interruption (disconnection or power failure), the clock must be reset.
Owner's Manual (English)
Page 28
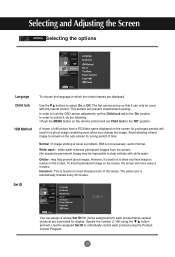
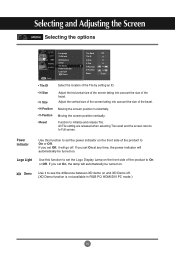
.../Video game displayed on the screen for display. Selecting and Adjusting the Screen Selecting the options Language Child lock ISM Method Set ID Tile Mode Power Indicator Logo light Demo Language Child lock ISM Method To choose the language in a ghost image remaining even when you change the image. Specify the... On or Off. Use the buttons to each product using the button and exit. Set ID Language Child lock ISM Method Set ID 1 Tile Mode Power Indicator Logo light Demo You can prevent unauthorized viewing.
.../Video game displayed on the screen for display. Selecting and Adjusting the Screen Selecting the options Language Child lock ISM Method Set ID Tile Mode Power Indicator Logo light Demo Language Child lock ISM Method To choose the language in a ghost image remaining even when you change the image. Specify the... On or Off. Use the buttons to each product using the button and exit. Set ID Language Child lock ISM Method Set ID 1 Tile Mode Power Indicator Logo light Demo You can prevent unauthorized viewing.
Owner's Manual (English)
Page 29
... several products to the settings will be connected to RS-232C or RGB Out Tile mode Language Child lock ISM Method Set ID Tile Mode Power Indicator Logo light Demo Tile Mode Tile ID H-Size V-Size H-Position V-Position Reset Off 0 0 0 To set It is also available as well as configuration of...
... several products to the settings will be connected to RS-232C or RGB Out Tile mode Language Child lock ISM Method Set ID Tile Mode Power Indicator Logo light Demo Tile Mode Tile ID H-Size V-Size H-Position V-Position Reset Off 0 0 0 To set It is also available as well as configuration of...
Owner's Manual (English)
Page 31
...the product to On or Off. Use this function to set the power indicator on . Selecting and Adjusting the Screen Selecting the options Language Child lock ISM Method Set ID ...Tile Mode Power Indicator Logo light Demo Tile Mode Tile ID H-Size V-Size H-Position V-Position Reset Off 0 0... release Tile. If you set the Logo Display Lamp on . Power Indicator Logo Light Use this function to set On at any time, the power indicator will automatically be turned on the front side of the product...
...the product to On or Off. Use this function to set the power indicator on . Selecting and Adjusting the Screen Selecting the options Language Child lock ISM Method Set ID ...Tile Mode Power Indicator Logo light Demo Tile Mode Tile ID H-Size V-Size H-Position V-Position Reset Off 0 0... release Tile. If you set the Logo Display Lamp on . Power Indicator Logo Light Use this function to set On at any time, the power indicator will automatically be turned on the front side of the product...
Owner's Manual (English)
Page 34
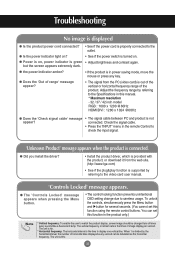
... several seconds. (You cannot set this function using the remote control buttons. The unit is green • Adjust brightness and contrast again. G the power indicator amber? • If the product is in the product only.) Note * Vertical frequency: To enable the user to the outlet.... The unit is Hz. * Horizontal frequency: The horizontal interval is the time to careless usage. You can be changed tens of the product. G Is the power indicator light on . G Does the 'Out of range' message appear? • The signal from the web site. (http://www.lge.com) • See ...
... several seconds. (You cannot set this function using the remote control buttons. The unit is green • Adjust brightness and contrast again. G the power indicator amber? • If the product is in the product only.) Note * Vertical frequency: To enable the user to the outlet.... The unit is Hz. * Horizontal frequency: The horizontal interval is the time to careless usage. You can be changed tens of the product. G Is the power indicator light on . G Does the 'Out of range' message appear? • The signal from the web site. (http://www.lge.com) • See ...
Owner's Manual (English)
Page 37
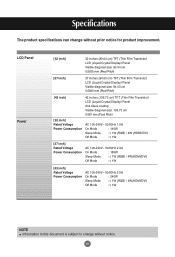
... (Thin Film Transistor) LCD (Liquid Crystal Display) Panel Anti-Glare coating Visible diagonal size: 106.73 cm 0.681 mm (Pixel Pitch) [32 inch] Rated Voltage Power Consumption AC 100-240V~ 50/60Hz 1.5A On Mode : 145W Sleep Mode : ≤ 1W (RGB) / 4W (HDMI/DVI) Off Mode : ≤ 1W [37 inch] Rated... AC 100-240V~ 50/60Hz 2.0A On Mode : 180W Sleep Mode : ≤ 1W (RGB) / 4W(HDMI/DVI) Off Mode : ≤ 1W [42 inch] Rated Voltage Power Consumption AC 100-240V~ 50/60Hz 2.5A On Mode : 240W Sleep Mode : ≤ 1W (RGB) / 4W(HDMI/DVI) Off Mode : ≤ 1W NOTE Information in...
... (Thin Film Transistor) LCD (Liquid Crystal Display) Panel Anti-Glare coating Visible diagonal size: 106.73 cm 0.681 mm (Pixel Pitch) [32 inch] Rated Voltage Power Consumption AC 100-240V~ 50/60Hz 1.5A On Mode : 145W Sleep Mode : ≤ 1W (RGB) / 4W (HDMI/DVI) Off Mode : ≤ 1W [37 inch] Rated... AC 100-240V~ 50/60Hz 2.0A On Mode : 180W Sleep Mode : ≤ 1W (RGB) / 4W(HDMI/DVI) Off Mode : ≤ 1W [42 inch] Rated Voltage Power Consumption AC 100-240V~ 50/60Hz 2.5A On Mode : 240W Sleep Mode : ≤ 1W (RGB) / 4W(HDMI/DVI) Off Mode : ≤ 1W NOTE Information in...

Owner's Manual (English)
Page 41
....00 60 RGB : Mode 1 ~ Mode 19 HDMI/DVI : Mode 1 ~ Mode 17 DTV Mode Component 480i o 576i o 480p o 576p o 720p o 1080i o RGB(DTV) x x o o o o HDMI/DVI(DTV) x x o o o o Power Indicator Mode On Mode Sleep Mode Off Mode Product Green Amber - NOTE DTV/PC selection on RGB and HDMI/DVI inputs is available for PC...
....00 60 RGB : Mode 1 ~ Mode 19 HDMI/DVI : Mode 1 ~ Mode 17 DTV Mode Component 480i o 576i o 480p o 576p o 720p o 1080i o RGB(DTV) x x o o o o HDMI/DVI(DTV) x x o o o o Power Indicator Mode On Mode Sleep Mode Off Mode Product Green Amber - NOTE DTV/PC selection on RGB and HDMI/DVI inputs is available for PC...

Owner's Manual (English)
Page 44
... - 10H FFH FFH FFH A2 Tile Mode 21. Color 10. OSD Select 13. Remote Lock/ key Lock 14. Aspect Ratio 04. Elapsed time return 25. Power 02. Volume Control 07. Sharpness 12. Tint 11. Color Temperature 16. Key 20. Tile V Size 23. RS-232C Controlling the Multiple Product Command Reference List...
... - 10H FFH FFH FFH A2 Tile Mode 21. Color 10. OSD Select 13. Remote Lock/ key Lock 14. Aspect Ratio 04. Elapsed time return 25. Power 02. Volume Control 07. Sharpness 12. Tint 11. Color Temperature 16. Key 20. Tile V Size 23. RS-232C Controlling the Multiple Product Command Reference List...


