
Owner's Manual
Page 7
Follow the instructions included with the wall mount. 10 cm 10 cm 10 cm 10 cm 10 cm DESKTOP PEDESTAL INSTALLATION For proper ventilation, allow a clearance of 10 cm on each side and from the wall. PREPARATION WALL MOUNT: HORIZONTAL INSTALLATION For proper ventilation, allow a clearance of 10 cm on each side and from the wall. 10 cm 10 cm 10 cm 10 cm 6
Follow the instructions included with the wall mount. 10 cm 10 cm 10 cm 10 cm 10 cm DESKTOP PEDESTAL INSTALLATION For proper ventilation, allow a clearance of 10 cm on each side and from the wall. PREPARATION WALL MOUNT: HORIZONTAL INSTALLATION For proper ventilation, allow a clearance of 10 cm on each side and from the wall. 10 cm 10 cm 10 cm 10 cm 6
Owner's Manual
Page 8
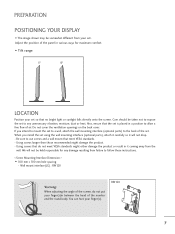
...in between the head of the screen, do not meet VESA standards. - When you intend to mount the set to a wall, attach the wall mounting interface (optional parts) to use screws and a wall mount that meet VESA standards might damage the product. - You can hurt your finger(s)in it will... LOCATION Position your set. Also, ensure that the set is placed in various ways for any unnecessary vibration, moisture, dust or heat. Wall mount interface(LG) : RW120 Warning: When adjusting the angle of the monitor and the stand body. Care should be taken not to expose the set to...
...in between the head of the screen, do not meet VESA standards. - When you intend to mount the set to a wall, attach the wall mounting interface (optional parts) to use screws and a wall mount that meet VESA standards might damage the product. - You can hurt your finger(s)in it will... LOCATION Position your set. Also, ensure that the set is placed in various ways for any unnecessary vibration, moisture, dust or heat. Wall mount interface(LG) : RW120 Warning: When adjusting the angle of the monitor and the stand body. Care should be taken not to expose the set to...


