
Owner's Manual
Page 3
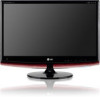
INPUT MENU ENTER VOLUME CHANNEL Power Button Button Button Buttons Buttons Button INPUT MENU ENTER VOL CH Light Sensor This is switched on. Note:You can adjust Power indicator in the OPTION menu. Headphone IR receiver Jack (Remote controller receiver) Power Indicator illuminates blue when the set . PREPARATION FRONT PANEL CONTROLS I This is a simplified representation of the front panel. The image shown may be somewhat different from your set is lens for light sensor select outside luminance, when setting AUTO BRIGHT ON. 1
INPUT MENU ENTER VOLUME CHANNEL Power Button Button Button Buttons Buttons Button INPUT MENU ENTER VOL CH Light Sensor This is switched on. Note:You can adjust Power indicator in the OPTION menu. Headphone IR receiver Jack (Remote controller receiver) Power Indicator illuminates blue when the set . PREPARATION FRONT PANEL CONTROLS I This is a simplified representation of the front panel. The image shown may be somewhat different from your set is lens for light sensor select outside luminance, when setting AUTO BRIGHT ON. 1
Owner's Manual
Page 27
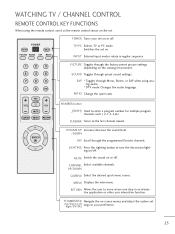
...Switch the sound on or off . UP/DOWN Q.MENU Select the desired quick menu source. RATIO Change the spect ratio. WATCHING TV / CHANNEL CONTROL REMOTE CONTROL KEY FUNCTIONS When using analog audio. * DTV mode: Changes the audio language. TV/PC Selects TV or PC mode. Switches the set . ...SOUND Toggles through Mono, Stereo, or SAP when using the remote control, aim it at the remote control sensor on the set on. SAP * Toggles through preset sound settings. CHANNEL Select available channels. MENU Displays the main menu....
...Switch the sound on or off . UP/DOWN Q.MENU Select the desired quick menu source. RATIO Change the spect ratio. WATCHING TV / CHANNEL CONTROL REMOTE CONTROL KEY FUNCTIONS When using analog audio. * DTV mode: Changes the audio language. TV/PC Selects TV or PC mode. Switches the set . ...SOUND Toggles through Mono, Stereo, or SAP when using the remote control, aim it at the remote control sensor on the set on. SAP * Toggles through preset sound settings. CHANNEL Select available channels. MENU Displays the main menu....

Owner's Manual
Page 28
...with -). Note: a. It will automatically disappear after approx. 40 seconds unless a button is displayed on the screen as figure after turning on the remote control. 4 Set the channel by pressing the power button on the product. 3 Press the TV/PC button on the set, you can adjust ... button to change current OSD into regular OSD. Setup Menu If the OSD (On Screen Display) is pressed. I Open the battery compartment cover on the remote control. WATCHING TV / CHANNEL CONTROL TURNING ON THE TV 1 First, connect the power cord correctly. 2 Turn on the power by using the CH +...
...with -). Note: a. It will automatically disappear after approx. 40 seconds unless a button is displayed on the screen as figure after turning on the remote control. 4 Set the channel by pressing the power button on the product. 3 Press the TV/PC button on the set, you can adjust ... button to change current OSD into regular OSD. Setup Menu If the OSD (On Screen Display) is pressed. I Open the battery compartment cover on the remote control. WATCHING TV / CHANNEL CONTROL TURNING ON THE TV 1 First, connect the power cord correctly. 2 Turn on the power by using the CH +...

Owner's Manual
Page 66
...:: OffOOffff : OffOn : 1 Power Indicator : On DDC-CI : On RTC : On E • In Key Lock 'On', if the set can be configured so that the remote control is pressed while viewing the TV. • Press the MENU button to close the menu window. • Press the RETURN button to move to...:: Off Caption : Off Set ID : 1 Power Indicator : On DDC-CI : On RTC : On E 1 MENU 2 ENTER 3 ENTER 4 ENTER Select OPTION. or NUMBER buttons on the remote control. • With the Key Lock On, the display ' Key Lock' appears on the screen if any button on the TV or POWER, INPUT, CH + -
...:: OffOOffff : OffOn : 1 Power Indicator : On DDC-CI : On RTC : On E • In Key Lock 'On', if the set can be configured so that the remote control is pressed while viewing the TV. • Press the MENU button to close the menu window. • Press the RETURN button to move to...:: Off Caption : Off Set ID : 1 Power Indicator : On DDC-CI : On RTC : On E 1 MENU 2 ENTER 3 ENTER 4 ENTER Select OPTION. or NUMBER buttons on the remote control. • With the Key Lock On, the display ' Key Lock' appears on the screen if any button on the TV or POWER, INPUT, CH + -

Owner's Manual
Page 73
... the RETURN button to move to the previous menu screen. 71 Select Lock System. PARENTAL CONTROL / RATINGS LOCK SYSTEM Enter the password, press '0', '0', '0', '0' on the remote control handset.
... the RETURN button to move to the previous menu screen. 71 Select Lock System. PARENTAL CONTROL / RATINGS LOCK SYSTEM Enter the password, press '0', '0', '0', '0' on the remote control handset.

Owner's Manual
Page 74
... 456 789 0 Select LOCK. • If you forget your new password. As soon as the 4 digits are entered, re-enter the same 4 digits on the remote control handset. Input the password. Select Set password. Choose any 4 digits for your password, press '7', '7', '7', '7' on the Confirm. • Press the MENU button to close...
... 456 789 0 Select LOCK. • If you forget your new password. As soon as the 4 digits are entered, re-enter the same 4 digits on the remote control handset. Input the password. Select Set password. Choose any 4 digits for your password, press '7', '7', '7', '7' on the Confirm. • Press the MENU button to close...

Owner's Manual
Page 81
... slowly after a minute, unplug the TV for 30 seconds and try it again. A Keep a sufficient distance between the product and the remote control causing obstruction. Poor reception on A This is normal, the image is muted during the product startup process. A Install new batteries. No...to see if there is any object between this product and other electronics. A Ensure that the correct remote operating mode is weak, reorient antenna. A No broadcast on . The remote control doesn't work normally. Ensure you are installed with Auto sleep activated. A Ensure that the ...
... slowly after a minute, unplug the TV for 30 seconds and try it again. A Keep a sufficient distance between the product and the remote control causing obstruction. Poor reception on A This is normal, the image is muted during the product startup process. A Install new batteries. No...to see if there is any object between this product and other electronics. A Ensure that the correct remote operating mode is weak, reorient antenna. A No broadcast on . The remote control doesn't work normally. Ensure you are installed with Auto sleep activated. A Ensure that the ...

Owner's Manual
Page 82
... to check the input source setting. 80 Adjust the video settings on , power indic- A Press the 'INPUT' button in menu option. A Adjust Balance in the remote control to match one of the product. Check the signal cable. Does the 'Out of accepted resolution/frequency settings listed in this manual. Power is...
... to check the input source setting. 80 Adjust the video settings on , power indic- A Press the 'INPUT' button in menu option. A Adjust Balance in the remote control to match one of the product. Check the signal cable. Does the 'Out of accepted resolution/frequency settings listed in this manual. Power is...

Owner's Manual
Page 88
...ready to be programmed, then press the corresponding mode button (such as a D V D or V C R) on the remote control. Programming a code into a remote mode 1 To find out whether your remote control can operate the component without programming, turn off. 5 Press the MENU button to store the code. 6 Test the... if the component responds properly. Now the remote control is lighted. 3 Press the MENU and MUTE buttons simultaneously. PROGRAMMING CODE DVD Brand Codes APEX DIGITAL 022 DENON 020 014 GE 005 006 HARMAN KARDON 027 JVC 012 LG 001 010 016 025 MAGNAVOX 013 MARANTZ 024...
...ready to be programmed, then press the corresponding mode button (such as a D V D or V C R) on the remote control. Programming a code into a remote mode 1 To find out whether your remote control can operate the component without programming, turn off. 5 Press the MENU button to store the code. 6 Test the... if the component responds properly. Now the remote control is lighted. 3 Press the MENU and MUTE buttons simultaneously. PROGRAMMING CODE DVD Brand Codes APEX DIGITAL 022 DENON 020 014 GE 005 006 HARMAN KARDON 027 JVC 012 LG 001 010 016 025 MAGNAVOX 013 MARANTZ 024...

Owner's Manual
Page 90
... port on the set. 2. Tf Tf 0.56 ms 2.24 ms Tf=108ms @455 kHz 88 Remote Control IR Codes A Output waveform Single pulse, modulated with 37.917 kHz signal at 455 kHz Tc T1 Carrier frequency FCAR = 1/TC = fOSC/12 Duty ...
... port on the set. 2. Tf Tf 0.56 ms 2.24 ms Tf=108ms @455 kHz 88 Remote Control IR Codes A Output waveform Single pulse, modulated with 37.917 kHz signal at 455 kHz Tc T1 Carrier frequency FCAR = 1/TC = fOSC/12 Duty ...

Owner's Manual
Page 93
... List COMMAND1 COMMAND2 DATA (Hexadecimal) COMMAND1 COMMAND2 DATA (Hexadecimal) 01. Power k 02. Input Select x 03. Volume Mute k 06. Contrast k 08. Tint k 11. OSD Select k 13. Remote Control Lock Mode k a 00 to 01 18. Color Temperature k e 00 to 01 14. Auto Configuration j f 00 to 0x63) on this model, set ID number in...
... List COMMAND1 COMMAND2 DATA (Hexadecimal) COMMAND1 COMMAND2 DATA (Hexadecimal) 01. Power k 02. Input Select x 03. Volume Mute k 06. Contrast k 08. Tint k 11. OSD Select k 13. Remote Control Lock Mode k a 00 to 01 18. Color Temperature k e 00 to 01 14. Auto Configuration j f 00 to 0x63) on this model, set ID number in...

Owner's Manual
Page 94
... function. * Note: In this model, set will send the Acknowledge after power on /off . You can also adjust mute using the MUTE button on remote control. Acknowledgement [i][ ][Set ID][ ][OK/NG][Data][x] 10. See page 93. Transmission [k][k][ ][Set ID][ ][Data][Cr] Data Min: 00 to... ID][ ][OK/NG][Data][x] 09. You can also adjust volume with the volume buttons on (Picture off (Picture on) Data 01: Screen mute on remote control. You can also adjust sharpness in the PICTURE menu. Transmission [k][c][ ][Set ID][ ][Data][Cr] Data 01: 4:3 06: Set by Hexadecimal code)...
... function. * Note: In this model, set will send the Acknowledge after power on /off . You can also adjust mute using the MUTE button on remote control. Acknowledgement [i][ ][Set ID][ ][OK/NG][Data][x] 10. See page 93. Transmission [k][k][ ][Set ID][ ][Data][Cr] Data Min: 00 to... ID][ ][OK/NG][Data][x] 09. You can also adjust volume with the volume buttons on (Picture off (Picture on) Data 01: Screen mute on remote control. You can also adjust sharpness in the PICTURE menu. Transmission [k][c][ ][Set ID][ ][Data][Cr] Data 01: 4:3 06: Set by Hexadecimal code)...

Owner's Manual
Page 95
...the front panel controls on /off Data 01: Lock on Acknowledgement [m][ ][Set ID][ ][OK/NG][Data][x] If you're not using the remote control and front panel controls on Acknowledgement [l][ ][Set ID][ ][OK/NG][Data][x] 13. You can also adjust balance in the AUDIO menu. ... Channel Number NTSC air: 02 I Install two 1.5 V AAA batteries. with +, - Transmission [k][m][ ][Set ID][ ][Data][Cr] Data 00: Lock off , remote control lock is used batteries with new ones. Acknowledgement [r][ ][Set ID][ ][OK/NG][Data][x] 15. You can also adjust treble in the AUDIO menu. Acknowledgement...
...the front panel controls on /off Data 01: Lock on Acknowledgement [m][ ][Set ID][ ][OK/NG][Data][x] If you're not using the remote control and front panel controls on Acknowledgement [l][ ][Set ID][ ][OK/NG][Data][x] 13. You can also adjust balance in the AUDIO menu. ... Channel Number NTSC air: 02 I Install two 1.5 V AAA batteries. with +, - Transmission [k][m][ ][Set ID][ ][Data][Cr] Data 00: Lock off , remote control lock is used batteries with new ones. Acknowledgement [r][ ][Set ID][ ][OK/NG][Data][x] 15. You can also adjust treble in the AUDIO menu. Acknowledgement...

Owner's Manual
Page 96
...= Minor is 3 = 00 03 Data 05 = 0010 0010 in binary = 01 Total = ma 00 23 00 00 00 00 01 2. Key (Command: m c) To send IR remote key code. Transmission [m][g][ ][Set ID][ ][Data][Cr] Data Min:00 to Max:64 (*transmit by Hexadecimal code) *Refer to the digital (ATSC) local channel 30... add and delete the channels. Tune to Hexadecimal before sending. Transmission [m][c][ ][Set ID][ ][Data][Cr] Acknowledgement [c][ ][Set ID][ ][OK/NG][Data][x] Code (Hexa) Remote control Code (Hexa) Remote control 0F 0B 08 79 10-19 4C 09 02 03 00 01 1E 73 TV/PC 40 INPUT 41 POWER 07 RATIO 06...
...= Minor is 3 = 00 03 Data 05 = 0010 0010 in binary = 01 Total = ma 00 23 00 00 00 00 01 2. Key (Command: m c) To send IR remote key code. Transmission [m][g][ ][Set ID][ ][Data][Cr] Data Min:00 to Max:64 (*transmit by Hexadecimal code) *Refer to the digital (ATSC) local channel 30... add and delete the channels. Tune to Hexadecimal before sending. Transmission [m][c][ ][Set ID][ ][Data][Cr] Acknowledgement [c][ ][Set ID][ ][OK/NG][Data][x] Code (Hexa) Remote control Code (Hexa) Remote control 0F 0B 08 79 10-19 4C 09 02 03 00 01 1E 73 TV/PC 40 INPUT 41 POWER 07 RATIO 06...


