
Service Manual
Page 2
... Best Location ...8 Installation Check ...8 How to Secure the Drain Pipe ...8 How to Install...9 Operation ...12 Function of Controls ...12 Disassembly ...13 Mechanical Parts...13 Air handling Parts...14 Electrical Parts ...15 Refrigerating Cycle...17 Schematic Diagram...20 Electronic Control Device...20 Wiring Diagram...21 Components Location ...22 Troubleshooting Guide ...23 Pipeing System ...23...
... Best Location ...8 Installation Check ...8 How to Secure the Drain Pipe ...8 How to Install...9 Operation ...12 Function of Controls ...12 Disassembly ...13 Mechanical Parts...13 Air handling Parts...14 Electrical Parts ...15 Refrigerating Cycle...17 Schematic Diagram...20 Electronic Control Device...20 Wiring Diagram...21 Components Location ...22 Troubleshooting Guide ...23 Pipeing System ...23...

Service Manual
Page 5
CAUTION Never touch the metal parts of the unit when removing the filter. • They are sharp and may cause an electric shock. Ensure that the outer case is not damaged ...
CAUTION Never touch the metal parts of the unit when removing the filter. • They are sharp and may cause an electric shock. Ensure that the outer case is not damaged ...
Service Manual
Page 9
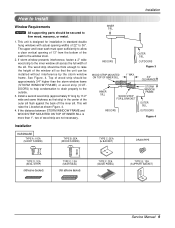
... G: 1EA (SUPPORT BACKET) Service Manual 9 Install a second wood strip (approximately 6" long by the storm window frame. Installation How to Install Window Requirements NOTICE All supporting parts should be approximately 3/4" higher than 1", two of wood strip are not necessary. This will raise the L bracket as first strip) in standard double hung windows...
... G: 1EA (SUPPORT BACKET) Service Manual 9 Install a second wood strip (approximately 6" long by the storm window frame. Installation How to Install Window Requirements NOTICE All supporting parts should be approximately 3/4" higher than 1", two of wood strip are not necessary. This will raise the L bracket as first strip) in standard double hung windows...
Service Manual
Page 13
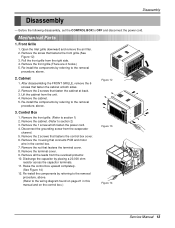
... and disconnect the power cord. Disconnect the grounding screw from the right side. 4. Remove the 2 screws that fastens the front grille.(See Figure 12) 3. Mechanical Parts 1. Remove the screw that fastens the control box cover. 6. Remove the terminal cover. 9. Front Grille 1. Cabinet 1. Figure 12 3. Disassembly Disassembly - Before the following disassembly, set...
... and disconnect the power cord. Disconnect the grounding screw from the right side. 4. Remove the 2 screws that fastens the front grille.(See Figure 12) 3. Mechanical Parts 1. Remove the screw that fastens the control box cover. 6. Remove the terminal cover. 9. Front Grille 1. Cabinet 1. Figure 12 3. Disassembly Disassembly - Before the following disassembly, set...
Service Manual
Page 14
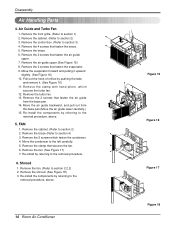
... to section 4) 3. Remove the fan. (See Figure 17) 7. Remove the shroud. (See Figure 18) 3. Remove the brace (Refer to the left carefully. 5. Disassembly Air Handling Parts 4. Air Guide and Turbo Fan 1. Remove the cabinet. (Refer to the removal procedure, above . 14 Room Air Conditioner Figure 15 Figure 16 Figure 17 Figure...
... to section 4) 3. Remove the fan. (See Figure 17) 7. Remove the shroud. (See Figure 18) 3. Remove the brace (Refer to the left carefully. 5. Disassembly Air Handling Parts 4. Air Guide and Turbo Fan 1. Remove the cabinet. (Refer to the removal procedure, above . 14 Room Air Conditioner Figure 15 Figure 16 Figure 17 Figure...

Service Manual
Page 15
... 1. Pull out the capacitor from the control box. (See Figure 21) 3. Remove the overload protector. 6. Leave the valve in place after servicing the system. 3. Electrical Parts 7. Remove the cabinet. (Refer to section 2) 2. Remove all the leads of capacitor terminals. 5. Remove the cabinet. (Refer to section 2) 2. Capacitor 1. Open the top cover from...
... 1. Pull out the capacitor from the control box. (See Figure 21) 3. Remove the overload protector. 6. Leave the valve in place after servicing the system. 3. Electrical Parts 7. Remove the cabinet. (Refer to section 2) 2. Remove all the leads of capacitor terminals. 5. Remove the cabinet. (Refer to section 2) 2. Capacitor 1. Open the top cover from...

Service Manual
Page 21
... FILTER WIRING DIAGRAM ASSEMBLY LOCATION NO. DESCRIPTION 1 MOTOR ASSY 2 CAPACITOR 3 COMPRESSOR 4 OVERLOAD PROTECTOR 5 DC PCB ASSEMBLY 6 AC PCB ASSEMBLY 7 THERMISTOR 8 PLASMA FILTER ASSY S: Service Parts N: Non Service Parts Q'TY PER SET 1 1 1 1 1 1 1 1 REMARKS S S S S S S S S Service Manual 21 ASSEMBLY BK RD 3 COMP. Wiring Diagram Schematic Diagram 1 BK CN-MOTOR CN-AC/DC CN-AC/DC...
... FILTER WIRING DIAGRAM ASSEMBLY LOCATION NO. DESCRIPTION 1 MOTOR ASSY 2 CAPACITOR 3 COMPRESSOR 4 OVERLOAD PROTECTOR 5 DC PCB ASSEMBLY 6 AC PCB ASSEMBLY 7 THERMISTOR 8 PLASMA FILTER ASSY S: Service Parts N: Non Service Parts Q'TY PER SET 1 1 1 1 1 1 1 1 REMARKS S S S S S S S S Service Manual 21 ASSEMBLY BK RD 3 COMP. Wiring Diagram Schematic Diagram 1 BK CN-MOTOR CN-AC/DC CN-AC/DC...
Service Manual
Page 26
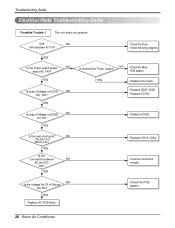
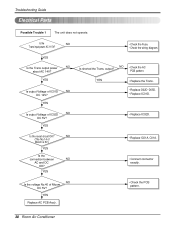
... PCB Ass'y. • Check the PCB pattern. 26 Room Air Conditioner NO Is the voltage No.18 of IC02D NO DC 5V? Troubleshooting Guide Electrical Parts Troubleshooting Guide Possible Trouble 1 The unit does not operate. Is the NO Trans input power AC 115V? YES ••CChheecckktthheeFFuussee.. ••CChheecckkththeewwiriirninggddiaiaggraramm. . YES...
... PCB Ass'y. • Check the PCB pattern. 26 Room Air Conditioner NO Is the voltage No.18 of IC02D NO DC 5V? Troubleshooting Guide Electrical Parts Troubleshooting Guide Possible Trouble 1 The unit does not operate. Is the NO Trans input power AC 115V? YES ••CChheecckktthheeFFuussee.. ••CChheecckkththeewwiriirninggddiaiaggraramm. . YES...
Service Manual
Page 30
... Micom is 5V.) YES Is the connection between NO AC and DC OK? NO (The No.14 of IC01D NO DC 12V? Troubleshooting Guide Electrical Parts Possible Trouble 1 The unit does not operate.
... Micom is 5V.) YES Is the connection between NO AC and DC OK? NO (The No.14 of IC01D NO DC 12V? Troubleshooting Guide Electrical Parts Possible Trouble 1 The unit does not operate.
Service Manual
Page 35
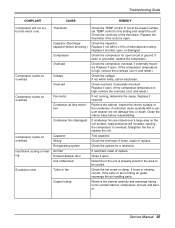
... continuity of the condenser; Replace if open. (If the compressor temperature is open . (If the compressor temperature is hitting air guide, rearrange the air handling parts. Remove the cabinet. Straighten the fins or replace the coil. Service Manual 35 Replace if shorted, open circuit or ground. Check the compressor for open...
... continuity of the condenser; Replace if open. (If the compressor temperature is open . (If the compressor temperature is hitting air guide, rearrange the air handling parts. Remove the cabinet. Straighten the fins or replace the coil. Service Manual 35 Replace if shorted, open circuit or ground. Check the compressor for open...
Service Manual
Page 37
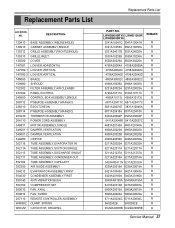
Replacement Parts List LOCATION NO. DESCRIPTION 130410 BASE ASSEMBLY,WELD[SINGLE] 130910 CABINET ASSEMBLY,SINGLE 135312 GRILLE ASSEMBLY,FRONT(SINGLE) ... COMPRESSOR SET 559010 FAN, AXIAL 359012 FAN, TURBO 267110 REMOTE CONTROLLER ASSEMBLY W48602 CLAMP, SPRING W0CZZ CAPACITOR, DRAWING Replacement Parts List PART NO. LWHD8000RY5 LWHD1000R LWHD8000RY6 3041A10041Q 3041A10041H 3091A10056C 3091A10056A 3531A24017B 3531A24020A 3530A10239B 3530A10236A 3550A30226A 3550A30226A 4758A20064A 4758A20069A 4758A20040C 4758A20040C 4758A20040D 4758A20040D 4800A30002C 4800A30002C 4998A10036A 4998A10036A ...
Replacement Parts List LOCATION NO. DESCRIPTION 130410 BASE ASSEMBLY,WELD[SINGLE] 130910 CABINET ASSEMBLY,SINGLE 135312 GRILLE ASSEMBLY,FRONT(SINGLE) ... COMPRESSOR SET 559010 FAN, AXIAL 359012 FAN, TURBO 267110 REMOTE CONTROLLER ASSEMBLY W48602 CLAMP, SPRING W0CZZ CAPACITOR, DRAWING Replacement Parts List PART NO. LWHD8000RY5 LWHD1000R LWHD8000RY6 3041A10041Q 3041A10041H 3091A10056C 3091A10056A 3531A24017B 3531A24020A 3530A10239B 3530A10236A 3550A30226A 3550A30226A 4758A20064A 4758A20069A 4758A20040C 4758A20040C 4758A20040D 4758A20040D 4800A30002C 4800A30002C 4998A10036A 4998A10036A ...

Service Manual
Page 38
Replacement Parts List LCATION NO. LWHD8000RY6 3041A10041Q 5238A10015A 5900A20020A 3H02932B 4948A20030A 5900A20015A 4800A30002C 5239A20019A 4900A20020A 4900A20020B 4681A20140A 4998A10036A 2520UCBA013 5421A10043A 5403A20180B 5211A22017B 5211A25020A ... PCB Assembly,Main PCB Assembly,Main Capacitor,Film,Box Power Cord Assembly Thermistor,NTC Escutcheon Cabinet Assembly,Single Guide Remote Controller Assembly Install Part Assembly,Single Frame Assembly Frame Assembly Grille Assembly,Front Grille,Inlet Filter Assembly,Air Cleaner Louver,Horizontal Louver,Vertical Louver,Vertical 38 Service ...
Replacement Parts List LCATION NO. LWHD8000RY6 3041A10041Q 5238A10015A 5900A20020A 3H02932B 4948A20030A 5900A20015A 4800A30002C 5239A20019A 4900A20020A 4900A20020B 4681A20140A 4998A10036A 2520UCBA013 5421A10043A 5403A20180B 5211A22017B 5211A25020A ... PCB Assembly,Main PCB Assembly,Main Capacitor,Film,Box Power Cord Assembly Thermistor,NTC Escutcheon Cabinet Assembly,Single Guide Remote Controller Assembly Install Part Assembly,Single Frame Assembly Frame Assembly Grille Assembly,Front Grille,Inlet Filter Assembly,Air Cleaner Louver,Horizontal Louver,Vertical Louver,Vertical 38 Service ...
Owners Manual
Page 2
...that they do not play with the air conditioner. ,ff the power cord requires replacement have an Authorized Servicer install an exact rep|acement part. , |nstallation work must he performed in accordance with the Nations| E_ectric Code by young children or tnvafids without supervision_ ,Young children ...THIS MANUAL Inside you will find many helpful hints on how to use and maintain your air conditioner pro_rly: Just a little preventive care on your part can fir_d the humors product, Dealer's Name on a _abel on |y: 2 Room Air Conditioner FOR "{OUR RECORDS Write the mode_ and sedai numbers...
...that they do not play with the air conditioner. ,ff the power cord requires replacement have an Authorized Servicer install an exact rep|acement part. , |nstallation work must he performed in accordance with the Nations| E_ectric Code by young children or tnvafids without supervision_ ,Young children ...THIS MANUAL Inside you will find many helpful hints on how to use and maintain your air conditioner pro_rly: Just a little preventive care on your part can fir_d the humors product, Dealer's Name on a _abel on |y: 2 Room Air Conditioner FOR "{OUR RECORDS Write the mode_ and sedai numbers...
Owners Manual
Page 7
... air conditioner for extended periods of injury if the unit's power is damaged and requires replacement, Ihave an Authorized Servicer install an exact replacement part. ii _i_(i_i!_!_!_!_!__ I i. There iisa possibility of tiime. 2. Do not use water to clean inside the air conditioner. Such usage... when handling sharp metal edges. 2. For repair .and maintenance, contact an Authorized Service Center. They should be written on while cleaning inner parts o,f the unit. Do not use an extension cord. When cleaning the unit, first make sure that the power and breaker are turned off...
... air conditioner for extended periods of injury if the unit's power is damaged and requires replacement, Ihave an Authorized Servicer install an exact replacement part. ii _i_(i_i!_!_!_!_!__ I i. There iisa possibility of tiime. 2. Do not use water to clean inside the air conditioner. Such usage... when handling sharp metal edges. 2. For repair .and maintenance, contact an Authorized Service Center. They should be written on while cleaning inner parts o,f the unit. Do not use an extension cord. When cleaning the unit, first make sure that the power and breaker are turned off...
Owners Manual
Page 52
... charge, your home to Obtain Product, Customer, or Service Assistance Call 1-800-243-0000, 24 hrs a day, 7 days per week. LG Electronics Inc, will repair or at the time warranty service is good only to the original purchaser of the product and effective only when used...: 5 Years from the menu, and have product type (Room Air Conditioner), model number, serial number, and ZIP code ready, The warranted parts including labor covers the cost of such a defective product shall be borne by the consumer. THISLIMITEDWARRANTY DOES NOT APPLYTO: Service trips to your product...
... charge, your home to Obtain Product, Customer, or Service Assistance Call 1-800-243-0000, 24 hrs a day, 7 days per week. LG Electronics Inc, will repair or at the time warranty service is good only to the original purchaser of the product and effective only when used...: 5 Years from the menu, and have product type (Room Air Conditioner), model number, serial number, and ZIP code ready, The warranted parts including labor covers the cost of such a defective product shall be borne by the consumer. THISLIMITEDWARRANTY DOES NOT APPLYTO: Service trips to your product...


