
Owner's Manual
Page 1
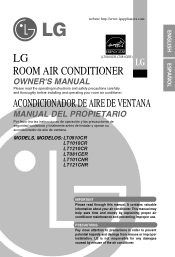
... Please read the operating instructions and safety precautions carefully and thoroughly before installing and operating your air conditioner.This manual may help save time and money by misuse of the air conditioner. website http://www.lgappliances.com ENGLISH ESPAÑOL ENERGY STAR LG (LT0810CR,LT081CER) LG ROOM AIR CONDITIONER OWNER'S MANUAL Please read through this...
... Please read the operating instructions and safety precautions carefully and thoroughly before installing and operating your air conditioner.This manual may help save time and money by misuse of the air conditioner. website http://www.lgappliances.com ENGLISH ESPAÑOL ENERGY STAR LG (LT0810CR,LT081CER) LG ROOM AIR CONDITIONER OWNER'S MANUAL Please read through this...

Owner's Manual
Page 2
...at all. PRECAUTION • Contact the authorized service technician for repair or maintenance of this unit. • Contact the installer for installation of this page in the event you a great deal of time and money over the life of your receipt to this...Air Conditioner Dealer's Name Date Purchased I Staple your air conditioner. Window-Type Air Conditioner Owner's Manual TABLE OF CONTENTS Safety Precautions 3 Before Operation 7 Introduction 8 Electrical Safety 9 Installation 11 Operating Instructions 18 Maintenance and Service 21 FOR YOUR RECORDS Write the model and serial numbers ...
...at all. PRECAUTION • Contact the authorized service technician for repair or maintenance of this unit. • Contact the installer for installation of this page in the event you a great deal of time and money over the life of your receipt to this...Air Conditioner Dealer's Name Date Purchased I Staple your air conditioner. Window-Type Air Conditioner Owner's Manual TABLE OF CONTENTS Safety Precautions 3 Before Operation 7 Introduction 8 Electrical Safety 9 Installation 11 Operating Instructions 18 Maintenance and Service 21 FOR YOUR RECORDS Write the model and serial numbers ...
Owner's Manual
Page 3
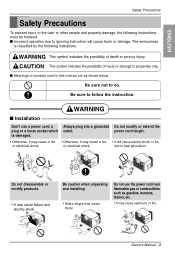
...damage, the following indications. Be sure to properties only. is classified by the following instructions must be followed. Be caution when unpacking and installing. • Sharp edges may cause explosion or fire. The seriousness is damaged. • Otherwise, it may cause a fire •...cord, a Always plug into a grounded Do not modify or extend the plug or a loose socket which outlet. Gasolin Owner's Manual 3 I Installation Don't use the power cord near flammable gas or combustibles such as shown below. I Meanings of death or serious injury. or electrical shock...
...damage, the following indications. Be sure to properties only. is classified by the following instructions must be followed. Be caution when unpacking and installing. • Sharp edges may cause explosion or fire. The seriousness is damaged. • Otherwise, it may cause a fire •...cord, a Always plug into a grounded Do not modify or extend the plug or a loose socket which outlet. Gasolin Owner's Manual 3 I Installation Don't use the power cord near flammable gas or combustibles such as shown below. I Meanings of death or serious injury. or electrical shock...

Owner's Manual
Page 5
...the unit. • Otherwise, it out. • It may cause injury. Do not damage or use an unspecified power cord. Keep level parallel in installing the product. • Otherwise, it may cause dispute with wet hands or in damp environment. • It will cause electric shock or fire •...shock. ENGLISH Safety Precautions Do not operate or stop the unit by the head when taking it may cause vibration or water leakage. I Installation CAUTION Install the product so that the noise or hot wind from the outdoor unit may not cause any damage to heat generation. due to the ...
...the unit. • Otherwise, it out. • It may cause injury. Do not damage or use an unspecified power cord. Keep level parallel in installing the product. • Otherwise, it may cause dispute with wet hands or in damp environment. • It will cause electric shock or fire •...shock. ENGLISH Safety Precautions Do not operate or stop the unit by the head when taking it may cause vibration or water leakage. I Installation CAUTION Install the product so that the noise or hot wind from the outdoor unit may not cause any damage to heat generation. due to the ...
Owner's Manual
Page 7
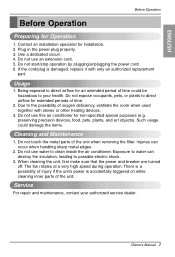
... Service For repair and maintenance, contact your health. Injuries can destroy the insulation, leading to your authorized service dealer. Owner's Manual 7 Do not use water to direct airflow for an extended period of time could damage the items. Cleaning and Maintenance 1....a very high speed during operation. Due to direct airflow for non-specified special purposes (e.g. ENGLISH Before Operation Before Operation Preparing for installation. 2. Use a dedicated circuit. 4. Do not touch the metal parts of oxygen deficiency, ventilate the room when used together with...
... Service For repair and maintenance, contact your health. Injuries can destroy the insulation, leading to your authorized service dealer. Owner's Manual 7 Do not use water to direct airflow for an extended period of time could damage the items. Cleaning and Maintenance 1....a very high speed during operation. Due to direct airflow for non-specified special purposes (e.g. ENGLISH Before Operation Before Operation Preparing for installation. 2. Use a dedicated circuit. 4. Do not touch the metal parts of oxygen deficiency, ventilate the room when used together with...
Owner's Manual
Page 8
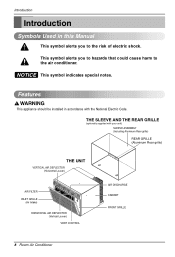
... alerts you to the air conditioner. THE SLEEVE AND THE REAR GRILLE (optionally supplied with the National Electric Code. Features This appliance should be installed in this Manual This symbol alerts you to hazards that could cause harm to the risk of electric shock. Introduction Introduction Symbols Used in accordance with your...
... alerts you to the air conditioner. THE SLEEVE AND THE REAR GRILLE (optionally supplied with the National Electric Code. Features This appliance should be installed in this Manual This symbol alerts you to hazards that could cause harm to the risk of electric shock. Introduction Introduction Symbols Used in accordance with your...

Owner's Manual
Page 11
... wrench • 1/4-inch hex socket and ratchet • Tape measure • Electric drill • 1/4-inch drill bit Owner's Manual 11 INSTALLATION REQUIREMENTS If you use an existing wall sleeve, you can maintain the best performance of this device and sharp edges that shown on... best performance. Wear protective gloves whenever lifting or carrying the unit. Install the new air conditioner according to these installation instructions to store unit during installation. SAVE CARTON for storage and this manual pose an excessive weight hazard. To avoid risk of personal injury, property...
... wrench • 1/4-inch hex socket and ratchet • Tape measure • Electric drill • 1/4-inch drill bit Owner's Manual 11 INSTALLATION REQUIREMENTS If you use an existing wall sleeve, you can maintain the best performance of this device and sharp edges that shown on... best performance. Wear protective gloves whenever lifting or carrying the unit. Install the new air conditioner according to these installation instructions to store unit during installation. SAVE CARTON for storage and this manual pose an excessive weight hazard. To avoid risk of personal injury, property...
Owner's Manual
Page 13
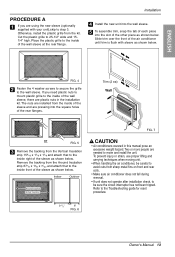
... right of the sleeve as shown below . Indoor Outdoor Around Insulation Vertical Insulation FIG. 7 • Air conditioners covered in the installation kit. Installation 4 Install the new unit into the wall sleeve. 5 To assemble trim, snap the tab of each piece into the slot of the air...Refer to 25-1/2" wide and 151/4" high. Cut the plastic grille to the Troubleshooting guide for reset procedure. 9 1/2" 6" FIG. 6 Owner's Manual 13 Otherwise, install the plastic grille from the inside of the rear flanges. Two or more people are needed to the wall sleeve. ENGLISH FIG. 4 2 Fasten...
... right of the sleeve as shown below . Indoor Outdoor Around Insulation Vertical Insulation FIG. 7 • Air conditioners covered in the installation kit. Installation 4 Install the new unit into the wall sleeve. 5 To assemble trim, snap the tab of each piece into the slot of the air...Refer to 25-1/2" wide and 151/4" high. Cut the plastic grille to the Troubleshooting guide for reset procedure. 9 1/2" 6" FIG. 6 Owner's Manual 13 Otherwise, install the plastic grille from the inside of the rear flanges. Two or more people are needed to the wall sleeve. ENGLISH FIG. 4 2 Fasten...
Owner's Manual
Page 15
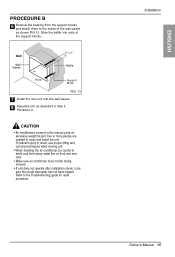
...on front and rear coils. • Make sure air conditioner does not fall during removal. • If unit does not operate after installation check, to be careful to avoid cuts from the support blocks and attach them to the inside of the support blocks. Wall Wall Sleeve... (7 3/32") Baffle Front Support Block FIG. 13 7 Install the new unit into slots of the wall sleeve as described in this manual pose an excessive weight hazard. Refer to move and install the unit. Installation Owner's Manual 15 CAUTION • Air conditioners covered in Step 5, Procedure A. To...
...on front and rear coils. • Make sure air conditioner does not fall during removal. • If unit does not operate after installation check, to be careful to avoid cuts from the support blocks and attach them to the inside of the support blocks. Wall Wall Sleeve... (7 3/32") Baffle Front Support Block FIG. 13 7 Install the new unit into slots of the wall sleeve as described in this manual pose an excessive weight hazard. Refer to move and install the unit. Installation Owner's Manual 15 CAUTION • Air conditioners covered in Step 5, Procedure A. To...
Owner's Manual
Page 17
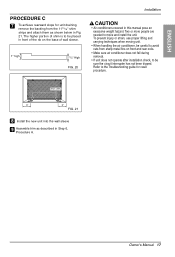
... 1113/16" shim strips and attach them as described in this manual pose an excessive weight hazard. Refer to be placed in Fig. 21. Owner's Manual 17 The higher portion of wall sleeve. 1" high 3/4" High FIG. 20 Installation • Air conditioners covered in Step 6, Procedure A. Shim (...2EA) 6" 6" FIG. 21 8 Install the new unit into the wall sleeve 9 Assemble trim as...
... 1113/16" shim strips and attach them as described in this manual pose an excessive weight hazard. Refer to be placed in Fig. 21. Owner's Manual 17 The higher portion of wall sleeve. 1" high 3/4" High FIG. 20 Installation • Air conditioners covered in Step 6, Procedure A. Shim (...2EA) 6" 6" FIG. 21 8 Install the new unit into the wall sleeve 9 Assemble trim as...


