
Owner's Manual
Page 1
... to prevent potential hazards and damage from misuse or improper installation. It contains valuable information about your room air conditioner. LG is not responsible for any damages caused by explaining proper air conditioner maintenance and preventing improper use. MODELS, MODELOS: LT0810CR LT1010CR LT1210CR LT081CER LT101CNR LT121CNR IMPORTANT Please read the operating instructions and...
... to prevent potential hazards and damage from misuse or improper installation. It contains valuable information about your room air conditioner. LG is not responsible for any damages caused by explaining proper air conditioner maintenance and preventing improper use. MODELS, MODELOS: LT0810CR LT1010CR LT1210CR LT081CER LT101CNR LT121CNR IMPORTANT Please read the operating instructions and...

Owner's Manual
Page 2
...for warranty issues. PRECAUTION • Contact the authorized service technician for repair or maintenance of this unit. • Contact the installer for installation of this page in the event you a great deal of time and money over the life of your part can find them... 2 Room Air Conditioner Window-Type Air Conditioner Owner's Manual TABLE OF CONTENTS Safety Precautions 3 Before Operation 7 Introduction 8 Electrical Safety 9 Installation 11 Operating Instructions 18 Maintenance and Service 21 FOR YOUR RECORDS Write the model and serial numbers here: Model # Serial # You can ...
...for warranty issues. PRECAUTION • Contact the authorized service technician for repair or maintenance of this unit. • Contact the installer for installation of this page in the event you a great deal of time and money over the life of your part can find them... 2 Room Air Conditioner Window-Type Air Conditioner Owner's Manual TABLE OF CONTENTS Safety Precautions 3 Before Operation 7 Introduction 8 Electrical Safety 9 Installation 11 Operating Instructions 18 Maintenance and Service 21 FOR YOUR RECORDS Write the model and serial numbers here: Model # Serial # You can ...
Owner's Manual
Page 3
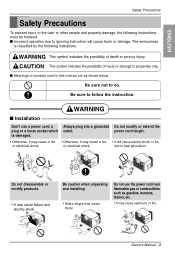
... sure to heat generation. Gasolin Owner's Manual 3 power cord length. due to follow the instruction. Be caution when unpacking and installing. • Sharp edges may cause failure and electric shock. WARNING I Installation Don't use the power cord near flammable gas or combustibles such as shown below. ENGLISH Safety Precautions Safety Precautions To...
... sure to heat generation. Gasolin Owner's Manual 3 power cord length. due to follow the instruction. Be caution when unpacking and installing. • Sharp edges may cause failure and electric shock. WARNING I Installation Don't use the power cord near flammable gas or combustibles such as shown below. ENGLISH Safety Precautions Safety Precautions To...

Owner's Manual
Page 5
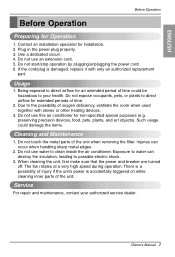
... ventilation before operating the unit. • Otherwise, it out. • It may cause dispute with wet hands or in installing the product. • Otherwise, it may cause electric shock and damage. I Installation CAUTION Install the product so that the noise or hot wind from the outdoor unit may not cause any damage to...
... ventilation before operating the unit. • Otherwise, it out. • It may cause dispute with wet hands or in installing the product. • Otherwise, it may cause electric shock and damage. I Installation CAUTION Install the product so that the noise or hot wind from the outdoor unit may not cause any damage to...
Owner's Manual
Page 7
...and Maintenance 1. Do not touch the metal parts of oxygen deficiency, ventilate the room when used together with only an authorized replacement part. Contact an installation specialist for Operation 1. Do not use an extension cord. 5. Injuries can destroy the insulation, leading to possible electric shock. 3. When cleaning the...2. Exposure to your authorized service dealer. The fan rotates at a very high speed during operation. ENGLISH Before Operation Before Operation Preparing for installation. 2. Do not start/stop operation by plugging/unplugging the power cord. 6.
...and Maintenance 1. Do not touch the metal parts of oxygen deficiency, ventilate the room when used together with only an authorized replacement part. Contact an installation specialist for Operation 1. Do not use an extension cord. 5. Injuries can destroy the insulation, leading to possible electric shock. 3. When cleaning the...2. Exposure to your authorized service dealer. The fan rotates at a very high speed during operation. ENGLISH Before Operation Before Operation Preparing for installation. 2. Do not start/stop operation by plugging/unplugging the power cord. 6.
Owner's Manual
Page 8
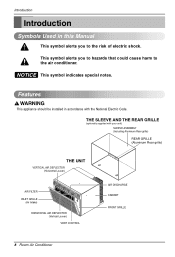
Features This appliance should be installed in this Manual This symbol alerts you to hazards that could cause harm to the risk of electric shock. THE SLEEVE AND THE REAR GRILLE (...
Features This appliance should be installed in this Manual This symbol alerts you to hazards that could cause harm to the risk of electric shock. THE SLEEVE AND THE REAR GRILLE (...

Owner's Manual
Page 11
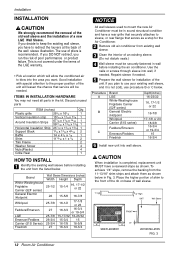
... the new air conditioner. (FIG. 2) 20-3/32" (511 mm) 24"(610 mm) 14-13/32" (366 mm) Air Conditioner 18-15/32"(468 mm) FIG. 1 INSTALLATION HARDWARE 1 24 5 2 Size options 8 6 9 3 7 2 Size options ITEM 1 2 3 4 5 6 7 8 9 NAME OF PARTS Q'TY PLASTIC GRILLE 1 VERTICAL INSULATION STRIP 1 AROUND ...with your unit), you should measure its dimensions. The power supply available must be the same as that may be installed. Installation ENGLISH Installation Remove packing materials from the wall sleeve and tape from the air conditioner. The carton is the best way to ...
... the new air conditioner. (FIG. 2) 20-3/32" (511 mm) 24"(610 mm) 14-13/32" (366 mm) Air Conditioner 18-15/32"(468 mm) FIG. 1 INSTALLATION HARDWARE 1 24 5 2 Size options 8 6 9 3 7 2 Size options ITEM 1 2 3 4 5 6 7 8 9 NAME OF PARTS Q'TY PLASTIC GRILLE 1 VERTICAL INSULATION STRIP 1 AROUND ...with your unit), you should measure its dimensions. The power supply available must be the same as that may be installed. Installation ENGLISH Installation Remove packing materials from the wall sleeve and tape from the air conditioner. The carton is the best way to ...
Owner's Manual
Page 12
...fastened in sound structural condition and have a rear grille that securely attaches to sleeve, or rear flange that serves as a stop for installation of the wall sleeve illustration. If you decide to blow into wall sleeve. This is completed, replacement unit MUST have to use your... existing wall sleeve, and it is recommended. ITEMS IN INSTALLATION HARDWARE You may not need all parts in Fig. 3. Procedure A B Brand LGE White-Westinghouse Frigidaire Carrier (52F series) General Electric /Hotpoint ...
...fastened in sound structural condition and have a rear grille that securely attaches to sleeve, or rear flange that serves as a stop for installation of the wall sleeve illustration. If you decide to blow into wall sleeve. This is completed, replacement unit MUST have to use your... existing wall sleeve, and it is recommended. ITEMS IN INSTALLATION HARDWARE You may not need all parts in Fig. 3. Procedure A B Brand LGE White-Westinghouse Frigidaire Carrier (52F series) General Electric /Hotpoint ...
Owner's Manual
Page 13
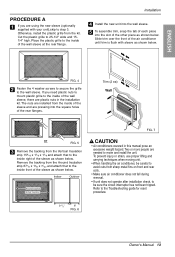
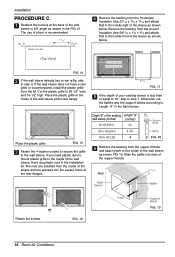
... there are needed to avoid cuts from the kit. Two or more people are plastic nuts in this manual pose an excessive weight hazard. Installation 4 Install the new unit into the wall sleeve. 5 To assemble trim, snap the tab of each piece into the square holes of the sleeve ...or strain, use proper lifting and carrying techniques when moving unit. • When handling the air conditioner, be careful to move and install the unit. Otherwise, install the plastic grille from sharp metal fins on front and rear coils. • Make sure air conditioner does not fall during removal. ...
... there are needed to avoid cuts from the kit. Two or more people are plastic nuts in this manual pose an excessive weight hazard. Installation 4 Install the new unit into the wall sleeve. 5 To assemble trim, snap the tab of each piece into the square holes of the sleeve ...or strain, use proper lifting and carrying techniques when moving unit. • When handling the air conditioner, be careful to move and install the unit. Otherwise, install the plastic grille from sharp metal fins on front and rear coils. • Make sure air conditioner does not fall during removal. ...
Owner's Manual
Page 14
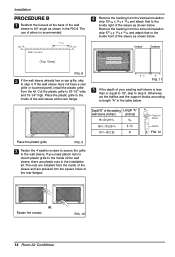
... the wall sleeve already has a rear grille, skip to the wall sleeve. Cut the plastic grille to length "A" in the table below. The nuts are installed from the inside of the sleeve and are plastic nuts in the FIG 8. Otherwise, cut the baffles and the support blocks according to 25-1/2" wide... the wall sleeve at the back of the wall sleeve to 60° angle as shown in the installation kit. The use of pliers is less than or equal to 18", skip to step 6. Installation PROCEDURE B 1 Redirect the louvers at the rear flange. 9 1/2" 6" FIG. 11 5 If the depth of your existing wall...
... the wall sleeve already has a rear grille, skip to the wall sleeve. Cut the plastic grille to length "A" in the table below. The nuts are installed from the inside of the sleeve and are plastic nuts in the FIG 8. Otherwise, cut the baffles and the support blocks according to 25-1/2" wide... the wall sleeve at the back of the wall sleeve to 60° angle as shown in the installation kit. The use of pliers is less than or equal to 18", skip to step 6. Installation PROCEDURE B 1 Redirect the louvers at the rear flange. 9 1/2" 6" FIG. 11 5 If the depth of your existing wall...
Owner's Manual
Page 15
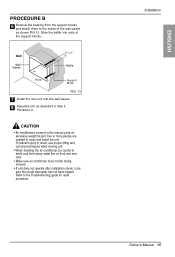
...support blocks. Slide the baffle into the wall sleeve. 8 Assemble trim as shown FIG 13. Wall Wall Sleeve (7 3/32") Baffle Front Support Block FIG. 13 7 Install the new unit into slots of the wall sleeve as described in this manual pose an excessive weight hazard... fins on front and rear coils. • Make sure air conditioner does not fall during removal. • If unit does not operate after installation check, to move and install the unit. To prevent injury or strain, use proper lifting and carrying techniques when moving unit. • When handling the air conditioner, be...
...support blocks. Slide the baffle into the wall sleeve. 8 Assemble trim as shown FIG 13. Wall Wall Sleeve (7 3/32") Baffle Front Support Block FIG. 13 7 Install the new unit into slots of the wall sleeve as described in this manual pose an excessive weight hazard... fins on front and rear coils. • Make sure air conditioner does not fall during removal. • If unit does not operate after installation check, to move and install the unit. To prevent injury or strain, use proper lifting and carrying techniques when moving unit. • When handling the air conditioner, be...
Owner's Manual
Page 16
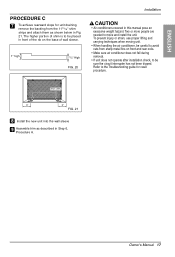
...the wall sleeve, there are plastic nuts in the table below . Otherwise, cut the baffles and the support blocks according to Length "A" in the installation kit. Slide the baffle into the square holes of the rear flanges. Place the plastic grille FIG. 15 3 Fasten the 4 washer screws to... secure the grille to 26-1/2" wide and 15-1/2" high. Installation PROCEDURE C 1 Redirect the louvers at the rear flange. 4 Remove the backing from the inside of the sleeve and are pressed into slots of ...
...the wall sleeve, there are plastic nuts in the table below . Otherwise, cut the baffles and the support blocks according to Length "A" in the installation kit. Slide the baffle into the square holes of the rear flanges. Place the plastic grille FIG. 15 3 Fasten the 4 washer screws to... secure the grille to 26-1/2" wide and 15-1/2" high. Installation PROCEDURE C 1 Redirect the louvers at the rear flange. 4 Remove the backing from the inside of the sleeve and are pressed into slots of ...
Owner's Manual
Page 17
... the 1113/16" shim strips and attach them as described in this manual pose an excessive weight hazard. Owner's Manual 17 Refer to move and install the unit. The higher portion of shim is to be placed in front of the rib on front and rear coils. • Make sure air... conditioner does not fall during removal. • If unit does not operate after installation check, to be sure the circuit interrupter has not been tripped. Two or more people are needed to the Troubleshooting guide for unit draining, remove...
... the 1113/16" shim strips and attach them as described in this manual pose an excessive weight hazard. Owner's Manual 17 Refer to move and install the unit. The higher portion of shim is to be placed in front of the rib on front and rear coils. • Make sure air... conditioner does not fall during removal. • If unit does not operate after installation check, to be sure the circuit interrupter has not been tripped. Two or more people are needed to the Troubleshooting guide for unit draining, remove...
Owner's Manual
Page 48
LG WILL NOT BE LIABLE FOR ANY CONSEQUENTIAL, INDIRECT, OR INCIDENTAL DAMAGES OF ANY KIND, INCLUDING LOST REVENUES OR PROFITS, IN CONNECTION WITH THE PRODUCT. A copy of your Sales Receipt to deliver, pick up, and/or install the product, instruct, or replace house fuses or correct wiring, ...the cost of repair or replacement of such a defective product shall be defective in the Operating Guide, accident, vermin, fire, flood, improper installation, acts of the product and effective only when used in China Choose the appropriate prompt from the menu, and have product type (Room ...
LG WILL NOT BE LIABLE FOR ANY CONSEQUENTIAL, INDIRECT, OR INCIDENTAL DAMAGES OF ANY KIND, INCLUDING LOST REVENUES OR PROFITS, IN CONNECTION WITH THE PRODUCT. A copy of your Sales Receipt to deliver, pick up, and/or install the product, instruct, or replace house fuses or correct wiring, ...the cost of repair or replacement of such a defective product shall be defective in the Operating Guide, accident, vermin, fire, flood, improper installation, acts of the product and effective only when used in China Choose the appropriate prompt from the menu, and have product type (Room ...


